
2014 XL883N Fuel Level Sensor + Digital Tach Install (NEW Procedures + Pics)
#1
 03-21-2014, 12:33 PM


Join Date: Mar 2014
Location: Florida
Posts: 47
Likes: 0
Received 0 Likes
on
0 Posts
Hello everyone,
I've seen the threads here about installing the fuel level sensor for our beloved Sportys, and wanted to add a new one as the procedures have changed for later model Sportsters, and thus even the instruction sheet is also outdated. The best part is, Jumper 200 has moved and is much easier to locate.
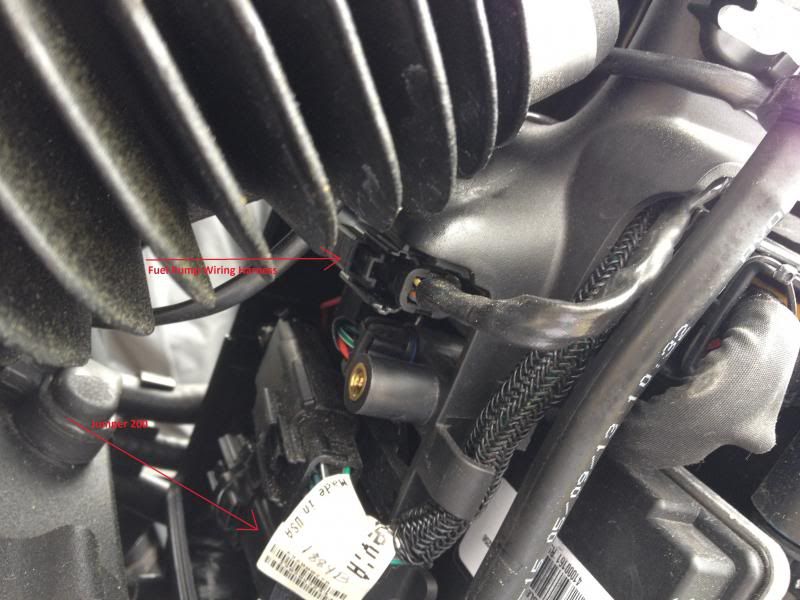
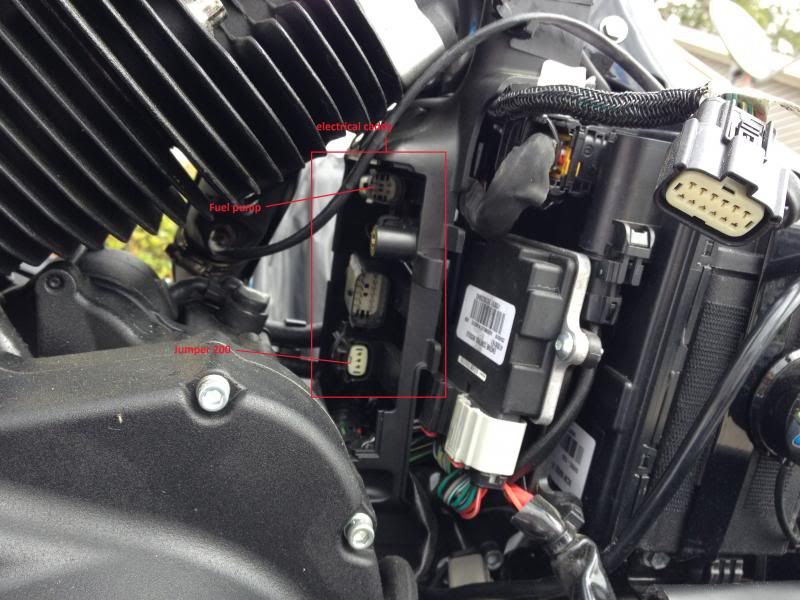
To start, we must remove the electrical caddy cover to access the fuel pump electrical connector. This will require a 5/32" allen wrench (there's only one screw...not two, as indicated in the instructions). The electrical caddy is located directly behind the engine:
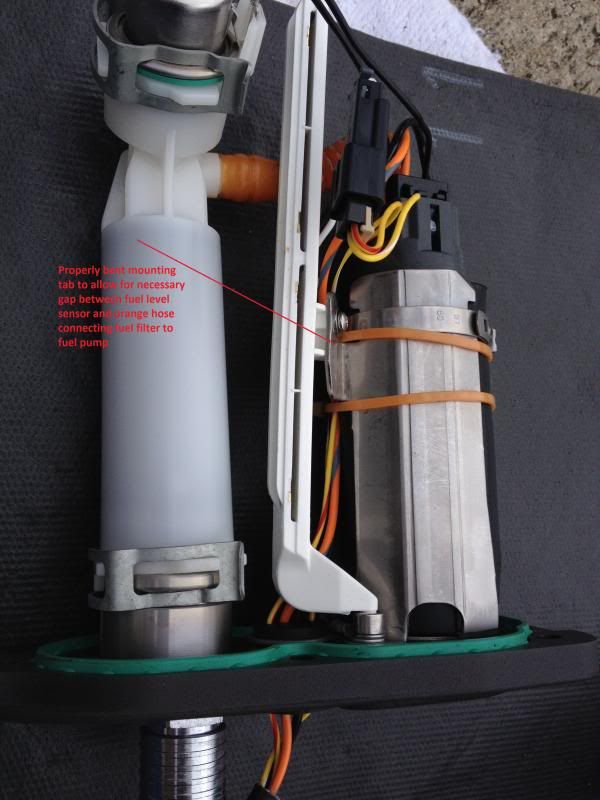
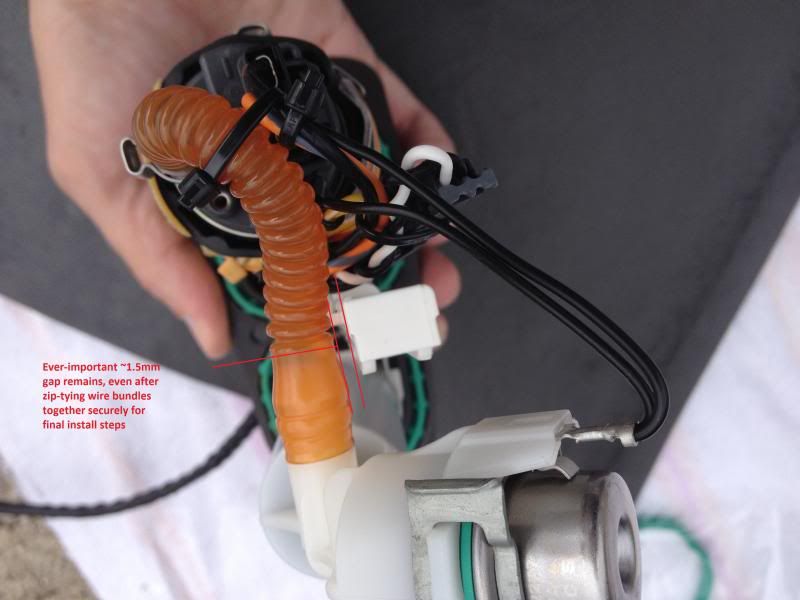
After you've completed the procedures for purging the fuel lines, removed the fuel tank and fuel pump, and the low fuel level float (don't worry about breaking the white pin that holds it on...you won't need it anyways) from the fuel pump housing, you'll install the new fuel level sensor to the fuel pump housing. The instructions are very clear about needing to make sure you keep a gap between the fuel level sensor, and the orange flex hose from the fuel filter to the fuel pump. If you make the mistake of allowing the fuel level sensor to TOUCH that orange hose, you WILL have problems with the fuel gauge always showing an empty fuel tank. To ensure the required ~1.5mm gap is maintained, you will likely need to BEND the metal tab on the fuel pump housing that the fuel sensor mounts to. THIS IS OK TO BEND THE TAB. Matter of fact, the instructions even tell you to bend it if you cannot get the required minimum gap distance. It also says to first try rotating the fuel filter to move the hose out of the way, BUT this will likely not do the trick, as the vibration of the motorcycle will simply spin the fuel filter back into place and you will have fuel level indicator problems. Just go ahead and bend the tab. It's OK. Do not try to bend it too far, as you will then be unable to get the fuel pump assembly back in the tank (the sensor will hit the edge of the opening in the fuel tank). I had a little trouble getting it back in because the orange zip ties on the fuel pump were catching on the fuel tank opening lip, but a little finesse, and I worked it in.
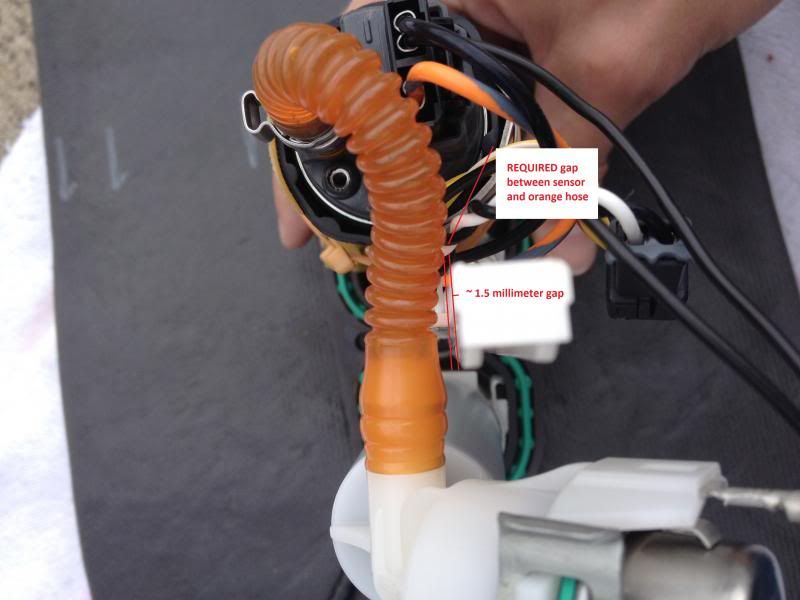
Once you have your minimum gap correct, begin securing all the wires to ALSO not make any contact with the fuel sensor, or you will have fuel level indicator problems, too. I've never been afraid of using "a few" zip ties to keep wires properly secured, and from rubbing against critical components. This comes from the aircraft mechanic in me.
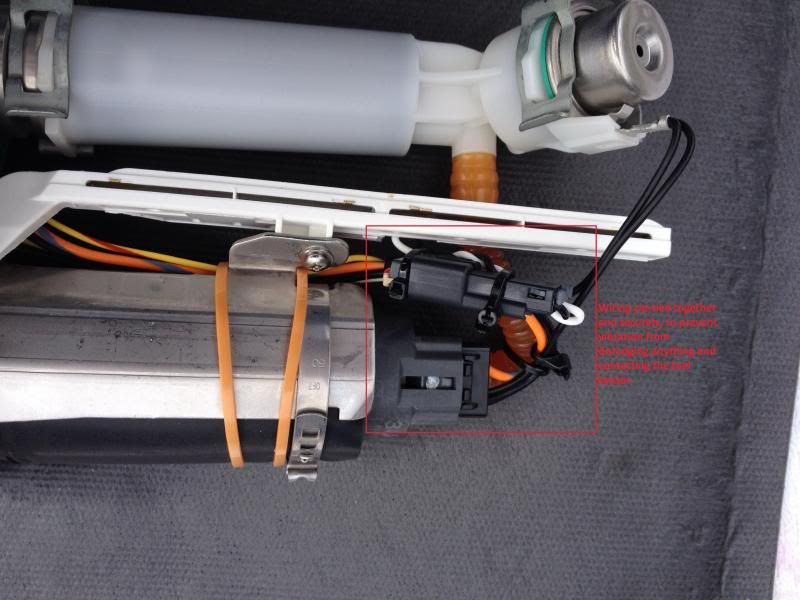

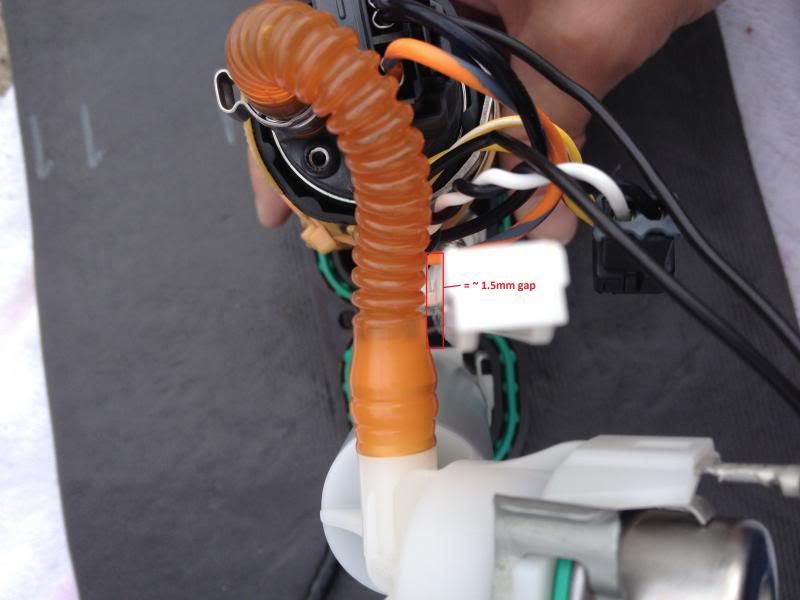
You'll notice in this picture, I've maintained my ~1.5mm gap, with all the wires neatly tied together:
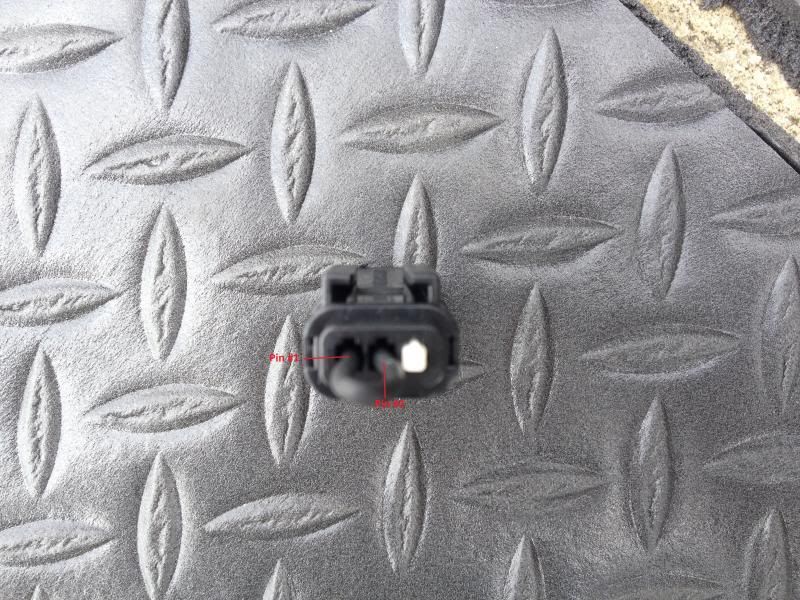
Next, you want to put your new jumper 200 together. It's really simple, just stick the pins in the holes as indicated. The tiny "lock" flange that holds them into place goes into the notch above the hole.
Lastly, your new Jumper 200 goes in the bottom plug of the electrical caddy. You find it just a few inches below the plug where you disconnected the fuel pump electrical plug. HD finally did us a favor and moved this little guy so we no longer have to hunt for it. If you can disconnect your fuel pump electrical plug, you can easily find jumper 200:
I used dielectric grease to coat the pins of my new jumper 200, to protect it from any water, etc that may find its way into the electrical caddy through washing. Probably not necessary, but I did it anyways.
Enjoy your new, easier-to-install fuel level sensor kit!
I've seen the threads here about installing the fuel level sensor for our beloved Sportys, and wanted to add a new one as the procedures have changed for later model Sportsters, and thus even the instruction sheet is also outdated. The best part is, Jumper 200 has moved and is much easier to locate.
To start, we must remove the electrical caddy cover to access the fuel pump electrical connector. This will require a 5/32" allen wrench (there's only one screw...not two, as indicated in the instructions). The electrical caddy is located directly behind the engine:

After you've completed the procedures for purging the fuel lines, removed the fuel tank and fuel pump, and the low fuel level float (don't worry about breaking the white pin that holds it on...you won't need it anyways) from the fuel pump housing, you'll install the new fuel level sensor to the fuel pump housing. The instructions are very clear about needing to make sure you keep a gap between the fuel level sensor, and the orange flex hose from the fuel filter to the fuel pump. If you make the mistake of allowing the fuel level sensor to TOUCH that orange hose, you WILL have problems with the fuel gauge always showing an empty fuel tank. To ensure the required ~1.5mm gap is maintained, you will likely need to BEND the metal tab on the fuel pump housing that the fuel sensor mounts to. THIS IS OK TO BEND THE TAB. Matter of fact, the instructions even tell you to bend it if you cannot get the required minimum gap distance. It also says to first try rotating the fuel filter to move the hose out of the way, BUT this will likely not do the trick, as the vibration of the motorcycle will simply spin the fuel filter back into place and you will have fuel level indicator problems. Just go ahead and bend the tab. It's OK. Do not try to bend it too far, as you will then be unable to get the fuel pump assembly back in the tank (the sensor will hit the edge of the opening in the fuel tank). I had a little trouble getting it back in because the orange zip ties on the fuel pump were catching on the fuel tank opening lip, but a little finesse, and I worked it in.


Once you have your minimum gap correct, begin securing all the wires to ALSO not make any contact with the fuel sensor, or you will have fuel level indicator problems, too. I've never been afraid of using "a few" zip ties to keep wires properly secured, and from rubbing against critical components. This comes from the aircraft mechanic in me.


You'll notice in this picture, I've maintained my ~1.5mm gap, with all the wires neatly tied together:

Next, you want to put your new jumper 200 together. It's really simple, just stick the pins in the holes as indicated. The tiny "lock" flange that holds them into place goes into the notch above the hole.

Lastly, your new Jumper 200 goes in the bottom plug of the electrical caddy. You find it just a few inches below the plug where you disconnected the fuel pump electrical plug. HD finally did us a favor and moved this little guy so we no longer have to hunt for it. If you can disconnect your fuel pump electrical plug, you can easily find jumper 200:

I used dielectric grease to coat the pins of my new jumper 200, to protect it from any water, etc that may find its way into the electrical caddy through washing. Probably not necessary, but I did it anyways.
Enjoy your new, easier-to-install fuel level sensor kit!
Last edited by Phillip W; 03-21-2014 at 12:37 PM.
#2
09-07-2014, 06:55 AM

Stage IV
Join Date: Jul 2014
Location: USA
Posts: 4
Likes: 0
Received 0 Likes
on
0 Posts
Hey Phillip W, Did you install a Combo Tach Digital Speedo at the same time? I have a 2014 XL1200 Custom and have already installed the Combo Tach Digital Speedo. I have the fuel level sensor on order. I'm getting mixed info from HD that the fuel level sensor needs to be installed at the same time as the Speedo, or the fuel level gauge/range function will not work, and/or the low fuel level light will stay on even when the tank is full. Do you or anyone else know if this is true and if so, what it would take to correct it? Thanks
#3
09-07-2014, 09:40 AM
Hey Phillip W, Did you install a Combo Tach Digital Speedo at the same time? I have a 2014 XL1200 Custom and have already installed the Combo Tach Digital Speedo. I have the fuel level sensor on order. I'm getting mixed info from HD that the fuel level sensor needs to be installed at the same time as the Speedo, or the fuel level gauge/range function will not work, and/or the low fuel level light will stay on even when the tank is full. Do you or anyone else know if this is true and if so, what it would take to correct it? Thanks
#4
09-07-2014, 10:40 AM
Stage IV
Join Date: Jul 2014
Location: USA
Posts: 4
Likes: 0
Received 0 Likes
on
0 Posts
The 2014 XL1200 Custom does come stock with a digital tach that reads out in the odo window by toggling the trip button. I've installed the analog tach (digital speedo) P/N 70900100C and would like to know if the fuel level gauge function will work if I install the fuel level sensor P/N 61200008 which does not come stock. So I think you are correct, just not for the XLs.
#5
09-07-2014, 10:54 AM
Stage IV
Join Date: Jul 2014
Location: USA
Posts: 4
Likes: 0
Received 0 Likes
on
0 Posts
#6
09-08-2014, 08:23 AM
The reason I was asking as a number of us have read in the manual that one of the functions in the new 2014 speedo/tach while using the trip switch to toggle through the display is a "R" (for fuel/miles range). However, none of us 2014 riders have the R show up when toggling through the display (the odometer miles, trip A & B, and time show up, but no range display). Since the speedo/tach is a Sportster model and the Sportster Operators manual discusses this, we all assume you have to install the fuel level kit IOT get it to display...makes sense.
BUT, when you go to the HD site and look up the fuel level kit, it says for their speedo/tach part not the stock speedo/tach.
Granted, I have not called HARLEY on this as it would be a nice to have but use my trip settings to calculate my gas MPG...but, with the 2.1 tank, I would get it if it works with the stock OEM speedo/tach on the 2014 Sportsters.
#7
09-08-2014, 03:23 PM
Trending Topics
#8
05-30-2015, 02:28 PM
Novice
Not sure if you did your install yet of your fuel sensor with the digital gauge but I just tried to have it done at the dealer and they couldn't get it to work. They said that once the digital speedometer is married to the bike it cannot accept a new program like the fuel sensor accessory. They have to be installed at the same time. The sensor cannot be installed later. I have a 2014 Iron 883. Installed the digital speedo at around 400 miles on the bike, went to install the sensor at 900 miles on the bike and they will not marry.

#10
06-01-2015, 08:33 AM
Not sure if you did your install yet of your fuel sensor with the digital gauge but I just tried to have it done at the dealer and they couldn't get it to work. They said that once the digital speedometer is married to the bike it cannot accept a new program like the fuel sensor accessory. They have to be installed at the same time. The sensor cannot be installed later. I have a 2014 Iron 883. Installed the digital speedo at around 400 miles on the bike, went to install the sensor at 900 miles on the bike and they will not marry.

