Touring Models Road King, Road King Custom, Road King Classic, Road Glide, Street Glide, Electra Glide, Electra Glide Classic, and Electra Glide Ultra Classic bikes.
Sponsored by:
Sponsored by:

EG outer fairing threaded inserts

  #1  
Old 01-20-2016, 10:26 AM
tgifford5's Avatar
tgifford5
tgifford5 is offline
Novice
Thread Starter
Join Date: Mar 2014
Location: Cedar Rapids, IA
Posts: 24
Likes: 0
Received 0 Likes on 0 Posts
Default EG outer fairing threaded inserts

Can these be replaced if they are cross threaded or bunged up? Or is the fairing toast and have to replace the outer fairing. They are just soft brass inserts that I can tell.
 
  #2  
Old 01-20-2016, 10:28 AM
Uncle Larry's Avatar
Uncle Larry
Uncle Larry is offline
Seasoned HDF Member

Join Date: Jan 2011
Location: Southeast Michigan 15 Minutes East Of Hell
Posts: 147,587
Received 47,744 Likes on 18,543 Posts
  #3  
Old 01-20-2016, 11:11 AM
tgifford5's Avatar
tgifford5
tgifford5 is offline
Novice
Thread Starter
Join Date: Mar 2014
Location: Cedar Rapids, IA
Posts: 24
Likes: 0
Received 0 Likes on 0 Posts
Thumbs up

Thank you Larry very much. Plus thank you for your little video on the ignition switch install and correct positioning. Someone shared that link with me. It helped immensely in putting my bike back together.
 
  #4  
Old 01-20-2016, 02:13 PM
gravnov's Avatar
gravnov
gravnov is offline
Cruiser
Join Date: Feb 2007
Location: Munich, Germany
Posts: 114
Received 25 Likes on 20 Posts
Default

But be careful, slotted end in first!
 
  #5  
Old 01-20-2016, 06:05 PM
just plain john's Avatar
just plain john
just plain john is offline
Elite HDF Member
Join Date: Nov 2012
Location: Pasadena TX
Posts: 3,783
Received 97 Likes on 78 Posts
Default

^^ Correct, put the slotted end in first and then seat them with a bolt. DO NOT try to screw them in with a screwdriver, ask me how I know lol.
 
  #6  
Old 02-02-2016, 09:45 AM
tgifford5's Avatar
tgifford5
tgifford5 is offline
Novice
Thread Starter
Join Date: Mar 2014
Location: Cedar Rapids, IA
Posts: 24
Likes: 0
Received 0 Likes on 0 Posts
Default

Thanks for the install pointers and the link for the inserts. How did you guys get the old inserts out? And did you use any type of epoxy or glue to seat the inserts in?
 
  #7  
Old 06-09-2016, 10:59 AM
470004's Avatar
470004
470004 is online now
Seasoned HDF Member
Join Date: Feb 2013
Location: New York
Posts: 20,915
Received 14,998 Likes on 6,203 Posts
Default

Originally Posted by tgifford5
Thanks for the install pointers and the link for the inserts. How did you guys get the old inserts out? And did you use any type of epoxy or glue to seat the inserts in?

I used a stack of washers with the inside diameter larger than the old insert. Pile them up over the insert and use the original screw and tighten down slowly until the insert starts coming up and bottom out against the screw. Add on more washers until the insert comes fully out of the hole. I did not use any epoxy or glue to hold the new brass insert.
 

Last edited by 470004; 06-09-2016 at 11:20 AM.
  #8  
Old 07-03-2017, 11:16 AM
RFC1962's Avatar
RFC1962
RFC1962 is offline
Tourer
Join Date: Jul 2016
Location: Ohio
Posts: 353
Received 36 Likes on 31 Posts
Default

Originally Posted by 47000412
I used a stack of washers with the inside diameter larger than the old insert. Pile them up over the insert and use the original screw and tighten down slowly until the insert starts coming up and bottom out against the screw. Add on more washers until the insert comes fully out of the hole. I did not use any epoxy or glue to hold the new brass insert.
I used a piece of steel tubing with an inside diameter that would fit the insert. Short piece of 1/4"-20 all thread and a washer and nut. Same concept, just a little easier to manage than a stack of washers. When installing, of course the slotted end first. The parts guy at the stealership told me the opposite. Told me to just use a big screw driver in the slots. I guess that's why he's a parts guy.
I take a short socket head cap screw 1/4-20 and a nut. Use the nut as a jam nut and thread the bolt into the repair insert and jam the nut. Now, just use an Allen wrench or socket Allen to screw your new insert in until it's flush with the top. The slots are like reliefs cut so as it threads in it kind of self taps the thread. Be sure to hold the boss as you thread in the repair insert. Especially the center one. It wants to twist as you screw in the insert. Hope this helps. Mike Bad
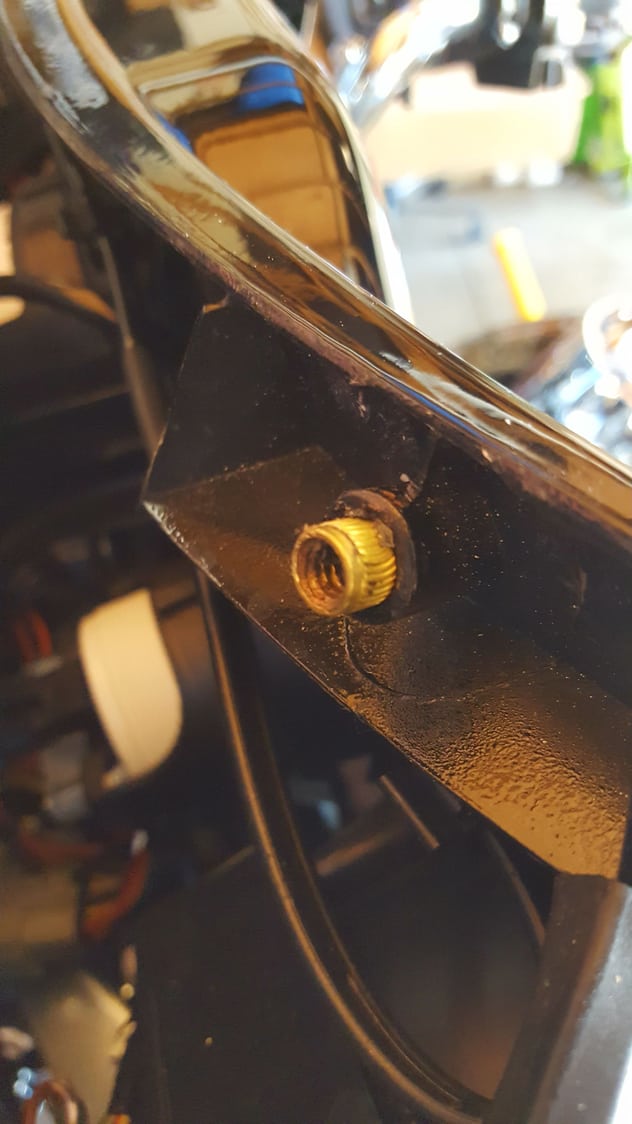
Harley repair insert
Jam nut the socket head bolt to the insert and screw it in.
Better than new.
 
Related Topics
Thread
Thread Starter
Forum
Replies
Last Post
Plasteredcat
Dyna Glide Models
2
08-30-2016 10:49 PM
ElectraRoadKing
Touring Models
7
05-05-2016 08:14 PM
OldTimer
General Harley Davidson Chat
0
09-25-2010 10:57 PM
Maple Leaf Hog
Touring Models
4
05-02-2008 03:52 PM
fryeca
Touring Models
14
01-07-2007 09:11 PM


Thread Tools
Search this Thread
Quick Reply: EG outer fairing threaded inserts


All times are GMT -5. The time now is 04:11 PM.