
'06 Ultra Fuel Filter Replacement How-To w/ Pics
#1
 06-08-2009, 01:59 AM

I changed out my wife's fuel filter on her '06 UC today, and I decided to document the procedure. I ride a VTX1300 and usually do these how-tos over on our chat board, so I figured I'd help some people out over here, too. The process took longer for me since I've never worked on a Harley before...other than the oil changes and other minor stuff. Now that I know how to do it, next time it will go quicker for sure. I do these mainly to help those who don't have a service manual, but the extra pictures can help supplement the manual, too. Also, it's encouragement for those who might be afraid to try working on their own bikes.
If this is in the wrong spot, please move it to where it should go. I'm a noob!
Pages 9-19 & 9-20 in the '06 Service Manual are related to the fuel filter canister replacement.
Removal
1. Remove Console Pod/Canopy (pages 9-15 & 9-16)
a. Drain fuel tank as follows:
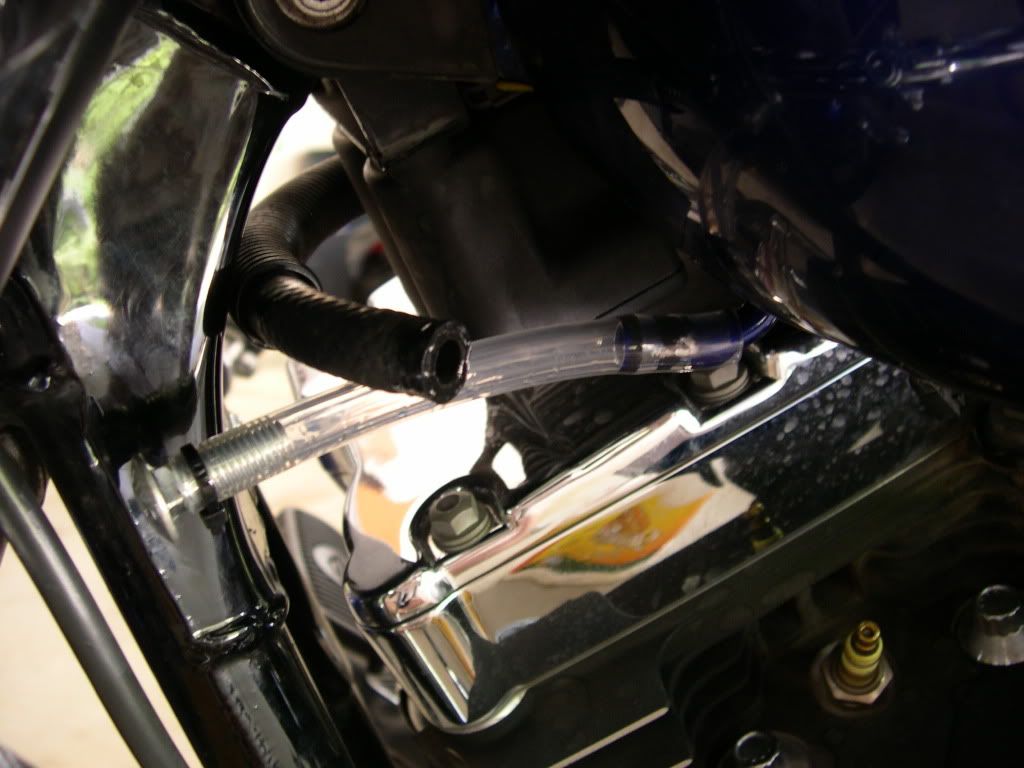
Obtain a short section of hose with a 5/16" I.D. Insert a bolt in one end and secure it with either a hose clamp or zip tie to ensure it's securely plugged. Cut the clamp from one end of the crossover tube beneath the fuel tank near the front of the bike using side cutters.

Remove the hose from the fuel inlet and quickly replace it with the short section of tubing that has the bolt in it. This will stop the fuel from completely emptying out of your tank. At the same time, there will be some gas that comes out of the crossover tube, so be prepared to catch it in a suitable container. Wipe up any gas that spills (and it will).
** In my case, the bolt I used was apparently not large enough, and the gas started dripping from the end of the hose. So I just disconnected it and let the gas come out into a container. Fortunately, my wife had about 170 miles on the tank, so there was maybe a gallon or so left in the tank. The picture below is when I had already drained the tank, but I put the tube back on for the picture.
I picked up the 5/16" I.D. tubing at Sears Hardware...it was like $0.39 a foot!
b. Remove seat (self explanatory - no pic needed)
c. Purge the fuel supply line of high pressure gas. Proceed as follows:
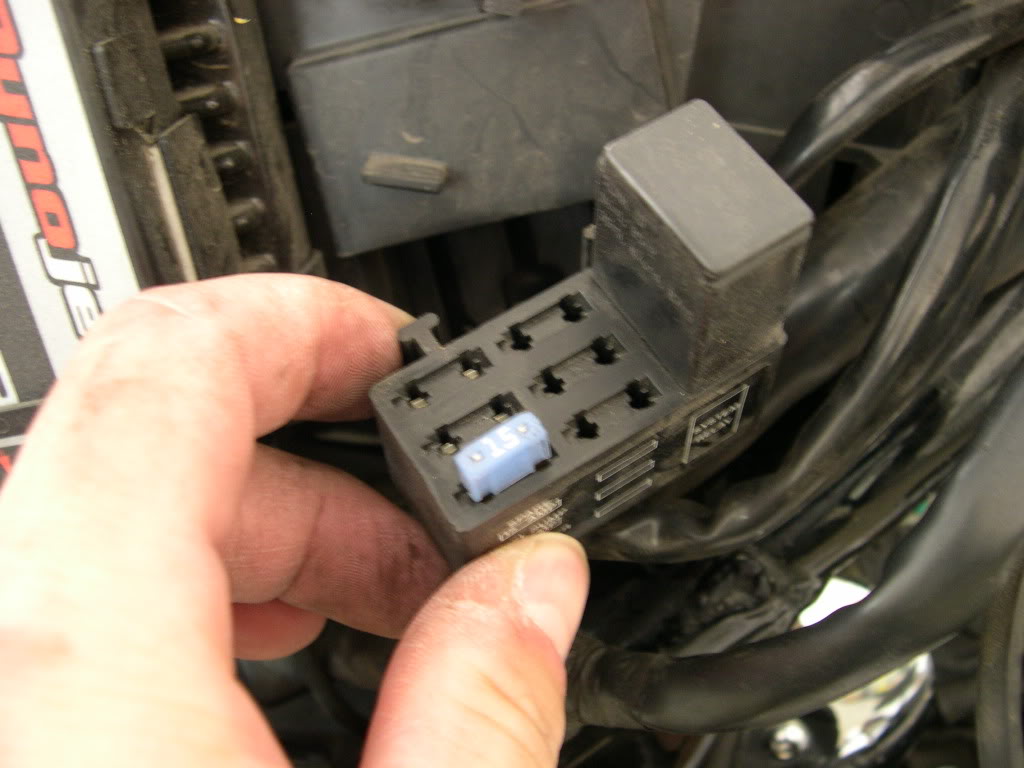
* Remove the 15-amp fuel pump fuse. The EFI fuses are located under the right sidecover. I removed the right saddlebag and sidecover. The fuse box is located to the right of the ECM, and it is released by pressing in on a plastic piece to release the tab. It was labeled with a white arrow pointing up. While pressing on that arrow, gently tug on the conduit to slide the block down and out. Then find the 15-amp fuse for the fuel pump and remove it. In this picture, I already removed it. It was right above the other 15-amp fuse you see here (left-side, middle fuse). It's also labeled on the front of the fuse block...you can't miss it.
* Start the engine and allow the motorcycle to run
* When the engine stalls, operate the starter for 3 seconds to remove remaining fuel from fuel lines.
d. Remove negative battery cable from battery
e. Open fuel door on console and remove the two Allen head bolts. Also remove the bolt at the flange at the rear of the console, if present.
f. Lay a clean towel down on the forward part of the rear fender and battery area.
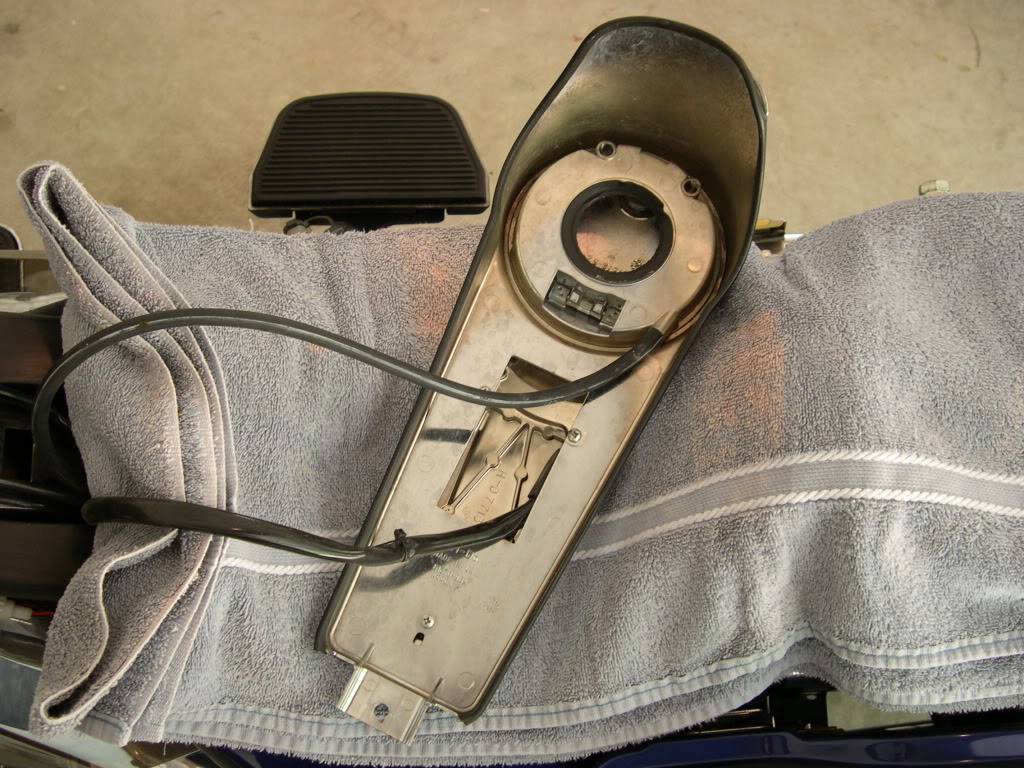
g. Remove filler cap from neck of fuel tank. Remove console and lay it upside down on the towel. Reinstall filler cap.
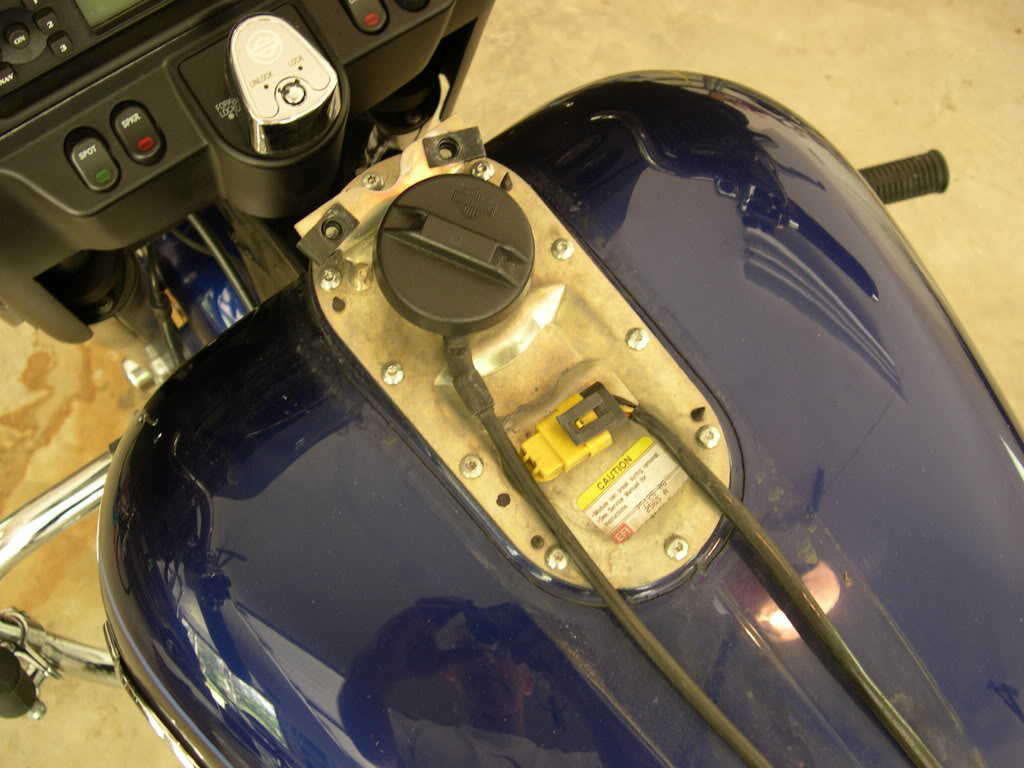
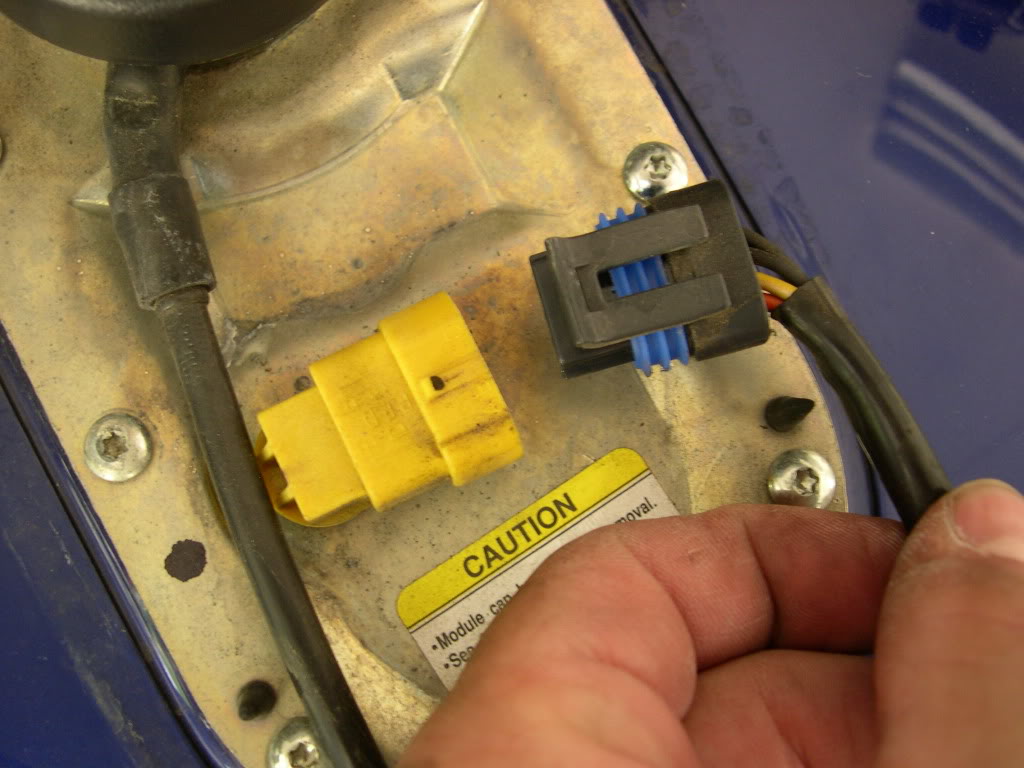
h. Remove fuel level sender/fuel pump connector, 4-place Packard, at top of canopy.
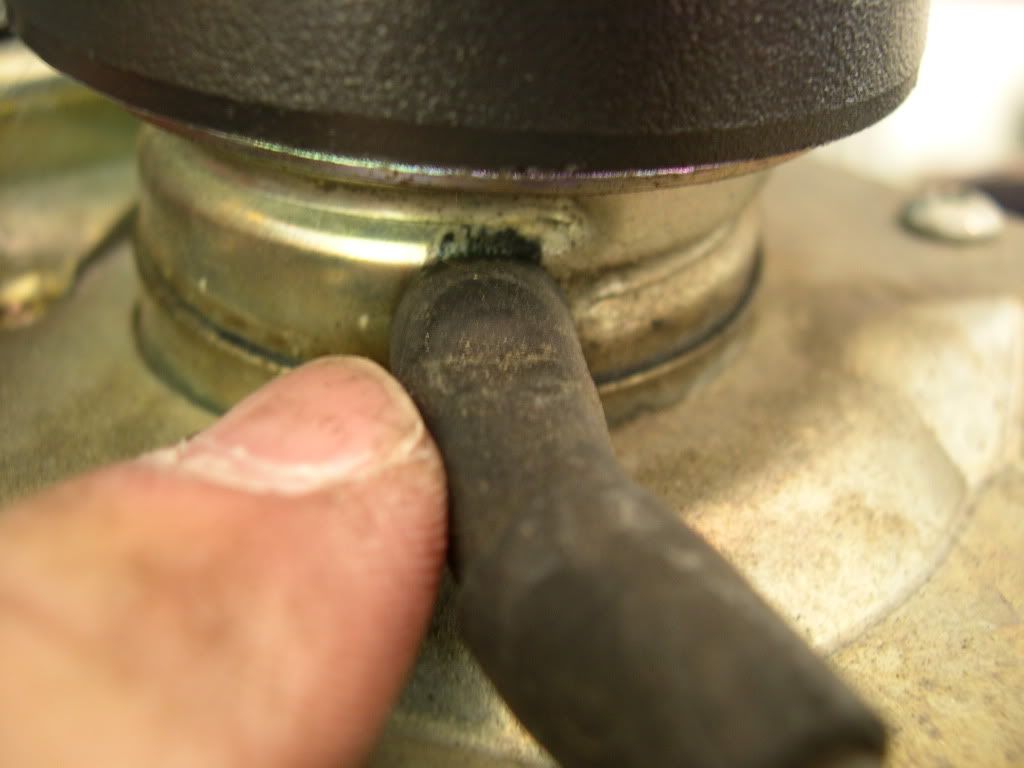
i. Gently pry off fuel vapor vent tube from fitting on filler neck of fuel tank. Don't pull fitting from filler neck.
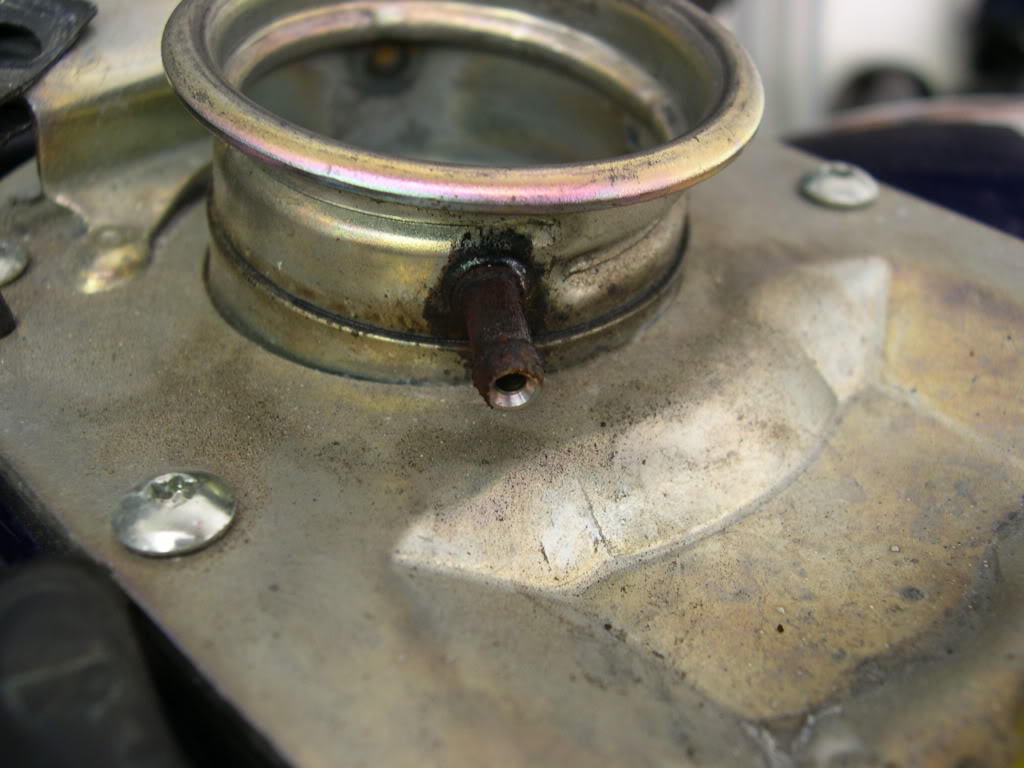
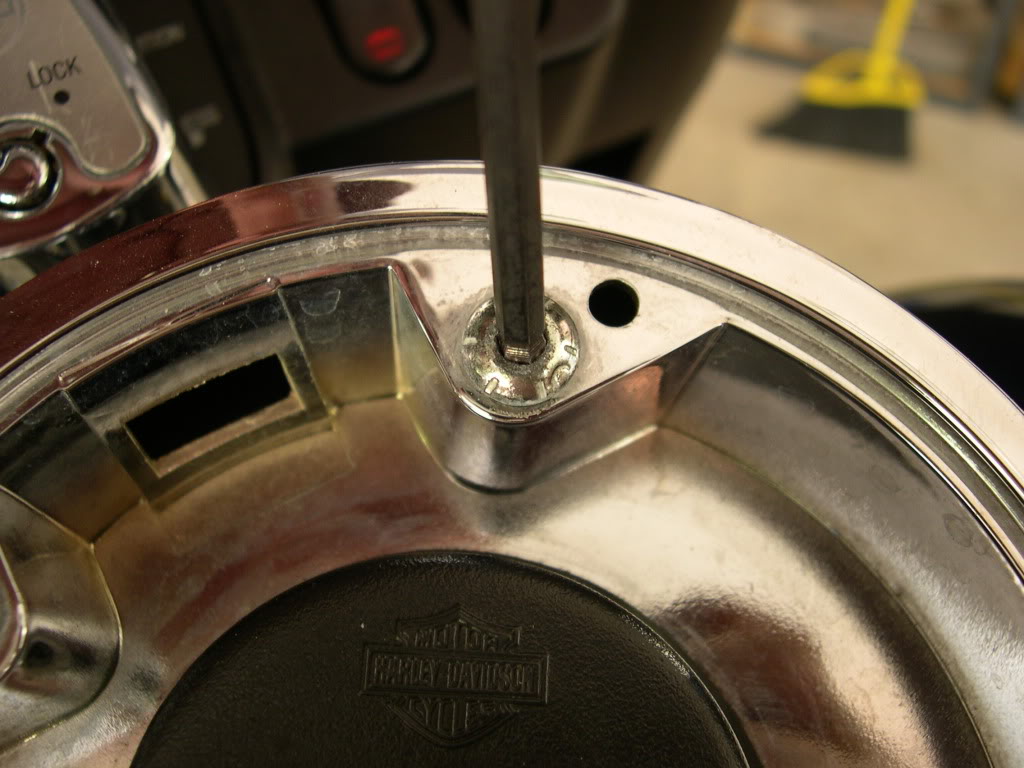
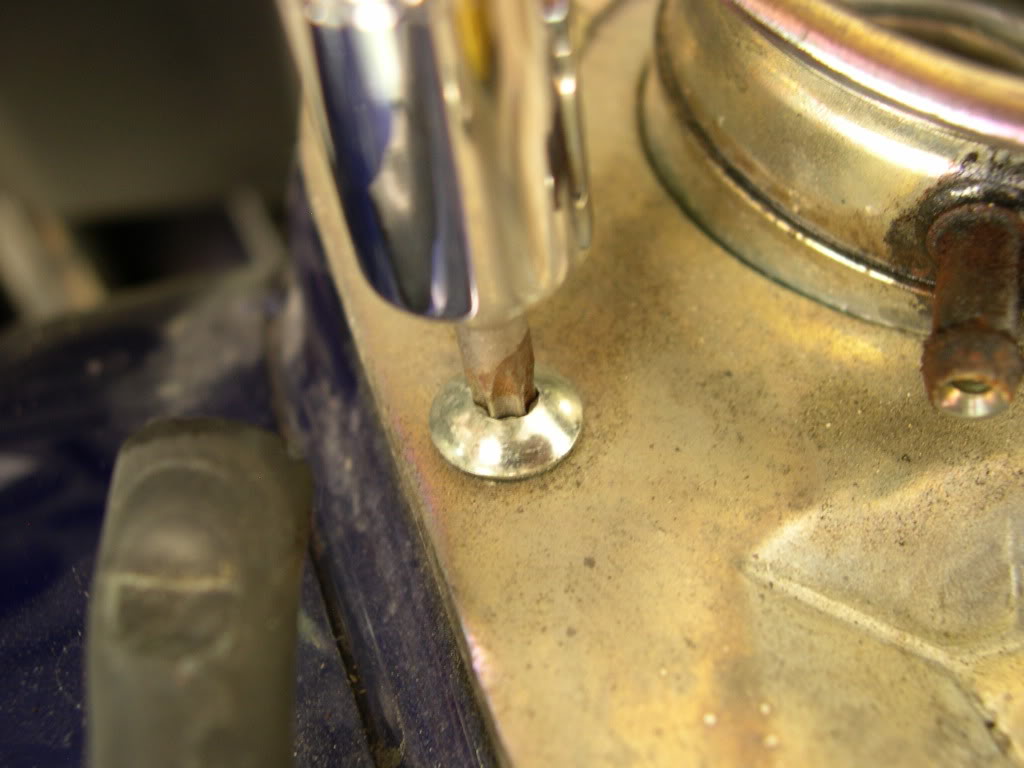
j. Using a T20 Torx bit, remove the ten screws around the outer edge of the canopy and discard.
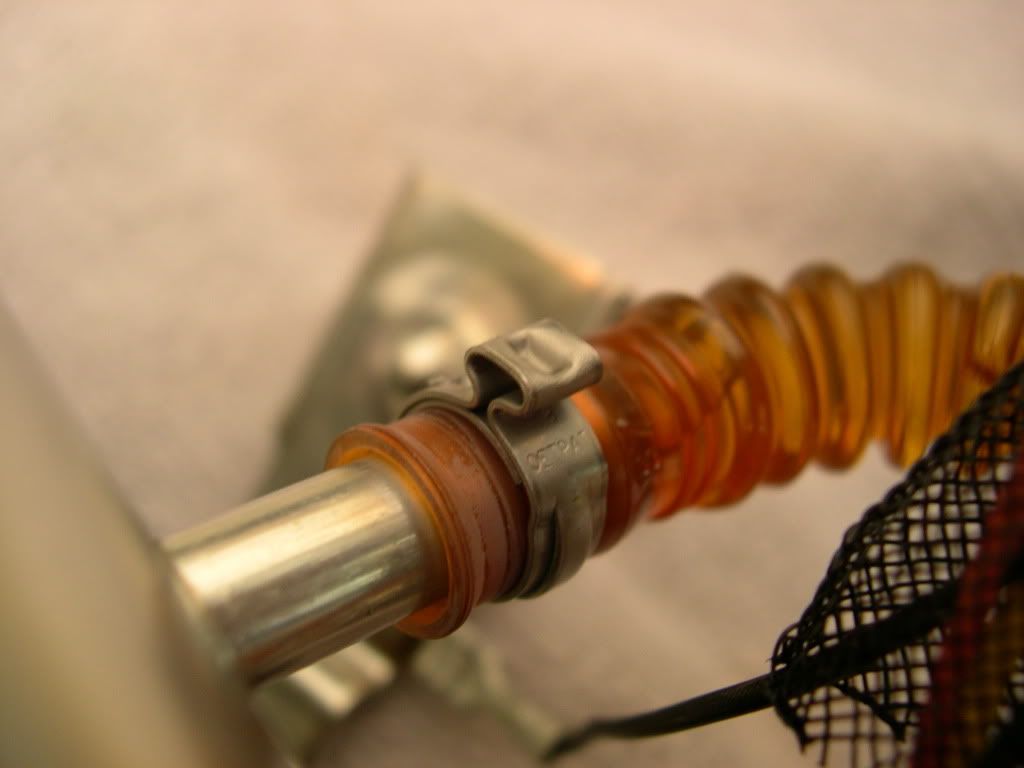
k. Raise canopy slightly to access top fitting (inlet port) at the back of the fuel pressure regulator. (It's towards the seat.) Using the side cutters, cut off the hose clamp and slide off the convoluted tube carefully. Make sure you don't drop any metal pieces into the tank.
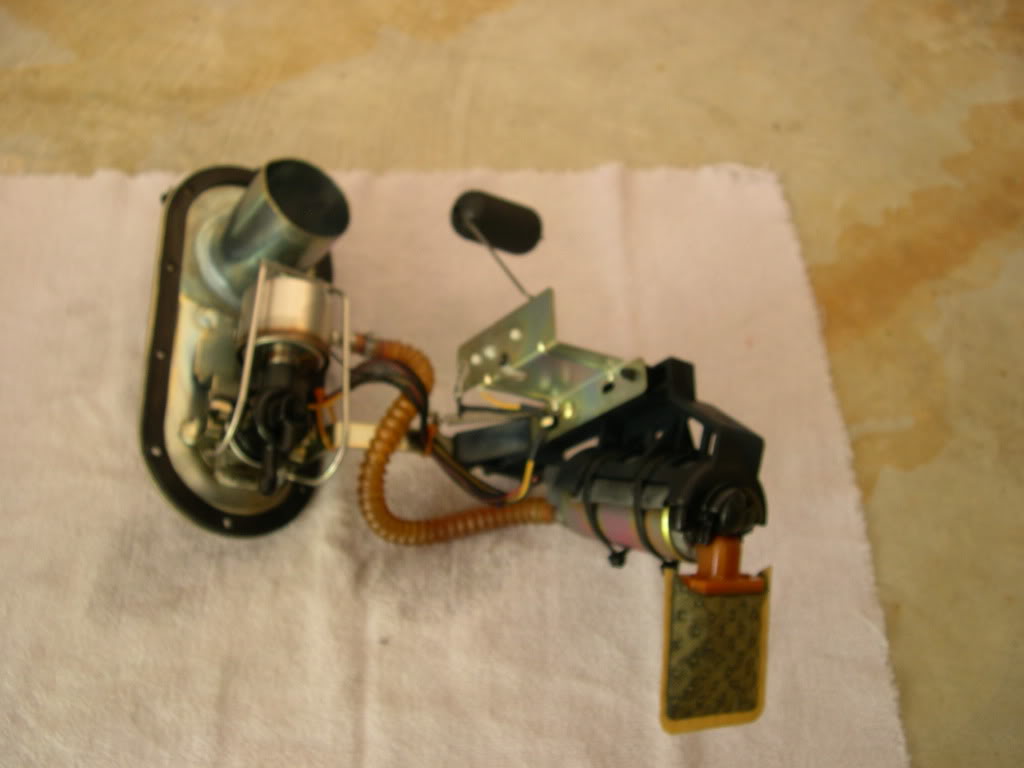
l. Remove canopy from fuel tank. There is a spring-loaded hinge on the fuel pump, which is down in the tank on the left side. When you pull the canopy up, you can see down in the left side of the tank. The cylindrical item down there is the fuel pump. Using a flat blade screwdriver (or your finger if it's long enough), push down on the fuel pump and then simultaneously turn the canopy counterclockwise to about a 45-degree angle. Then carefully manuever the entire assembly from the tank.
m. Remove and discard canopy gasket. Verify that sealing devices from screws are not lodged in the canopy holes. Remove and discard sealing devices if present.
2. (Back to Page 9-19) Release fuel filter canister as follows:
a. Pull wireform to release from slots on fuel filter canister bracket.
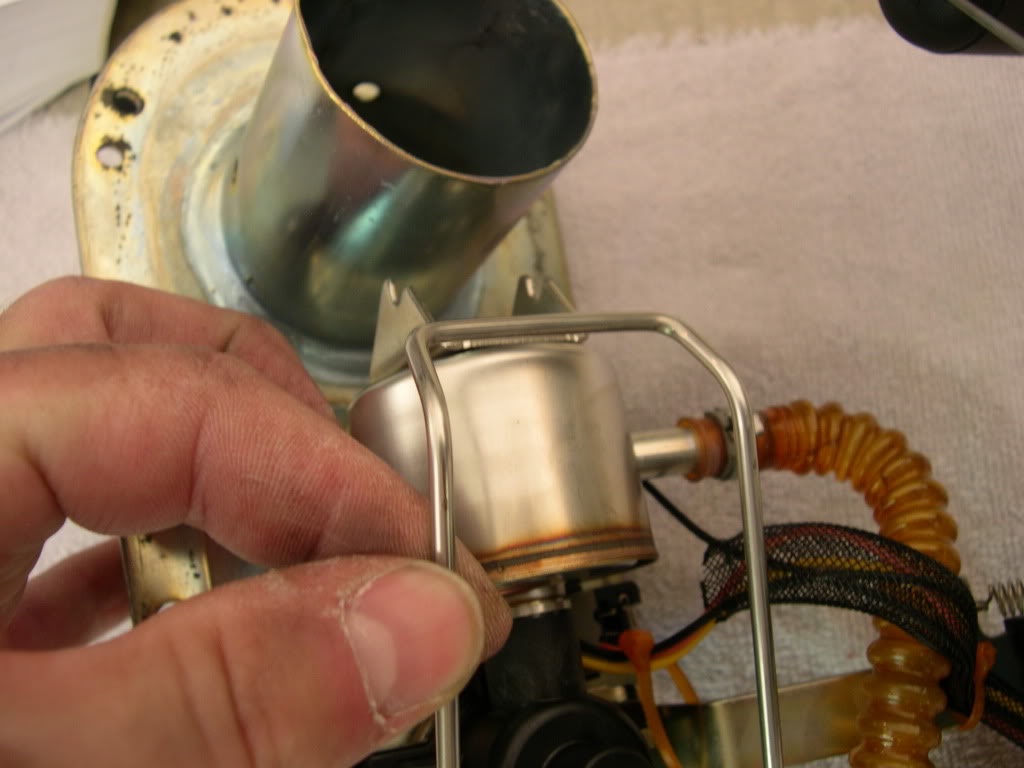
b. Use hinge to swing wireform out of the way. Move canister bracket back to disengage tab from slot on canopy weldment.
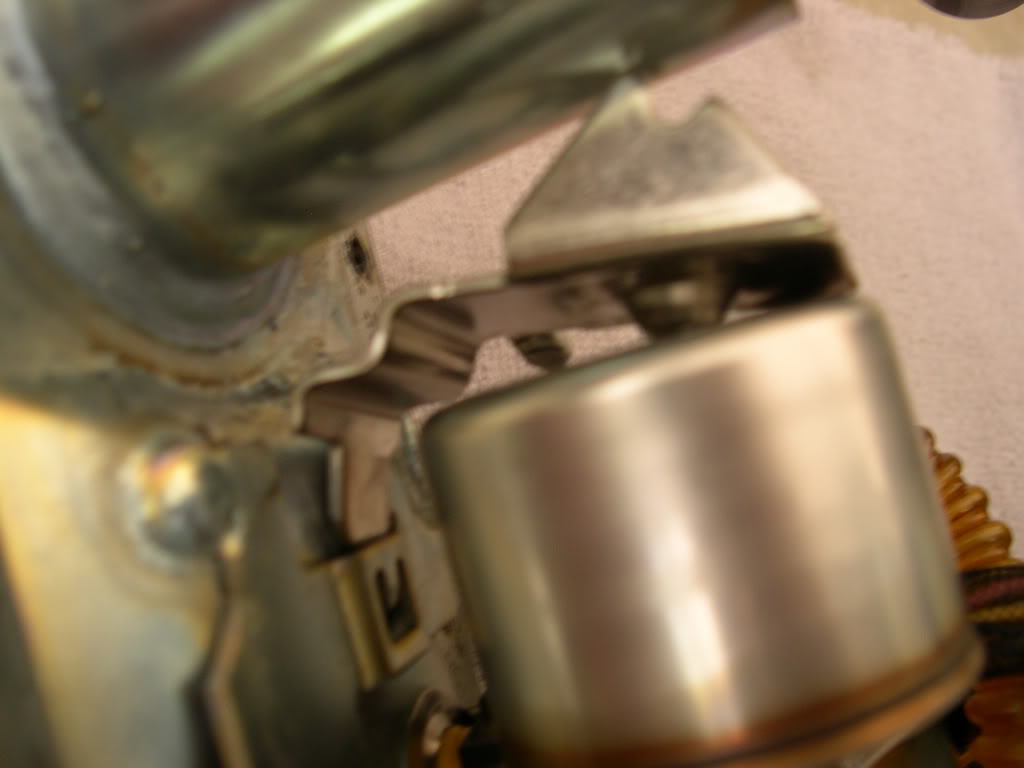
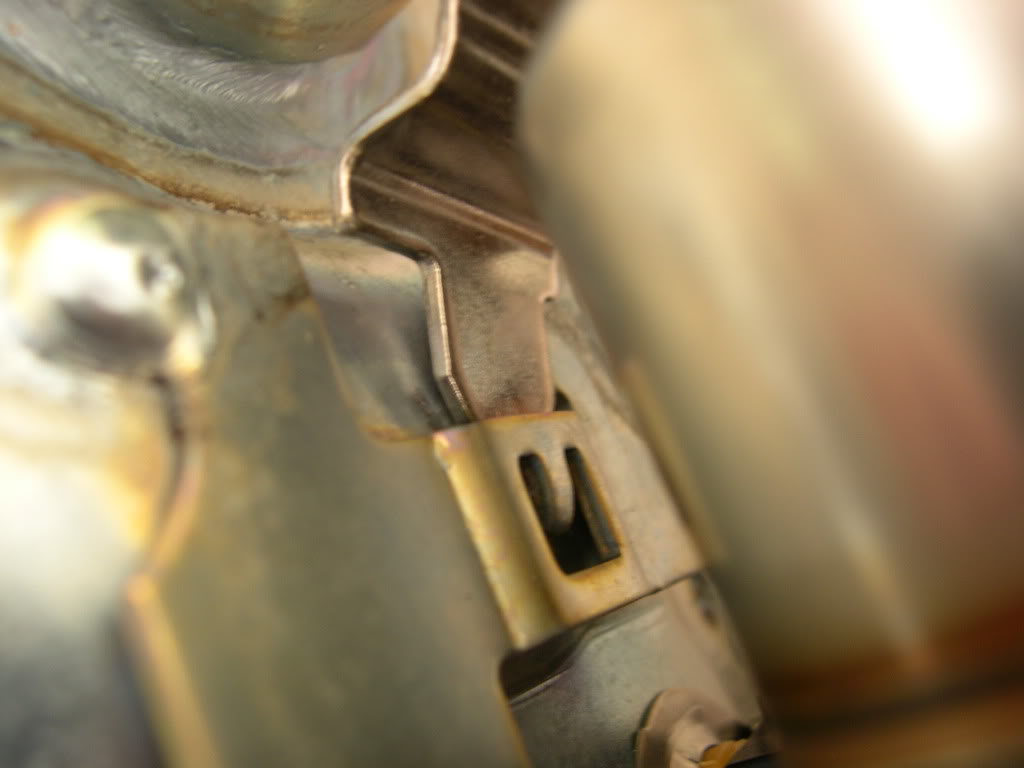
c. Pull fitting on canister from fuel pressure regulator assembly.
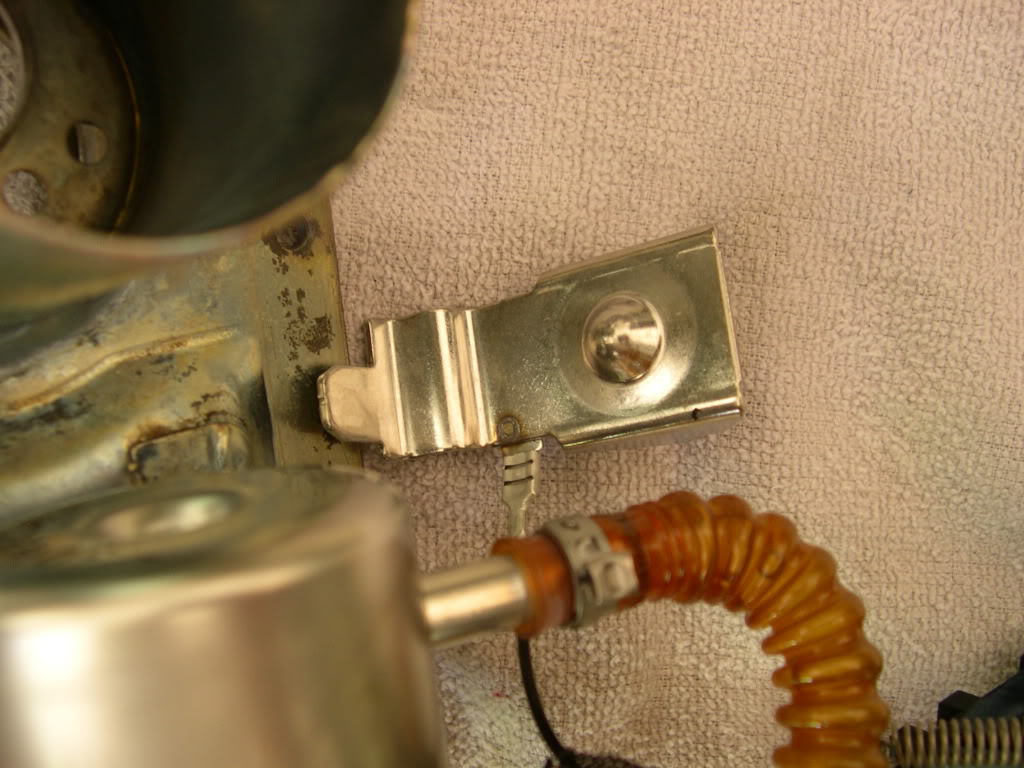
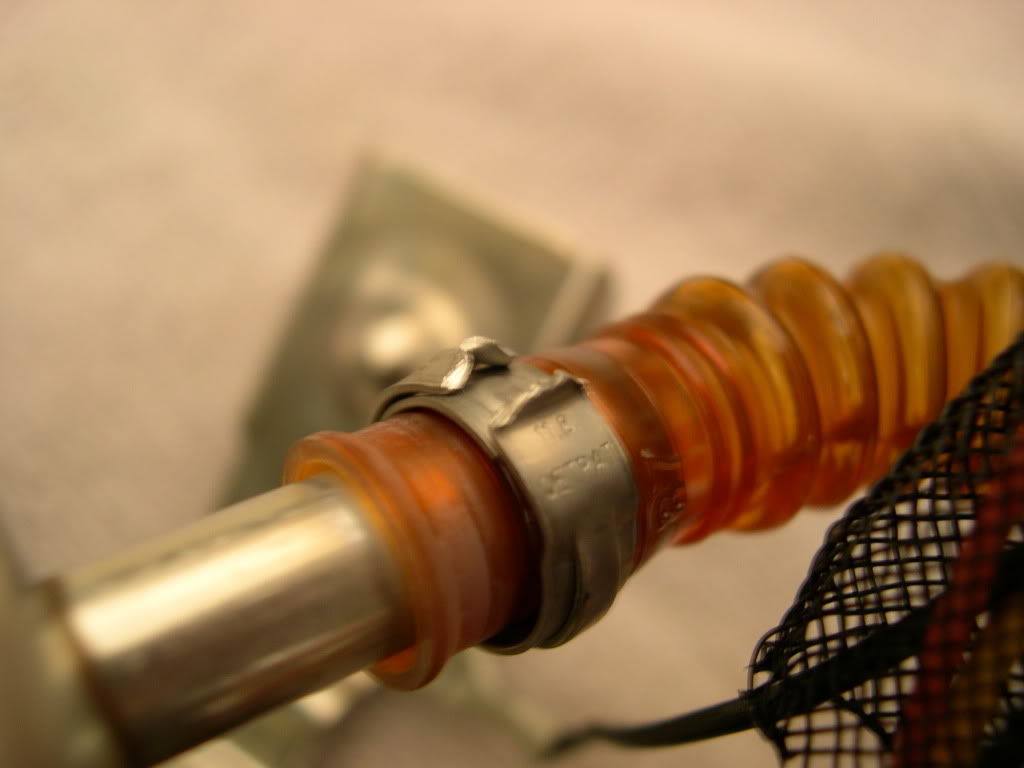
3. Using side cutters, cut hose clamp and remove convoluted tube from inlet port at side of fuel filter canister. Avoid cutting or damaging tube. Discard fuel filter canister.
* The kit came with a new section of convoluted tubing that goes in between the fuel pump and fuel filter. I went ahead and replaced that tube.
Installation
* The new kit consists of the fuel filter, a new section on convoluted tubing, an o-ring for the fuel filter and two new hose clamps.
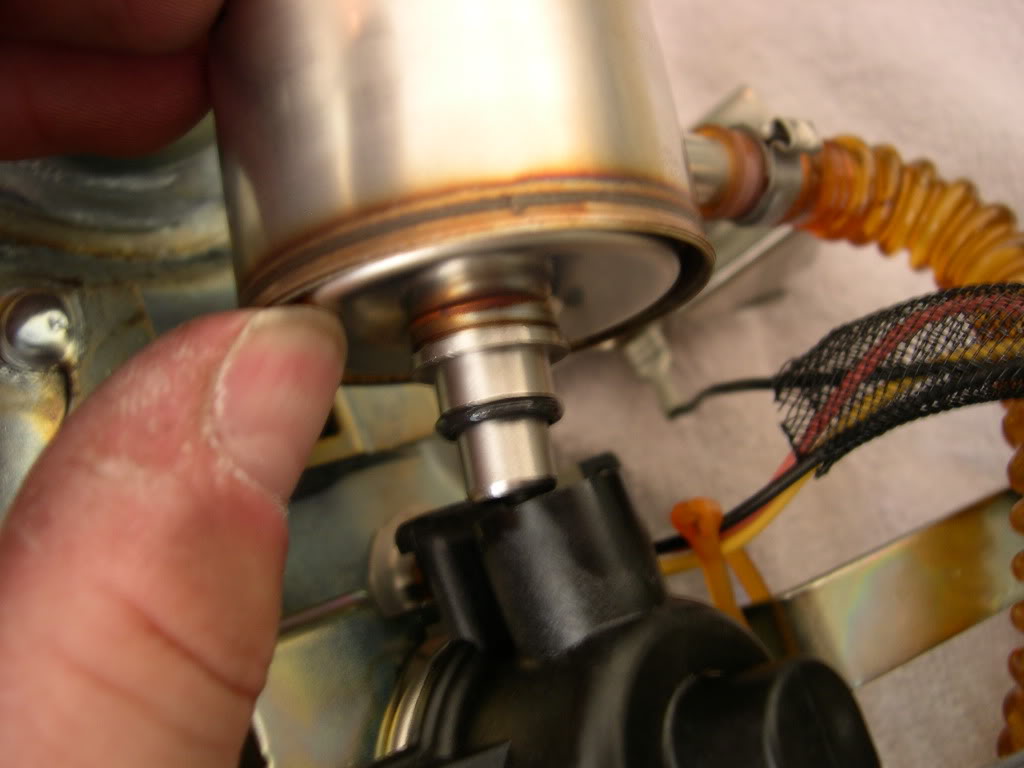
1. If present, remove and discard plastic/rubber caps on new fuel filter canister.
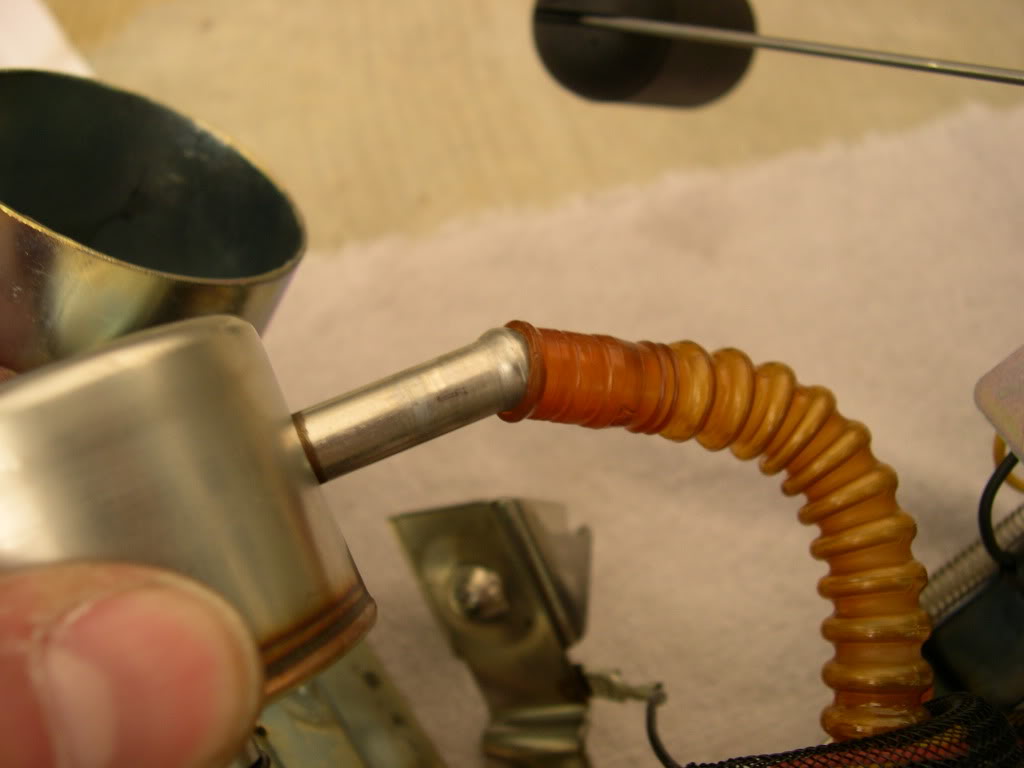
2. Slide new hose clamp onto free end of convoluted tube (from fuel pump). Install tube onto inlet port at side of the fuel filter canister. Use glass cleaner to aid in installation. Crimp clamp.
* Since I replaced the piece of tubing, I had cut both hose clamps off. It was so much easier putting the new tubing on the fuel filter first. Then I routed the tube, just like the old one, to the fuel pump. I didn't have a special crimping tool, so I just used channel locks to crimp them. They didn't look pretty, but they were tight.
3. Install fuel filter canister as follows:
a. Install new o-ring onto fitting of fuel filter canister. Insert fitting into fuel pressure regulator assembly, so that inlet port is on fuel pump side.
b. Slide tab on canister bracket into slot of canopy weldment until bump on bracket engages depression at side of canister.
c. Use hinge to rotate wireform over canister bracket. Press on wireform until it fully engages slots on canister bracket.
d. Verify that socket terminal is firmly installed on spade connector on canister bracket, if present.
4. Install Console Pod/Canopy (reverse order of removal)
* Use new canopy gasket, 10 new T20 Torx screws and new hose clamps. Since the kit only came with two hose clamps, I had to use regular screw-on hose clamps (which I prefer anyway). Tighten screws in criss-cross pattern to 18-24 in-lbs, starting with top and bottom screws.
If this is in the wrong spot, please move it to where it should go. I'm a noob!
Pages 9-19 & 9-20 in the '06 Service Manual are related to the fuel filter canister replacement.
Removal
1. Remove Console Pod/Canopy (pages 9-15 & 9-16)
a. Drain fuel tank as follows:
Obtain a short section of hose with a 5/16" I.D. Insert a bolt in one end and secure it with either a hose clamp or zip tie to ensure it's securely plugged. Cut the clamp from one end of the crossover tube beneath the fuel tank near the front of the bike using side cutters.
Remove the hose from the fuel inlet and quickly replace it with the short section of tubing that has the bolt in it. This will stop the fuel from completely emptying out of your tank. At the same time, there will be some gas that comes out of the crossover tube, so be prepared to catch it in a suitable container. Wipe up any gas that spills (and it will).
** In my case, the bolt I used was apparently not large enough, and the gas started dripping from the end of the hose. So I just disconnected it and let the gas come out into a container. Fortunately, my wife had about 170 miles on the tank, so there was maybe a gallon or so left in the tank. The picture below is when I had already drained the tank, but I put the tube back on for the picture.
I picked up the 5/16" I.D. tubing at Sears Hardware...it was like $0.39 a foot!
b. Remove seat (self explanatory - no pic needed)
c. Purge the fuel supply line of high pressure gas. Proceed as follows:
* Remove the 15-amp fuel pump fuse. The EFI fuses are located under the right sidecover. I removed the right saddlebag and sidecover. The fuse box is located to the right of the ECM, and it is released by pressing in on a plastic piece to release the tab. It was labeled with a white arrow pointing up. While pressing on that arrow, gently tug on the conduit to slide the block down and out. Then find the 15-amp fuse for the fuel pump and remove it. In this picture, I already removed it. It was right above the other 15-amp fuse you see here (left-side, middle fuse). It's also labeled on the front of the fuse block...you can't miss it.
* Start the engine and allow the motorcycle to run
* When the engine stalls, operate the starter for 3 seconds to remove remaining fuel from fuel lines.
d. Remove negative battery cable from battery
e. Open fuel door on console and remove the two Allen head bolts. Also remove the bolt at the flange at the rear of the console, if present.
f. Lay a clean towel down on the forward part of the rear fender and battery area.
g. Remove filler cap from neck of fuel tank. Remove console and lay it upside down on the towel. Reinstall filler cap.
h. Remove fuel level sender/fuel pump connector, 4-place Packard, at top of canopy.
i. Gently pry off fuel vapor vent tube from fitting on filler neck of fuel tank. Don't pull fitting from filler neck.
j. Using a T20 Torx bit, remove the ten screws around the outer edge of the canopy and discard.
k. Raise canopy slightly to access top fitting (inlet port) at the back of the fuel pressure regulator. (It's towards the seat.) Using the side cutters, cut off the hose clamp and slide off the convoluted tube carefully. Make sure you don't drop any metal pieces into the tank.
l. Remove canopy from fuel tank. There is a spring-loaded hinge on the fuel pump, which is down in the tank on the left side. When you pull the canopy up, you can see down in the left side of the tank. The cylindrical item down there is the fuel pump. Using a flat blade screwdriver (or your finger if it's long enough), push down on the fuel pump and then simultaneously turn the canopy counterclockwise to about a 45-degree angle. Then carefully manuever the entire assembly from the tank.
m. Remove and discard canopy gasket. Verify that sealing devices from screws are not lodged in the canopy holes. Remove and discard sealing devices if present.
2. (Back to Page 9-19) Release fuel filter canister as follows:
a. Pull wireform to release from slots on fuel filter canister bracket.
b. Use hinge to swing wireform out of the way. Move canister bracket back to disengage tab from slot on canopy weldment.
c. Pull fitting on canister from fuel pressure regulator assembly.
3. Using side cutters, cut hose clamp and remove convoluted tube from inlet port at side of fuel filter canister. Avoid cutting or damaging tube. Discard fuel filter canister.
* The kit came with a new section of convoluted tubing that goes in between the fuel pump and fuel filter. I went ahead and replaced that tube.
Installation
* The new kit consists of the fuel filter, a new section on convoluted tubing, an o-ring for the fuel filter and two new hose clamps.
1. If present, remove and discard plastic/rubber caps on new fuel filter canister.
2. Slide new hose clamp onto free end of convoluted tube (from fuel pump). Install tube onto inlet port at side of the fuel filter canister. Use glass cleaner to aid in installation. Crimp clamp.
* Since I replaced the piece of tubing, I had cut both hose clamps off. It was so much easier putting the new tubing on the fuel filter first. Then I routed the tube, just like the old one, to the fuel pump. I didn't have a special crimping tool, so I just used channel locks to crimp them. They didn't look pretty, but they were tight.
3. Install fuel filter canister as follows:
a. Install new o-ring onto fitting of fuel filter canister. Insert fitting into fuel pressure regulator assembly, so that inlet port is on fuel pump side.
b. Slide tab on canister bracket into slot of canopy weldment until bump on bracket engages depression at side of canister.
c. Use hinge to rotate wireform over canister bracket. Press on wireform until it fully engages slots on canister bracket.
d. Verify that socket terminal is firmly installed on spade connector on canister bracket, if present.
4. Install Console Pod/Canopy (reverse order of removal)
* Use new canopy gasket, 10 new T20 Torx screws and new hose clamps. Since the kit only came with two hose clamps, I had to use regular screw-on hose clamps (which I prefer anyway). Tighten screws in criss-cross pattern to 18-24 in-lbs, starting with top and bottom screws.

#4
06-08-2009, 07:59 AM
Road Warrior
#5
06-08-2009, 10:02 AM
She has 36,000+ miles on the bike. And, yes, I plan on opening up the filter to take a look at it on the inside. I'll post pics of that, too.
On a side note, I am not getting e-mail notifications on my posts, even though I have the option set under my profile to receive instant notification. Do I have to have a certain number of posts before I start receiving e-mails?
On a side note, I am not getting e-mail notifications on my posts, even though I have the option set under my profile to receive instant notification. Do I have to have a certain number of posts before I start receiving e-mails?
#6
06-08-2009, 10:14 AM
#7
06-08-2009, 10:28 AM
Cruiser
Trending Topics
#8
06-08-2009, 10:30 AM
BTW, you only recognized me because I didn't choose a psuedo name when I joined over here.


#10
06-08-2009, 08:56 PM
I'm gonna tear into the old one later tonight (yeah, I'm a night owl) and post what I find.
