
07 Broken Fairing Bracket?... I think not!! w/ Pics
#1
 01-22-2010, 10:49 AM

Join Date: Feb 2009
Location: St. Augustine Florida
Posts: 1,519
Likes: 0
Received 2 Likes
on
2 Posts
Good morning fellow forumers.
I have always been critical of anticipated failures on all my Harleys and make every attemp to correct, repair or improve these conditions prior to their failure. My partner in crime, Mr. Crown Royal is a diverse shade tree mechanic that continuosly talks me into undertaking these tasks.
This is one of the reasons I have always loved my Harley's.
Give me a Crown and Ginger, a Harley and a service manual.... and I am a happy guy. Not to mention that Mr. Crown, coupled with the valuable information provided by you fine people has saved me a significant amount of coin.
In return, I feel compelled to share a simple project that I recently did that appears to be mentioned here alot. This is really very simple and did not cost more than $9.00 excuding the cost of Mr. Crown Royal which was about $3.78. per serving. I make big drinks! And only buy the 1.75ltr jugs.
I removed my outer fairing by removing all 7 (Torx 27)bolts. I started with the top 3 at the windshild and then proceded to the right and left side. The service manual is very detailed in this. If you dont have GET ONE!. And have an extension available for your ratched.
The only suggestion is to leave the center windshiled bolt as to provide support to the fairing prior to removal. And as always...protect chrome, paint and other things you do not want scratched or damaged. Socks over the driving lights work real well.
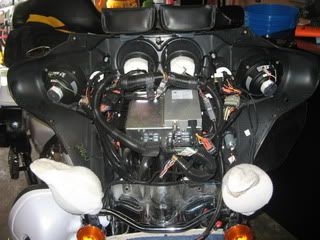
Note all stock components within the fairing. Speaker upgrade will be next project.
Once the outer fairing is removed,unplug the headlight connector by squeezing inwards and set fairing aside under protected conditions. Oh yeah, clean it and polish it before you put it back on. One will also notice a significant amount of dust, debris and insect particulate deposited where one fingers will not reach well into to clean and or polish such as on the upper end of the forks and on the chrome plate in which the lower fairing bolts attach to. This is a good tme to clean and polish these areas and to blow off any dust deposited on the HK and any exposed associated wiring harnesses.
At this point I picked up a set of 2"x2" galvinized angle brackets from Home Depot for around $4.00. and four 10-32x1/2" SS screws and nylon insert SS nuts for another $0.36. The brackets come in 4 to a pack.
Next step was to test fit where the angle brackets would be mounted onto the existing vertical brackets. No brainer, just hold up against the MOCO bracket and note where the attaching bolt goes.
Drill this hole out and an additional two for the remainder of the bracket.
I drilled used a 1/4" drill bit.
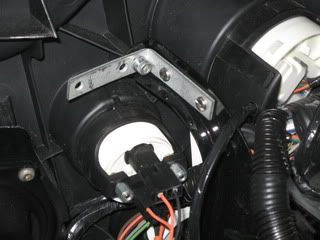
Here is the new bracket reinforcement attached to the original MOCO bracket. $61.00 each at dealer by the way for the redesigned brackets.
This 2"x2" angle bracket was predrilled. You will need to drill the hole for the MOCO fastener allen bolt. Sorry, I forgot the size. Mr. Crown's fault!
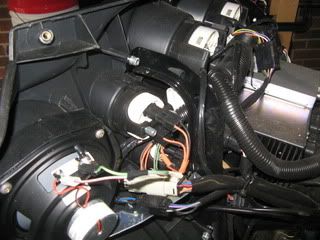
Below is a close up of before the bracket installation.
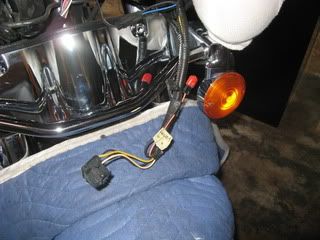
Once this side is done, repeat for the other side. Mr. Crown Royal is sensible most of the time. The next photo is of the "extra" electrical wires" from the head light. I have seen several posts inquiring as to the location of these.These are very obvious and will come in handy if one was to hardwire a GPS, IPhone or any other electrical paraphanalia you select. You will need spade connectors. 10-12 I believe. Just remove protective tips and plug in.
Note the much cleaner chrome now?
During this effort, I decided to measure the existing horizontal brackets as well and machine me a set. It was not until this morning reading here on the Forum that some speaker upgrade kits include these. This will be the next project regarding an outer fairing removal or maybe an iol temp gauge install.
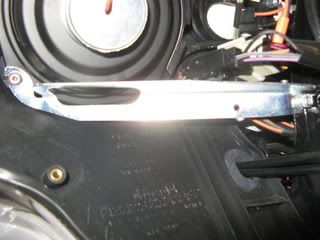
The picture below shows the offending horizontal bracket prior to it's untimely demise. Neither right or left showed indications of failure...yet.
I hope this helps. This is a very simple project that some folks are hesitant to tackle. The most difficult part is getting the fairing unwedged from behind the light bar. It does come out. Dont force it. Move it into several positions and angles and it will slide right out. This is why the socks are on the lights!! Also inspect the sealing 2 piece gasket that is in between the inner and outer fairing pieces. Mine was in great condition and did not need replacement. These are available from dealer at $4.75 each. Right and left side, sold separately.
As stated, my next project that Mr. Crown talked me into is a speaker upgrade. He will be joining in research into what brand as this was his idea!! Ideas are welcomed. HogTunes etc.
Please ride safe and enjoy life~!~!
I love my Harley!!
I have always been critical of anticipated failures on all my Harleys and make every attemp to correct, repair or improve these conditions prior to their failure. My partner in crime, Mr. Crown Royal is a diverse shade tree mechanic that continuosly talks me into undertaking these tasks.
This is one of the reasons I have always loved my Harley's.
Give me a Crown and Ginger, a Harley and a service manual.... and I am a happy guy. Not to mention that Mr. Crown, coupled with the valuable information provided by you fine people has saved me a significant amount of coin.
In return, I feel compelled to share a simple project that I recently did that appears to be mentioned here alot. This is really very simple and did not cost more than $9.00 excuding the cost of Mr. Crown Royal which was about $3.78. per serving. I make big drinks! And only buy the 1.75ltr jugs.
I removed my outer fairing by removing all 7 (Torx 27)bolts. I started with the top 3 at the windshild and then proceded to the right and left side. The service manual is very detailed in this. If you dont have GET ONE!. And have an extension available for your ratched.
The only suggestion is to leave the center windshiled bolt as to provide support to the fairing prior to removal. And as always...protect chrome, paint and other things you do not want scratched or damaged. Socks over the driving lights work real well.
Note all stock components within the fairing. Speaker upgrade will be next project.
Once the outer fairing is removed,unplug the headlight connector by squeezing inwards and set fairing aside under protected conditions. Oh yeah, clean it and polish it before you put it back on. One will also notice a significant amount of dust, debris and insect particulate deposited where one fingers will not reach well into to clean and or polish such as on the upper end of the forks and on the chrome plate in which the lower fairing bolts attach to. This is a good tme to clean and polish these areas and to blow off any dust deposited on the HK and any exposed associated wiring harnesses.
At this point I picked up a set of 2"x2" galvinized angle brackets from Home Depot for around $4.00. and four 10-32x1/2" SS screws and nylon insert SS nuts for another $0.36. The brackets come in 4 to a pack.
Next step was to test fit where the angle brackets would be mounted onto the existing vertical brackets. No brainer, just hold up against the MOCO bracket and note where the attaching bolt goes.
Drill this hole out and an additional two for the remainder of the bracket.
I drilled used a 1/4" drill bit.
Here is the new bracket reinforcement attached to the original MOCO bracket. $61.00 each at dealer by the way for the redesigned brackets.
This 2"x2" angle bracket was predrilled. You will need to drill the hole for the MOCO fastener allen bolt. Sorry, I forgot the size. Mr. Crown's fault!
Below is a close up of before the bracket installation.
Once this side is done, repeat for the other side. Mr. Crown Royal is sensible most of the time. The next photo is of the "extra" electrical wires" from the head light. I have seen several posts inquiring as to the location of these.These are very obvious and will come in handy if one was to hardwire a GPS, IPhone or any other electrical paraphanalia you select. You will need spade connectors. 10-12 I believe. Just remove protective tips and plug in.
Note the much cleaner chrome now?
During this effort, I decided to measure the existing horizontal brackets as well and machine me a set. It was not until this morning reading here on the Forum that some speaker upgrade kits include these. This will be the next project regarding an outer fairing removal or maybe an iol temp gauge install.
The picture below shows the offending horizontal bracket prior to it's untimely demise. Neither right or left showed indications of failure...yet.
I hope this helps. This is a very simple project that some folks are hesitant to tackle. The most difficult part is getting the fairing unwedged from behind the light bar. It does come out. Dont force it. Move it into several positions and angles and it will slide right out. This is why the socks are on the lights!! Also inspect the sealing 2 piece gasket that is in between the inner and outer fairing pieces. Mine was in great condition and did not need replacement. These are available from dealer at $4.75 each. Right and left side, sold separately.
As stated, my next project that Mr. Crown talked me into is a speaker upgrade. He will be joining in research into what brand as this was his idea!! Ideas are welcomed. HogTunes etc.
Please ride safe and enjoy life~!~!
I love my Harley!!
Last edited by Our07Ultra; 01-22-2010 at 10:55 AM.
#4
01-22-2010, 12:00 PM

Road Warrior
#5
01-22-2010, 12:08 PM

#6
01-22-2010, 05:19 PM
Ultimate HDF Member

#7
01-22-2010, 07:52 PM
Extreme HDF Member
Trending Topics
#8
02-24-2010, 06:22 AM

#9
03-23-2010, 10:11 PM
Tourer
My wife and I had identical 2002 Standards. Fairing brackets broke in the identical places on both bikes. I just got some cheap conduit hangers at Home Depot and hack sawed and bent them to fit. I sort of just connected the cracked bracket together with the new little thing I'd formed by drilling holes in the old bracket and screwing the formed hangers into them. I was pissed at the whole deal, but I figure it's a stress issue that Harley has ingeniously invented. They'd rather have the bracket brake than to have the fairing crack. God, what it must take to be an HD engineer!
#10
03-23-2010, 11:51 PM

Road Captain
Join Date: Aug 2007
Location: Pittsburgh, Pa.
Posts: 672
Likes: 0
Received 0 Likes
on
0 Posts