
Pictorial: installing Heritage-style handlebars on a 2011 Road King
#21
 09-12-2011, 06:55 PM


Pry open the switch housing, and let it hang down. It won't fall apart: no worries. Remove the 2 cable clamps from the holes in the underside of the bars. Just wiggle and pull gently, and you should be able to reuse them (if they don't break: mine were fine).

Pull the right grip off. Mine came off very easily. The white knurled *** is the end of the throttle grip sensor (TGS). It mates with a matching "gear" on the inside of the right (twist) grip.
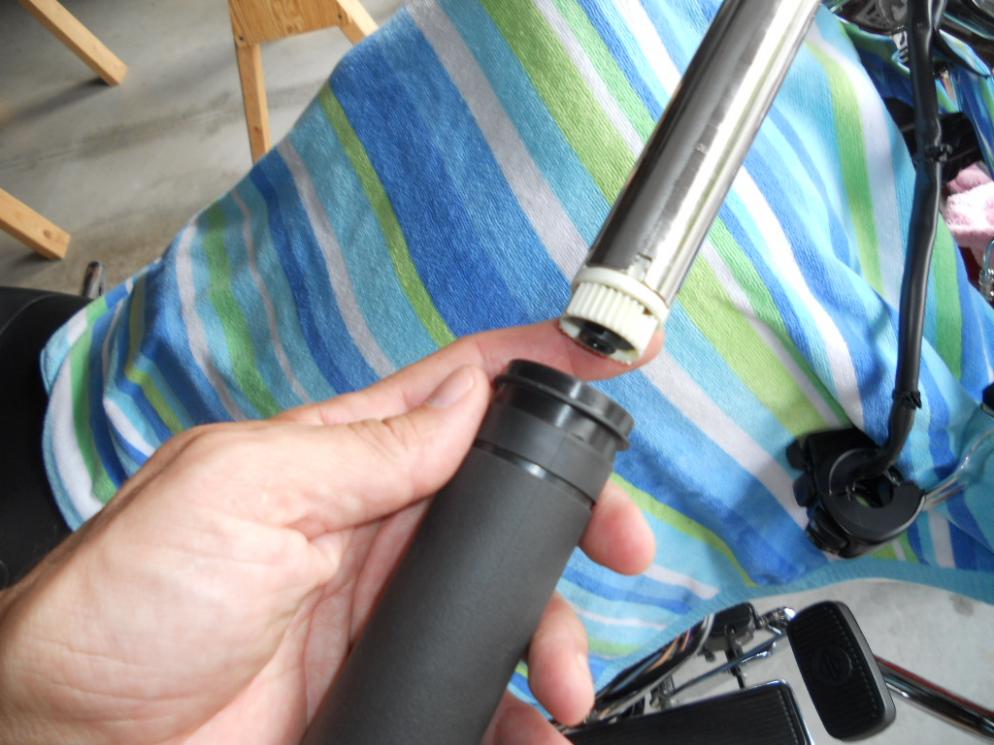
Gently pull the TGS out of the end of the bar, feeding the TGS wiring harness into the hole in the middle of the bar at the same time. I marked the "top" position of my TGS with red tape, but it probably doesn't matter. You'll need almost all the length of the wiring harness, so you'll have to free it up inside the nacelle (you already unplugged it in part 5) and feed it through the spaghetti mess in there.

Stop when you can see both of the small plugs which were inside the bar. The small (black) one unplugs easily.

The green one, you have to gently insert a very small screwdriver or thick needle, and pry gently to release the clip. I broke a very small plastic bit on the nacelle-end plug, but I don't think it was important. (It wasn't the clip itself.) Nevertheless, when I reassembled the whole thing later, I taped the plug with thin electical tape. Probably shouldn't have done this, because I had a very hard time getting the whole thing fed back through the bar. The extra thickness of tape around the green plug was a problem.

Pull the right grip off. Mine came off very easily. The white knurled *** is the end of the throttle grip sensor (TGS). It mates with a matching "gear" on the inside of the right (twist) grip.
Gently pull the TGS out of the end of the bar, feeding the TGS wiring harness into the hole in the middle of the bar at the same time. I marked the "top" position of my TGS with red tape, but it probably doesn't matter. You'll need almost all the length of the wiring harness, so you'll have to free it up inside the nacelle (you already unplugged it in part 5) and feed it through the spaghetti mess in there.
Stop when you can see both of the small plugs which were inside the bar. The small (black) one unplugs easily.
The green one, you have to gently insert a very small screwdriver or thick needle, and pry gently to release the clip. I broke a very small plastic bit on the nacelle-end plug, but I don't think it was important. (It wasn't the clip itself.) Nevertheless, when I reassembled the whole thing later, I taped the plug with thin electical tape. Probably shouldn't have done this, because I had a very hard time getting the whole thing fed back through the bar. The extra thickness of tape around the green plug was a problem.
The following users liked this post:
pdbuzz (04-29-2017)
#22
09-12-2011, 08:12 PM
That's it for the right side. The left side grip/switch/clutch assembly is almost entirely similar, except easier because there's less going on. (Sorry: no pictures.) Unclamp the clutch assembly (2 torx screws) and let it hang down. Unscrew the switch assembly (2 torx screws) and let it hang down. Wiggle out the 2 cable clamps from the holes in the bars. The left grip is supposed to be glued to the bar, and maybe mine was. But a simple twist of the grip, and it broke free and pulled right off. It was very easy to remove. I've read about cutting the grip off (!), and someone said you could insert a long, straightened out paperclip, bend a handle on it, and rotate it around. It will then walk its way around the grip, breaking the glue, and you can re-use the grip. Sounds like a good idea, but as I said, I didn't need to do it.
Once you get the grip off, you're virtually done with the disassembly. Just unscrew the handlebar clamp which you can see in this old picture. Just 4 T40 torx bolts, and the handlebar is off.

Here's the bar, just removed. Pull the throttle grip sensor wiring harness (TGSWH) out of the bar, wipe it down, and wrap it with some electical tape if (like mine) the sheath looks all torn up. If you don't wrap the grip-end plugs, you won't add any thickness to worry about, and you might keep the wires from shorting out some time in the future.

At around this point, my camera battery ran out. So no pictures for a while. Sorry. Feed the TGSWH into the right side of your new bars. I had to fish the TGSWH from the grip end using a piece of string, but it was very easy. It tended to hang up on the large creases in the bar on the underside of the grips. These creases are there to give the thick wiring harness (going to the switch housing) a place to go when you clamp on the brake and clutch housings, but they constrict the inside cavity of the bars quite a bit.
Now clamp your new handlebar loosely, making sure it is centered. Don't tighten it down, just enough so it won't move easily. Turn the bar from side to side and make sure the bar won't contact the fuel tank or (more likely) the chrome speedo housing at full stop. I pulled mine back as far as possible, so that at each full stop, the bar cleared the speedo ring by about half a finger thickness. This part obviously depends on what feels comfortable to you. Just don't ding the tank. If the bar doesn't hit the speedo ring, then the lever assemblies won't hit either (once you get them on): don't worry. At least with the bars I used... You should be able to re-adust later if needed, just by prying off the decorative cover, which gives you access to the top 2 screws.
Once you get the bars positioned where you want them, tighten the front screws on the clamp until the top and bottom of the clamp make contact. Tighten the rear screws to 16-20 ft-lbs. Then tighten the front screws to the same torque. The service manual (which I've quoted here, to avoid getting sued) says "A slight gap will exist between the upper and lower clamps at the rear of the handlebars after tightening".
Install the left grip with some glue. I have no recommendations on this, because frankly, I didn't use any. But you should, and you should use the correct Harley glue (Part no. 99839-95) so you can't get mad at me. Put glue on the inside of the grip, push grip on all at once, and let it cure for 6-8 hours, blah, blah, blah... Assemble the 2 halves of the switch housing, making sure to engage the groove in the housing with the flange on the end of the rubber grip. Do up the screws loosely. Attach the clutch lever assembly loosely, making sure to fit the tab on the switch housing into the grove on the clutch housing. Don't pinch the wiring harness when you do up the clamp: it is supposed to fit into the groove on the underside of the handlebar. This was all pretty easy and obvious, except the part about being careful about pinching wires.
Position the whole left grip assembly so it feels right to you. Top screw (+ washer) on the clutch clamp first: tighten to 72-108 in-lbs, then tighten the lower one (+ washer) to the same torque. Torque the switch housing screws to 35-45 in-lbs. No washers on these. Push the cable clamps into the holes in the bar.
Once you get the grip off, you're virtually done with the disassembly. Just unscrew the handlebar clamp which you can see in this old picture. Just 4 T40 torx bolts, and the handlebar is off.
Here's the bar, just removed. Pull the throttle grip sensor wiring harness (TGSWH) out of the bar, wipe it down, and wrap it with some electical tape if (like mine) the sheath looks all torn up. If you don't wrap the grip-end plugs, you won't add any thickness to worry about, and you might keep the wires from shorting out some time in the future.
At around this point, my camera battery ran out. So no pictures for a while. Sorry. Feed the TGSWH into the right side of your new bars. I had to fish the TGSWH from the grip end using a piece of string, but it was very easy. It tended to hang up on the large creases in the bar on the underside of the grips. These creases are there to give the thick wiring harness (going to the switch housing) a place to go when you clamp on the brake and clutch housings, but they constrict the inside cavity of the bars quite a bit.
Now clamp your new handlebar loosely, making sure it is centered. Don't tighten it down, just enough so it won't move easily. Turn the bar from side to side and make sure the bar won't contact the fuel tank or (more likely) the chrome speedo housing at full stop. I pulled mine back as far as possible, so that at each full stop, the bar cleared the speedo ring by about half a finger thickness. This part obviously depends on what feels comfortable to you. Just don't ding the tank. If the bar doesn't hit the speedo ring, then the lever assemblies won't hit either (once you get them on): don't worry. At least with the bars I used... You should be able to re-adust later if needed, just by prying off the decorative cover, which gives you access to the top 2 screws.
Once you get the bars positioned where you want them, tighten the front screws on the clamp until the top and bottom of the clamp make contact. Tighten the rear screws to 16-20 ft-lbs. Then tighten the front screws to the same torque. The service manual (which I've quoted here, to avoid getting sued) says "A slight gap will exist between the upper and lower clamps at the rear of the handlebars after tightening".
Install the left grip with some glue. I have no recommendations on this, because frankly, I didn't use any. But you should, and you should use the correct Harley glue (Part no. 99839-95) so you can't get mad at me. Put glue on the inside of the grip, push grip on all at once, and let it cure for 6-8 hours, blah, blah, blah... Assemble the 2 halves of the switch housing, making sure to engage the groove in the housing with the flange on the end of the rubber grip. Do up the screws loosely. Attach the clutch lever assembly loosely, making sure to fit the tab on the switch housing into the grove on the clutch housing. Don't pinch the wiring harness when you do up the clamp: it is supposed to fit into the groove on the underside of the handlebar. This was all pretty easy and obvious, except the part about being careful about pinching wires.
Position the whole left grip assembly so it feels right to you. Top screw (+ washer) on the clutch clamp first: tighten to 72-108 in-lbs, then tighten the lower one (+ washer) to the same torque. Torque the switch housing screws to 35-45 in-lbs. No washers on these. Push the cable clamps into the holes in the bar.
The following users liked this post:
pdbuzz (04-29-2017)
#23
09-12-2011, 09:10 PM
For the right side, plug the TGS into the 2 plugs hanging out of the bar end, and feed the whole thing toward the center of the bar, pulling gently on the wiring harness. I had to smear a little vaseline on the big green plug (really on the tape), because I had taped it up and it was almost too thick to get through. Engage the TGS in the slots on the bar end properly. If you're using a different bar, you'll have to cut slots, but that's another whole kettle of fish. Slide the grip on, making sure it fits over the knurled **** in the TGS. If you have heated grips, deal with them now. If you don't have cruise control, there is some friction shoe thing to deal with now as well. I don't know about these last 2 things, b/c I don't have them. (Sorry.)
Put the switch housing on loosely, making sure that no wires are pinched, as before. Put the brake lever assembly back on, being really careful about the switch button I showed in an earlier picture. This fit on pretty easily. Do up the 2 screws on the clamp to attach the brake lever assembly, but don't tighten yet. Position the whole assembly so it feels right. Making sure you don't pinch wires, and that the twist grip moves freely, push the grip towards the center and the switch housing toward the grip. Tighten the switch housing screws snug, make sure the grip twists freely, and torque the switch housing screws to 35-45 in-lbs.
The camera was recharged now, so here's a picture. Note that I left the bars pretty far back, rather than in-line with the front fork. You may not like it this way. Heck, I might not either, but I'll change it if I don't like it.

Next, make sure the brake lever is properly aligned and that the brake switch works properly. Tighten the top screw first, to 72-108 in-lbs, and then do the bottom one to the same torque.
Make sure everything works properly! Twist grip: free, but not too much play. Remove the cardboard shim, and make sure the brake lever works smoothly. Insert the 2 cable clamps into the 2 holes in the bar.
That's most of it. Before you put the headlight back in, plug in the TGS plug inside the nacelle and make sure you clip back on any of the other plugs you dislodged when you were rooting around in there. I found 3 that I had messed up: the white one went on a stud on the right side (driver's left) top of the fork plate, and the black one (TGS) went back on a stud on the left side. In the pictures, notice the slots that fit on the studs:


There was some other plug that clipped on a clip somewhere else. It's a mess, so try to clean it up some.
Put the handlebar clamp shroud back on. I just held the washer and nut on 2 fingers inside the nacelle and the small screw went right in. Put the spear back on top of the nacelle. Put the headlamp assembly back in with 6 or 7 small screws: the copper-colored clip goes on the bottom, and the bar/shield should be right-side-up. Secure the trim ring ("headlamp door") with 1 screw, fitting the spring clip on top into the groove up there first. Snap the 2 decorative covers back on top of the handlebar clamp shroud.
Put the main fuse back in, left side cover and saddle bag back on. Reset the clock, and make sure everything really works before you go back on the road. That's it! I'd like to say this all took me only 1/2 hour, but really it was more like 5 hours. Obviously, part of this was working carefully and taking pictures. Most people could probably do it in 2 hours or so.
I'll try to post some before and after pictures later. But frankly, I can barely tell any difference from the pictures, whereas the difference in the feel of the bars is HUGE. In fact, they may be a little bit too far back, so I may rotate them up a little, but I'll wait a week or so and see how it feels then. My initial impression is that they feel very comfortable now. Thanks for watching!

Put the switch housing on loosely, making sure that no wires are pinched, as before. Put the brake lever assembly back on, being really careful about the switch button I showed in an earlier picture. This fit on pretty easily. Do up the 2 screws on the clamp to attach the brake lever assembly, but don't tighten yet. Position the whole assembly so it feels right. Making sure you don't pinch wires, and that the twist grip moves freely, push the grip towards the center and the switch housing toward the grip. Tighten the switch housing screws snug, make sure the grip twists freely, and torque the switch housing screws to 35-45 in-lbs.
The camera was recharged now, so here's a picture. Note that I left the bars pretty far back, rather than in-line with the front fork. You may not like it this way. Heck, I might not either, but I'll change it if I don't like it.
Next, make sure the brake lever is properly aligned and that the brake switch works properly. Tighten the top screw first, to 72-108 in-lbs, and then do the bottom one to the same torque.
Make sure everything works properly! Twist grip: free, but not too much play. Remove the cardboard shim, and make sure the brake lever works smoothly. Insert the 2 cable clamps into the 2 holes in the bar.
That's most of it. Before you put the headlight back in, plug in the TGS plug inside the nacelle and make sure you clip back on any of the other plugs you dislodged when you were rooting around in there. I found 3 that I had messed up: the white one went on a stud on the right side (driver's left) top of the fork plate, and the black one (TGS) went back on a stud on the left side. In the pictures, notice the slots that fit on the studs:
There was some other plug that clipped on a clip somewhere else. It's a mess, so try to clean it up some.
Put the handlebar clamp shroud back on. I just held the washer and nut on 2 fingers inside the nacelle and the small screw went right in. Put the spear back on top of the nacelle. Put the headlamp assembly back in with 6 or 7 small screws: the copper-colored clip goes on the bottom, and the bar/shield should be right-side-up. Secure the trim ring ("headlamp door") with 1 screw, fitting the spring clip on top into the groove up there first. Snap the 2 decorative covers back on top of the handlebar clamp shroud.
Put the main fuse back in, left side cover and saddle bag back on. Reset the clock, and make sure everything really works before you go back on the road. That's it! I'd like to say this all took me only 1/2 hour, but really it was more like 5 hours. Obviously, part of this was working carefully and taking pictures. Most people could probably do it in 2 hours or so.
I'll try to post some before and after pictures later. But frankly, I can barely tell any difference from the pictures, whereas the difference in the feel of the bars is HUGE. In fact, they may be a little bit too far back, so I may rotate them up a little, but I'll wait a week or so and see how it feels then. My initial impression is that they feel very comfortable now. Thanks for watching!

#28
09-13-2011, 12:11 AM
Excellent post, most helpful.
I have been wanting to do the exact same thing to my 04 Ultra and for the same reasons. Now I have a really good idea of what to expect. I really appreciate the clear and detailed pictures and text..... now i just need to figure out what bars will work for me.
Thanks for posting this,
mike
I have been wanting to do the exact same thing to my 04 Ultra and for the same reasons. Now I have a really good idea of what to expect. I really appreciate the clear and detailed pictures and text..... now i just need to figure out what bars will work for me.
Thanks for posting this,
mike