I ride a 2012 Ultra, Vivid Black, I am wanting to paint it the new 2014 candy orange. I called my local Harley dealer for the paint code and was informed Harley doesn't release their paint codes but he can look it up and order it for me. When he looked it up he said Harley doesn't offer it as of now. Does anyone know what the code would be?
The Amber Whiskey is new, but I think Candy Orange is the same as '13.
PPG is Harley's paint manufacturer. Neither will release the code. Even when you order direct from a PPG distributor (note, distributor not store), it comes in a sealed "factory pack" from their Cleveland plant.
I ordered my '13 Candy Orange from MoCo. PN 98628DJS for the Ember Red base, and PN 98628DPU for the Candy top coat. You will also need a clear coat. I used 2 coats of DuPont clear with excellent match to the factory gloss.
Also of note, the appearance of gold flake in the paint is actually silver flake in the base with the candy topcoat making it shine gold. When you shoot your last coat of base, leave it a little dry to get the metallic to sit at the surface of the layer below it. It should appear almost matte. "Less is more" on that last coat of base. Then shoot 2 wet coats of candy with 75% overlap so as not to tiger stripe. Let it flash 30 min before clear. You should see that gold flake pop after the first coat of clear flashes.
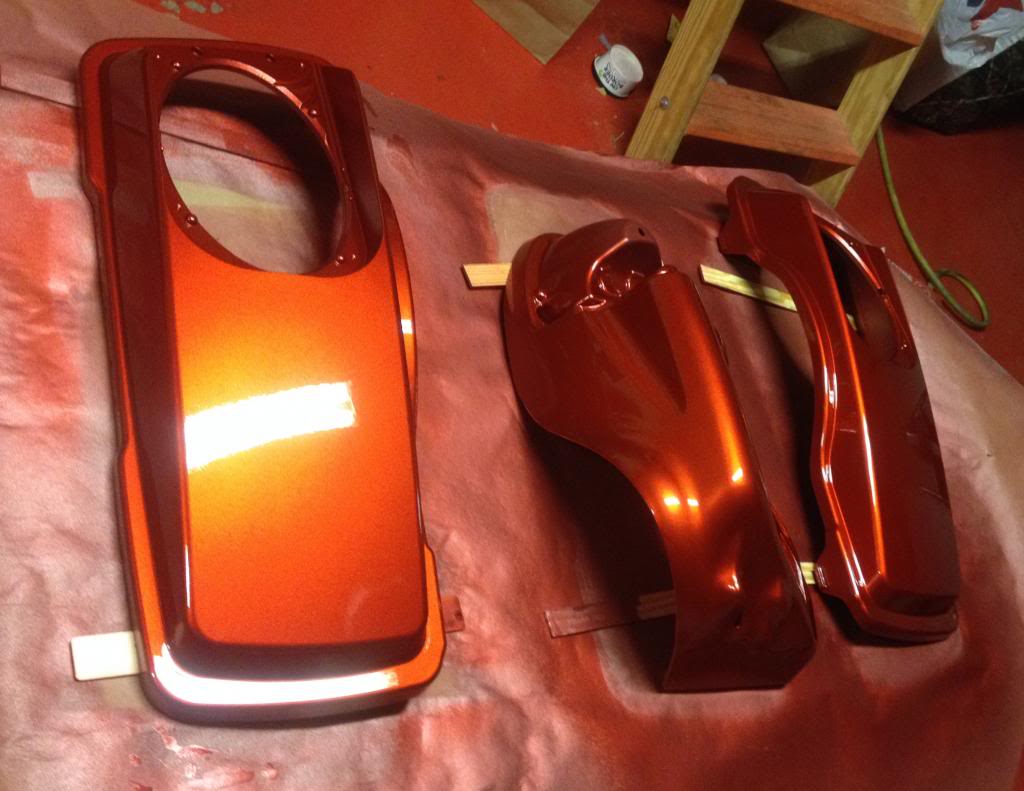
Here is a pic of the '13 Candy Orange going down:
Last edited by jayhawkclint; 05-31-2014 at 10:09 PM.
The paint is special order and found the price varies greatly from dealer to dealer. There was a $100 price difference between the 3 in my area. Might even be worth checking into some of the online dealers like Surdykes, although I'm guessing you'd have to pay some hazmat shipping costs.
Just finished the paint work on a 14' Candy Orange Ultra as well... Used the same paint as noted in the post above,by Jayhawkclint , straight from the Harley parts counter.. Using PPG reducers and PPG 2021 Concept clear and I was surprised at how good the color match was... Its perfect... On a side note... That paint is not suppose to be cleared for a minimum of 4 hours... ( not 30 minutes) to allow the solvents to evaporate from the base and candy coats , ( since its a 2-1-1) thinned ratio.... Any sooner and you risk getting solvent pop through your clear coat...unfortunately I now have a half a quart each of the Ember red and Candy orange left over, until I get another job that color....
Last edited by blockzilla; 06-19-2014 at 02:01 PM.
Reason: Put in paint part name
1st off thanks for the great information. I know this is a really old post but hoping I can still pick your brain on this subject. I would have pm'd you but am new and don't know how to do that.
I'm painting some parts for my 2013 Road King. (Same exact bike as jayhawkclint although I think he regretfully sold it.) I was able to get the paints from a PPG supplier in my area thanks to the part number information you provided. I've followed your directions and am able to get the metallic to pop exactly like factory. The problem is on my sample cards the color keeps coming out a little too red. I've gone with fewer/lighter tint coats but the color is too dark and the maroon from the base shows through. When I go with more or heavier tint coats it offsets the maroon in the base but gets more red from the red that's in the tint. (2 coats of tint as you recommended seems to be the closest match)
I should mention that I had my paint supplier mix each one in a rattle can the because the parts I'm painting are small the paints expensive and I didn't need anything close to a pint or quart. That being said, provided the paint was mixed correctly and I believe it was, I can't see why reducers and so forth would effect the color.
I know it's stupid to ask if you have any thoughts or ideas since I'm using rattle cans which is like comparing apples to oranges but.... Any ideas/thoughts? How heavy did you apply your base? I was thinking about going with a lighter coat of base but that seems to go against common sense as I'm thinking you would want a good base. (I used the recommended grey primer.)
Thanks again for the great information.
Last edited by rlflitho; 06-02-2017 at 08:18 PM.
Reason: added information
I have a PPG mixing system, and most of the time the paint matches well, but some colors, especially tri-coats, it just doesn't match the Harley paint, even though PPG is said to be the supplier to the MoCo. Amber Whiskey is one of those colors. I recently did this bike for a customer and the paint match was perfect with the OEM paint. Not so much with PPG.
Although, keep in mind that some parts of the bike don't match each other from the factory. Side covers especially often don't match the rest of the bike, and being that part is so easy to take off, many people will try to match to that part, and end up with bad results. I've seen many bikes the side covers were to dark/ not as much paint as other parts of a bike. Try to use bags/fenders to match to.
Last edited by Ndfastln; 06-04-2017 at 11:01 AM.
Reason: typo
Hey new to the paint thing, I am also trying to find paint to do my inner fairing of my 2013 CORG. When you say you bought the paint from MoCo, do you mean from the Harley Dealer?

 11-06-2013, 10:17 AM