How to Change Cams in a 2007 and up Twin Cam
#1
 02-28-2016, 08:08 AM

This is an old article and post but I have been asked over and over again to post this project page on HDF so it would be easy to find.
OK... You guys know I try to please so here it is. It hasn't changed and I hope this easy to follow guide helps.
This project has approximately 5800 words and there will be areas where you will need to read between the lines to get some things done but the more I detail the more difficult this exercise will read. If you see a Hint or a Caution then please pay special attention as there is a good reason I put it in. There will be some of you that will see things that I left out and others may learn new ways but regardless this is the easiest way that I know how to change cams in a new style Harley. Pictures: I know they are small. You can blow them up. Right click on any picture and save a copy to your desktop. Open it from your desktop and magnify it. They are of fair quality but will show good detail if you drill down into the picture.
Now for the disclaimer... I've done this many times. Maybe you would like to learn; maybe you just want to see how it's done. It's all good. But, here it comes... Neither I nor this site or anyone else is not responsible if you mess up. It's your dollar.
Now that is out of the way.... I hope you enjoy!
The following information is for those who want to change their cams in their 2007 and up Twin Cam Harley Davidson motor but have doubt they can. This is a fairly straight forward event for someone that has simple mechanical skills and a little time on their hands. Can you do it? Yes you can if you are willing to get a little dirty and want to say Yes, I did.
Shops that work on our beloved Harley’s can charge as much as 8 hours at their going rate for labor (enter labor per hour cost here) plus materials and shop costs. You can do this labor free and save yourself a bundle of George Washington’s.
The first step to take is to convince yourself that you can do this. Everyone had to start somewhere and when you dive in you too will see this is a little easier than you may think. Simply follow the correct process of removing the cams and reverse your steps. That’s all there is to it.
Parts gathering is key so do the research of finding the just the right cam for you and a good quiet set of new lifters. The most popular cams as I type may be the Woods 555, Andrews 54H or the S&S 510. Putting these style cams into a Harley touring bike will give you better low end Torque and a bit more Horse Power, imperative when riding a heavy bike with a 103 or larger motor. For those who have a 96” motor I would suggest my favorite cam the Andrews 26H which you can feel come into play as low as 1800 RPM’s and retain the mass moving Torque up to 4800 RPM’s. UPDATE: The TTS100 cams come in as low as 1500 seem to be the best combination of low end grunt all the way to 5000 RPM. As of now this is my favorite cam for the TG
Hint: Do your homework; pick the right cam for you, your bike and your motor build. Matching your motor components is essential to a good motor that gives you gratification and long life.
Good lifters are not the Harley basic stock set. The two best and most quiet, as I type, are the Woods Bi-Directional or the Head Quarters Black Ops Lifters. They are drop in lifers with no modifications on your part. To me it doesn’t matter if you have 500 or 500,000 miles on your bike… replace the lifters when you replace the cams!
Do you need adjustable push rods? Nope, you can reuse your factory push rods but you must remove your tank and open the rocker box covers. This actually is very easy to do and saves you loads of time plus no pinched or cut fingers or guess work to adjust the rods. If you really want to use adjustable rods you can and it is suggested you use adjustable rods with all Woods cams as the inner cam center circle is about 20 thousandths smaller so you will need to adjust that out or you could get lifter tapping valve noise. (Yes, I know there are those who used stock rods with a Woods cam but I’ll bet you used the Woods or HQ lifters didn’t ya??)
You will need a quart of your favorite oil, the three o-ring seals for the oil pump, a tube of engine assembly lubricant, a tube of high temp anti-seize and a set of high quality inner cam bearings. If you have more than 10,000 miles on your motor it will be best to pick up a replacement set of cam chain torsion shoes as they are a wearable item and will need to be changed from time to time. You don’t need to purchase any cover seals as you can reuse them with no issues of oil leaking.
Hint: Harley uses Hi-Temp thread locker. Pick up a tube and use it in the same places where you see white on the end of the removed bolt. If you want to use another thread locker then I recommend Locktite #222. It holds well but not so stiff you can’t remove the bolts after it dries or gets hot.
Special Tools. This is an expense but really not bad. Weigh the cost of the dealership labor compared to the little money for the right tool. The most important tools that you will need are the inner cam bearing removal and installation tools. If you really like to fill your tool box then go HERE
You will need the 320640 and the 320652. You can also get your inner bearings here too 910004. Unless you have very strong fingers and need assistance with reinstalling your push rod retaining clips then I suggest you pick up this great little tool 340050. The bearing removal tool can be rented from your local auto parts store if you decide you want to save a little cash.
The bearings must be installed with the installer tool as it will recess the bearings to their proper depth. Driving them in with a socket and a hammer is not going to do the job and may damage your inner motor case so get the tool. Also think about selling these tools when you are done to retrieve some of your costs. Have a friend that has a set, ask to borrow them.
Hint: Find a well lit area, clean of debris and uncluttered. If you have a lift table then you’re all set. If you will be doing this on a concrete floor then you will be on your knees for a long time. Good knee pads will help a lot.
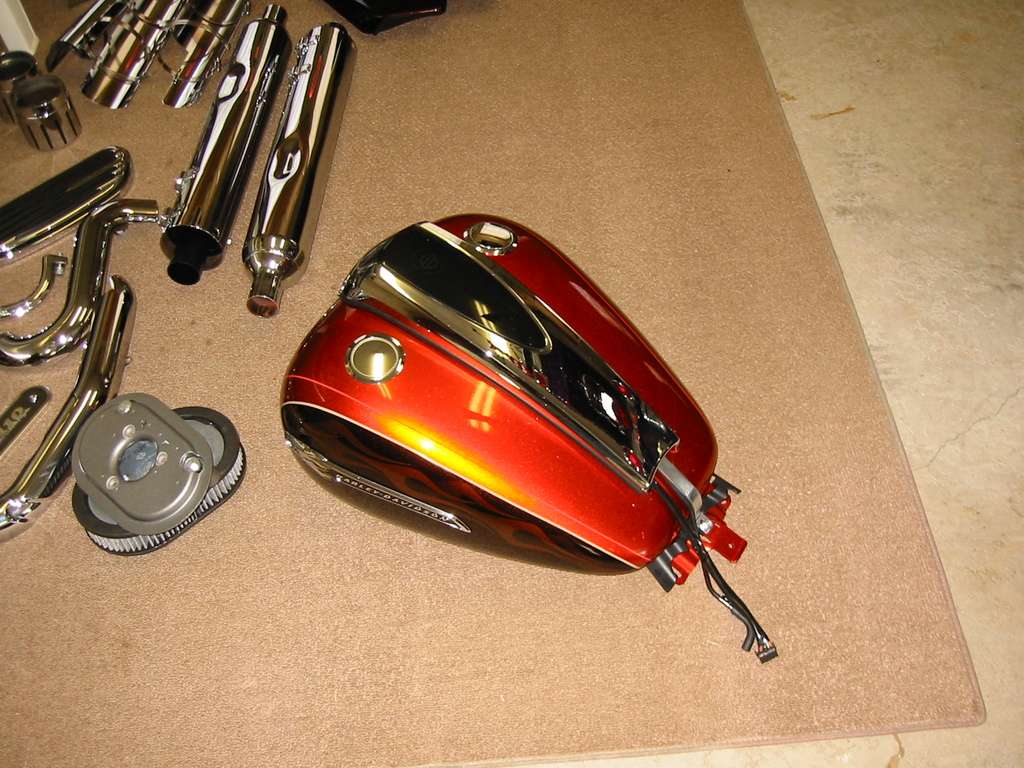
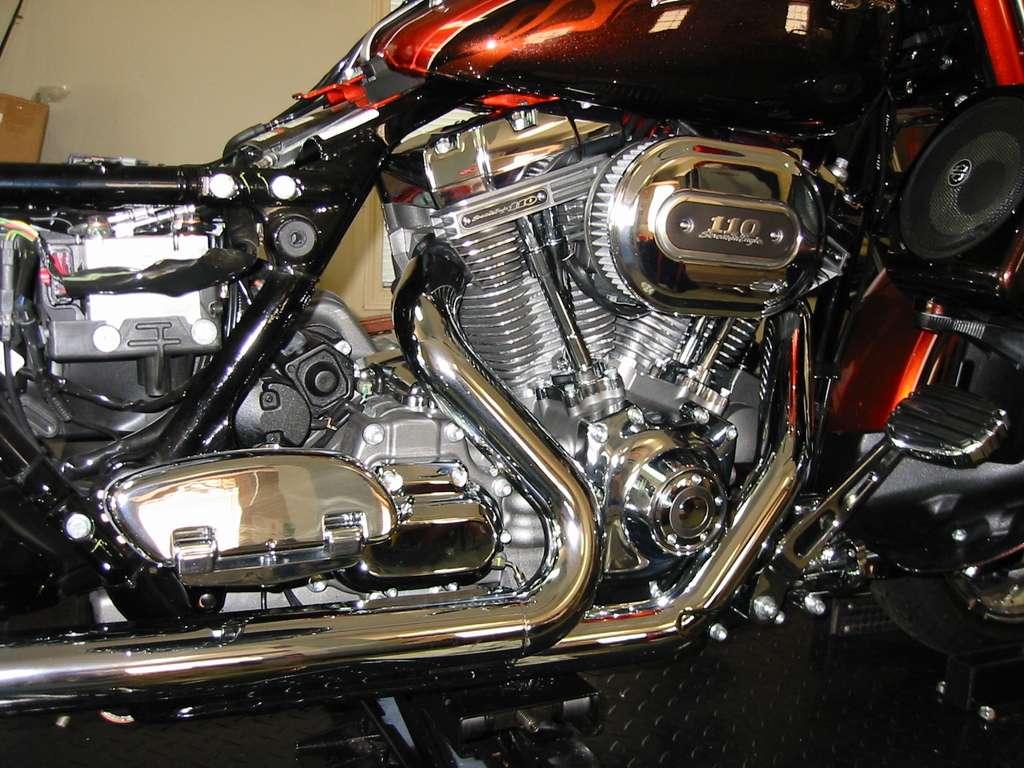
OK, let’s get started. For this project I used a 2012 SE Street Glide with a SE 110 motor. Don’t worry; it is exactly as any other motor. The procedure is the same. Put your new lifters in a plastic cup and soak them in the new quart of oil. This will help pre-load the lifters with motor oil and will shorten the time for them to pump up when the motor starts. Grab several zip lock sandwich bags and a sharpie. When removing parts put them in a bag and label the bag. Trust me, this will save time and the possible loss of that one important screw.
Remove all the exhaust pipe heat shields and the mufflers. Hint: You may have to put a little penetrant on the shield screw clamps so they will remove easily. Mark the pipe muffler clamps for side and direction. There’s nothing worse than to put on a muffler and have the clamp turned in the wrong direction when you are ready to tighten it up. Place all take off parts well away from your work area as they are easy to step on and ruin your day.
Next~~~
Remove the right side floor board. Do this by removing the hinge bolts just under the floor board and removing one Allen head bolt for the rear floor board support. That one Allen head bolt is tough to remove so take your hammer and smack the crap out of your Allen wrench. It will move a little then hit it again until it is loose enough to take out with just the wrench. Put the hinge bolts back on the floor board for safe keeping.
Go ahead at this time and unfasten the spark plug wires and remove the spark plugs.
Next~~~
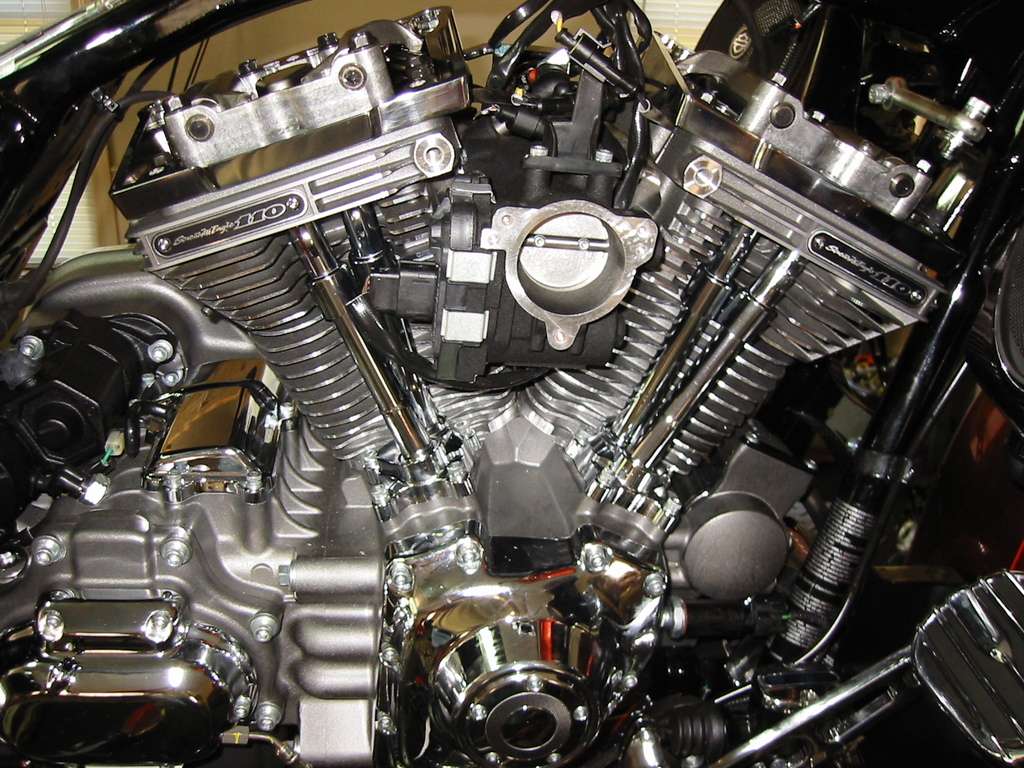
OK, let’s remove that air cleaner. Get your zip lock bag ready, there are a lot of screws.
Next~~~
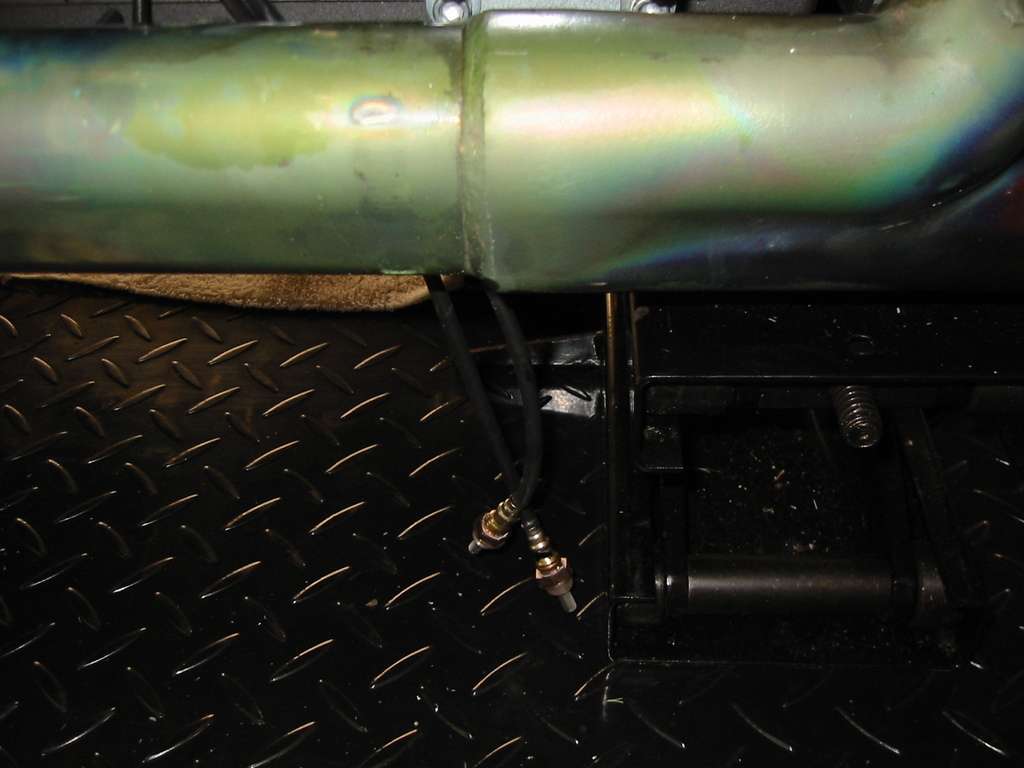
It’s time to remove the head pipe so locate the 02 sensors and mark the top sensor with a sharpie. The top is for the rear cylinder. The other end of the sensor has a black wire connector and the front (bottom sensor) is the white connector under the right hand side cover. Clip the wire tie that holds the sensor wires and any other retaining device so the wires are free. Unscrew them with an open end wrench and remove them very carefully. Move them out of the way.
Next~~~
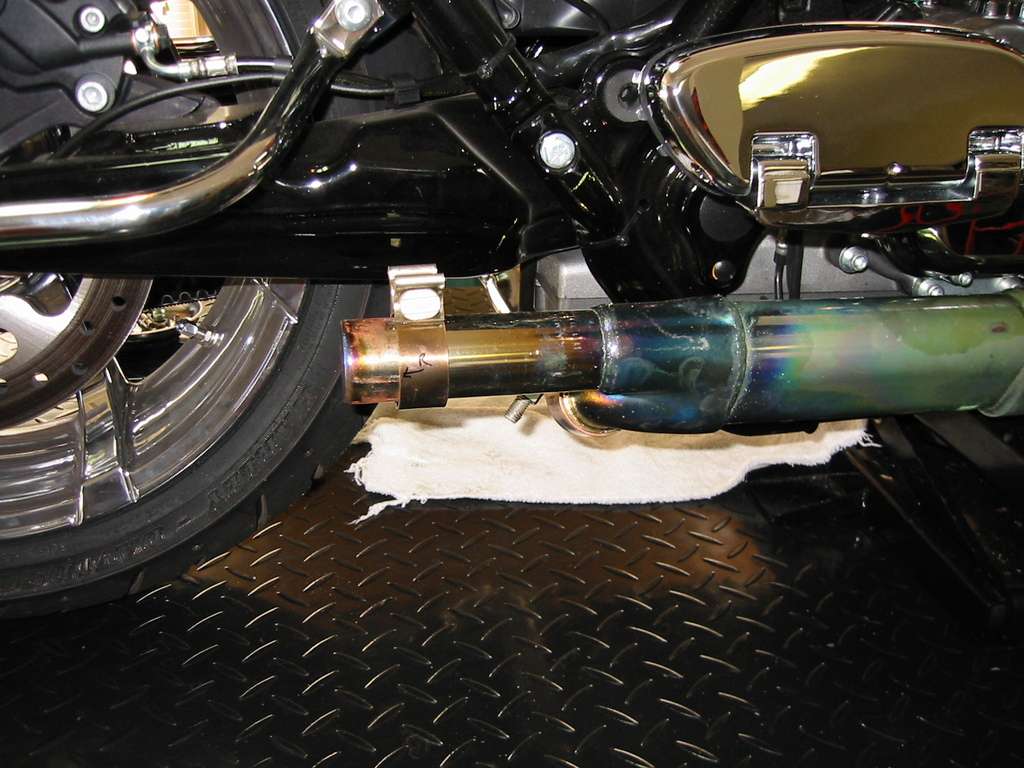
There are two exhaust nuts on each head. Be sure to spray them well with penetrant so they will come loose. They get really hot and will be tough to remove if you don’t do this. Next is the main support bracket bolt just under the transmission side cover. That bolt doesn’t have to come off, just loosen it about 10 turns. The exhaust support bracket is a U channel and will simply slide off the bolt. Unbolt the crossover bracket. The bracket will fall off in your hands. To keep from losing it screw the bracket back on the bike after you pull the pipes off.
If you are going to replace your head pipe then loosen the cross over pipe clamp and pull the cross over pipe off at this time.
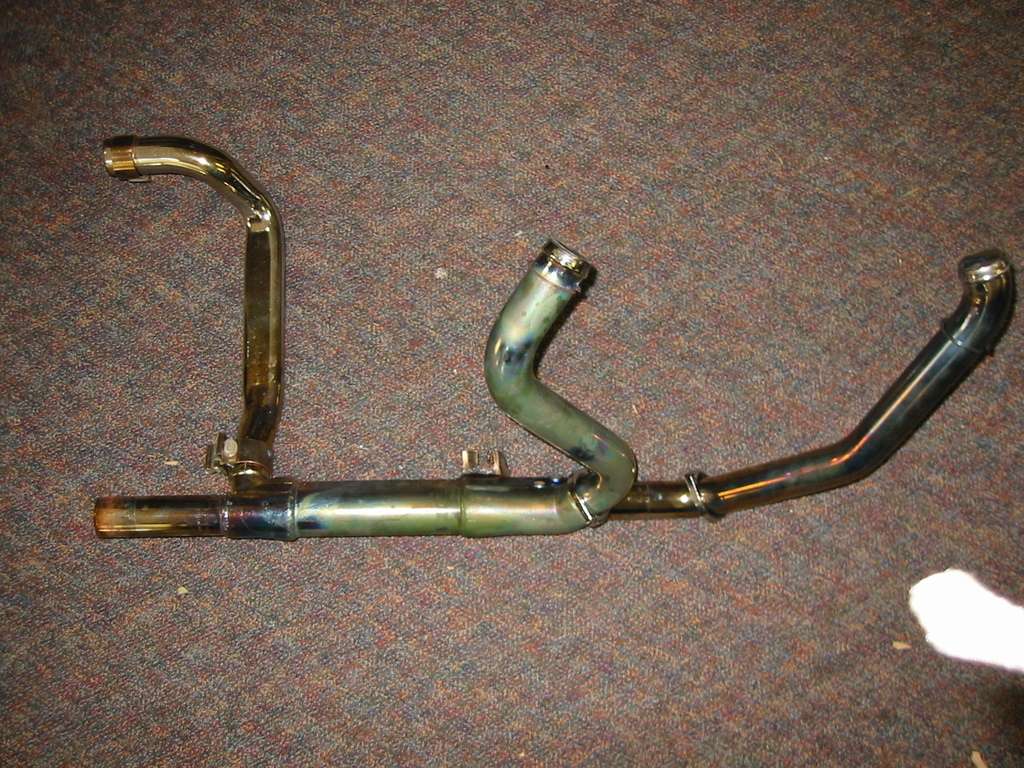

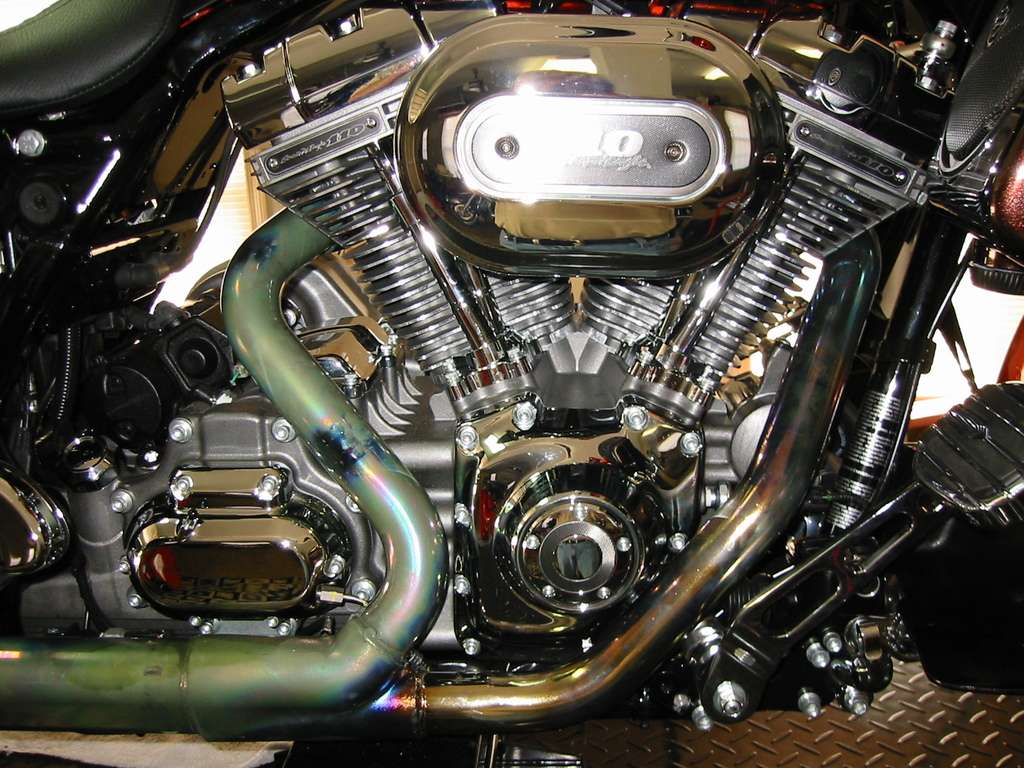
Here’s what she should look like now.
Next~~~
Since we are reusing the stock push rods then it’s time to remove the tank. You do this by removing seat first. On the left side of the gas tank there is a fuel line just to the right of the horn. There s a chrome locking ring. Pull the locking ring down and pull the gas line disconnect off. No gas will come out as this is a quick disconnect feature that shuts off the flow.

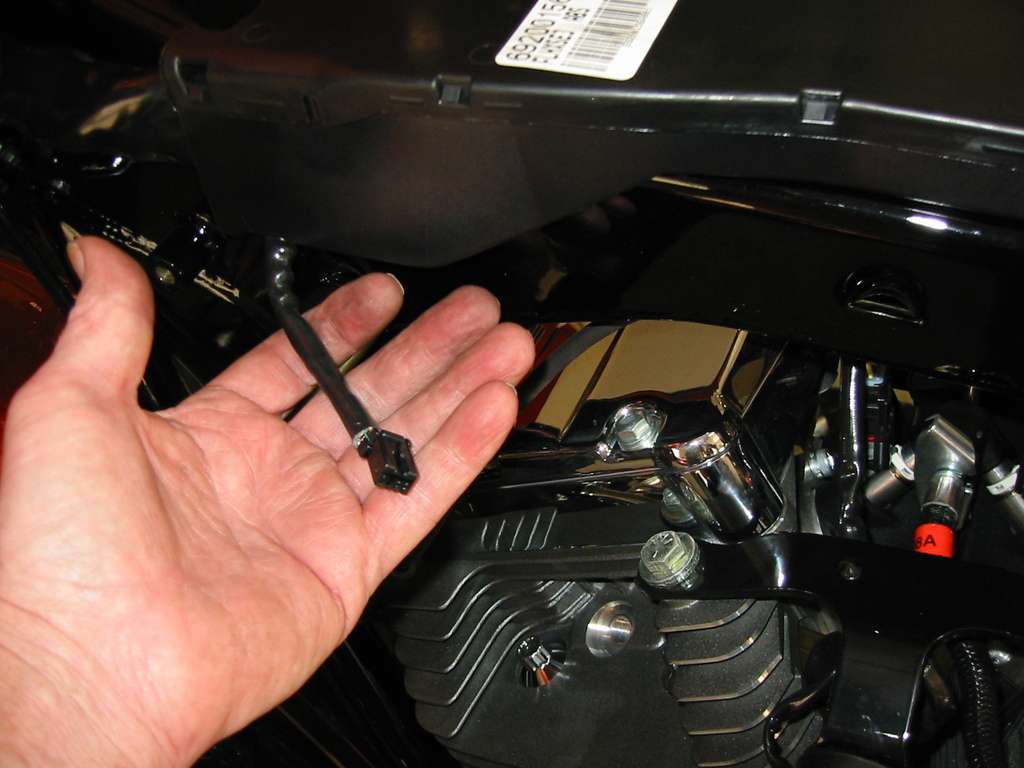
There is a fuel overflow line that will pull apart just behind the tank. Go ahead and separate this line. There is a wire connector coming from under the tank console. Go ahead and unplug that too.

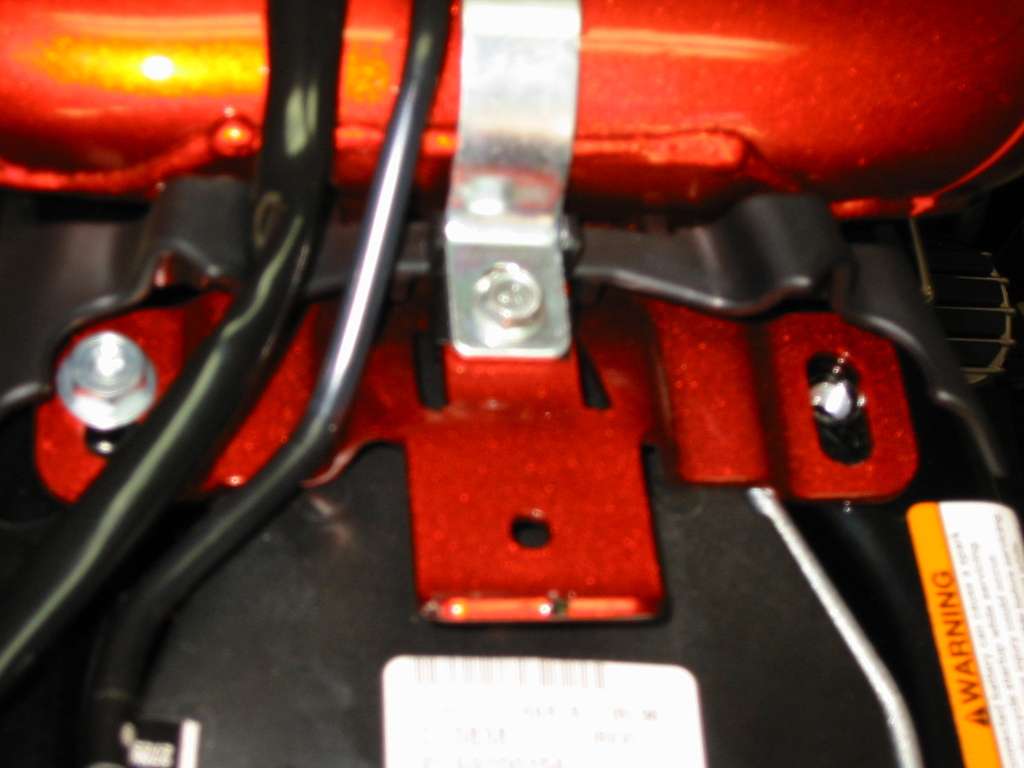
Here are the two tank bolts that must come off. You will see that one is missing in this picture. I didn’t get a shot of the front two bolts. They are under a rubber decorative piece that simply pulls off. The bolt is easily seen then. Go ahead and pull all of these bolts off. Slide the tank back just a bit and you will find another wire connector in the front of the tank. Before you lift the tank off disconnect this small wire connector.
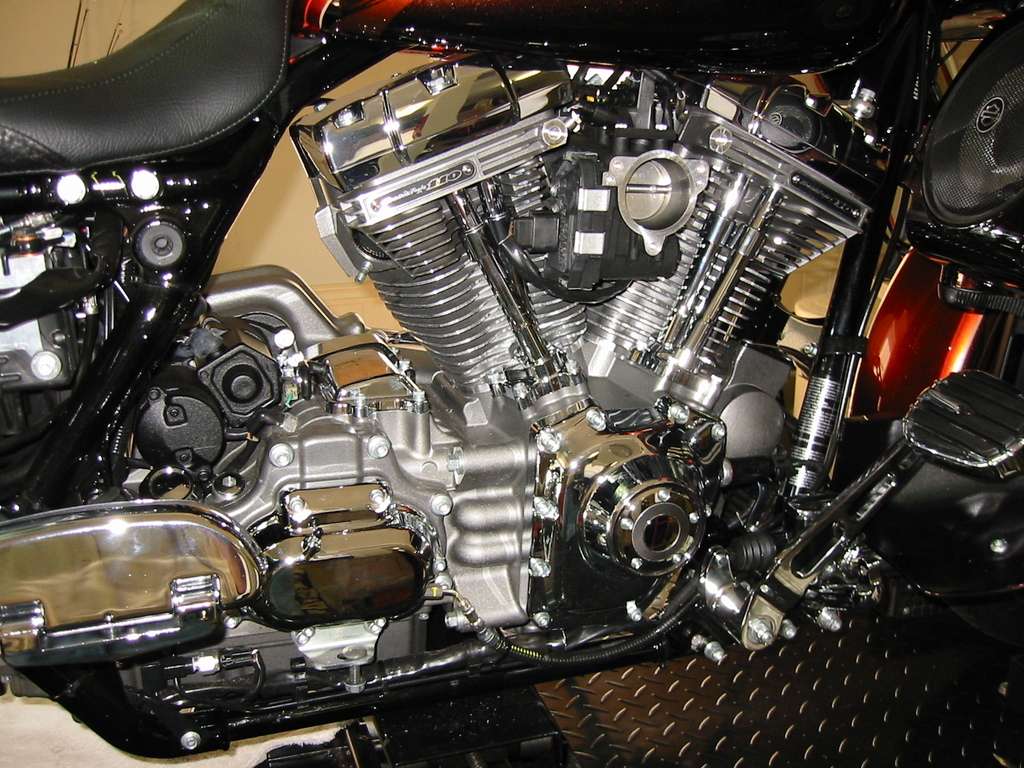
OK. The tank can be a little heavy if it is full of gas. It is also a focal point on your bike. Make sure your hands are clean and lift it back and up. Carefully walk it to your storage area and gently lay it down.
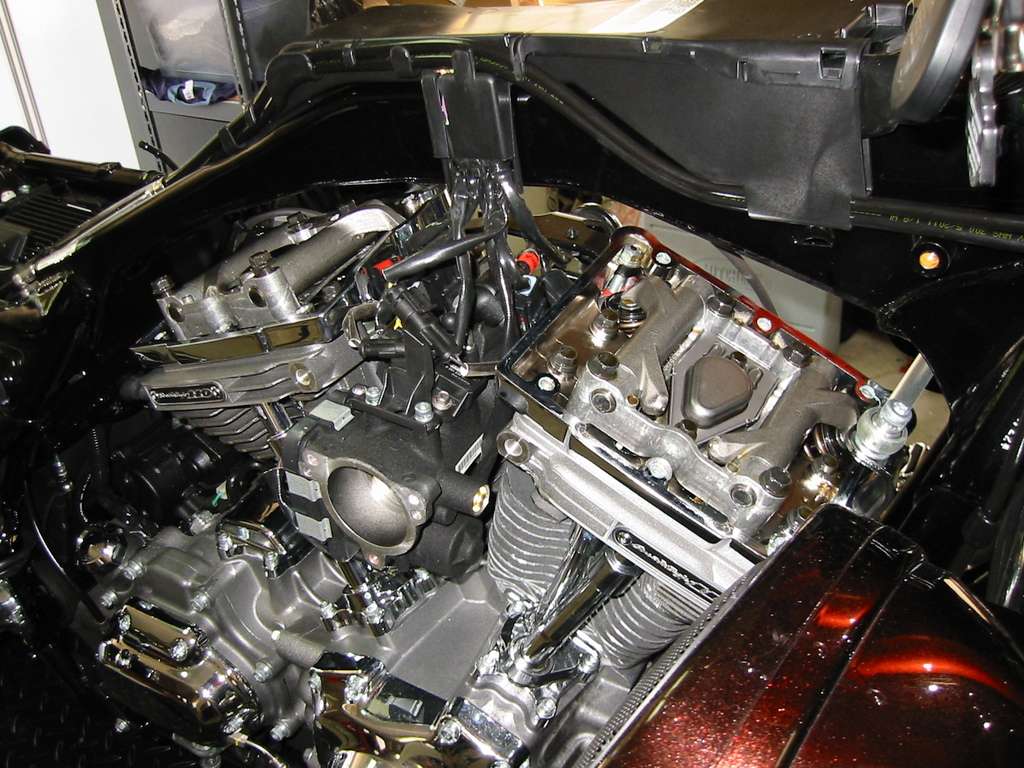
Here is what she looks like now. We are ready to tackle the cam chest.

Next~~~
Time to get nasty…. Start by removing the rocker box covers. Once all six bolts are out you can slide them out from the right hand side of the motor. Save those bolts in a baggie. On top of the head is the cylinder oil breather. There are two bolts that hold it on. Loosen these two bolts first. There is no need to remove the breather so leave it alone. There are four bolts that hold the rockers on. Loosen these bolts a little at a time to slowly raise the rockers. There will be valve spring tension on them and we don’t want to put them in a bind. There is no need to remove the bolts just loosen them all the way out. So now we have a total of six bolts holding down the rocker arms. Do this to the other side now.
Slowly raise the rocker arms up and spin them down so you can pull the push rods out now. Spin them to the outside and under. You will see what I mean when you try this. The rods will be a little slippery but will come right up. The silver rod is the intake rod and the black one is the exhaust rod. They are different lengths so keep this in mind. They must go back in the same place. Black to the outside, silver to the inside. Put them somewhere clean. Put all interior parts you take off in a clean place. You don’t want to get dirt of any kind in your motor when it goes back together.

For those who are curious about what is under the cylinder breather take a look at this next picture. Now leave yours alone. There is a gasket under there and it will break if you lift up the breather. You can also see in the below shot how the rocker arms are turned under so you can get to the push rods.
Next~~~
Time to remove the push rod covers. You will find at the top of each rod a retainer clip. This clip has a tab for a screwdriver. Carefully insert the screwdriver in the tab and turn it counter clockwise. The clips will pop right out. Grab the bottom of the push rod cover and remove each assembly. All four are the same so just put them up and keep them clean.
Take your Allen wrench and remove the eight screws that hold the chrome lifter covers off. There is a gasket under them so watch that you don’t break that gasket. The back four screws are tough to get to. Be careful not to lose control and slip. Caution: The motor fins will cut you like a razor or the wrench could chip or break a fin.
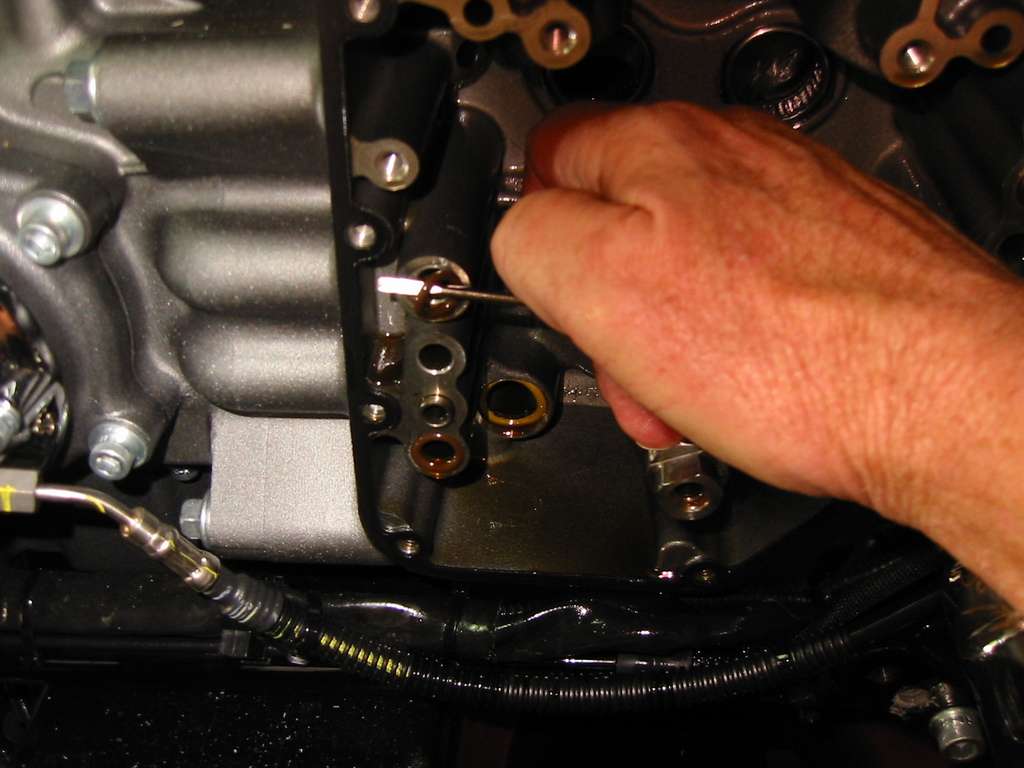
See the brown o-rings? Keep up with them and make sure they don’t come up missing. There are four yellow o-rings just above them in the bottom of the heads. Same deal here. They will stay as long as you don’t mess with them. If they get lost you will need to go see your dealer to replace them. They seal the push rod covers and keep them from leaking oil. No o-ring = one mell of a hess.
Take a small pan and place it under the timing cover. Remove all Allen bolts. Sometimes the cover will stick to the gasket. You can use a rubber hammer to smack the cover a few times. Do not try to pry it loose or you will damage the cover. Hit the heck out of it and it will pop off. There will be about 10 ounces of motor oil come out. The pan will catch it. Isn’t this fun?? Whoooo Hooooooo.

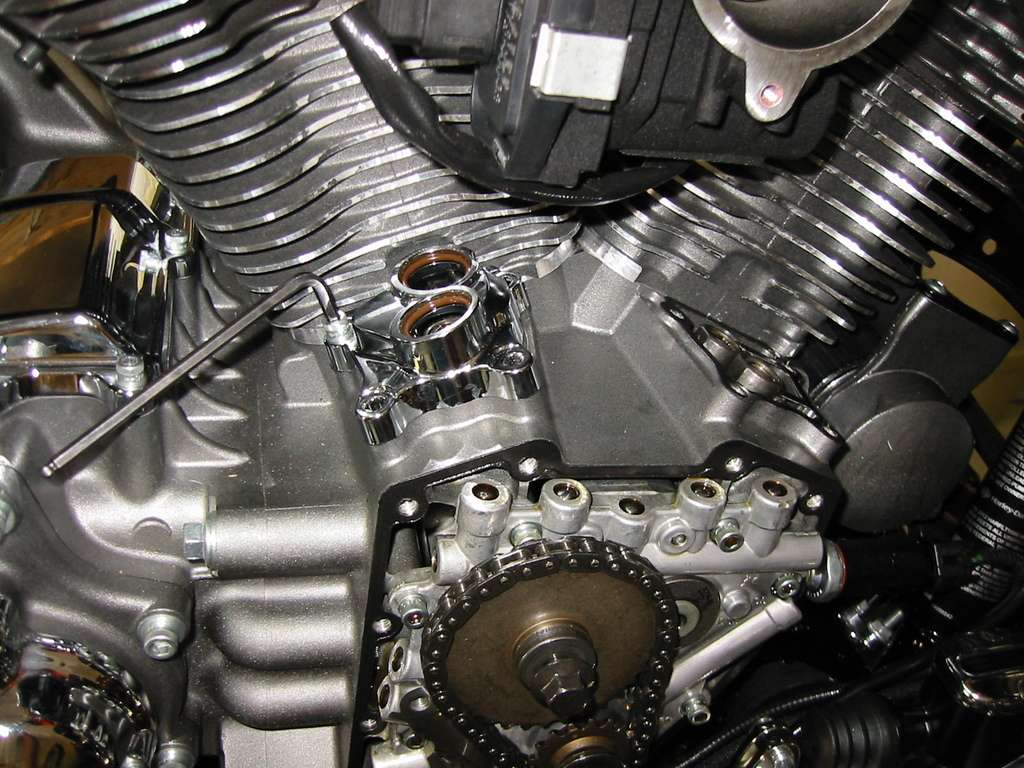
Time to get serious now. Put the bike in neutral. Take a socket wrench and turn the bottom gear bolt until you line up the two dots just like you see in this picture. If you don’t do this then you may put the motor cams and timing 180* off as the top larger cam gear turns once for every two times the smaller crank gear will turn. Line up those dots.
Next~~~
Next picture is what the cam plate looks like with the gears, chain and the chain tensioner removed. Put the bike in first gear. Some say you need a gear locking device to loosen the two gear bolts. I’ve never found this to be true but if you want one then order one when you get the bearing too. They are inexpensive. Take your socket wrench and simply give it a good sharp pop to break loose each gear bolt. Yes, the chain will move just a little but not to worry. The chain is still connected so both will move. We will line the dots up again later.
OK, so now we have a clean look at the cam plate. Do you see the lock ring on the right hand cam? Good, grab a pair of ring pliers and remove it. There is a spacer washer on both cams, remove the spacer and remember which one went where. Put the lock ring with the right spacer washer.
Now it is time to remove the Allen head bolts that hold the cam plate to the motor case. First, do you see the four Allen heads that surround the bottom shaft? Good, they hold the oil pump on the cam plate. Leave them alone. We want the oil pump to come off with the cam plate. There is no need to remove it and risk putting the pump guts back in out of order or allow dirt in.
Go ahead and remove the other six Allen head bolts at this time. Two on the top and two on each side. Again, leave the four bolts that surround the bottom shaft alone.
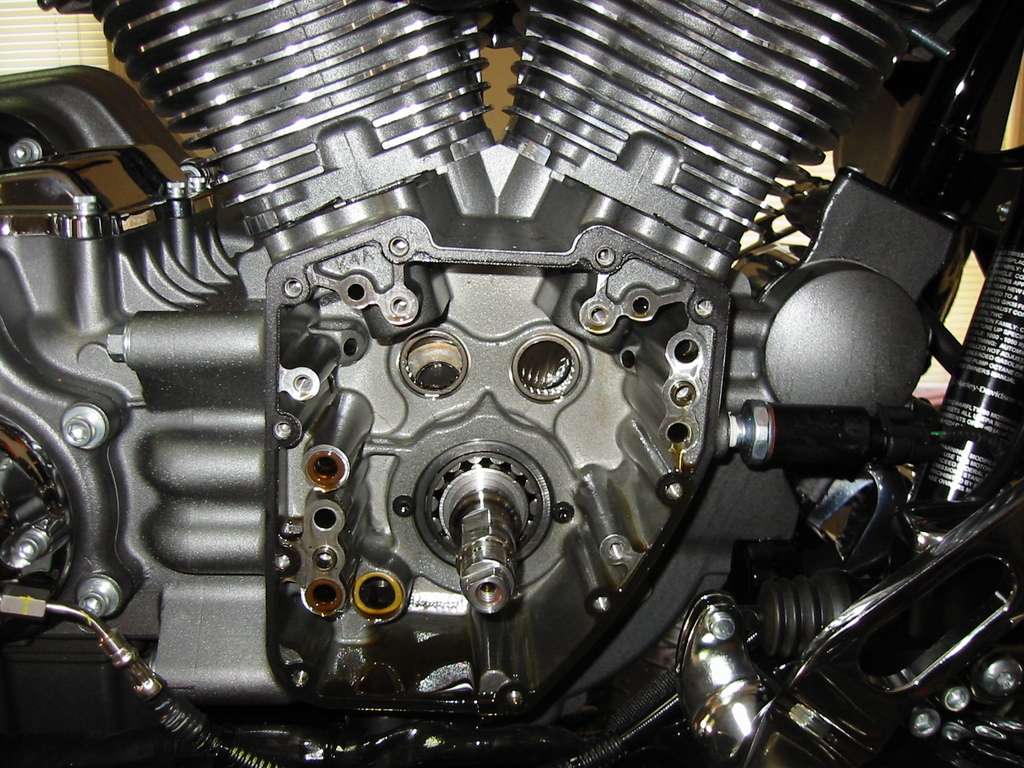
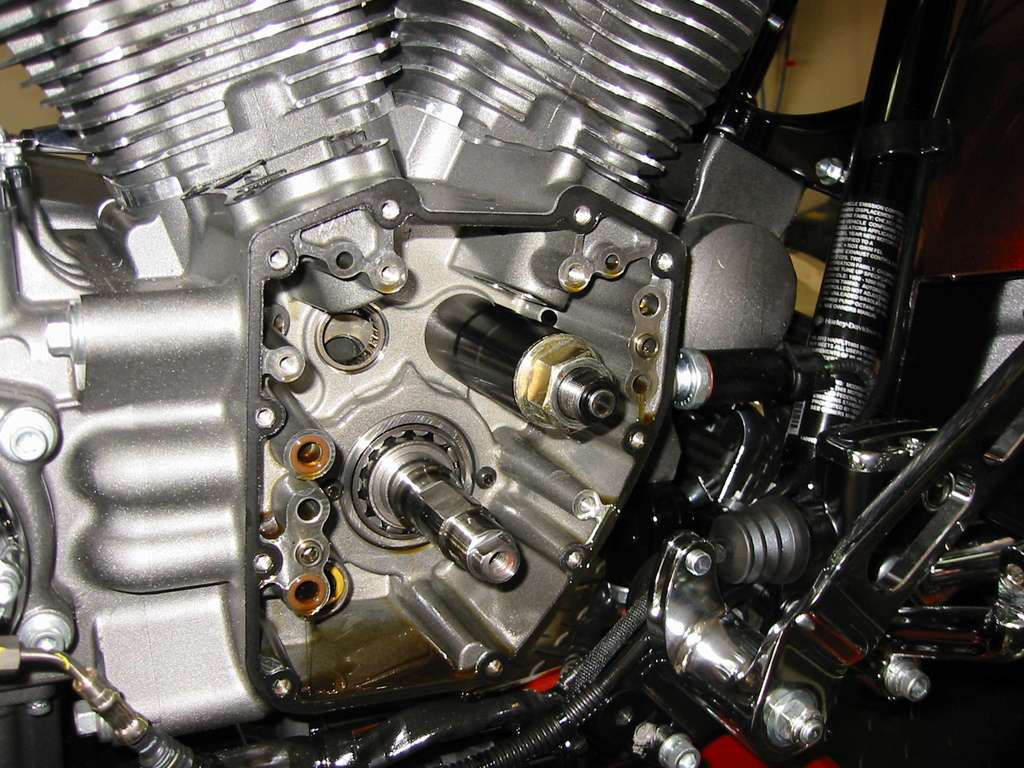
OK, this is what the cam plate looks like after you slide it off the crank shaft. If it will not come off easily then use a wedge or a light weight crowbar (flat wonder-bar) to gently nudge it towards you. You can do this with a screwdriver too just be very careful with this as it takes a light touch but will come out and slide to you I promise.
See that the oil pump is still attached.
Next is to remove the chain tensioner and slide the cams off the cam plate.
Next~~~
It’s time to install your new cams. Are you ready? Did you clean the new cams? No? Then let’s do that now…. I’ll wait until you return. You must get the industrial grease/wax from the new cams. You can use some lawnmower gas or brake cleaner and it will melt right off. Clean them good we don’t want any of this material or dirt on the cams. OK, good you are back… it’s time to have some more fun.
Remove the small chain from your old cams. It’s a puzzle but if you put the gear teeth from one cam under the gear teeth on the other cam you can pull the chain right off. Now comes the interesting part. Install the chain on your new cams and you must align the dots on each cam to look like the picture below. Sorry about the fuzzy image. Oh my, you are a few teeth off? That’s OK, pick up the chain from the gear teeth on one cam and walk the chain in the opposite direction you need the dot to go. Keep doing this until these two dots align.
Got the cams aligned now? Great job.
Let’s get the tube of engine lube and spread some around the cam plate cam holes and on the outer journals of the cam. You don’t have to use much but we need some lubrication as not to score the aluminum cam plate when we install the cams and when waiting on the oil pressure to come up after starting.
Once the cams are back in the cam plate pick up the entire assembly and turn it over. Look again to see if the dots on the cam are aligned. Yes, they are? OK, then lay the assembly back down and put the tensioner back on. You simply start one screw then use your thumb to press tension on the chain which will align up the other screw hole. Remember this technique as there is one more on the cam plate that you will do the exact thing to.
Now the cam plate will look just like this picture below. Now when you pick up the assembly you will need to hold the cams and plate or they just may come apart. It’s tough to do and the tensioner will hold the cams in the cam plate but I’ve seen them hit the floor before.
Do you remember those inner cam bearings you bought? Time to pull the old ones and install the new. So let’s get started.
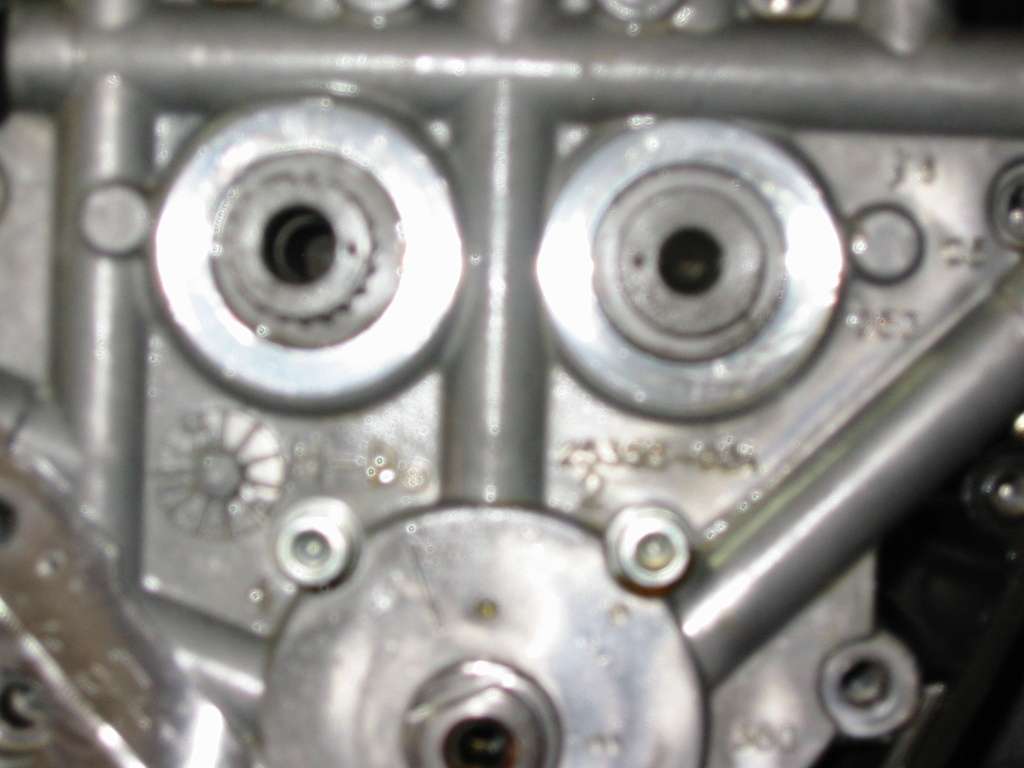
Look at the below picture. Do you see the bearings sitting side by side? It looks like two big eyes looking at you and the main shaft is sticking its tongue out at you. That’s where the inner cam journals ride and spin so we want the best bearing to protect the motor. The HD stock bearings are not so good. Let’s put in a better one.
Here is what the tool looks like. The next picture is what the tool looks like when you have it installed and ready to pull the bearing.
The bearing tool must be inserted into the center of the bearing and the tool flush with the motor case. Run the large nut finger tight then take the spreading rod and tap it in when it is seated you will hear a change in tone as it taps the inside motor, stop there. Take two wrenches, hold the threaded shaft and tighten the large nut. As it tightens it will back out the old bearing. It will soon become loose and you can pull it out with your hand. Do not let the bearing tool fall on the crank shaft. Do this to the other side now and pull the other bearing.
Now the bearings are out and you need to use your insert tool to press the new bearings back in. Take your engine lube and pack the inner part of the roller bearings. Do this liberally. There is really no such thing as too much inside those needle bearings.
Note: Install the new bearings with the writing on the bearing to the outside of the motor. You should be able to read the numbers on the bearing after you install them. Why? Because the number side has a square shoulder and the other side is tapered a bit so they will slide in.
Take the engine lube and coat the bearing hole so the new bearings will slide in easily. Take the insert tool and place the bearing on the end, making sure the writing on the bearing is showing. Slip the bearing into the hole as far as you can, that won’t be much. You can take your spread rod from your puller and use it to tap the bearings into place. Make sure the bearings are straight when going in. Use light taps with a hammer. They will go in nice and smooth. When they reach the proper depth the tone will change letting you know that is as far as it will go.
Remove the insert tool. Take your finger and make sure the bearing is recessed into the case just a little.
Scary wasn’t it? It’s supposed to be. Always use caution and double check everything and your motor modifications will be right the first time with no damage.

It’s time to install the cams and cam plate. But first we need to replace those pesky oil pump o-rings. Use a small screwdriver and pull them out. To hold the new ones back in you can dab them in oil or use a little engine lube on them. The oil will make them stick into place while you are aligning the cam plate. See below. Pull the two small brown ones and the larger yellow one and replace with new. Caution: Don’t try to skip this step. If the old oil o-rings leak then your oil pressure will suffer…. Uhhh, not good.
Next~~~
Next we will use our engine lube again. Spread some on all the cam lobes. We don’t want friction to be our enemy.
Next is to slide the cam plate back into the engine case. Start by aligning the crank shaft through the oil pump and carefully align the cam rear journals back into the bearings. This is easier than it sounds. When it lines up just right it will slide all the way in. Once this is done go ahead and install your six Allen screw bolts and tighten everything up.
Take a look at the end of the cams facing you. You should see two dots, one on each cam. Turn the cams until the dots are lined up next to each other in between the cams. See pic below
For those of you that will say… Hey, where are your spacers and snap ring? This is an old picture but shows the cam dots where they need to be.
Now that your cams are aligned and ready to go… Remember the cam gears, timing chain and tensioner? Remember how we lined up the two dots on the large and small gear? We need to put them back on now. Put the chain around both gears and align the dots. Slip the gears over the two shafts.
Are the dots aligned? No? Ok then, that’s alright, it happens. Simply put the gears on where they line up on the shaft the best and keep the dots as close together as you can. Once the gears are on you can move the gears (with the motor in neutral) by putting the small bolt back into the small gear and use a socket wrench to spin the gears back into alignment. See the picture below. Once they are lined up properly go ahead and install the timing chain tensioner.
Hint: The timing gear dots should be very close during the re-installation. If they are not then you haven’t aligned your cam dots properly. If the cam dots are properly aligned you may look at the above picture. Do you see the slot in the crank shaft? It should point to this same position. Then the timing gears dots will be very close without the motor being 180* off. If you haven’t moved the crank shaft then there will be no issues. If you did then you MUST realign the crank to accept the proper dot location with the shaft slot pointing this way and the cam dots facing each other. DO NOT PUT IT BACK TOGETHER UNLESS IT IS SO!
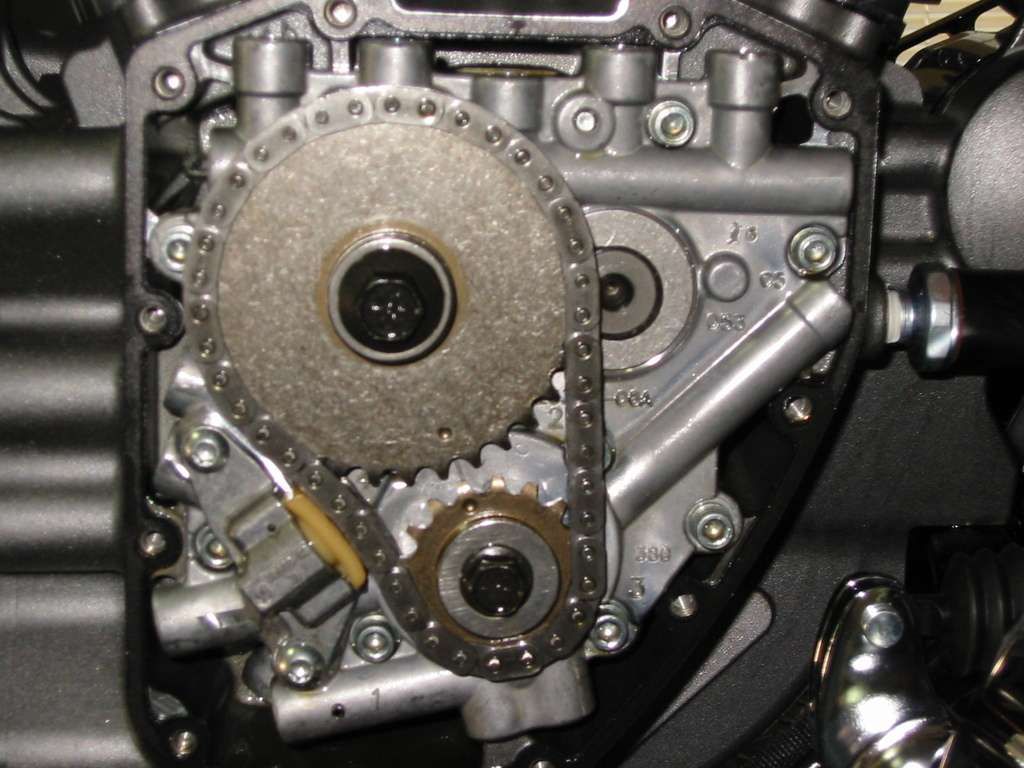
The below shot is the timing gears, chain, tortioner installed and the dots aligned properly. At this point, take your timing cover in hand, clean the gasket and install the cover. Tighten all the Allen bolts in a star pattern.
Whewww… the first time is always the hardest but you’ve done a fantastic job so far. Let’s get the rest done so we can go riding.
The rest of this will go fast so grab your wrenches and a clean towel, pull down your hat and let’s get started.
Remember your new lifters? It’s time to drain the cup back into the oil bottle and install the new lifters now. They will only go one way. The roller goes down and sits on the cam lobe. Go ahead and get that done. Remember the retaining bar for each set of lifters? It’s time to install that now. Each lifter has a flat spot on the side. As a matter of fact each lifter has two flat spots. This is to tell you the direction of the roller. The lifter retaining bar uses these flat spots to hold the lifters in place. See how nicely the retaining bar sits just next to the lifters? It’s time to go clean the oil off your hands and take a short break. Smok’m if you got’m…

Next~~~
Lifter covers, where are they? Clean them off real well and grab your eight Allen head bolts. Remember what we had to do removing them? Yes, the four rear bolts are the toughest. Let’s get them started but not tight. Now put in the other four and tighten them all down. You should be ready for your push rod covers now.
Each of the four push rod covers is identical. Start with the back push rod cover. Doesn’t matter which cylinder but you can’t put the back in with the front push rod cover in place. Make sure the brown and yellow o-rings are in place as we spoke about when removing them. The brown o-ring is on the bottom and yellow o-ring at the top just under the head. Caution: If these o-rings are not there then your motor will leak oil when running. Make sure all these o-rings are in place.
It’s time for the push rods now. Remember the black rods are the exhaust, they go on the outside and the silver rods go to the inside. Go ahead and clean them and slide them down from the top of the heads and into the center of the lifters. You will feel them slip into the lifters so raise them up and down to get the feel of it. You don’t want them sitting on a lifter shoulder so lift up the push rod cover and make sure they are sitting down inside the lifter.
Hint: Do this for the rear push rods first then read the next paragraph. Then do the front push rods and covers. If not you will find it next to impossible to install the rear push rod clips.
There are four retainer clips. These clips are going to be difficult to put back in. They are chrome pieces of metal that look like a piece of pipe cut long ways. This clip forces down on a spring inside the push rod cover and holds the o-ring seals down. If you purchased your installation tool then use that and they will go right in. If you didn’t purchase the installation tool then use the flat end of a large screwdriver to push down on the push rod cover spring while putting the top end of the clip in first. You will use screwdriver as a ramp to slide them into place with your thumb. This is probably the hardest thing to do during this job. Caution: Be careful that you don’t slip and cut yourself or break a cooling fin on the jug. It will go back together but you must have patience here.
It’s time to focus on the heads now. Let’s put the rocker arm bolts back in now and tighten them up. Don’t forget the two bolts for the little breather covers too.
Here is what everything will look like to this point.
Grab your rocker box covers and clean off the gaskets then install the six bolts for each of them. The shorter bolts go on the left hand side of the rocker covers. Snug them up well.
Are you ready to install the tank? Yeah, me too… Clean your hands and pick up the tank. Reverse your removal notes and tighten all the bolts. Put your front rubber cups back over the front frame bolts and reconnect your gas line.
Spark plugs are next followed by putting on the plug wires.
If you are going to install a new aftermarket head pipe then now is the time. If not, grab your pipes and reinstall them. Before you tighten up everything be sure to install your 02 sensors. Remember you marked the top sensor with a sharpie so that one goes in last. Put the bottom (front sensor) in first. Use a little anti-seize on the threads being very careful not to get any on the sensor tip or it could damage the sensor. Run the sensor wires under the exhaust bracket located just under the tranny side cover. Clip them back in and install wire ties to hold them down.

Once you install your sensors you can tighten up the head pipe. Tighten up the head bolts first but just a little snug then install the cross over pipe and bracket. Go back to the heads and snug them up but not enough to break the stud. The gasket underneath will give a little but it’s not meant to be torqued down so tight it crushes the gasket so go easy but not so easy they aren’t tight. Now, tighten the main bracket bolt under the tranny cover and snug it up good.
Hint: you don’t want your head pipe in a bind so work it back and forth making sure it settles in well. If it is in a bind there will be floorboard vibrations until you get the pipe adjusted properly. So take your time here and do it the right way the first time.
Grab your mufflers and install them. Remember that you marked your clamps so you will know which way they go. If they are turned around so the clamp nut is awkward to tighten then you may want to pull the mufflers back off and turn them around. Be sure to measure how far they come out the back. They should be even. You don’t want one pipe sticking out further than the other.
Heat Shields! They go on in order. Put your front shield on then your back shield. If you have muffler shields then put them on next. The last shield that goes on is the collector shield. This is the hardest one to get right as it must go over and line up to all the others. Caution: Tighten these screw clamps with care. If you tighten them up too tight the clamp spot welds will indent the heat shield so be very careful here.
Air cleaner time. Grab all those screws and reinstall your air cleaner. Make sure it is straight and level.
We still have a few more things to install and we’ll be done.
Retrieve your floorboard and reinstall the rear support now. Put your floorboard hinge bolts and tighten them up. Not too snug though you want your floorboard to be tight but not so it won’t hinge up.

The last thing is the seat and you’re all done. Great Job!
Are you ready for the end results? It’s about time to crank it up so let’s talk about what to expect. When you install new lifters it will take time for them to fill with oil. This will sound like all heck is breaking loose. Here is what to do. Crank it up, let it idle and sound like a box of rocks for about 30 seconds then turn it off. There will be enough oil pressure built up to fill the lifters. Crank the bike again and it should not be so loud and start to calm down to a single tick. This won’t take long, maybe another minute or so. Shut down the bike. Crank the bike again and let it continue to idle for a few minutes. The penetrant will start to smoke off the motor, that’s fine, let it smoke.
Rev the motor up just a little, the warmer the oil the better the lifters will pump up and this single tick will go away. Shut down the bike and let it cool. Crank the bike again and the single tick will return but only for a few seconds. That will be the last time you hear it. Warm up the bike again and turn it off, time to check the oil level.
For those who have a tuning device it’s Tune Time! For those who have no tuning device…. It’s Buy A Tuner and Tune Time! You will need to reset your VE tables so the ECM will know how the motor breaths with the new cams. Once this is done hold on real tight, you’re going to love it!!
Wiz-out
OK... You guys know I try to please so here it is. It hasn't changed and I hope this easy to follow guide helps.
Changing Cams in a 2007 and up Harley
This project has approximately 5800 words and there will be areas where you will need to read between the lines to get some things done but the more I detail the more difficult this exercise will read. If you see a Hint or a Caution then please pay special attention as there is a good reason I put it in. There will be some of you that will see things that I left out and others may learn new ways but regardless this is the easiest way that I know how to change cams in a new style Harley. Pictures: I know they are small. You can blow them up. Right click on any picture and save a copy to your desktop. Open it from your desktop and magnify it. They are of fair quality but will show good detail if you drill down into the picture.
Now for the disclaimer... I've done this many times. Maybe you would like to learn; maybe you just want to see how it's done. It's all good. But, here it comes... Neither I nor this site or anyone else is not responsible if you mess up. It's your dollar.
Now that is out of the way.... I hope you enjoy!
The following information is for those who want to change their cams in their 2007 and up Twin Cam Harley Davidson motor but have doubt they can. This is a fairly straight forward event for someone that has simple mechanical skills and a little time on their hands. Can you do it? Yes you can if you are willing to get a little dirty and want to say Yes, I did.
Shops that work on our beloved Harley’s can charge as much as 8 hours at their going rate for labor (enter labor per hour cost here) plus materials and shop costs. You can do this labor free and save yourself a bundle of George Washington’s.
The first step to take is to convince yourself that you can do this. Everyone had to start somewhere and when you dive in you too will see this is a little easier than you may think. Simply follow the correct process of removing the cams and reverse your steps. That’s all there is to it.
Parts gathering is key so do the research of finding the just the right cam for you and a good quiet set of new lifters. The most popular cams as I type may be the Woods 555, Andrews 54H or the S&S 510. Putting these style cams into a Harley touring bike will give you better low end Torque and a bit more Horse Power, imperative when riding a heavy bike with a 103 or larger motor. For those who have a 96” motor I would suggest my favorite cam the Andrews 26H which you can feel come into play as low as 1800 RPM’s and retain the mass moving Torque up to 4800 RPM’s. UPDATE: The TTS100 cams come in as low as 1500 seem to be the best combination of low end grunt all the way to 5000 RPM. As of now this is my favorite cam for the TG
Hint: Do your homework; pick the right cam for you, your bike and your motor build. Matching your motor components is essential to a good motor that gives you gratification and long life.
Good lifters are not the Harley basic stock set. The two best and most quiet, as I type, are the Woods Bi-Directional or the Head Quarters Black Ops Lifters. They are drop in lifers with no modifications on your part. To me it doesn’t matter if you have 500 or 500,000 miles on your bike… replace the lifters when you replace the cams!
Do you need adjustable push rods? Nope, you can reuse your factory push rods but you must remove your tank and open the rocker box covers. This actually is very easy to do and saves you loads of time plus no pinched or cut fingers or guess work to adjust the rods. If you really want to use adjustable rods you can and it is suggested you use adjustable rods with all Woods cams as the inner cam center circle is about 20 thousandths smaller so you will need to adjust that out or you could get lifter tapping valve noise. (Yes, I know there are those who used stock rods with a Woods cam but I’ll bet you used the Woods or HQ lifters didn’t ya??)
You will need a quart of your favorite oil, the three o-ring seals for the oil pump, a tube of engine assembly lubricant, a tube of high temp anti-seize and a set of high quality inner cam bearings. If you have more than 10,000 miles on your motor it will be best to pick up a replacement set of cam chain torsion shoes as they are a wearable item and will need to be changed from time to time. You don’t need to purchase any cover seals as you can reuse them with no issues of oil leaking.
Hint: Harley uses Hi-Temp thread locker. Pick up a tube and use it in the same places where you see white on the end of the removed bolt. If you want to use another thread locker then I recommend Locktite #222. It holds well but not so stiff you can’t remove the bolts after it dries or gets hot.
Special Tools. This is an expense but really not bad. Weigh the cost of the dealership labor compared to the little money for the right tool. The most important tools that you will need are the inner cam bearing removal and installation tools. If you really like to fill your tool box then go HERE
You will need the 320640 and the 320652. You can also get your inner bearings here too 910004. Unless you have very strong fingers and need assistance with reinstalling your push rod retaining clips then I suggest you pick up this great little tool 340050. The bearing removal tool can be rented from your local auto parts store if you decide you want to save a little cash.
The bearings must be installed with the installer tool as it will recess the bearings to their proper depth. Driving them in with a socket and a hammer is not going to do the job and may damage your inner motor case so get the tool. Also think about selling these tools when you are done to retrieve some of your costs. Have a friend that has a set, ask to borrow them.
Hint: Find a well lit area, clean of debris and uncluttered. If you have a lift table then you’re all set. If you will be doing this on a concrete floor then you will be on your knees for a long time. Good knee pads will help a lot.
OK, let’s get started. For this project I used a 2012 SE Street Glide with a SE 110 motor. Don’t worry; it is exactly as any other motor. The procedure is the same. Put your new lifters in a plastic cup and soak them in the new quart of oil. This will help pre-load the lifters with motor oil and will shorten the time for them to pump up when the motor starts. Grab several zip lock sandwich bags and a sharpie. When removing parts put them in a bag and label the bag. Trust me, this will save time and the possible loss of that one important screw.
Remove all the exhaust pipe heat shields and the mufflers. Hint: You may have to put a little penetrant on the shield screw clamps so they will remove easily. Mark the pipe muffler clamps for side and direction. There’s nothing worse than to put on a muffler and have the clamp turned in the wrong direction when you are ready to tighten it up. Place all take off parts well away from your work area as they are easy to step on and ruin your day.
Next~~~
Remove the right side floor board. Do this by removing the hinge bolts just under the floor board and removing one Allen head bolt for the rear floor board support. That one Allen head bolt is tough to remove so take your hammer and smack the crap out of your Allen wrench. It will move a little then hit it again until it is loose enough to take out with just the wrench. Put the hinge bolts back on the floor board for safe keeping.
Go ahead at this time and unfasten the spark plug wires and remove the spark plugs.
Next~~~
OK, let’s remove that air cleaner. Get your zip lock bag ready, there are a lot of screws.
Next~~~
It’s time to remove the head pipe so locate the 02 sensors and mark the top sensor with a sharpie. The top is for the rear cylinder. The other end of the sensor has a black wire connector and the front (bottom sensor) is the white connector under the right hand side cover. Clip the wire tie that holds the sensor wires and any other retaining device so the wires are free. Unscrew them with an open end wrench and remove them very carefully. Move them out of the way.
Next~~~
There are two exhaust nuts on each head. Be sure to spray them well with penetrant so they will come loose. They get really hot and will be tough to remove if you don’t do this. Next is the main support bracket bolt just under the transmission side cover. That bolt doesn’t have to come off, just loosen it about 10 turns. The exhaust support bracket is a U channel and will simply slide off the bolt. Unbolt the crossover bracket. The bracket will fall off in your hands. To keep from losing it screw the bracket back on the bike after you pull the pipes off.
If you are going to replace your head pipe then loosen the cross over pipe clamp and pull the cross over pipe off at this time.
Here’s what she should look like now.
Next~~~
Since we are reusing the stock push rods then it’s time to remove the tank. You do this by removing seat first. On the left side of the gas tank there is a fuel line just to the right of the horn. There s a chrome locking ring. Pull the locking ring down and pull the gas line disconnect off. No gas will come out as this is a quick disconnect feature that shuts off the flow.
There is a fuel overflow line that will pull apart just behind the tank. Go ahead and separate this line. There is a wire connector coming from under the tank console. Go ahead and unplug that too.
Here are the two tank bolts that must come off. You will see that one is missing in this picture. I didn’t get a shot of the front two bolts. They are under a rubber decorative piece that simply pulls off. The bolt is easily seen then. Go ahead and pull all of these bolts off. Slide the tank back just a bit and you will find another wire connector in the front of the tank. Before you lift the tank off disconnect this small wire connector.
OK. The tank can be a little heavy if it is full of gas. It is also a focal point on your bike. Make sure your hands are clean and lift it back and up. Carefully walk it to your storage area and gently lay it down.
Here is what she looks like now. We are ready to tackle the cam chest.
Next~~~
Time to get nasty…. Start by removing the rocker box covers. Once all six bolts are out you can slide them out from the right hand side of the motor. Save those bolts in a baggie. On top of the head is the cylinder oil breather. There are two bolts that hold it on. Loosen these two bolts first. There is no need to remove the breather so leave it alone. There are four bolts that hold the rockers on. Loosen these bolts a little at a time to slowly raise the rockers. There will be valve spring tension on them and we don’t want to put them in a bind. There is no need to remove the bolts just loosen them all the way out. So now we have a total of six bolts holding down the rocker arms. Do this to the other side now.
Slowly raise the rocker arms up and spin them down so you can pull the push rods out now. Spin them to the outside and under. You will see what I mean when you try this. The rods will be a little slippery but will come right up. The silver rod is the intake rod and the black one is the exhaust rod. They are different lengths so keep this in mind. They must go back in the same place. Black to the outside, silver to the inside. Put them somewhere clean. Put all interior parts you take off in a clean place. You don’t want to get dirt of any kind in your motor when it goes back together.
For those who are curious about what is under the cylinder breather take a look at this next picture. Now leave yours alone. There is a gasket under there and it will break if you lift up the breather. You can also see in the below shot how the rocker arms are turned under so you can get to the push rods.
Next~~~
Time to remove the push rod covers. You will find at the top of each rod a retainer clip. This clip has a tab for a screwdriver. Carefully insert the screwdriver in the tab and turn it counter clockwise. The clips will pop right out. Grab the bottom of the push rod cover and remove each assembly. All four are the same so just put them up and keep them clean.
Take your Allen wrench and remove the eight screws that hold the chrome lifter covers off. There is a gasket under them so watch that you don’t break that gasket. The back four screws are tough to get to. Be careful not to lose control and slip. Caution: The motor fins will cut you like a razor or the wrench could chip or break a fin.
See the brown o-rings? Keep up with them and make sure they don’t come up missing. There are four yellow o-rings just above them in the bottom of the heads. Same deal here. They will stay as long as you don’t mess with them. If they get lost you will need to go see your dealer to replace them. They seal the push rod covers and keep them from leaking oil. No o-ring = one mell of a hess.
Take a small pan and place it under the timing cover. Remove all Allen bolts. Sometimes the cover will stick to the gasket. You can use a rubber hammer to smack the cover a few times. Do not try to pry it loose or you will damage the cover. Hit the heck out of it and it will pop off. There will be about 10 ounces of motor oil come out. The pan will catch it. Isn’t this fun?? Whoooo Hooooooo.
Time to get serious now. Put the bike in neutral. Take a socket wrench and turn the bottom gear bolt until you line up the two dots just like you see in this picture. If you don’t do this then you may put the motor cams and timing 180* off as the top larger cam gear turns once for every two times the smaller crank gear will turn. Line up those dots.
Next~~~
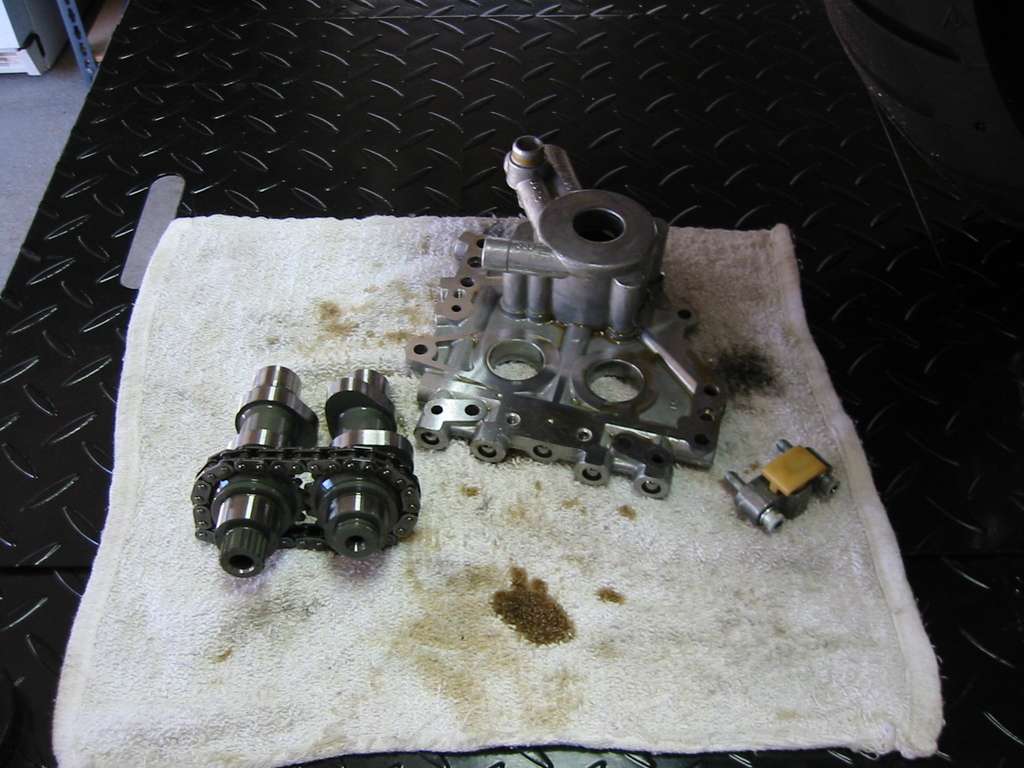
Next picture is what the cam plate looks like with the gears, chain and the chain tensioner removed. Put the bike in first gear. Some say you need a gear locking device to loosen the two gear bolts. I’ve never found this to be true but if you want one then order one when you get the bearing too. They are inexpensive. Take your socket wrench and simply give it a good sharp pop to break loose each gear bolt. Yes, the chain will move just a little but not to worry. The chain is still connected so both will move. We will line the dots up again later.
OK, so now we have a clean look at the cam plate. Do you see the lock ring on the right hand cam? Good, grab a pair of ring pliers and remove it. There is a spacer washer on both cams, remove the spacer and remember which one went where. Put the lock ring with the right spacer washer.
Now it is time to remove the Allen head bolts that hold the cam plate to the motor case. First, do you see the four Allen heads that surround the bottom shaft? Good, they hold the oil pump on the cam plate. Leave them alone. We want the oil pump to come off with the cam plate. There is no need to remove it and risk putting the pump guts back in out of order or allow dirt in.
Go ahead and remove the other six Allen head bolts at this time. Two on the top and two on each side. Again, leave the four bolts that surround the bottom shaft alone.
OK, this is what the cam plate looks like after you slide it off the crank shaft. If it will not come off easily then use a wedge or a light weight crowbar (flat wonder-bar) to gently nudge it towards you. You can do this with a screwdriver too just be very careful with this as it takes a light touch but will come out and slide to you I promise.
See that the oil pump is still attached.
Next is to remove the chain tensioner and slide the cams off the cam plate.
Next~~~
It’s time to install your new cams. Are you ready? Did you clean the new cams? No? Then let’s do that now…. I’ll wait until you return. You must get the industrial grease/wax from the new cams. You can use some lawnmower gas or brake cleaner and it will melt right off. Clean them good we don’t want any of this material or dirt on the cams. OK, good you are back… it’s time to have some more fun.
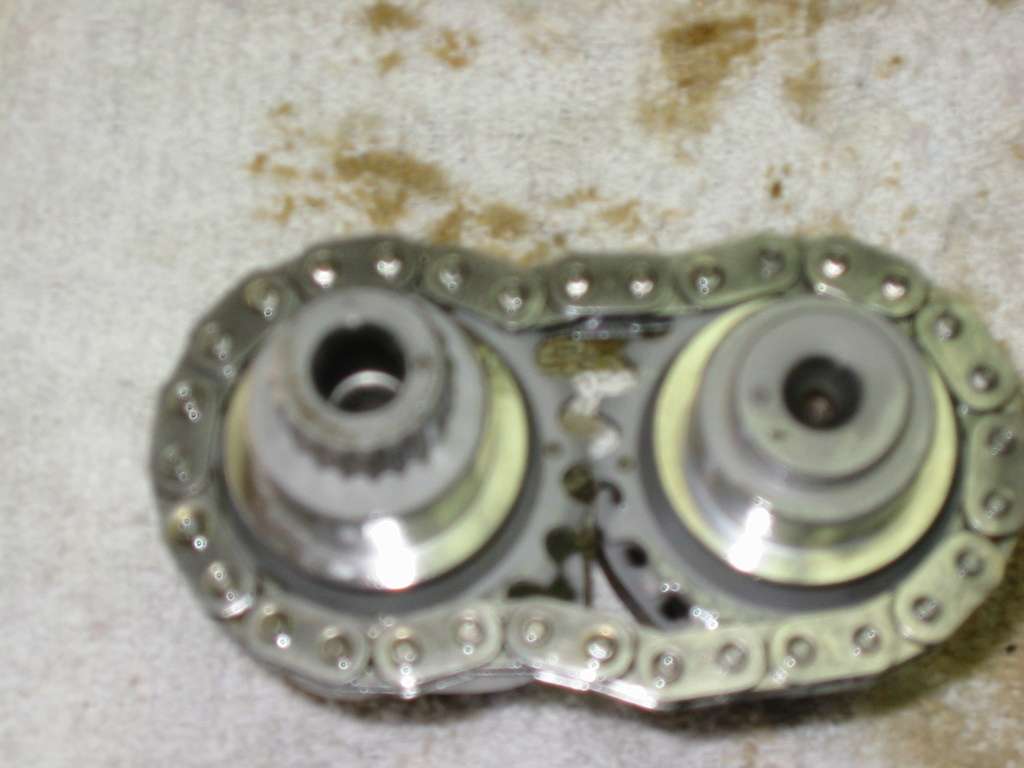
Remove the small chain from your old cams. It’s a puzzle but if you put the gear teeth from one cam under the gear teeth on the other cam you can pull the chain right off. Now comes the interesting part. Install the chain on your new cams and you must align the dots on each cam to look like the picture below. Sorry about the fuzzy image. Oh my, you are a few teeth off? That’s OK, pick up the chain from the gear teeth on one cam and walk the chain in the opposite direction you need the dot to go. Keep doing this until these two dots align.
Got the cams aligned now? Great job.
Let’s get the tube of engine lube and spread some around the cam plate cam holes and on the outer journals of the cam. You don’t have to use much but we need some lubrication as not to score the aluminum cam plate when we install the cams and when waiting on the oil pressure to come up after starting.
Once the cams are back in the cam plate pick up the entire assembly and turn it over. Look again to see if the dots on the cam are aligned. Yes, they are? OK, then lay the assembly back down and put the tensioner back on. You simply start one screw then use your thumb to press tension on the chain which will align up the other screw hole. Remember this technique as there is one more on the cam plate that you will do the exact thing to.
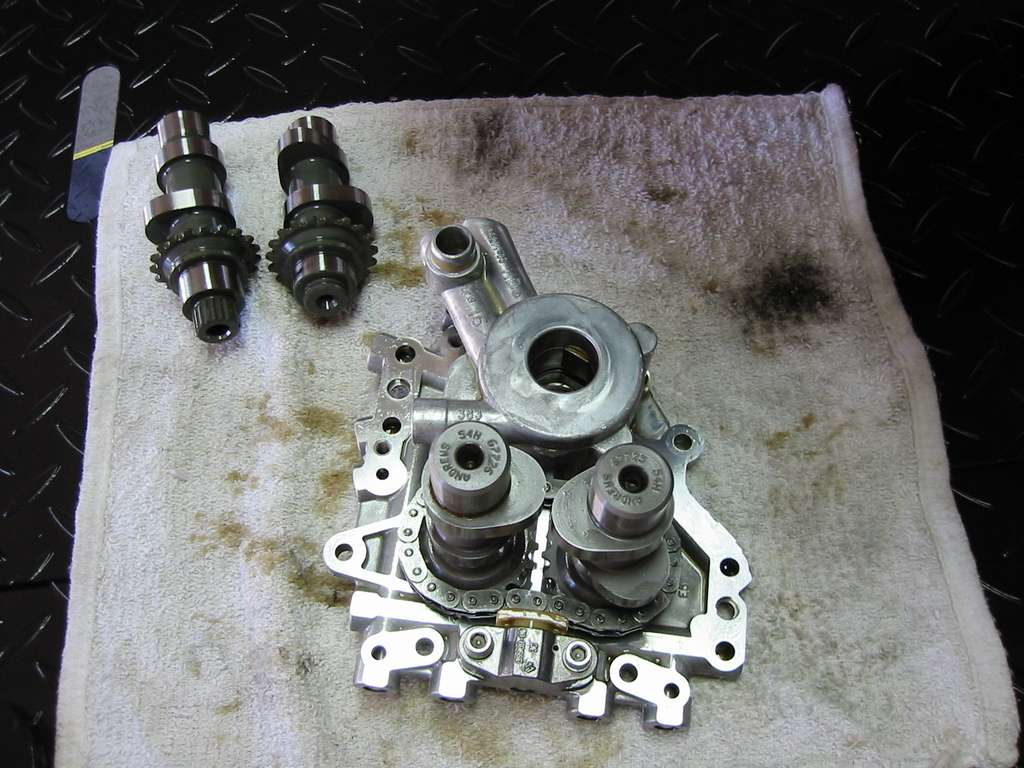
Now the cam plate will look just like this picture below. Now when you pick up the assembly you will need to hold the cams and plate or they just may come apart. It’s tough to do and the tensioner will hold the cams in the cam plate but I’ve seen them hit the floor before.
Do you remember those inner cam bearings you bought? Time to pull the old ones and install the new. So let’s get started.
Look at the below picture. Do you see the bearings sitting side by side? It looks like two big eyes looking at you and the main shaft is sticking its tongue out at you. That’s where the inner cam journals ride and spin so we want the best bearing to protect the motor. The HD stock bearings are not so good. Let’s put in a better one.
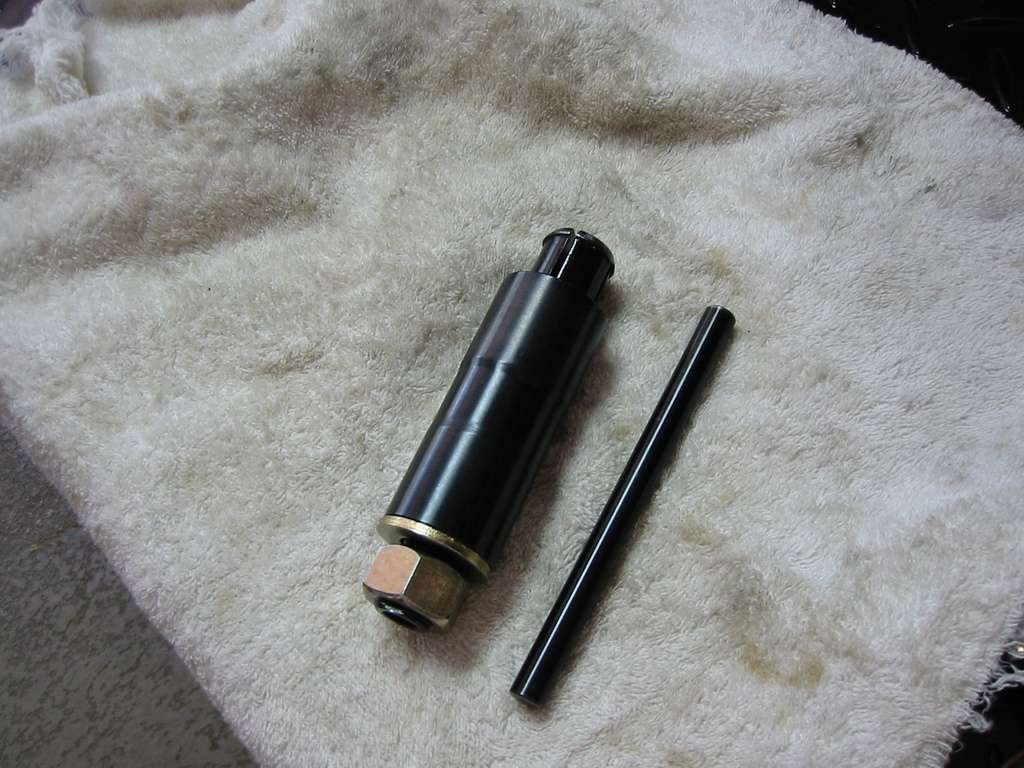
Here is what the tool looks like. The next picture is what the tool looks like when you have it installed and ready to pull the bearing.
The bearing tool must be inserted into the center of the bearing and the tool flush with the motor case. Run the large nut finger tight then take the spreading rod and tap it in when it is seated you will hear a change in tone as it taps the inside motor, stop there. Take two wrenches, hold the threaded shaft and tighten the large nut. As it tightens it will back out the old bearing. It will soon become loose and you can pull it out with your hand. Do not let the bearing tool fall on the crank shaft. Do this to the other side now and pull the other bearing.
Now the bearings are out and you need to use your insert tool to press the new bearings back in. Take your engine lube and pack the inner part of the roller bearings. Do this liberally. There is really no such thing as too much inside those needle bearings.
Note: Install the new bearings with the writing on the bearing to the outside of the motor. You should be able to read the numbers on the bearing after you install them. Why? Because the number side has a square shoulder and the other side is tapered a bit so they will slide in.
Take the engine lube and coat the bearing hole so the new bearings will slide in easily. Take the insert tool and place the bearing on the end, making sure the writing on the bearing is showing. Slip the bearing into the hole as far as you can, that won’t be much. You can take your spread rod from your puller and use it to tap the bearings into place. Make sure the bearings are straight when going in. Use light taps with a hammer. They will go in nice and smooth. When they reach the proper depth the tone will change letting you know that is as far as it will go.
Remove the insert tool. Take your finger and make sure the bearing is recessed into the case just a little.
Scary wasn’t it? It’s supposed to be. Always use caution and double check everything and your motor modifications will be right the first time with no damage.
It’s time to install the cams and cam plate. But first we need to replace those pesky oil pump o-rings. Use a small screwdriver and pull them out. To hold the new ones back in you can dab them in oil or use a little engine lube on them. The oil will make them stick into place while you are aligning the cam plate. See below. Pull the two small brown ones and the larger yellow one and replace with new. Caution: Don’t try to skip this step. If the old oil o-rings leak then your oil pressure will suffer…. Uhhh, not good.
Next~~~
Next we will use our engine lube again. Spread some on all the cam lobes. We don’t want friction to be our enemy.
Next is to slide the cam plate back into the engine case. Start by aligning the crank shaft through the oil pump and carefully align the cam rear journals back into the bearings. This is easier than it sounds. When it lines up just right it will slide all the way in. Once this is done go ahead and install your six Allen screw bolts and tighten everything up.
Take a look at the end of the cams facing you. You should see two dots, one on each cam. Turn the cams until the dots are lined up next to each other in between the cams. See pic below
For those of you that will say… Hey, where are your spacers and snap ring? This is an old picture but shows the cam dots where they need to be.
Now that your cams are aligned and ready to go… Remember the cam gears, timing chain and tensioner? Remember how we lined up the two dots on the large and small gear? We need to put them back on now. Put the chain around both gears and align the dots. Slip the gears over the two shafts.
Are the dots aligned? No? Ok then, that’s alright, it happens. Simply put the gears on where they line up on the shaft the best and keep the dots as close together as you can. Once the gears are on you can move the gears (with the motor in neutral) by putting the small bolt back into the small gear and use a socket wrench to spin the gears back into alignment. See the picture below. Once they are lined up properly go ahead and install the timing chain tensioner.
Hint: The timing gear dots should be very close during the re-installation. If they are not then you haven’t aligned your cam dots properly. If the cam dots are properly aligned you may look at the above picture. Do you see the slot in the crank shaft? It should point to this same position. Then the timing gears dots will be very close without the motor being 180* off. If you haven’t moved the crank shaft then there will be no issues. If you did then you MUST realign the crank to accept the proper dot location with the shaft slot pointing this way and the cam dots facing each other. DO NOT PUT IT BACK TOGETHER UNLESS IT IS SO!
The below shot is the timing gears, chain, tortioner installed and the dots aligned properly. At this point, take your timing cover in hand, clean the gasket and install the cover. Tighten all the Allen bolts in a star pattern.
Whewww… the first time is always the hardest but you’ve done a fantastic job so far. Let’s get the rest done so we can go riding.
The rest of this will go fast so grab your wrenches and a clean towel, pull down your hat and let’s get started.
Remember your new lifters? It’s time to drain the cup back into the oil bottle and install the new lifters now. They will only go one way. The roller goes down and sits on the cam lobe. Go ahead and get that done. Remember the retaining bar for each set of lifters? It’s time to install that now. Each lifter has a flat spot on the side. As a matter of fact each lifter has two flat spots. This is to tell you the direction of the roller. The lifter retaining bar uses these flat spots to hold the lifters in place. See how nicely the retaining bar sits just next to the lifters? It’s time to go clean the oil off your hands and take a short break. Smok’m if you got’m…
Next~~~
Lifter covers, where are they? Clean them off real well and grab your eight Allen head bolts. Remember what we had to do removing them? Yes, the four rear bolts are the toughest. Let’s get them started but not tight. Now put in the other four and tighten them all down. You should be ready for your push rod covers now.
Each of the four push rod covers is identical. Start with the back push rod cover. Doesn’t matter which cylinder but you can’t put the back in with the front push rod cover in place. Make sure the brown and yellow o-rings are in place as we spoke about when removing them. The brown o-ring is on the bottom and yellow o-ring at the top just under the head. Caution: If these o-rings are not there then your motor will leak oil when running. Make sure all these o-rings are in place.
It’s time for the push rods now. Remember the black rods are the exhaust, they go on the outside and the silver rods go to the inside. Go ahead and clean them and slide them down from the top of the heads and into the center of the lifters. You will feel them slip into the lifters so raise them up and down to get the feel of it. You don’t want them sitting on a lifter shoulder so lift up the push rod cover and make sure they are sitting down inside the lifter.
Hint: Do this for the rear push rods first then read the next paragraph. Then do the front push rods and covers. If not you will find it next to impossible to install the rear push rod clips.
There are four retainer clips. These clips are going to be difficult to put back in. They are chrome pieces of metal that look like a piece of pipe cut long ways. This clip forces down on a spring inside the push rod cover and holds the o-ring seals down. If you purchased your installation tool then use that and they will go right in. If you didn’t purchase the installation tool then use the flat end of a large screwdriver to push down on the push rod cover spring while putting the top end of the clip in first. You will use screwdriver as a ramp to slide them into place with your thumb. This is probably the hardest thing to do during this job. Caution: Be careful that you don’t slip and cut yourself or break a cooling fin on the jug. It will go back together but you must have patience here.
It’s time to focus on the heads now. Let’s put the rocker arm bolts back in now and tighten them up. Don’t forget the two bolts for the little breather covers too.
Here is what everything will look like to this point.
Grab your rocker box covers and clean off the gaskets then install the six bolts for each of them. The shorter bolts go on the left hand side of the rocker covers. Snug them up well.
Are you ready to install the tank? Yeah, me too… Clean your hands and pick up the tank. Reverse your removal notes and tighten all the bolts. Put your front rubber cups back over the front frame bolts and reconnect your gas line.
Spark plugs are next followed by putting on the plug wires.
If you are going to install a new aftermarket head pipe then now is the time. If not, grab your pipes and reinstall them. Before you tighten up everything be sure to install your 02 sensors. Remember you marked the top sensor with a sharpie so that one goes in last. Put the bottom (front sensor) in first. Use a little anti-seize on the threads being very careful not to get any on the sensor tip or it could damage the sensor. Run the sensor wires under the exhaust bracket located just under the tranny side cover. Clip them back in and install wire ties to hold them down.
Once you install your sensors you can tighten up the head pipe. Tighten up the head bolts first but just a little snug then install the cross over pipe and bracket. Go back to the heads and snug them up but not enough to break the stud. The gasket underneath will give a little but it’s not meant to be torqued down so tight it crushes the gasket so go easy but not so easy they aren’t tight. Now, tighten the main bracket bolt under the tranny cover and snug it up good.
Hint: you don’t want your head pipe in a bind so work it back and forth making sure it settles in well. If it is in a bind there will be floorboard vibrations until you get the pipe adjusted properly. So take your time here and do it the right way the first time.
Grab your mufflers and install them. Remember that you marked your clamps so you will know which way they go. If they are turned around so the clamp nut is awkward to tighten then you may want to pull the mufflers back off and turn them around. Be sure to measure how far they come out the back. They should be even. You don’t want one pipe sticking out further than the other.
Heat Shields! They go on in order. Put your front shield on then your back shield. If you have muffler shields then put them on next. The last shield that goes on is the collector shield. This is the hardest one to get right as it must go over and line up to all the others. Caution: Tighten these screw clamps with care. If you tighten them up too tight the clamp spot welds will indent the heat shield so be very careful here.
Air cleaner time. Grab all those screws and reinstall your air cleaner. Make sure it is straight and level.
We still have a few more things to install and we’ll be done.
Retrieve your floorboard and reinstall the rear support now. Put your floorboard hinge bolts and tighten them up. Not too snug though you want your floorboard to be tight but not so it won’t hinge up.
The last thing is the seat and you’re all done. Great Job!
Are you ready for the end results? It’s about time to crank it up so let’s talk about what to expect. When you install new lifters it will take time for them to fill with oil. This will sound like all heck is breaking loose. Here is what to do. Crank it up, let it idle and sound like a box of rocks for about 30 seconds then turn it off. There will be enough oil pressure built up to fill the lifters. Crank the bike again and it should not be so loud and start to calm down to a single tick. This won’t take long, maybe another minute or so. Shut down the bike. Crank the bike again and let it continue to idle for a few minutes. The penetrant will start to smoke off the motor, that’s fine, let it smoke.
Rev the motor up just a little, the warmer the oil the better the lifters will pump up and this single tick will go away. Shut down the bike and let it cool. Crank the bike again and the single tick will return but only for a few seconds. That will be the last time you hear it. Warm up the bike again and turn it off, time to check the oil level.
For those who have a tuning device it’s Tune Time! For those who have no tuning device…. It’s Buy A Tuner and Tune Time! You will need to reset your VE tables so the ECM will know how the motor breaths with the new cams. Once this is done hold on real tight, you’re going to love it!!
Wiz-out
Last edited by Mr. Wizard; 03-29-2016 at 04:41 PM. Reason: fat fingers
#3
02-28-2016, 12:10 PM
#4
02-28-2016, 05:59 PM
Road Master
#5
02-29-2016, 04:40 PM

#6
02-29-2016, 10:55 PM

#7
03-28-2016, 05:42 PM
Trending Topics
#8
03-29-2016, 04:42 PM
#10
01-25-2019, 05:00 PM
Seasoned HDF Member