Harley Davidson Sportster: How to Adjust Drive Belt
The drive belt transfers the torque from the engine to the rear wheel. Its tension must remain correct, otherwise belt slip and reduced power will occur. Belt slip can quickly damage a belt, leading to a costly and time consuming repair.
This article applies to the Harley Davidson Sportster.
Proper drive belt adjustment is key to ensuring a long drive belt service life. A drive belt replacement requires several hours of labor and the cost for the belt alone is over $200. To avoid this, checking and correcting the drive belts deflection every 5,000 miles should be done. It's not uncommon for a Sportster owner to go between 50,000 and 100,000 miles on their original drive belt. Belt tension can be checked in minutes and Harley Davidson created special tools to make adjustment quick and easy.

Materials Needed
- Breaker bar
- 1 7/16" socket (later models)
- 24mm socket (earlier models)
- Needle nose pliers (earlier models)
- Adjustable wrench
- Torque wrench
- Standard wrench set (3/8"-3/4") (earlier models)
- Tape measure or caliper
- The Harley Davidson belt tension gauge (part number HD-35381A) (optional)
- The Harley Davidson axle nut torque adapter (part number HD-47925) (optional)
- JIMS 3rd hand axle locker tool 970 (optional)
Step 1 – Measure the belt tension
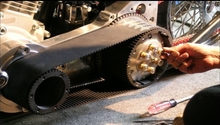
If your bike is equipped with saddlebags, you'll need to remove them to gain access to the belt. You'll need to remove the belt guard if it prevents you from accessing the bottom side of the belt. Some year models include a belt guard with a slot made for the gauge. The belt tension can be checked several ways. The most accurate method is with a belt tension gauge. Leave your Sportster unsupported on the ground and leaning on the kickstand. Place the transmission into neutral. Wait until the bike is cold, as heat tends to alter the measurement. Place the gauge against the bottom of the belt and then push up. Make sure the gauge is positioned at the belt's middle point in relation to the sprockets. On the XR 1200x, measure the belt equal distances between the idler wheel and rear sprocket. Once 10 lbs of force is reached, record the amount of belt deflection on the gauge. Some Sportsters have a slot on the belt guard with markings spaced 1/8" apart. It's a good idea to check the deflection in several different places on the belt and adjust according to the tightest measurement. The factory service manual lists the specification in these amounts:
- XL 883R = 9/16" to 5/8"
- Other XL models = 1/4" to 5/16"
- XR 1200 X = 1/4" TO 3/8"
If the tension is good, then there's no need to adjust the belt. It's a good idea to lift the rear wheel off the ground and inspect the length of the belt for cracks and tears.
A second method commonly talked about is twisting the belt. Grab the belt at equal distances between the two sprockets and twist. If 45 degrees of twist can be achieved, you have a general indication of proper belt tension. Sportster owners have reported that the 45-degree measurement method corresponds to a 3/8" to 5/16" belt tension measurement.
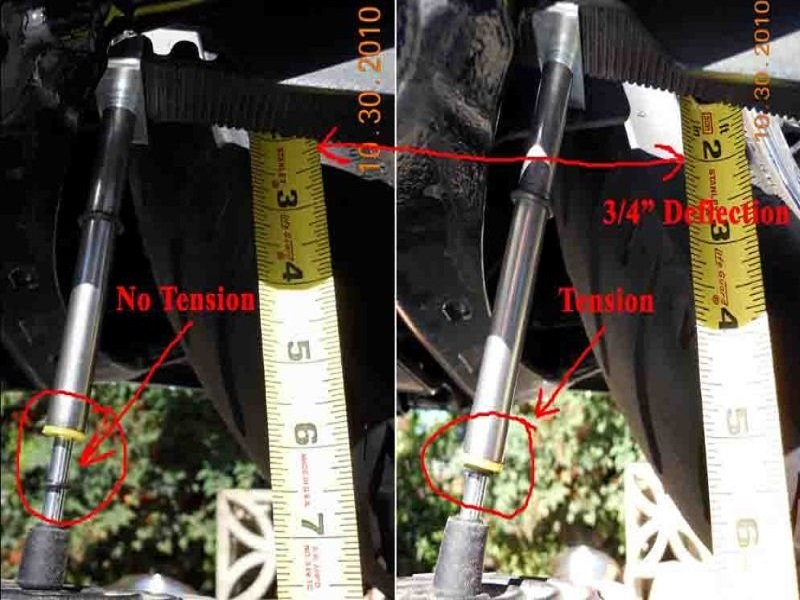
Figure 1. Using the belt tension gauge. 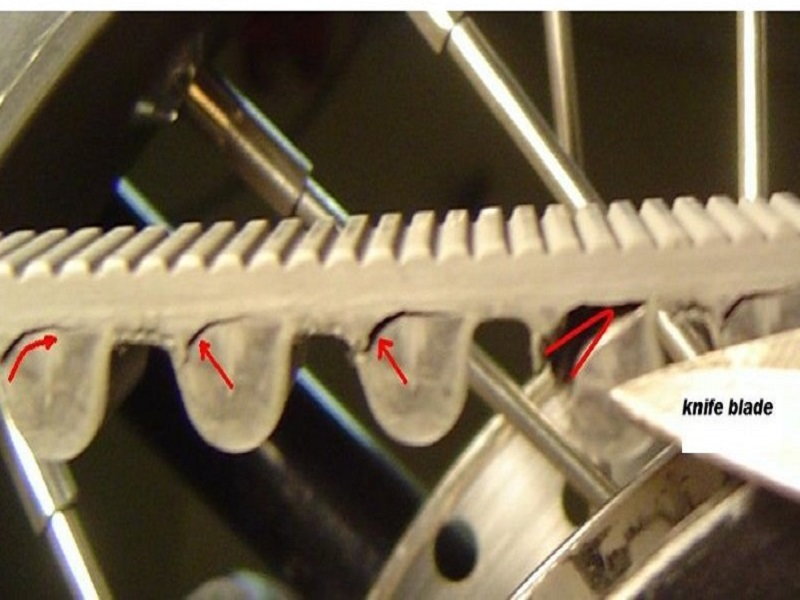
Figure 2. If cracks like these are on the belt, it's time for replacement! 
Figure 3. The slot found on some Sportster drive belt guards. 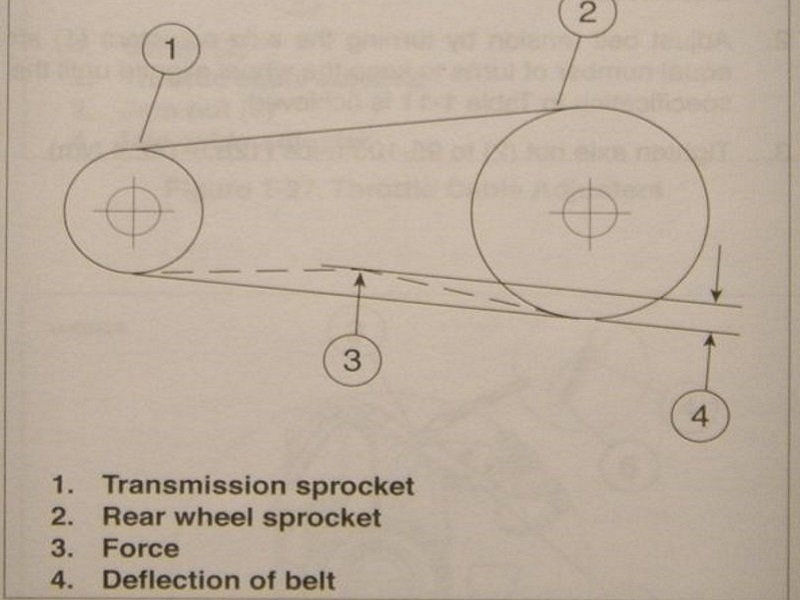
Figure 4. A diagram from the factory service manual.
Step 2 – Loosen the rear axle nut
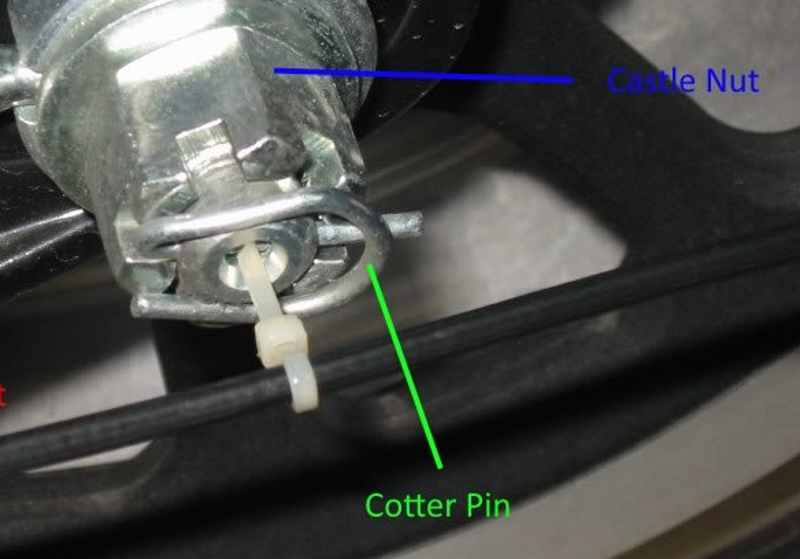
There are two styles of axle nut used on the Sportster. Earlier year models use a standard castle nut style axle nut with a cotter pin. A bolt and lock nut combination are used to adjust belt deflection. Newer year models use an adjuster cam and weld nut for deflection adjustment. An e-clip is used on these models instead of a cotter pin, but removal of the e-clip is not mandatory.
Maintaining proper alignment with the front wheel is critical to successfully performing the adjustment.
To loosen the axle nut on the earlier year models, you'll need a 24mm socket, breaker bar, and needle nose pliers. Take off the axle nut cover if your Sportster is equipped with one. Remove the cotter pin by straightening the pin out and pulling it out of the axle. Use your 24mm socket and breaker bar to loosen the caste nut. This nut is torqued to 100 ft/lbs at the factory. If the rear axle begins to spin with the castle nut before the nut is loose, you'll need to hold the Hex head (opposite end) of the axle stationary.
For the later year model adjuster cam equipped Sportster, you'll need a 1 7/16" socket and breaker bar. Alternatively, Harley Davidson makes a torque adapter (part number HD-47925) that allows you to work between the muffler and wheel. Without this adapter, you may need to remove the rear muffler support.
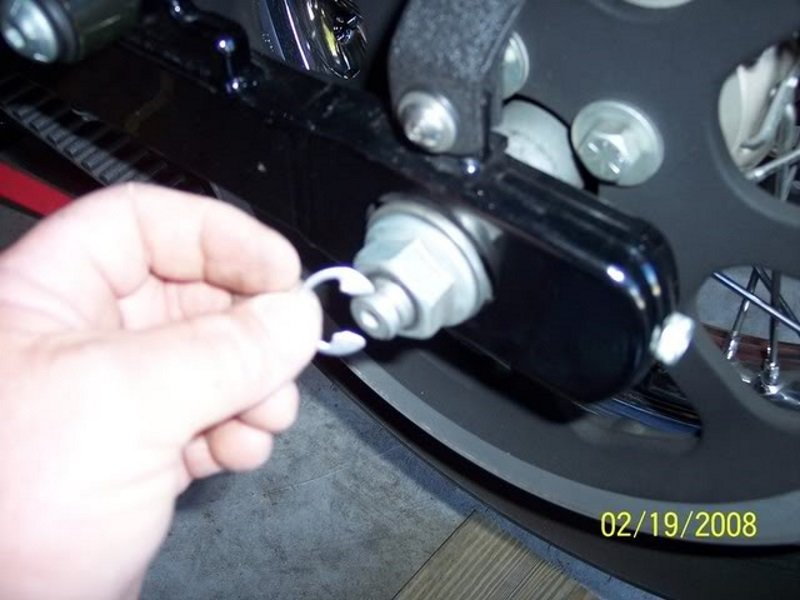
Figure 6. The e-clip found on later model Sportsters. 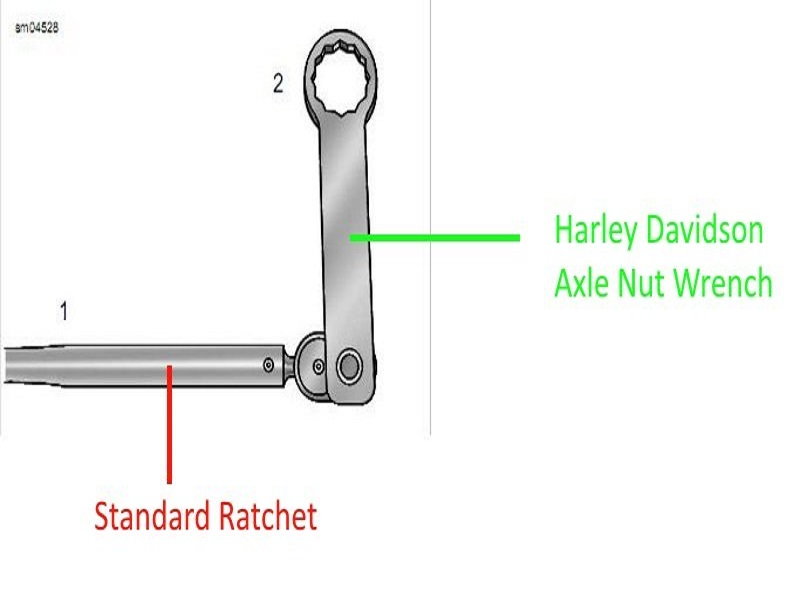
Figure 7. How to use the Harley Davidson drive belt wrench with a regular ratchet.
Step 3 – Adjust the drive belt tension
To adjust the drive belt tension on the earlier year models, begin by loosening one of the jam nuts. The same amount of adjustment needs to be made on both sides to maintain a proper alignment once one adjustment nut is moved. Recording this measurement can be done in several ways.
- Measure the distance between the axle nut and end of the swing arm.
- Mark the adjustment bolt threads with a Sharpie.
- Record the degree of turn you made to the adjustment bolt.
Turn the adjustment nut clockwise to move the rear axle backwards and apply more tension to the belt. A counterclockwise turn will do the opposite. Once you're happy with the adjustment, record your measurement. Repeat the process on the other side.
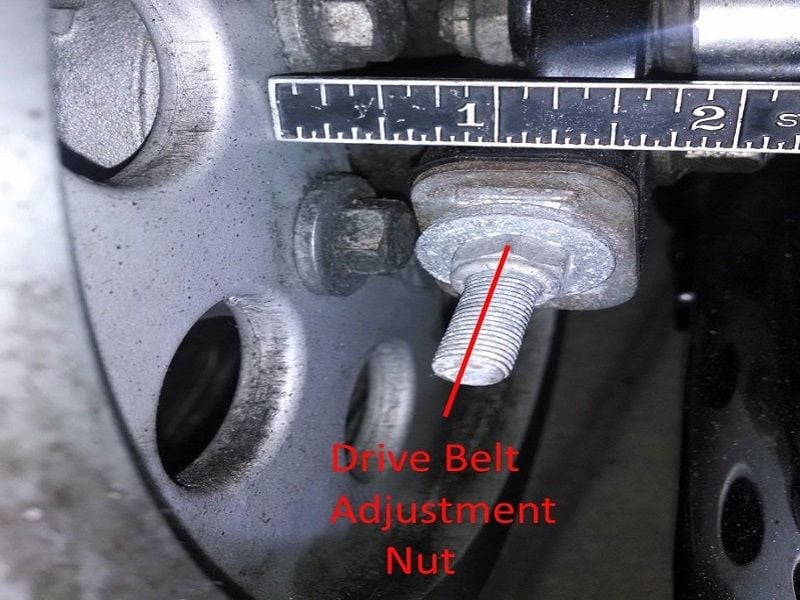
Figure 8. The drive belt adjustment bolt and nut. 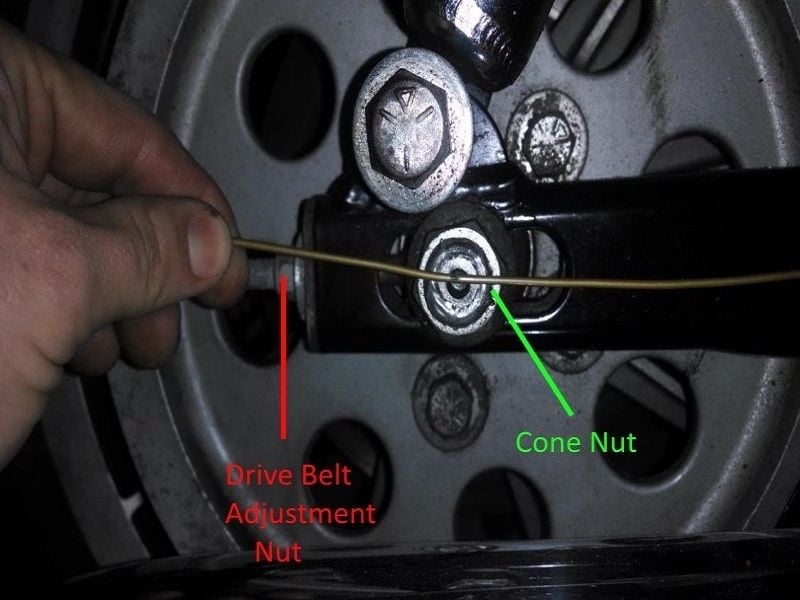
Figure 9. A side view of the drive belt adjustment nut. 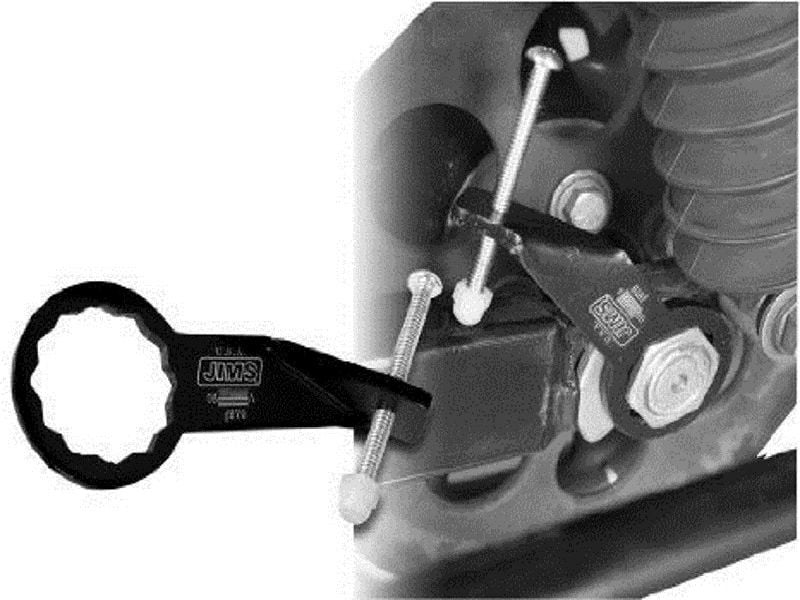
Figure 10. The special tool used to hold the weld nut stationary during tightening.
Later model Sportsters with the cone and weld nuts adjust belt tension by turning the weld nut on the left side of the axle. Turning the weld nut rotates both cams against the stops on the swing arm. This moves the axle back and forth. Turn the weld nut counterclockwise to reduce tension, and clockwise to increase it. Once you're happy with the adjustment and ready to check the belt tension, tighten the cone nut to 30 ft/lbs while holding the weld nut stationary. This is not the final torque value. It is temporary while making adjustments to the belt tension. If the weld nut is allowed to turn during torquing, the belt adjustment will change. A special tool (JIMS axle nut locker) is made to assist holding the weld nut during torquing. The tool uses a bolt to hold the weld nut stationary against the wrench.
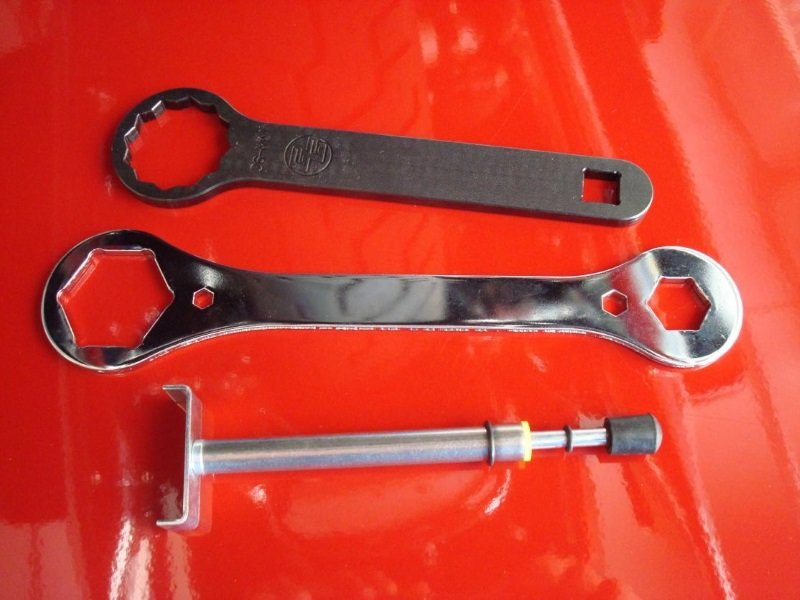
Figure 11. The tools used to adjust the belt tension on later model Sportsters. 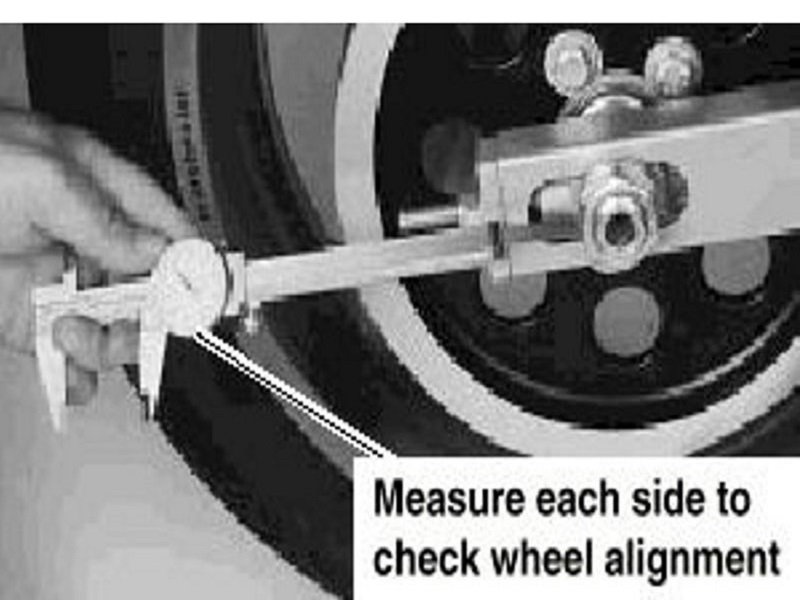
Figure 12. Measuring the distance between the axle nut and swing arm for an accurate wheel alignment.
Step 4 – Finish the drive belt adjustment
Once you've verified the drive belt deflection is within specification, you'll need to torque the axle nuts back to their original values. The final torque value differs by year model as axle designs changed.
- Early 1990's to 2005 use a 3/4" axle. Torque it to 62 ft/lbs.
- 2005 to 2007 use a solid axle. Torque it to 75 ft/lbs.
- 2008 and up use a hollow axle. Torque it to 100 ft/lbs.
All later models using the weld and cone nuts must torque the cone nut to 100 ft/lbs. Remember, the weld nut must remain stationary while torquing the cone nut. This applies to the adjustment bolt design as well. Hold the Hex side of the rear axle while applying the final torque to the castle nut. If the cotter pin will not line up with the slot in the rear axle, tighten the axle nut until it does. Check the cotter pin for damage and replace if necessary.
Featured Video: How to Adjust Drive Belt Tension
Related Discussions
- Cost of Drive Belt - HDForums.com
- How to Replace Drive Belt - HDForums.com
- Drive Belts - HDForums.com