Daily Slideshow: Riding Skills Series - The Basics
Odds are that you haven't forgotten how to ride. But some of the finer points of riding skills and abilities are dulled, to say the least, and could use a honing. In this series, we will revisit our riding skills, in basic, intermediate and advanced sections. So let's get going with the basics.


Introduction
Spring is upon us again. The tools are all put away, everything is tuned up and running well. Your bike is ready. Are you? If you are like me, you've been spending the last few months in freezing temps under a blanket of snow. You might have snuck out for a short ride here and there when the weather permitted, but nothing like the long rides of Spring, Summer, and Fall. Motorcycling is an acquired skill, it is perishable too. So in as good of shape as our rides may be in... How good of shape are your skills after the winter hiatus?
When you are watching a football game on TV what are all the players doing on the field? Are they warming up and getting a little light practice in right? Are they practicing the fingertip catches that make sports center? No, they're not. The players are down there practicing the basic routes and basic catches. The players know that a good foundation in the basics pays in dividends when the big plays have to be made. Motorcycling is no different, you should take the same approach to your riding. A good foundation in the basics will pay dividends in your riding experience.
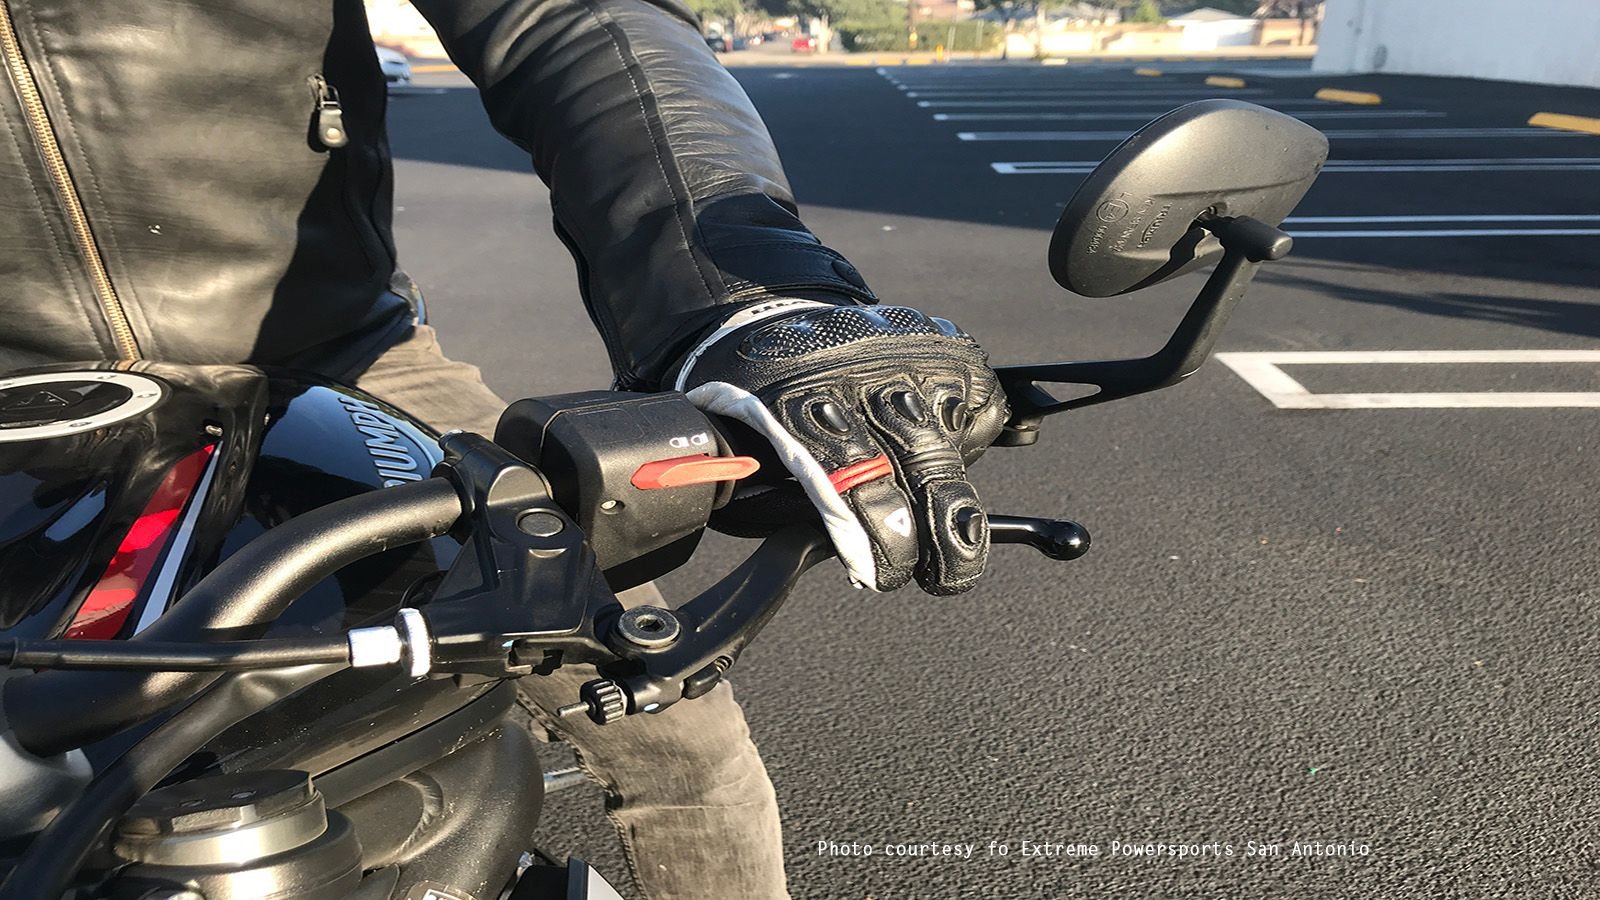
Body Position
Let's take a good long look at how we sit on our motorcycle. Our body position has a direct effect on how we interact with and operate the motorcycle. There are many aspects of body position that are just plain overlooked and could be the source of many problems with our riding technique. The position will change from bike to bike, a sport bike does not have the same body position as a cruiser but there are basic issues that apply to all motorcycles. It is your motorcycle and like a good suit, it should be tailored to fit you.
Starting with the handlebars and our hands, are all the levers and switches within reach? Do you have to make exaggerated movements to squeeze the brake? The clutch? Honk the horn? The position of your handlebars should be giving you a slight bend at the elbows leaving your arms relaxed and loose, ready to steer. Contrary to popular belief, the handlebars are not for hanging onto the motorcycle, they are for controlling it. Adding your body weight to the controls never helps and in many cases makes matters worse.
Moving down, we want our seat to grip us and hold us in place under acceleration, no one likes sliding backward when on the move. Your hips should be centered in the seat for most of the time. Your legs should have an adequate bend in them being able to rest your feet on the foot pegs without any undue strain or discomfort. Your feet should be able to manipulate the rear brake and gear shift without massive amounts of movement. The right foot should be able to slide over the brake lever without fuss. The left foot should only have to move around the gear shift enough to make up shifts and down shifts quickly and minimal movement of the foot.
Using Brakes
Brakes, they are the first thing a rider will go for when in trouble. Is it always the right thing to do? That depends on the situation. For now, let's just discuss how to use them and worry about the finer points of braking later. For those of us that have taken the Motorcycle Safety Foundation course, we have all heard the term, "four to go and four to slow" on the front brake. I have long disagreed with this philosophy. Typically in a panic situation, our muscles tend to work a lot better than they normally do due to the influx of adrenaline. Grabbing a fistful of front brake has never made any situation better.
Personally, I feel that teaching new riders this technique is a mistake. That is just my opinion. Instead, we should investigate using fewer fingers, like one or two. Try operating the front brake with just your right index finger (where you can safely practice of course) and see how much braking force can be applied with that lone finger. If one is not enough, try adding your middle finger. A two finger pull of the front brake lever should be more than you will ever need with a set of modern brakes ahead of you. There are two advantages to the one or two finger method of braking. One is this technique allows you to keep the brake covered, shortening your reaction time to apply the brake. The second is that by using one or two fingers you get more fine control over the lever and your brakes. Far too many riders just manhandle the lever, it is not a case of simply on or off. By getting finer control we can modulate the pressure of the brake better and have more control of what goes on beneath us.
The same can be said for the rear brake. How many riders do you see just stomp down on the rear brake lever and lock the rear wheel up? We all have done it at one point or another. The rear brake is no different from the front in how it performs, the effects on the motorcycle are different but the principle is the same. The rear brake should be operated with fine control and modulation. Having the rear brake lever adjusted in such a manner that your foot can cover it helps with maintaining lever contact and modulating pressure. Nine times out of ten a rider will just stomp on the rear brake because they have no contact and have "lost" it on the bike.
For maximum braking capability, the front and rear brakes should be used together. Remember, if you're sliding you are not stopping.
Clutch Control
Much like our brakes, the clutch requires a degree of finesse to work it smoothly. Does the clutch lever require all four fingers to operate it? The majority of the time the answer would be no, it does not. Should something mechanically go wrong where a great amount of force would be required to operate the clutch then one would do what has to be done. The majority of the time using all four fingers on the clutch lever is a waste of effort. Especially when the bulk of clutch work is done in what is known as the "friction zone".
The friction zone is approximately one half to one-third of the total clutch lever travel. It is the point where the clutch is going from engaged to disengage. The friction zone is the key to smooth take offs. By shortening the distance the clutch has to travel we also shorten the time we are on the clutch. Two fingers on the clutch lever to pull and release will pretty much guarantee you are in the friction zone all of the time. Let's say that you are sitting a stop light. Instead of sitting in gear with the clutch all the way pulled in, doesn't it make more sense to sit in neutral with the clutch disengaged? It saves wear and tear on your clutch pack for one. Secondly when the light turns green, or the car in front of you begins to go, it is far easier to pull in with two fingers, drop into gear and begin slipping the clutch out to get underway. The time on your clutch went from minutes to seconds.
Starting is one thing, but what about gear changes while underway? The majority of motorcycles today are equipped with gearboxes that allow the rider to upshift without even using the clutch. For all intents and purposes, we will continue to use the clutch for all shifting processes. So if our motorcycles are able to upshift without the clutch, why pull it all the way in for shifting? The two-finger technique comes into play again here. We want to use the clutch just enough to give us a bit of slip to help those gear changes go smoothly and quickly while helping our gearbox not get hammered on as bad without it.
Counter Steering
Steering a motorcycle, it happens backward. Countersteering is a byproduct of physics and their application to motorcycles. A good rule of thumb is that when a motorcycle is traveling over 20 mph counter steering takes effect. It is a simple process to understand but many in the motorcycling community don't fully grasp it. Simply put, if one were going down the road on their motorcycle over 20 mph pressing on the left bar will cause the bike to lean to the left. When the bike leans left it will start to turn left. It is literally that simple. What is actually happening is the rider is using the gyroscopic effect of the front wheel to tilt the frame and rear wheel in the direction they want to go. Countering the gyroscope that is the rear wheel and changing its direction.
Counter Steering directly relates to lean angle and the amount of turning the bike takes on a path. The more pressure that is applied to the bar equals the more amount of lean angle the bike will make. Lean angle is what determines how sharp, or how fast, the motorcycle can turn. What happens to the bike after counter steering has been started depends on the particular motorcycle geometry. The typical cruiser has more rake and trail than the typical sportbike. A bike with more rake and trail will want to go straight. A bike with less rake and trail will want to turn more and go straight less.
If we compare what happens on each we will find on the bike with greater rake and trail pressure on the bar has to remain constant to maintain the turn. If we lighten the pressure on the bar, the bike will want to stand back up on its own. When aboard the bike with less rake and trail we have to add a step to the countersteering process. The initial press on the bar in the direction you want to go is the same. However, when the motorcycle is leaned over and on its arc through the corner the rider will experience what is called drop in. The front wheel literally falls in line with the rear wheel on the same arc. If you were to pluck the rider off the bike and pin the throttle so that it remains constant, the motorcycle would constantly run in a circle until a new change in direction is given. After a drop in occurs, it is up to the rider to add greater lean into a turn or counter steer the bike out of the turn.
Closing Thoughts
We should always strive to improve ourselves as motorcyclists. Always push gain a better understanding of what is happening below you. Never stop learning and more importantly, never stop practicing. Every time you ride, select one thing to work on and practice. This will not only make a faster rider it will make you a more capable and safer rider. The techniques and tips in this article are for educational purposes. It is up to you to employ and learn them in a safe manner. The author has compiled the information in this article through his twenty plus years of racing, street riding, schooling, and study.
For help with your Harley maintenance and repair projects, please visit our how-to section in the forum.
