
My Budget Sportster Build
#1
 02-17-2015, 02:40 PM


Aloha Everyone,
I have owned my Sportster for about a month now and am ready to begin customizing it.
My bike is a 2009 Sportster 883 Custom. Its red with a lot of chrome but I am planning to blackout as much of the bike as possible. I want to make it look like a 883 Iron. You may be thinking "why not just buy an Iron then?" well, I got my Sportster in a trade, traded my pickup truck for it, so i plan to build it into something that fits my style.
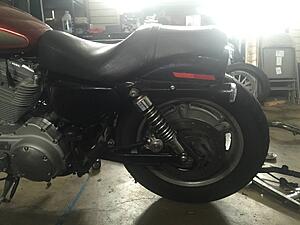
Heres what my bike looks like stock


I have owned my Sportster for about a month now and am ready to begin customizing it.
My bike is a 2009 Sportster 883 Custom. Its red with a lot of chrome but I am planning to blackout as much of the bike as possible. I want to make it look like a 883 Iron. You may be thinking "why not just buy an Iron then?" well, I got my Sportster in a trade, traded my pickup truck for it, so i plan to build it into something that fits my style.
Heres what my bike looks like stock
#2
02-17-2015, 02:57 PM
As the title states, i am trying to build my bike on a budget. i would like to completely change the look and ride of my bike but don't have the funds that it would normally take to do so.
My first step was to find a tank that i like. i don't like the larger 4.5gal tank the Custom model comes with, it was to big and round for my taste. I wanted something similar to the 3.3gal peanut style tank that came with other sportsters. I began searching eBay and craigslist for a tank, but everything i found was between 300-500 dollars which was too expensive for me.
after searching every place i could think of i was caught with a lucky break. on craigslist i found a broken down XL883L that somebody was selling for parts. it had the tank i was hoping for and many other parts i thought i could use. after haggling with the owner for a while i was eventually able to purchase the parts bike (or most of it at least) for not much more than it would have cost me to purchase the tank online and ship it to hawaii.
heres what the parts bike looked like before it was taken apart and sold for parts
#3
02-17-2015, 03:06 PM
my plan to save money is to customize my 883Custom is to use as many parts from the parts bike 883Low as possible and not purchase anything.
i plan to:
cut down the rear fender
change the tanks
use the shorter risers from the 883 low
powder coat the mag wheels
paint as many trim pieces black as possible
i plan to:
cut down the rear fender
change the tanks
use the shorter risers from the 883 low
powder coat the mag wheels
paint as many trim pieces black as possible

#5
02-17-2015, 05:21 PM
Some cool idea's. It will be nice to have a bike exactly how you want it.
If I were in your shoes, if painting the peanut tank, I would paint the original as well in similar fashion so if you need a larger tank for a long trip and wanted to use it, a simple swaparoo. Just make sure if you keep the original tank and it's in storage, the inside is protected by something. I'm sure some guys here have some good solutions. I would fill it up with gas and put fuel stabilizer in it. There might be a better solution though.
If I were in your shoes, if painting the peanut tank, I would paint the original as well in similar fashion so if you need a larger tank for a long trip and wanted to use it, a simple swaparoo. Just make sure if you keep the original tank and it's in storage, the inside is protected by something. I'm sure some guys here have some good solutions. I would fill it up with gas and put fuel stabilizer in it. There might be a better solution though.
#6
02-17-2015, 06:20 PM
Some cool idea's. It will be nice to have a bike exactly how you want it.
If I were in your shoes, if painting the peanut tank, I would paint the original as well in similar fashion so if you need a larger tank for a long trip and wanted to use it, a simple swaparoo. Just make sure if you keep the original tank and it's in storage, the inside is protected by something. I'm sure some guys here have some good solutions. I would fill it up with gas and put fuel stabilizer in it. There might be a better solution though.
If I were in your shoes, if painting the peanut tank, I would paint the original as well in similar fashion so if you need a larger tank for a long trip and wanted to use it, a simple swaparoo. Just make sure if you keep the original tank and it's in storage, the inside is protected by something. I'm sure some guys here have some good solutions. I would fill it up with gas and put fuel stabilizer in it. There might be a better solution though.
I was unsure of using the fuel pump from the parts bike so i switched my fuel pump over to the peanut tank. right now i have the fuel pump stored in a bucket of gas to prevent it from rusting. would you recommend storing the tank and pump individually as i am, or store they together with the fuel pump installed?
#7
02-18-2015, 03:12 PM
i ordered a set of led turn signals on eBay. they were pretty cheap so i wasn't expecting too much. they are made of pretty cheap plastic and the leds aren't as bright as i would have hoped, but they are black and more streamline than the stock signal so they will work.
Since i got the lights in i decided to cut down my rear fender and install the rear turn signals.
heres the line i drew out for the fender trimming. i decided to trim it down to right before the last bolt that connects to the frame.

this is my first time cutting metal, i used a grinder with a metal grinding wheel to do both the cutting and the shaping of the fender. i nicked the paint a few times, but overall i am proud of my first attempt. i think i cut it pretty straight.
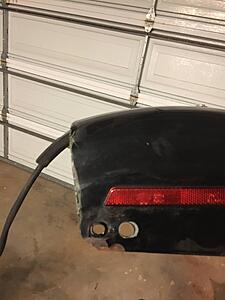
I plan to repaint the rear fender later when i repaint the rest of the tins, so for the meantime i just used some extra paint we had lying around and brushed on a coat to cover the cut marks
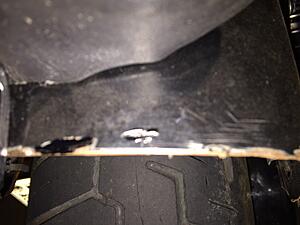
i cut the wiring harness a few inches before the fender ended and spliced in the wiring for the turn signals using electrical tape. i used hot glue to attach the wiring to the underside of the fender. the hot glue worked great and made it really easy to clean up the wiring mess. the bolts that the turn signals werent long enough so i had to buy longer bolts to attach the lights to the frame.
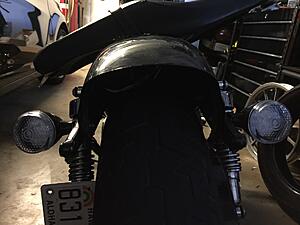
Heres a final pic of the fender on my bike with the lights installed
Since i got the lights in i decided to cut down my rear fender and install the rear turn signals.
heres the line i drew out for the fender trimming. i decided to trim it down to right before the last bolt that connects to the frame.
this is my first time cutting metal, i used a grinder with a metal grinding wheel to do both the cutting and the shaping of the fender. i nicked the paint a few times, but overall i am proud of my first attempt. i think i cut it pretty straight.

I plan to repaint the rear fender later when i repaint the rest of the tins, so for the meantime i just used some extra paint we had lying around and brushed on a coat to cover the cut marks


i cut the wiring harness a few inches before the fender ended and spliced in the wiring for the turn signals using electrical tape. i used hot glue to attach the wiring to the underside of the fender. the hot glue worked great and made it really easy to clean up the wiring mess. the bolts that the turn signals werent long enough so i had to buy longer bolts to attach the lights to the frame.
Heres a final pic of the fender on my bike with the lights installed

Trending Topics

#9
02-18-2015, 04:05 PM
Any specific reason to cut it from the front? i assume cutting it from the front would allow you to keep the tail light assembly and the wiring harness it has. i didn't need to keep that since i have a led tail light coming in the mail, and my turn signals were not able to plug into the stock harness
#10
03-30-2015, 11:16 PM

Cruiser
Join Date: Dec 2014
Location: Spokane, WA
Posts: 110
Likes: 0
Received 0 Likes
on
0 Posts
I cut the front of my iron 883 and tried to rotate it down like others have commented on. It doesn't work well for a 2011 iron. The geometry doesn't line up properly and the distance between the tire and fender is way too small for normal use, as it bottoms out too easily.
I would cut the back of the fender and shape it properly, taking your time and use a belt grinder for the final passes. Finish it off with sand paper and paint it according.
I would cut the back of the fender and shape it properly, taking your time and use a belt grinder for the final passes. Finish it off with sand paper and paint it according.