


* HOW TO * under fifty bux *
Thread Starter
|
Club Member
Joined: May 2006
Posts: 14,564
Likes: 9,225
From: the 50s & the 60s

ORIGINAL: HOGRIDA_06
Another great step by step with pics. You rock Mud!
Another great step by step with pics. You rock Mud!
Coming from you, means a lot.
One thing that I did leave out though -
After boring,
clean the penetrations up with a chainsaw file.
Easy.
mud
May our Moderator Rest in Peace
Joined: Sep 2006
Posts: 11,386
Likes: 35
From: Rochester, NY
ORIGINAL: mudpuddle
I have another guard Frank but, I don't think it would be worth that much effort,
and, probably not necessary anyway.
I will ride with mine like this for now and see how I like it.
I think you probably meant to type TIG.
MIG is your wire feed process.
I would like to seethe sandwich technique on the belt Guard.
Do it and post up some pix.
mud
No I meant MIG, lots of guys have small MIG or wire welders, but TIG welders are not as common in ordinary garages, and a TIG welder isn't really necessary for something like this.
In fact if I were going to do it I might be more inclined to make a sandwich from the two guards with something like a slow curing epoxy between the two with a lot of wood blocks and clamps. Slow curing epoxy's are generally stronger andwill allow you to take your time getting thingsaligned and clamped together properly before the epoxy set up on you.
Once cured the epoxy would "bond" the two layers togetherbetter than garage welding can do for a super stiff assembly. With the added benifit of eliminating thechance of it rusting from the inside out on you.
If Boeing can make 767, 777, and 787 wings that way I don't see why the same method couldn't be usedfor something that doesn't require anything like thestructural integrety needed for an airliners wing.
Thread Starter
|
Club Member
Joined: May 2006
Posts: 14,564
Likes: 9,225
From: the 50s & the 60s
ORIGINAL: Citoriplus
mud,
No I meant MIG, lots of guys have small MIG or wire welders, but TIG welders are not as common in ordinary garages, and a TIG welder isn't really necessary for something like this.
In fact if I were going to do it I might be more inclined to make a sandwich from the two guards with something like a slow curing epoxy between the two with a lot of wood blocks and clamps. Slow curing epoxy's are generally stronger andwill allow you to take your time getting thingsaligned and clamped together properly before the epoxy set up on you.
Once cured the epoxy would "bond" the two layers togetherbetter than garage welding can do for a super stiff assembly. With the added benifit of eliminating thechance of it rusting from the inside out on you.
If Boeing can make 767, 777, and 787 wings that way I don't see why the same method couldn't be usedfor something that doesn't require anything like thestructural integrety needed for an airliners wing.
ORIGINAL: mudpuddle
I have another guard Frank but, I don't think it would be worth that much effort,
and, probably not necessary anyway.
I will ride with mine like this for now and see how I like it.
I think you probably meant to type TIG.
MIG is your wire feed process.
I would like to seethe sandwich technique on the belt Guard.
Do it and post up some pix.
mud
I have another guard Frank but, I don't think it would be worth that much effort,
and, probably not necessary anyway.
I will ride with mine like this for now and see how I like it.
I think you probably meant to type TIG.
MIG is your wire feed process.
I would like to seethe sandwich technique on the belt Guard.
Do it and post up some pix.
mud
No I meant MIG, lots of guys have small MIG or wire welders, but TIG welders are not as common in ordinary garages, and a TIG welder isn't really necessary for something like this.
In fact if I were going to do it I might be more inclined to make a sandwich from the two guards with something like a slow curing epoxy between the two with a lot of wood blocks and clamps. Slow curing epoxy's are generally stronger andwill allow you to take your time getting thingsaligned and clamped together properly before the epoxy set up on you.
Once cured the epoxy would "bond" the two layers togetherbetter than garage welding can do for a super stiff assembly. With the added benifit of eliminating thechance of it rusting from the inside out on you.
If Boeing can make 767, 777, and 787 wings that way I don't see why the same method couldn't be usedfor something that doesn't require anything like thestructural integrety needed for an airliners wing.
"Ifyou can find another guard you couldSpot,
MIG, or wire weld
the two inside each other"
I want to tell you that MIG is the wire feed process.
Post some pix when you laminate the two beltguards, sounds interesting.
mud

Road Warrior
Joined: Oct 2006
Posts: 1,506
Likes: 1
From: eastern shore, md.
seems to me the "sandwich" idea... well, sorta defeats the original purpose of "swiss-cheesing" [drilling/boring]
in the 1st place... that being removing weight.
just sayin'
in the 1st place... that being removing weight.
just sayin'
May our Moderator Rest in Peace
Joined: Sep 2006
Posts: 11,386
Likes: 35
From: Rochester, NY
ORIGINAL: metal_mike
seems to me the "sandwich" idea... well, sorta defeats the original purpose of "swiss-cheesing" [drilling/boring]
in the 1st place... that being removing weight.
just sayin'
seems to me the "sandwich" idea... well, sorta defeats the original purpose of "swiss-cheesing" [drilling/boring]
in the 1st place... that being removing weight.
just sayin'
Road Warrior
Joined: Oct 2006
Posts: 1,506
Likes: 1
From: eastern shore, md.
ORIGINAL: Citoriplus
"IF" the idea is to save weight, I agree. But if its for looks, that's another story.
ORIGINAL: metal_mike
seems to me the "sandwich" idea... well, sorta defeats the original purpose of "swiss-cheesing" [drilling/boring]
in the 1st place... that being removing weight.
just sayin'
seems to me the "sandwich" idea... well, sorta defeats the original purpose of "swiss-cheesing" [drilling/boring]
in the 1st place... that being removing weight.
just sayin'

Cruiser


Joined: Dec 2006
Posts: 148
Likes: 14
From: Just North of Inverness,Scotland
Hi
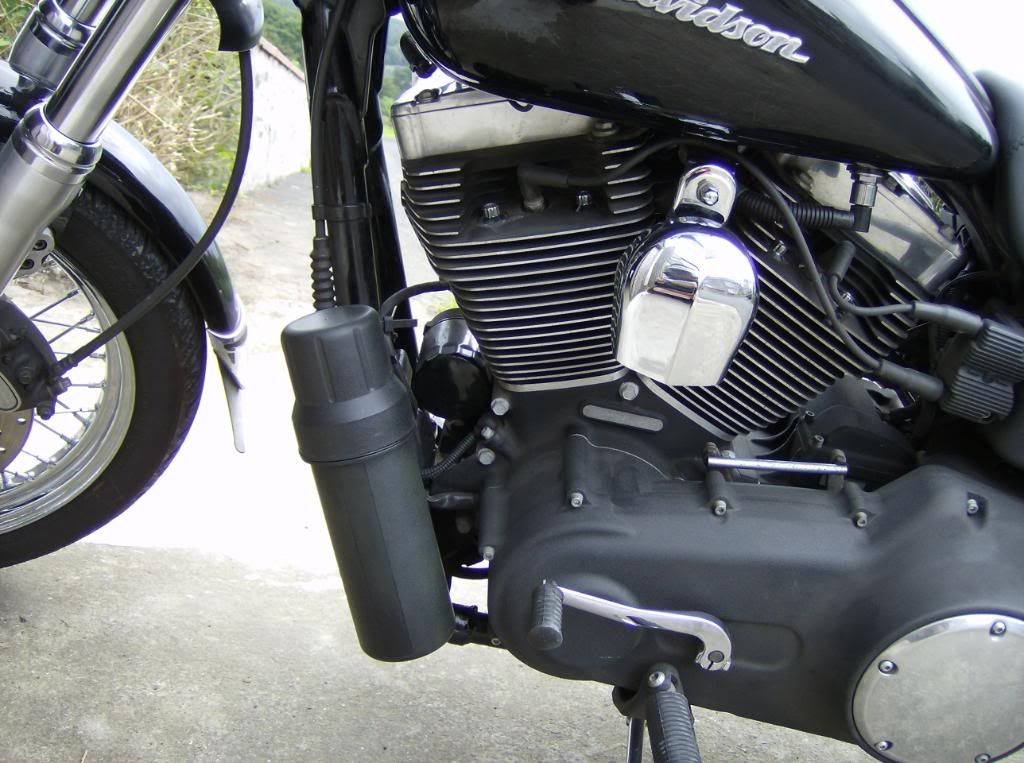
Here's a couple of small things I did,not quite in your league Mud ! ,but I figured every little thing can help and they certainly don't cost much!
If you have a fender extension you can make it more effective by the addition of an extension piece,I made this using a piece of 'sit on' rubber flooringcoving,the type used by floorlayers for vinyls in hospitals and the like (guess what I do for a living),its just held on by the one bolt but has been fine.
I also made a cover to protect the front of the motor it hard to see but it is actually a cut downthin plastic ring binder,I used the rings to attatch to a mount under the motor and a couple of zip ties on the downtubes.
The side mounted tool bag is a cheap(£8)'Adventure bag' off roaders use,inside the tools are kept in a couple of cut down plastic bottles that fit tightly together so the tools stay dry and rust free.
I use the same typebag on my bars,its great for keeping small change etc.
Last edited by roadkillvespa; Feb 25, 2010 at 09:10 AM. Reason: Fix Links
Cruiser
Joined: Dec 2006
Posts: 148
Likes: 14
From: Just North of Inverness,Scotland
I'll try againwith the pics!
[IMG]local://upfiles/21808/A2B01A6066C543B292FA209AE57B5AF6.jpg[/IMG]
[IMG]local://upfiles/21808/A2B01A6066C543B292FA209AE57B5AF6.jpg[/IMG]
HD Forum Stories
The Best of Harley-Davidson for Lifelong Riders

Harley-Davidson Fat Boy Becomes a Dark, Decepticon-Inspired Custom
Verdad Gallardo
6 Weirdest Harley-Davidsons Ever Sold to the Public
Verdad Gallardo
7 Times Harley-Davidson Chucked Tradition Out the Window
Verdad Gallardo
7 Surprising Harley-Davidson Products that Are Not Motorcycles
Verdad Gallardo
8 Best Harley-Davidson Motorcycles Ever
Pouria Savadkouei
10 Worst Harley-Davidson Motorcycles Ever
Pouria Savadkouei
Killer Custom's Jail Break Is The Breakout That Refused to Blend In
Verdad Gallardo
Crazy Bunderbike Build Looks Amazing, But Is It Impossible to Ride?
Verdad Gallardo