


* HOW TO * under fifty bux *
Thread Starter
|
Club Member
Joined: May 2006
Posts: 14,564
Likes: 9,225
From: the 50s & the 60s

ORIGINAL: Bobber Rider
XK
a question about installing them turn sig standoffs on the triple tree pinch bolts
i assume you torqued the pinch bolts to spec with the standoff mounted?
did you encounter a problem when torquing that the standoff wanted to "rotate" and not stay in place?
(i hope i am making myself clear)
when i tried it, i couldn't seem to keep the standoff in position(perpendicular to the fork)
they would rotate (right one upwards, left one downwards) in the direction of closing the bolt.
ORIGINAL: XKROME
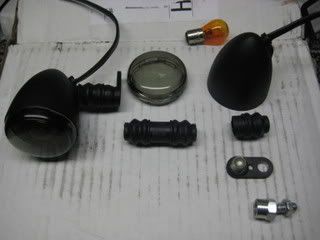
i used Trotter's idea about painting turn sig reflectors, Joe's idea that he got from the sporty section by 128AUTO for the rubber boots and mine for using the handle bar hardware to relocate fronts to lower tree's along withmy rear sig relocate.
guess you could call it team work[sm=deal.gif]
i used Trotter's idea about painting turn sig reflectors, Joe's idea that he got from the sporty section by 128AUTO for the rubber boots and mine for using the handle bar hardware to relocate fronts to lower tree's along withmy rear sig relocate.
guess you could call it team work[sm=deal.gif]
a question about installing them turn sig standoffs on the triple tree pinch bolts
i assume you torqued the pinch bolts to spec with the standoff mounted?
did you encounter a problem when torquing that the standoff wanted to "rotate" and not stay in place?
(i hope i am making myself clear)
when i tried it, i couldn't seem to keep the standoff in position(perpendicular to the fork)
they would rotate (right one upwards, left one downwards) in the direction of closing the bolt.
I'm not relocating mine to the forks, but after reading the query,
I went out and mocked up and torqued the pinch bolts to the 35 ft/lb value.
First picture -
Here I am using a Spud Wrench to hold the "standoff" while torking.
.

.
OK, next snapshot, (below)
The red arrow shows a shim washer. That is what I like to use in this type of application.
The blue arrow, a "normal" flat washer is only in this picture to illustrate the difference.
The washer keeps the bolt head from biting into and twisting the "standoff".
Also shown, (green arrow) don't forget the 243 Blue TheadLocker. Surface Insensitive.
.

.
I see a lot of folks here at HDFDyna, and other places,
saying things like -
"Don't worry I used a liberal amount of LocTite".
"Use plenty, better safe than sorry".
"Don't be a cheapskate, this is a 20,000 dollar machine, lay it on heavy".
Actually, a small drop is all that is necessary (see pic above).
Shown above as well -
My torque wrenches are Proto brand. I like them a lot.
Bought mine in 1976. Way before Stanley bought Proto.
I send the them to the calibration/certification facility
every 3-4 years, for recalibration.
Don't care about the certification, I ain't wrenching the Space Shuttle,
or seeking any government contracts.
For many years, they performed the operation for free, as a courtesy.
When Stanley bought them out a few years back,
they started charging for the service.
I sent all three of my wrenches in last year, and, if I remember correctly,
I was charged around 120 bux to
clean/rebuild/calibrate/certify the three, including shipping cost
(they threw in 3 new storage boxes this time around).
Another thing I read here at HDFDyna recently
was the recommendation to fully relieve the spring pressure
before storing the wrench.
This may or may not be true.
The technicians at the Proto facility
told me to leave the wrench set at 25% value,
which in the case pictured above, my 3/8 drive ft/lb wrench,
would be stored at 20 ft/lb.
.
edited to add -
throw a couple towels over the tank and the fender below,
anytime you get a wrench this size anywhere near the paintwork
for any length of time. That **** can get slippery,
and the very slightest nick in the paint can for sure ruin your day.
Myownself, haven't made that mistake in a very long while,
but I did learn the lesson the hard way, way back when.
.
.
Last edited by mud; Jan 19, 2020 at 06:51 AM.
Thread Starter
|
Club Member
Joined: May 2006
Posts: 14,564
Likes: 9,225
From: the 50s & the 60s
ORIGINAL: HOGRIDA_06
Hey Mud, I don't care what they say about you.
I think you put together a fine write up.
And I find your post very informable.
Hey Mud, I don't care what they say about you.
I think you put together a fine write up.
And I find your post very informable.
at leest eye can right.
Thanks for the comment, I appreciate it.
I am interested in helping folks out.
The world wide interjet is a fine thing.
I've learned a lot, and,
since I have been around the block more than once,
I like to pass onthe little bit of info stored in my memory banks.
mud
Last edited by mud; Jan 3, 2009 at 09:32 AM.
XK
a question about installing them turn sig standoffs on the triple tree pinch bolts
iassume you torqued the pinch bolts to spec with the standoff mounted?
did you encounter a problem when torquing that the standoff wanted to "rotate" and not stay in place?
(i hope i am making myself clear)
when i tried it, i couldn't seem to keep the standoff in position(perpendicular to the fork)
they yould rotate (right one upwards, left one downwards) in the direction of closing the bolt.
Ezra and Jay,
I'm not relocating mine to the forks, but after reading the query,
I went out and mocked up and torqued the pinch bolts to the 35 ft/lb value.
First picture -
Here I am using a Spud Wrench to hold the "standoff" while torking.

OK, next snapshot,
The red arrow shows a shim washer. That is what I like to use in this type of application.
The blue arrow, a "normal" flat washer is only in this picture to illustrate the difference.
The washer keeps the bolthead from biting into and twisting the "standoff"."
I'm not relocating mine to the forks, but after reading the query,
I went out and mocked up and torqued the pinch bolts to the 35 ft/lb value.
First picture -
Here I am using a Spud Wrench to hold the "standoff" while torking.
OK, next snapshot,
The red arrow shows a shim washer. That is what I like to use in this type of application.
The blue arrow, a "normal" flat washer is only in this picture to illustrate the difference.
The washer keeps the bolthead from biting into and twisting the "standoff"."
thanks Mud that will save me allot o head scratchin. my boots are supposed to be here tomorrow so I'm hoping to get it all back together this weekend and have some pix to show off soon thereafter.
Last edited by mud; Jan 3, 2009 at 09:35 AM.
Thread Starter
|
Club Member
Joined: May 2006
Posts: 14,564
Likes: 9,225
From: the 50s & the 60s
ORIGINAL: XKROME
thanks Mud that will save me allot o head scratchin.
my boots are supposed to be here tomorrow
so I'm hoping to get it all back together this weekend
and have some pix to show off soon thereafter.
thanks Mud that will save me allot o head scratchin.
my boots are supposed to be here tomorrow
so I'm hoping to get it all back together this weekend
and have some pix to show off soon thereafter.
But, for others that may read my posting above,
I am going to go back and edit in, this -
throw a couple towels over the tank and the fender below,
anytime you get a wrench this size anywhere near the paintwork
for any length of time. That sh it can get slippery,
and the very slightest nick in the paint can for sure ruin your day.
Myownself, haven't made that mistake in a very long while,
but I did learn the lesson the hard way, way back when.
Looking forward to your pix soon.
mud

Last edited by mud; Jan 3, 2009 at 09:35 AM.
Thread Starter
|
Club Member
Joined: May 2006
Posts: 14,564
Likes: 9,225
From: the 50s & the 60s
ORIGINAL: WS6 Formula
Horn relocation, formed bracket and attached using the rear motor mount bolt.


Horn relocation, formed bracket and attached using the rear motor mount bolt.
The Kuryakyn taillite blackout is a really clean easy mod.
Thanks for that one as well.
This hornrelocate makes for about 4-5 options.
Off the top of my head, I can think of at least one other member
Bobber Rider, has another technique.
mud
Last edited by mud; Jan 3, 2009 at 09:36 AM.
Thread Starter
|
Club Member
Joined: May 2006
Posts: 14,564
Likes: 9,225
From: the 50s & the 60s
ORIGINAL: WS6 Formula
eBay seller "gregg5869" has some real nice inexpensive billet timing covers:
eBay seller "gregg5869" has some real nice inexpensive billet timing covers:
One for 50 buck eBay stuff,
and one for 50 buck J and P catalog shopping.
mud
Last edited by mud; Jan 3, 2009 at 09:36 AM.
Road Warrior
Joined: Nov 2005
Posts: 1,877
Likes: 4
From: Houston
HD Forum Stories
The Best of Harley-Davidson for Lifelong Riders

6 Weirdest Harley-Davidsons Ever Sold to the Public
Verdad Gallardo
7 Times Harley-Davidson Chucked Tradition Out the Window
Verdad Gallardo
7 Surprising Harley-Davidson Products that Are Not Motorcycles
Verdad Gallardo
8 Best Harley-Davidson Motorcycles Ever
Pouria Savadkouei
10 Worst Harley-Davidson Motorcycles Ever
Pouria Savadkouei
Killer Custom's Jail Break Is The Breakout That Refused to Blend In
Verdad Gallardo
Crazy Bunderbike Build Looks Amazing, But Is It Impossible to Ride?
Verdad Gallardo
Harley-Davidson Reveals Super Cool Cafe Racer Concept
Verdad Gallardo
Engraved Rebellion: Inside Bundnerbike's Glam Rock II
Verdad Gallardo
Banned
Joined: Apr 2007
Posts: 3,349
Likes: 2
From: Appling GA
This one prolly fits in that cat. but since I got the idea fron this thread I'm posting a pic.
They dont make a brake pedal cover for a sportster. I found I nice kury with spikes on ebay for a 20spot. I drilled a hole center of the
stock pedal and I had to grind a small bit of the back plate of the brake cover off, I also fourtyfived the leading edge of the alum. pedal and some off the top off because it was a little too thick for the pedal to slide onto. But I got in on and I like the look.
I also replaced my sissybar with a detach last week and lost the fender reflectors. And put a 180 jet in the carb.
I know I said I was gonna change the chin spoiler out for a skid plate but its starting to grow on me. That mods on hold.
I found a couple of sporty dipsticks on ebay I am gonna make my knife dipstick soon (hopefully)
[IMG]local://upfiles/30673/2E28FADC67C041338555A7B58DCA4587.jpg[/IMG]
They dont make a brake pedal cover for a sportster. I found I nice kury with spikes on ebay for a 20spot. I drilled a hole center of the
stock pedal and I had to grind a small bit of the back plate of the brake cover off, I also fourtyfived the leading edge of the alum. pedal and some off the top off because it was a little too thick for the pedal to slide onto. But I got in on and I like the look.
I also replaced my sissybar with a detach last week and lost the fender reflectors. And put a 180 jet in the carb.
I know I said I was gonna change the chin spoiler out for a skid plate but its starting to grow on me. That mods on hold.
I found a couple of sporty dipsticks on ebay I am gonna make my knife dipstick soon (hopefully)
ORIGINAL: mudpuddle
I need to start a couple new topics.
One for 50 buck eBay stuff,
and one for 50 buck J and P catalog shopping.
mud
I need to start a couple new topics.
One for 50 buck eBay stuff,
and one for 50 buck J and P catalog shopping.
mud