* HOW TO * under fifty bux *
#1221
 03-31-2009, 10:44 PM

I have been lurking for a couple weeks and have to say this thread is addicting. Especially to a guy with metal shavings in his blood. I just bought a 05 FXDLI and have already started the madness. I'll try to get some pics added if I can figure it out.
1st- I took out the lower tree bolts to hold the tubes.
2nd-Tig Welded a 3/8 - 16 x 1-1/2 hex head bolt to a 5/16-24 x 1 bolt,Head to Head.
.
.
http://i511.photobucket.com/albums/s...s/100_1744.jpg
.
.
3rd- Took off the signals and the old hardware.
4th- Installed the 5/16 nuts from the old hardware onto the new bolts.
5th- Threaded the bolts into the signal housing as far as possible. Dont over turn them because I think they will actually hit the buld housing and could break the case. Just finger tight.
6th- Install the boots purchased from A-dvance Auto. (They are from a 97 Ford pickup- caliper pin boots)
7th- Thread the 3/8 side into the tree.
As you thread the 3/8 bolt in the 5/16 bolt will be un-threading from the signal. Mine came all out but a couple threads. Enought to tighten the jam nut against the signal housing. Torque down the 3/8 bolts. Slide the boot back over it and done.
Bfore
.
.
http://i511.photobucket.com/albums/s...s/100_1745.jpg
.
.
After
.
.
http://i511.photobucket.com/albums/s...ters/After.jpg
.
.
#1222
04-01-2009, 08:08 AM
Cruiser
Join Date: Mar 2009
Location: IN
Posts: 108
Likes: 0
Received 0 Likes
on
0 Posts
#1223
04-01-2009, 03:53 PM
Advanced
Probably most already know this. On my 1979 FXS Lowrider and 1987 FXR, and I'm assuming all other Harley's, at least later shovelheads to date, the headlights came on on both ignition switch settings. If your battery is a bit weak and you're trying to start your bike with the headlight on, you're taking away some of the power available for the starter. The switch actually has two settings built in, one to run with lights off and the other to run with lights on. There's a jumper that connects the ignition terminal of the switch to the light terminal. Just unscrew the jumper from the light terminal and double it back on to the ignition terminal. Now you have a three position switch, off-ignition on/lights off-ignition on/lights on. If you don't like it, just reconnect back to the original configuration. Just remember to turn your lights on once it's started especially if it's required in your state.
Dave
Dave
Last edited by chengdave2003; 04-01-2009 at 03:59 PM.
#1224
04-02-2009, 04:34 PM
Advanced
I've been working my butt off trying to get my old Keihin butterfly carb running right on my 1987 FXR. My budget is tight, I can't buy another carb unless I can find a good deal. One of the more difficult things to do is adjusting the idle on the bike. I don't want to carry a screwdriver with me to adjust the idle so I came up with this extended adjuster using stuff I had in the shop. I started with a 1/2" stainless steel allen head bolt about 2 inches long or so and turned down the shank till it was about .25" diameter. Then I drilled and tapped it for a 4mm - .70 thread. I red Loctited the 4mm screw in the tapped hole after I removed the head of the screw. I turned the inside of the hex for the allen wrench to fit a small coat button off of my military service jacket that I RTV'd in place just to jazz it up a bit. I'm attaching photo's of what the bolt looked like before and after I finished it (the unfinished screw is a bit shorter as I couldn't find another the same length). Works like a champ...


After changing the pilot jet and adjusting the air/fuel mixture and idle, it seems to be running better than it ever has before....it's certainly starting better.... I need some nice weather to give it a good test drive...
Dave Young
After changing the pilot jet and adjusting the air/fuel mixture and idle, it seems to be running better than it ever has before....it's certainly starting better.... I need some nice weather to give it a good test drive...
Dave Young
Last edited by chengdave2003; 04-03-2009 at 06:19 PM. Reason: Updated picture
#1225
04-03-2009, 02:00 PM
Stage III
Join Date: Apr 2009
Location: Portland Oregon
Posts: 3
Likes: 0
Received 0 Likes
on
0 Posts
#1226
04-10-2009, 03:25 PM
Advanced
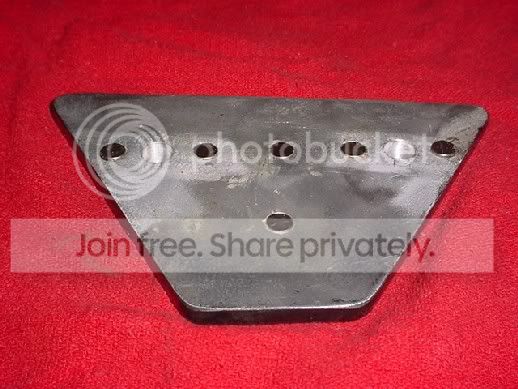
In post 861 of this thread I had posted a side plate that I had fabricated to go beneath the left side cover of my 1987 FXR. It was a temporary design as I wanted one that I could quickly remove to use as a plate under my kickstand on gravel or asphalt. Today I re-fabricated the plate.
On a bar under the side plate there is two holes drilled from factory that had plastic plugs in it. I took two �-20x.5” Allen head bolts and chucked them up in the lathe. I shortened the head of both as they are .25 inches thick as is the diamond plate. I also tapered the head to about 1/16” from the bottom of the head. These bolts were installed in the factory drilled holes to act as guides for the new kickstand plate. I started off with � inch aluminum diamond plate, sprayed layout fluid on it and scribed the dimensions and then rough cut the plate to shape. I then put it on a milling machine and milled it to its proper dimension. Turning over I used a mill and plunge cut twice to correlate to the location of the Allen head bolts just installed. I had several � inch diameter high strength magnets. I plunge cut six holes in back of the cover and epoxied the magnets in place. I tested the plate for fit and function. It's easy to pull off and it’s not going anywhere unless I pull it off. I spray painted it gloss black. After it dried, I cleaned off the raised “diamonds” on the plate for looks. I’m planning on using the plate magnet side down, with the kickstand resting only on the “diamonds” of the diamond plate. It goes without saying that I’ll probably have to paint or retouch it every once in a while.


On a bar under the side plate there is two holes drilled from factory that had plastic plugs in it. I took two �-20x.5” Allen head bolts and chucked them up in the lathe. I shortened the head of both as they are .25 inches thick as is the diamond plate. I also tapered the head to about 1/16” from the bottom of the head. These bolts were installed in the factory drilled holes to act as guides for the new kickstand plate. I started off with � inch aluminum diamond plate, sprayed layout fluid on it and scribed the dimensions and then rough cut the plate to shape. I then put it on a milling machine and milled it to its proper dimension. Turning over I used a mill and plunge cut twice to correlate to the location of the Allen head bolts just installed. I had several � inch diameter high strength magnets. I plunge cut six holes in back of the cover and epoxied the magnets in place. I tested the plate for fit and function. It's easy to pull off and it’s not going anywhere unless I pull it off. I spray painted it gloss black. After it dried, I cleaned off the raised “diamonds” on the plate for looks. I’m planning on using the plate magnet side down, with the kickstand resting only on the “diamonds” of the diamond plate. It goes without saying that I’ll probably have to paint or retouch it every once in a while.
Last edited by chengdave2003; 04-13-2009 at 08:06 AM.
#1228
04-21-2009, 04:48 PM
i can't believe i spent the last 2 days at work reading this whole thread. once i started i couldn't stop. lot's of great ideas. i liked the idea of moving idiot lights off the headlight visor. i have a super glide with the dual tach speedo combo. added drags last winter and now trying to get the guages down onto tank. i think a low rider tank is what i'm leaning toward. are there other model tanks that will fit on stock tabs without mods???
#1229
04-22-2009, 04:33 AM
Novice
Join Date: Jun 2008
Location: Kent, England
Posts: 19
Likes: 0
Received 0 Likes
on
0 Posts
i can't believe i spent the last 2 days at work reading this whole thread. once i started i couldn't stop. lot's of great ideas. i liked the idea of moving idiot lights off the headlight visor. i have a super glide with the dual tach speedo combo. added drags last winter and now trying to get the guages down onto tank. i think a low rider tank is what i'm leaning toward. are there other model tanks that will fit on stock tabs without mods???
Thanks for mentioning moving the idiot lights off the headlight visor mod. Can you tell me the post number in this thread and save me trawling?
Thanks
JohnCT