Using a lift on a Dyna frame
#11
 11-14-2013, 09:37 AM


Outstanding HDF Member
Humm Ive got the HF lift and although I moved the lift pads out further a long time ago, I still need to know where the lift points are. I mean the pan drops below the frame rails and theres a welded plate that runs 8-10in a long the side. Those who use the HD spacers, where do those go?
Im liking the idea of fabricating shims I would use when I lift the bike, I had a similar shim on my wifes VStar. I just need to know where on the frame I need the shims.
Ive got it apart while Im waiting for the apes to arrive and once I put it all back together I will concentrate on the shims. Interesting the wiring doesnt use Molex connectors like the Touring bikes. Im hoping 10" bars wont require throttle and brake line extensions but if its going to be done right it may be necessary......but thats the subject of a diff thread.
Ive got it apart while Im waiting for the apes to arrive and once I put it all back together I will concentrate on the shims. Interesting the wiring doesnt use Molex connectors like the Touring bikes. Im hoping 10" bars wont require throttle and brake line extensions but if its going to be done right it may be necessary......but thats the subject of a diff thread.
For example, properly cut piece of wood with maybe just the trans pan shim from the Harley shim kit i already have bolted to the board or jack pad. Mainly for locating the jack perfectly every time. I havent decided yet how I will be addressing this issue, but the Harley lift blocks are garbage.
#12
11-14-2013, 11:11 AM
Yeah anytime your using plastic and shims in the same sentence your going to be in for a wild ride. I had a contoured carpeted board that facilitated frame deviations on my mrs VStar that worked pretty well. Moving the pads further out def stabilizes the load and already did that. When I get back to it I will post my mod to include moving the pads out which can be done using the same bolts and only requires cutting a notch on the end of the pad frame to allow it to drop down completely.
#13
11-14-2013, 01:38 PM

If this works correctly, below I have copied a post I made some time back about some home made adapters I made. I had read quite a few concerns about the Harley adapters (plastic two piece) and decided to make my own. They were simple to make and have worked very well. I also made a modification to my Harbout Freight lift that I have been pleased with as well. Emmo
Harbour Freight Lift Modification and DIY Adapters
I thought I would share a couple of DIY projects I just completed. I have been researching a jack/lift on this site for my Super Glide. I had settled on the Harbour Freight ($59.95), but I had decided not to alter the jack and instead make my own lift adapters. I didn't care for some of the things I read and pictures I have seen of the HD adapters. I made my DIY adapters out of 2" flat steel with 1 1/8" x 2" blocks of old seasoned poplar. The flat bar is held to the wood block two lengths of all thread and the inside of the adapter wall is filled with two strips of hard rubber that make a perfect fit to the bike frame. The one odd adapter for the rear right I made from a section of U channel padded with leather and filed with the same rubber to allow for a tight fit to the 1 1/8" protective shield that's welded to the frame. The three adapters are held to the frame by two strips of innertube.
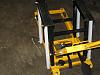
Once the adapters were complete I got to looking at the jack and thinking about how someone had moved the lift rails futher apart by attaching the lift arms to the inside slot on the lift rail. I liked the idea of moving the lift rails further apart. Since I had some 1 inch square tubing in the shop I decided to beef up the jack by adding four new sections of lift arms. This modification did not require any drilling to the Jack, only re-bolting the lift rails one slot left and right. So, I did end up modifying the jack ....a little.
Based on the modifications other have made and used for several years, I'm sure this is overkill. But, I thought I would share anyway. I had the all thread, rubber and square tubing in the shop, so al I had to buy was the flat steel and four bolts. Total cost was right at $20. Maybe I'll try it out this Saturday. Emmo
Attached Thumbnails
Harbour Freight Lift Modification and DIY Adapters
I thought I would share a couple of DIY projects I just completed. I have been researching a jack/lift on this site for my Super Glide. I had settled on the Harbour Freight ($59.95), but I had decided not to alter the jack and instead make my own lift adapters. I didn't care for some of the things I read and pictures I have seen of the HD adapters. I made my DIY adapters out of 2" flat steel with 1 1/8" x 2" blocks of old seasoned poplar. The flat bar is held to the wood block two lengths of all thread and the inside of the adapter wall is filled with two strips of hard rubber that make a perfect fit to the bike frame. The one odd adapter for the rear right I made from a section of U channel padded with leather and filed with the same rubber to allow for a tight fit to the 1 1/8" protective shield that's welded to the frame. The three adapters are held to the frame by two strips of innertube.
Once the adapters were complete I got to looking at the jack and thinking about how someone had moved the lift rails futher apart by attaching the lift arms to the inside slot on the lift rail. I liked the idea of moving the lift rails further apart. Since I had some 1 inch square tubing in the shop I decided to beef up the jack by adding four new sections of lift arms. This modification did not require any drilling to the Jack, only re-bolting the lift rails one slot left and right. So, I did end up modifying the jack ....a little.
Based on the modifications other have made and used for several years, I'm sure this is overkill. But, I thought I would share anyway. I had the all thread, rubber and square tubing in the shop, so al I had to buy was the flat steel and four bolts. Total cost was right at $20. Maybe I'll try it out this Saturday. Emmo
Attached Thumbnails


Last edited by Emmo; 11-14-2013 at 01:43 PM.
#14
11-14-2013, 02:17 PM
Outstanding HDF Member
Well, I just meaured my Harbor Freight Jack and it is over 2 inches narrower than the Sears red Jack, so if I was gonna do the Red Jack mod to the Harbor Freight unit, my lift pads would have to be spaced WAY farther out this requiring really long bolts and spacers to accomodate this. Then I would still doubt that the narrow lifting frame would not hit somewhere.
#15
11-14-2013, 06:19 PM
If this works correctly, below I have copied a post I made some time back about some home made adapters I made. I had read quite a few concerns about the Harley adapters (plastic two piece) and decided to make my own. They were simple to make and have worked very well. I also made a modification to my Harbout Freight lift that I have been pleased with as well. Emmo
Harbour Freight Lift Modification and DIY Adapters
I thought I would share a couple of DIY projects I just completed. I have been researching a jack/lift on this site for my Super Glide. I had settled on the Harbour Freight ($59.95), but I had decided not to alter the jack and instead make my own lift adapters. I didn't care for some of the things I read and pictures I have seen of the HD adapters. I made my DIY adapters out of 2" flat steel with 1 1/8" x 2" blocks of old seasoned poplar. The flat bar is held to the wood block two lengths of all thread and the inside of the adapter wall is filled with two strips of hard rubber that make a perfect fit to the bike frame. The one odd adapter for the rear right I made from a section of U channel padded with leather and filed with the same rubber to allow for a tight fit to the 1 1/8" protective shield that's welded to the frame. The three adapters are held to the frame by two strips of innertube.
Once the adapters were complete I got to looking at the jack and thinking about how someone had moved the lift rails futher apart by attaching the lift arms to the inside slot on the lift rail. I liked the idea of moving the lift rails further apart. Since I had some 1 inch square tubing in the shop I decided to beef up the jack by adding four new sections of lift arms. This modification did not require any drilling to the Jack, only re-bolting the lift rails one slot left and right. So, I did end up modifying the jack ....a little.
Based on the modifications other have made and used for several years, I'm sure this is overkill. But, I thought I would share anyway. I had the all thread, rubber and square tubing in the shop, so al I had to buy was the flat steel and four bolts. Total cost was right at $20. Maybe I'll try it out this Saturday. Emmo
Attached Thumbnails
Now Im not following you on the adapters and it might just be the geezer in me. Could you show the placement of the shims?
#16
11-15-2013, 01:58 PM
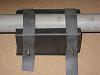
TUCCI, my bike is a 2009 Super Glide Custom. The adapters I made are three wood blocks that go left and right front frame as far forward as possible and left rear frame. The right rear adapter (where the metal plate hanges down) is a small section of U channel with leather for padding. The back of the rear adapters are placed 17 inches from the front of the forward adapters. The lift arms are 17 inches apart. Here are a few picutures I snapped and a drawintg that might better explain. I don't think the the U channel for the right rear was all that necessary, but I patterned everything after the adapter kit that Harley sells.I hope this helps and hopefully I copy the pictures correctly. Emmo
#17
11-15-2013, 05:51 PM
TUCCI, my bike is a 2009 Super Glide Custom. The adapters I made are three wood blocks that go left and right front frame as far forward as possible and left rear frame. The right rear adapter (where the metal plate hanges down) is a small section of U channel with leather for padding. The back of the rear adapters are placed 17 inches from the front of the forward adapters. The lift arms are 17 inches apart. Here are a few picutures I snapped and a drawintg that might better explain. I don't think the the U channel for the right rear was all that necessary, but I patterned everything after the adapter kit that Harley sells.I hope this helps and hopefully I copy the pictures correctly. Emmo
How tall are the wood blocks placed in the three corners?
Does the 'U' shaped wedge that slides over the metal plate give any height, in other words how thick is the padding towards the lift rail (1/2, 5/8 ?)
Some may not have 17" lift spacing on their lift pads (I will need to measure mine but think Im pretty close) if theres less space where would that lack of dimension be taken up, front, rear or perhaps move the front to back blocks closer together?
Is there a chance of bending the 'pan plate' if you pull the blocks closer together?
Thanks for taking the time to share your experience with us.
#18
11-15-2013, 08:26 PM
TUCCI, the wood blocks that I made are 2 1/8” wide X 1 3/16” high X 4 �” long. I had some hard rubber that’s 3/8” thick that I cut to fill in the inside of each adapter on both sides so it fit snug to the frame. I wanted the blocks of wood to be wider than the frame to make it more stable on the lift arms. The steel plate that I used on each side of the adapters was 2” wide and cut to length. The U shape channel for the fourth adapter is about 1/8” inch thick with the metal and the leather. I made the U adapter first and attached it to the Plate that’s welded to the frame. I then wanted the blocks to be thick enough so that all four adapters would be level on the lift arms.
If the lift arms are closer together, the adapter could be moved closer together. However, the farther apart they are, the more stable I would think. Emmo
I might add that the wood I used was some very oldd and very seasoned poplar that I had laying around the shop. It was nearly as hard as the steel sides.
Last edited by Emmo; 11-15-2013 at 08:31 PM.
#19
11-15-2013, 10:01 PM


#20
11-16-2013, 08:44 AM
Awesome guys great thread. Yeah the JS is nice but too much for my budget, maybe someday when $550 is burning a hole in my pocket.
Thanks for the pic of the placement Jaron....and Emmo, thank you for all the design data......its guys like you that make the HDForum what it is, a priceless resource for anyone who insists on doing it himself. ....hoorahhh.
Thanks for the pic of the placement Jaron....and Emmo, thank you for all the design data......its guys like you that make the HDForum what it is, a priceless resource for anyone who insists on doing it himself. ....hoorahhh.