
Adding Hardbags to an FLS - 2014 Softail Slim
#11
 10-03-2015, 05:21 PM

Road Master
OK well if you say so they don't make a kit for it. I mean what's the difference between the slim and any other softtail. Because I could have swore that it was either native or bad dads who makes a kit that will fit ALL softtail. This kit I just seen even fits back to 2000. I mean did the slim get a different fame design ? Or a different placement of fender bolts. If so please inform me because I like to know this stuff. But to me the slim is just a Harley duece with a cruiser front end. I mean it's not like they ever design something new we all know they just rehash the older stuff over and over
#12
10-04-2015, 05:04 PM

OK well if you say so they don't make a kit for it. I mean what's the difference between the slim and any other softtail. Because I could have swore that it was either native or bad dads who makes a kit that will fit ALL softtail. This kit I just seen even fits back to 2000. I mean did the slim get a different fame design ? Or a different placement of fender bolts. If so please inform me because I like to know this stuff. But to me the slim is just a Harley duece with a cruiser front end. I mean it's not like they ever design something new we all know they just rehash the older stuff over and over
Last edited by fidgit; 10-04-2015 at 07:45 PM.
#13
10-04-2015, 11:12 PM
Ok so we left off with the rear fender apart and the tail lights removed. I had to cut the wiring to move forward. Like i said previously, you can disassemble the light itself but its a pain and ultimately I will have to splice some wires so not worth the effort. <br><br> The Alloy Art fender strut lights are pretty simple to mount, they really just slide onto the frame rail from the back. I ran the wires through the hole in the strut thats intended for the factory wiring. <br><br> 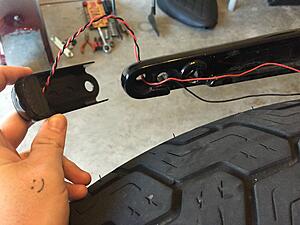 <br><br>I used the same cable clips that the factory wires ran through as well. Next comes putting the fender and sissy bar etc back on. This is a super pain in the ***. The bracket underneath the fender needs to be held in place while you also hold the sissy bar and the fender itself and screw the bolts in. If you have 5 hands, youre golden. If not, expect a lot of cursing and having to do things twice.<br>Here is the really tricky part though. The new brackets for the bags need to be held in by the same bolts that hold the fender etc in place. I had to make sure all that was lined up, THEN get the bracket in place and bolt it in as well. I decided to use a rubber washed over the tail light but under the saddle bag support for scratch proofing purposes. Im not sure if it will really be worth the effort but they cost like 25 cents each so WTH. <br>Heres a note for anybody trying this same type of modification; The factory bolts will not be long enough to use. I popped into home depot and picked up (2) 3/8x1.5in coarse threaded bolts for the rear and (2) 3/8x1in coarse threaded bolts for the front. <br>
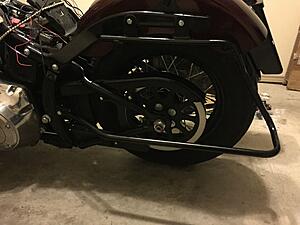 <br> So if youre confused, I did<br>Nut bar (?) <br>interior frame/bracket<br>Actual painted fender<br>sissybar<br>strut<br>LED taillight<br>rubber washer<br>saddlebag bracket<br><br>
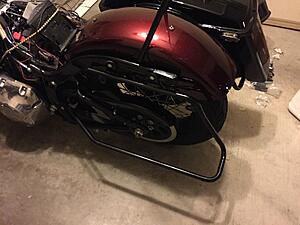 <br><br>Now I bought these bags from a chinese knock off manufacturer on eBay. (I know, I know...
 ) Seriously they were $200 +shipping which wasnt too bad. They are good quality to be honest, not painted. More like Shiny ABS plastic. <br>The bags just sit on the brackets, theres a rubber piece that is underneath the bag itself to keep it from moving around. They are connected to the bike with a small metal bracket that goes through a rubber gasket in the side of bag itself.<br><br>
 <br><br>
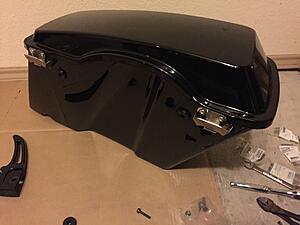 <br><br> Easy enough right? The fit is a little rough but ultimately it all went together pretty easily. <br><br>
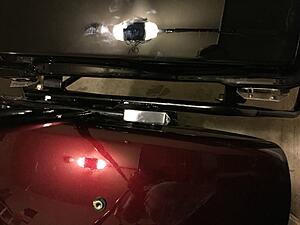 <br><br> The gap between the bags and the fender are a little wide but its to be expected. Im ok with it. <br><br> Im actually really happy with how they look and how it all went together. In total I spent about $5/600 on the whole setup.<Br><br>Bags-250<br>Bracket- 80<br>welding- 100<br>taillights - $120<br>connector 15<br>Plus a few dollars for spray paint, extra bolts and the rubber washers.<br><br>All in all Id say it was an easy project with an awesome outcome. Now Im ready for trips without my backpack.<br><br>
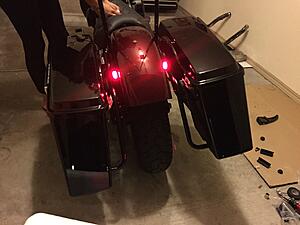 <br>
<br>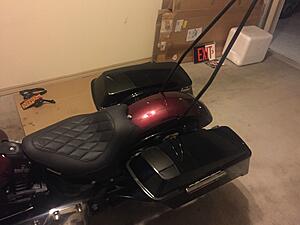 <br>
<br>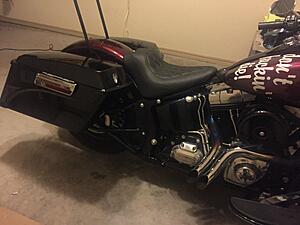 <br>
<br>
 <br><br>I used the same cable clips that the factory wires ran through as well. Next comes putting the fender and sissy bar etc back on. This is a super pain in the ***. The bracket underneath the fender needs to be held in place while you also hold the sissy bar and the fender itself and screw the bolts in. If you have 5 hands, youre golden. If not, expect a lot of cursing and having to do things twice.<br>Here is the really tricky part though. The new brackets for the bags need to be held in by the same bolts that hold the fender etc in place. I had to make sure all that was lined up, THEN get the bracket in place and bolt it in as well. I decided to use a rubber washed over the tail light but under the saddle bag support for scratch proofing purposes. Im not sure if it will really be worth the effort but they cost like 25 cents each so WTH. <br>Heres a note for anybody trying this same type of modification; The factory bolts will not be long enough to use. I popped into home depot and picked up (2) 3/8x1.5in coarse threaded bolts for the rear and (2) 3/8x1in coarse threaded bolts for the front. <br>
 <br> So if youre confused, I did<br>Nut bar (?) <br>interior frame/bracket<br>Actual painted fender<br>sissybar<br>strut<br>LED taillight<br>rubber washer<br>saddlebag bracket<br><br>
 <br><br>Now I bought these bags from a chinese knock off manufacturer on eBay. (I know, I know...
 <br><br>
 <br><br> Easy enough right? The fit is a little rough but ultimately it all went together pretty easily. <br><br>
 <br><br> The gap between the bags and the fender are a little wide but its to be expected. Im ok with it. <br><br> Im actually really happy with how they look and how it all went together. In total I spent about $5/600 on the whole setup.<Br><br>Bags-250<br>Bracket- 80<br>welding- 100<br>taillights - $120<br>connector 15<br>Plus a few dollars for spray paint, extra bolts and the rubber washers.<br><br>All in all Id say it was an easy project with an awesome outcome. Now Im ready for trips without my backpack.<br><br>
 <br>
<br> <br>
<br> <br>
<br>
Last edited by fidgit; 10-04-2015 at 11:20 PM.
#14
10-04-2015, 11:25 PM
If anybody has any questions or wants to know where I bought this stuff, that kinda thing just shoot me a PM and Ill help you out. It was such a pain figuring out where to buy stuff or what I needed because I seriously have not seen anyone else do this except that ONE guy on this forum who doesnt answer messages and isnt active anymore lol. I will definitely say thanks to him for showing me its a possibility though. <br><br>Also, YES that is a new MUSTANG WIDE TRIPPER seat and pillion on the bike. Another part I got from RevZilla that is awesome. Definitely worth the $$ on those 4/500 mile days.
#15
10-05-2015, 07:41 AM
Elite HDF Member
Nice write up.
You do not have to disassemble the tail lights, or cut the wires, to remove them. Simply get a paperclip and remove the pins from the connectors on the ends of the wires.
Also, removing the entire fender and struts assembly together makes it much easier. Then you can lay down some towels and set it all on the ground while you work on it.
#16
10-05-2015, 08:10 AM

fidgit might I suggest an in dept how to; covering all aspects of this topic and than submitting it to a mod to either have it stickied, or at the very least, added to the DIY section for future viewing?
I was really nice of you to share this valuable piece of information and I my self would hate having it disappear forever. As often other important threads do.
I was really nice of you to share this valuable piece of information and I my self would hate having it disappear forever. As often other important threads do.
#17
10-05-2015, 08:23 AM

I'm no expert on the welding thing so I can't really say much about it. If it holds, no worries. If it doesn't, you find a different shop. Kinda hard once you drop it off to get done. No real option but to pay and go on your way. Not a huge deal, so don't let anyone get you down about it...
However, to me BigDog's comments portray a pretty strange attitude. I do my own welding but if I had to have something done by a shop the first thing I'd do is see examples of the quality of the work they do. "If it holds, no worries"? Holding is the only measure of the quality of a weld for you? " Kinda hard once you drop it off to get done. No real option but to pay and go on your way." ? Really? So if a shop does a **** job of welding on your piece you just pay the money and skip merrily on your way? Really? If I'm paying a shop to weld for me I'm going to expect a quality weld to include proper penetration, strength, and appearance. If the weld isn't up to reasonable standards I'm not paying for it. It the shop trashes my parts they are putting some money in my pocket or providing me with acceptable replacement parts. Maybe I'm strange but when I pay for a service I tend to expect that service to be done properly.
#18
10-05-2015, 09:50 AM
I can't see the photos so I can't comment on them one way or the other.
However, to me BigDog's comments portray a pretty strange attitude. I do my own welding but if I had to have something done by a shop the first thing I'd do is see examples of the quality of the work they do. "If it holds, no worries"? Holding is the only measure of the quality of a weld for you? " Kinda hard once you drop it off to get done. No real option but to pay and go on your way." ? Really? So if a shop does a **** job of welding on your piece you just pay the money and skip merrily on your way? Really? If I'm paying a shop to weld for me I'm going to expect a quality weld to include proper penetration, strength, and appearance. If the weld isn't up to reasonable standards I'm not paying for it. It the shop trashes my parts they are putting some money in my pocket or providing me with acceptable replacement parts. Maybe I'm strange but when I pay for a service I tend to expect that service to be done properly.
However, to me BigDog's comments portray a pretty strange attitude. I do my own welding but if I had to have something done by a shop the first thing I'd do is see examples of the quality of the work they do. "If it holds, no worries"? Holding is the only measure of the quality of a weld for you? " Kinda hard once you drop it off to get done. No real option but to pay and go on your way." ? Really? So if a shop does a **** job of welding on your piece you just pay the money and skip merrily on your way? Really? If I'm paying a shop to weld for me I'm going to expect a quality weld to include proper penetration, strength, and appearance. If the weld isn't up to reasonable standards I'm not paying for it. It the shop trashes my parts they are putting some money in my pocket or providing me with acceptable replacement parts. Maybe I'm strange but when I pay for a service I tend to expect that service to be done properly.
To be honest, I wasnt sure how to take his comments either. Im new to the city of Austin, and I live in an apartment so I wasnt able to bring all my tools with me. Including my trusty old stick welder. Now I did a search for small job welding services and companies that could do this but nobody wanted the work. Finally I contacted a local welding supply company and just asked them if it was possible for them to recommend someone.
The owners said he knew a guy that did that kinda work on the side. We met, he seemed cool, understood what i needed done and had an old BMW r90 that was in great shape. He said $80-100 and I agreed.
I got them back and the brackets were in the wrong place. I think he simply misunderstood my directions. -I said 16cm center to center, he moved the bracket 16 cm from where it was No big deal, went over the problem, he agreed to fix them. Had them back and correct the next day. I was satisfied with the work and everything lined up. He asked for $100. Again I agreed and dont feel overcharged.
That being said, if something goes wrong and they come apart, I might shoot him an email and see if he wants to make the repair, I dont expect him to do it for free though. Ultimately I didnt bring this stuff to a business and get a receipt. I have to accept that I may be stuck w a faulty job that needs to be done over. But Ill cross that bridge when i get there.
For now Im happy with how they look and Im satisfied.
#19
10-05-2015, 10:07 AM
fidgit might I suggest an in dept how to; covering all aspects of this topic and than submitting it to a mod to either have it stickied, or at the very least, added to the DIY section for future viewing?
I was really nice of you to share this valuable piece of information and I my self would hate having it disappear forever. As often other important threads do.
I was really nice of you to share this valuable piece of information and I my self would hate having it disappear forever. As often other important threads do.
#20
10-05-2015, 01:47 PM