Heritage Valve Adjustment
#11
 03-30-2016, 07:18 AM

Outstanding HDF Member
I'd tell them that if I hire them to fix the gasket, and when I get it back it's making more noise than when they got it.... THEY have a problem!
If they won't agree to stand behind their work, take it somewhere else. Absolutely no reason you should be on the hook for something they screw up!!!
If they won't agree to stand behind their work, take it somewhere else. Absolutely no reason you should be on the hook for something they screw up!!!
Life has taught me to get guarantees in writing before making payments.
#12
03-31-2016, 11:43 AM
View these pics and you can see where the gaskets are located. There are also two gaskets that are part of the newer style breather assembly in the rocker boxes.
These are pics that are part of a tech tip I wrote on the cam tensioner upgrade.
http://s471.photobucket.com/user/gtm...upgrade?sort=9
These are pics that are part of a tech tip I wrote on the cam tensioner upgrade.
http://s471.photobucket.com/user/gtm...upgrade?sort=9
The following users liked this post:
Campy Roadie (03-31-2016)
#13
03-31-2016, 01:10 PM

View these pics and you can see where the gaskets are located. There are also two gaskets that are part of the newer style breather assembly in the rocker boxes.
These are pics that are part of a tech tip I wrote on the cam tensioner upgrade.
http://s471.photobucket.com/user/gtm...upgrade?sort=9
These are pics that are part of a tech tip I wrote on the cam tensioner upgrade.
http://s471.photobucket.com/user/gtm...upgrade?sort=9
#14
04-01-2016, 09:40 AM
Road Warrior
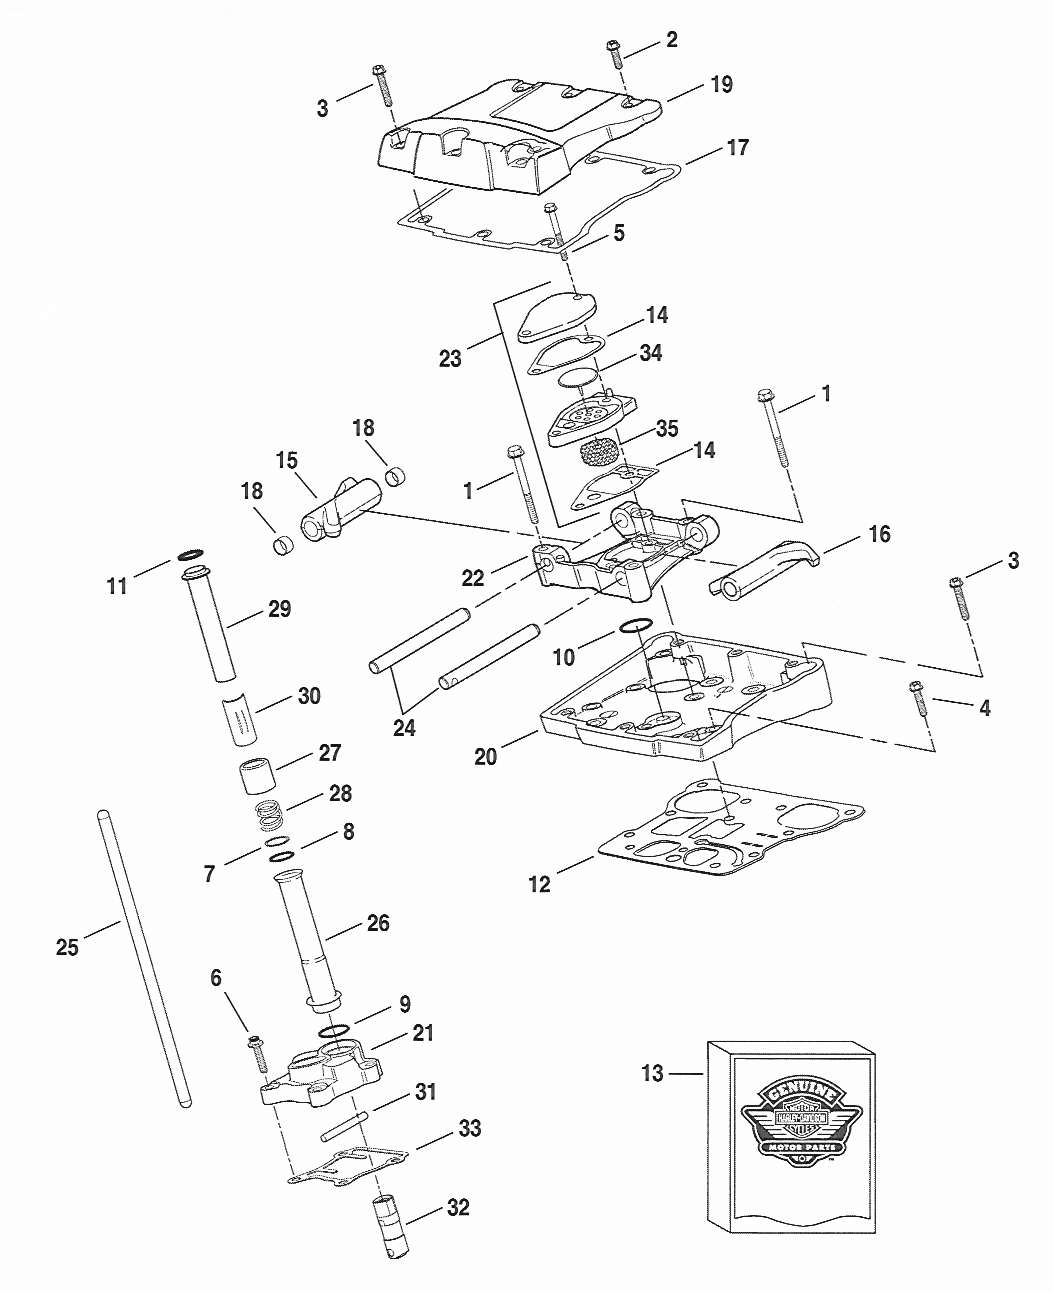
There are two parts to the rocker box itself, upper and lower. The rocker assembly is contained by the lower rocker box. Both have gaskets. The upper gasket is between the lower rocker box and the upper; the other gasket is between the lower rocker box and the head.
So to replace the lower rocker box gasket you have to remove the rocker assembly. Replacing the lifter block gasket would involve removing the push rods and push rod tubes (or at least lifting them) as well as the lifter block itself.
So to replace the lower rocker box gasket you have to remove the rocker assembly. Replacing the lifter block gasket would involve removing the push rods and push rod tubes (or at least lifting them) as well as the lifter block itself.
#15
04-02-2016, 04:50 AM

#16
04-02-2016, 05:43 AM

Road Warrior
The rest of that picture you can take off and replace the lower gasket No 12, which I presume is the one you need done. Note tho they will probably replace the top one too, and probably the two breather assemblies if they are the newest type because they should be glues together but often come apart when the engine is dismantled.
The new gasket No 12 should be the same thickness as the old one so when the top is all put back together there should be no difference re pushrods what so ever.
#17
04-02-2016, 09:29 AM
Given you have no valve train noise or desire for anyone to disturb anything in that department, the pushrod tubes sit in the cylinder head so do not NEED to be touched/disturbed at all, or the pushrods for that matter (stock/solid/or adjustable - doesn't matter).
The rest of that picture you can take off and replace the lower gasket No 12, which I presume is the one you need done. Note tho they will probably replace the top one too, and probably the two breather assemblies if they are the newest type because they should be glues together but often come apart when the engine is dismantled.
The new gasket No 12 should be the same thickness as the old one so when the top is all put back together there should be no difference re pushrods what so ever.
#18
04-02-2016, 06:22 PM
Road Warrior
Yea, I got lost on that bit too, which was why I thought it may be useful to clarify.
#19
04-07-2016, 01:11 PM

There are two parts to the rocker box itself, upper and lower. The rocker assembly is contained by the lower rocker box. Both have gaskets. The upper gasket is between the lower rocker box and the upper; the other gasket is between the lower rocker box and the head.
So to replace the lower rocker box gasket you have to remove the rocker assembly. Replacing the lifter block gasket would involve removing the push rods and push rod tubes (or at least lifting them) as well as the lifter block itself.
So to replace the lower rocker box gasket you have to remove the rocker assembly. Replacing the lifter block gasket would involve removing the push rods and push rod tubes (or at least lifting them) as well as the lifter block itself.
#20
04-07-2016, 04:09 PM
Road Warrior
