
Installation Steps for 10" Z Bars on a Nightster

#32
 11-04-2015, 09:23 AM

Elite HDF Member


#33
11-06-2015, 02:07 PM
Is there an easy way to separate the right controls from the throttle cables? I was hoping I could disconnect all the wiring and run them through the bars in the comfort of my house instead of outside hovering over the bike. I brought the left control and turn signal harnesses inside, but it doesn't look like I can do the same for the right controls without removing the throttle cables.
Also, what kind of connector is the turn signal connector? There 3 wires for each side that go into a 6 pin connector (1 connector for both turn signals). I need to know how to disassemble that.
Also, what kind of connector is the turn signal connector? There 3 wires for each side that go into a 6 pin connector (1 connector for both turn signals). I need to know how to disassemble that.
#34
11-07-2015, 11:25 AM
Seems like I'm going to have to cut the stock wrapping around the control wires (doesn't quite seem like shrink tube but it might be). Someone suggested running one wire at a time through the bars, so obviously that means there will be no shrink on the cables inside of the bar, is that a problem? I might put like a 2 inch piece at the control end before it enters the bars, then just put more on where it exits. Sound good?
#35
11-07-2015, 01:14 PM
Elite HDF Member
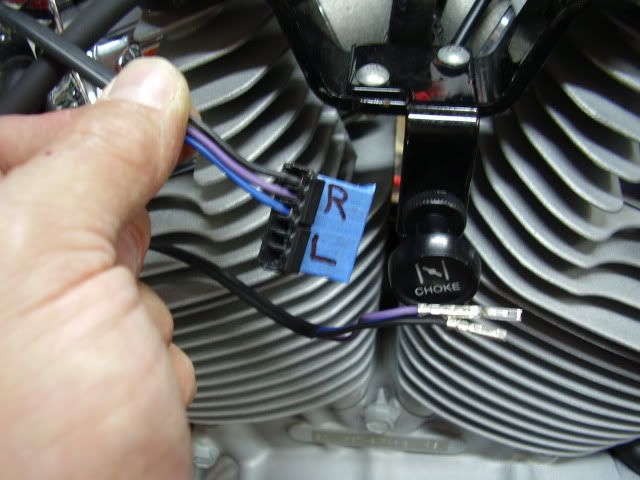
Loosen the throttle cables' adjusters all the way. The cables should come out of the brass ferrules, try not to kink the cables by using too much force on the needlenose pliers, then the metal parts that go into the switch housings simply pull out (they're held by a circlip, see pic below). When you separate the right switch housing, be aware of the throttle tension assembly (star wheel on the bottom of the housing) and the little piece of plastic in there that provides the friction against the throttle-grip tube.
I used a little corrugated wire loom on the wires after they exited the handlebars. Different bars/risers in pic, but same principle, I reckon. I used a little electrician's tape at the wires' housing end. I guess shrink tube would work, instead, as long as you push it on before pulling any wires through, of course. Something to think about.
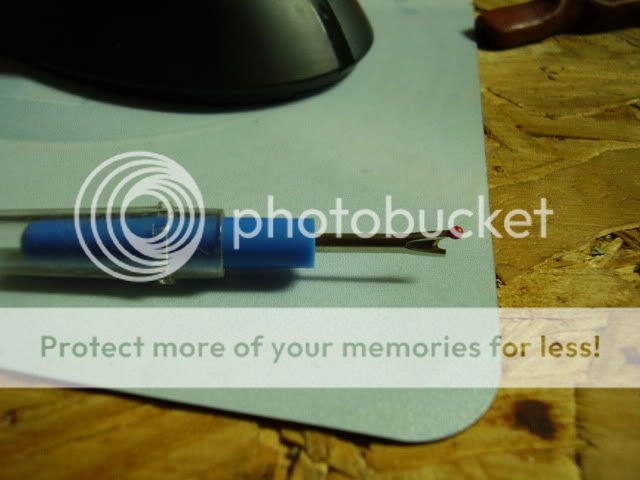
The easiest tool I've found to remove the existing wire loom is a seam ripper, from a sewing store or craft section of Walmart. They're about 2 bucks. Using a seam ripper makes it far less likely to nick a wire. The little red ball goes inside the loom and you simply move up the loom (the sharp point is broken on the seam ripper in the pic, but it still works very well).
Dry-fit your switch housings/grips to new bars to verify where you need to drill. They should pop out in the switch housing area, not before or the wires will get pinched by the housings (assuming you ordered them without dimples). All the bars I've wired, were dimpled. A rat-tail file should clean up the drilled holes. I drilled two holes in the bottom of the bars, rather than one big one or an oval, and a grommet in each hole.
Label and take pics as you go. Removing the pins from the plugs occasionally requires a little patience. A small, sharp pointed tool gets in the plug to release the pins. I sharpened a paper clip. It's hard to describe, but I bet there's a Youtube video.
Throttle cable ends:


Seam ripper:
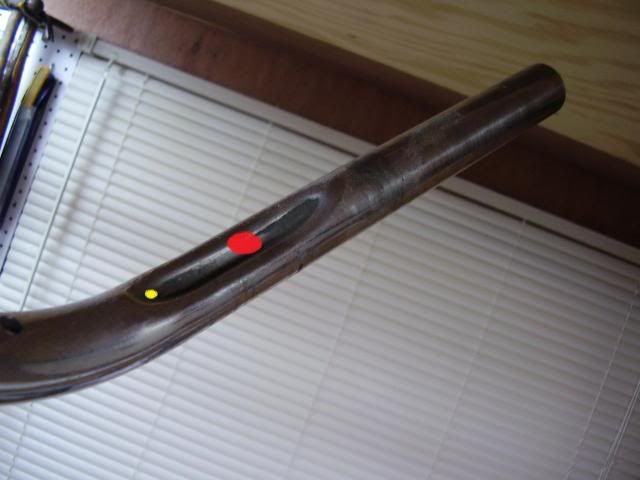
If your bars ARE dimpled, you'll want to drill about where the red dot is, rather than the yellow dot. Yellow dot area might pinch the wires or leave them exposed outside of the switch housings. I learned the hard way on the first set I internally wired.
Look, Ma! No wires!
Factory 2005 Custom model bars on factory risers, powder coated black:

I used a little corrugated wire loom on the wires after they exited the handlebars. Different bars/risers in pic, but same principle, I reckon. I used a little electrician's tape at the wires' housing end. I guess shrink tube would work, instead, as long as you push it on before pulling any wires through, of course. Something to think about.
The easiest tool I've found to remove the existing wire loom is a seam ripper, from a sewing store or craft section of Walmart. They're about 2 bucks. Using a seam ripper makes it far less likely to nick a wire. The little red ball goes inside the loom and you simply move up the loom (the sharp point is broken on the seam ripper in the pic, but it still works very well).
Dry-fit your switch housings/grips to new bars to verify where you need to drill. They should pop out in the switch housing area, not before or the wires will get pinched by the housings (assuming you ordered them without dimples). All the bars I've wired, were dimpled. A rat-tail file should clean up the drilled holes. I drilled two holes in the bottom of the bars, rather than one big one or an oval, and a grommet in each hole.
Label and take pics as you go. Removing the pins from the plugs occasionally requires a little patience. A small, sharp pointed tool gets in the plug to release the pins. I sharpened a paper clip. It's hard to describe, but I bet there's a Youtube video.
Throttle cable ends:


Seam ripper:


If your bars ARE dimpled, you'll want to drill about where the red dot is, rather than the yellow dot. Yellow dot area might pinch the wires or leave them exposed outside of the switch housings. I learned the hard way on the first set I internally wired.

Look, Ma! No wires!
Factory 2005 Custom model bars on factory risers, powder coated black:

#36
11-07-2015, 03:43 PM
Thanks for the info.
It's funny, I came across your seam ripper, front turn signal, and yellow/red dot pictures in a thread from a couple years back just a couple hours ago but didn't know how you protected them. My bars are already slotted for internal wiring, so I am all set there. Is the turn signal plug easy to manipulate to pull/insert the pins?
I was able to just pivot the throttle side grip to have the cables come out of their grooves with the ferrules, then gently yanked them out of the housing. Didn't have to do any adjusting or plier work luckily.
#37
11-07-2015, 04:07 PM
Elite HDF Member
It's been awhile, but I think the action is to insert your pointed tool, then lift the tiny tab in order to remove the pin. I wish I could be more certain, but I don't do it very often. That was a lot of beers ago.
From what I remember, it's like this:
http://s695.photobucket.com/user/FXD...f69a6.jpg.html
and:
http://www.1130cc.com/forums/showthread.php?t=96267
From what I remember, it's like this:
http://s695.photobucket.com/user/FXD...f69a6.jpg.html
and:
http://www.1130cc.com/forums/showthread.php?t=96267
#39
11-08-2015, 02:26 PM
Looking to start on the new brake line. I don't have any speed bleeder or vacuum to help, but I'm fine with leaving it overnight to bleed.
From what I've gathered, I can zip tie the brake lever to the grip so the valve in the master cylinder is open and hook up a tube at the bleeder valve at the caliper and leave this overnight. That should drain all the fluid right?
From what I've gathered, I can zip tie the brake lever to the grip so the valve in the master cylinder is open and hook up a tube at the bleeder valve at the caliper and leave this overnight. That should drain all the fluid right?
#40
11-08-2015, 04:28 PM
Elite HDF Member
Have the bleed screw closed overnight, while the brake lever is compressed. I use rubber bands or a piece of inner-tube tied around the lever/throttle. In the morning, crack the bleed screw open. Won't hurt anything to leave the hose attached, but close the bleeder. Pump the lever up and dump via the bleed screw multiple cycles, before clamping the lever overnight. Be sure to keep the brake fluid in the master cylinder at a proper level while going through the pump and dump cycles. It's my understanding that the overnight pressure forces the last bit of air out, but it won't fill the entire line. You probably already know, I'll say it anyway, an '08 will take DOT 4, but check the writing on the master cylinder cover to verify. DOT 4 fluid eats anything it gets on, including the finish on the outside of the caliper, master cylinder and the MC cover, so be careful with spills/drips. Clean up with Brake Clean, should do the trick.
I assume you're installing a new brake line.
I assume you're installing a new brake line.
Last edited by HarleyScuba; 11-08-2015 at 04:31 PM. Reason: nunya