


HD Audio iPod Interface Install - 2011 RGC
Thread Starter
|
Outstanding HDF Member
Joined: Jan 2011
Posts: 2,333
Likes: 77
From: Orlando, FL
And something to highlight... after you have done all this and you are certain that the pins are installed correctly, and that everything is plugged where it should be and you still do not get the radio to recognize the iPod... don't panic!!!
Unplug and plug all connectors again, making sure those are inserted and seated all the way in... and to avoid any embarrassment, please do not ask me how I know... please...
Unplug and plug all connectors again, making sure those are inserted and seated all the way in... and to avoid any embarrassment, please do not ask me how I know... please...
Extreme HDF Member
Joined: Apr 2006
Posts: 10,449
Likes: 46
From: Roswell, GA
And something to highlight... after you have done all this and you are certain that the pins are installed correctly, and that everything is plugged where it should be and you still do not get the radio to recognize the iPod... don't panic!!!
Unplug and plug all connectors again, making sure those are inserted and seated all the way in... and to avoid any embarrassment, please do not ask me how I know... please...
Unplug and plug all connectors again, making sure those are inserted and seated all the way in... and to avoid any embarrassment, please do not ask me how I know... please...
4. Follow instructions in the service manual appendix to insert
the (A) terminal of the yellow/orange wire into
cavity 13
of the 35-way connector (1). Insert the (A) terminal of the
yellow/violet wire into
yellow/violet wire into
cavity 14.
5. Insert the five terminated wires from the ipod/NIM harness
into the 35-way connector (1) as follows:
into the 35-way connector (1) as follows:
�
Insert the red/blue wire terminal into cavity 4.
�
Insert the tan/red wire terminal into cavity 8.
�
Insert the violet/gray wire terminal into cavity 19.
�
Insert the black/blue wire terminal into cavity 27.
� Insert the tan/blue wire terminal into cavity 31.
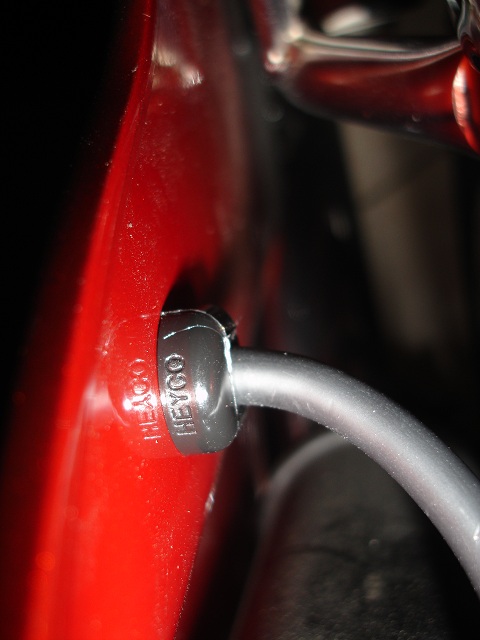
What you and I experienced is a "false lock" of the wire/socket in the connector with the red wedgelock in the "locked" position. By "false lock" I mean that that socket/wire seems to be correctly inserted because pulling on it doesn't remove it from the connector, but, in fact, it is not fully inserted into the connector.
To avoid the "false lock," take a look at the red wedgelock when the wedgelock has been put in the locked position. The sockets should be touching the inner surface of the wedgelock. For a visual comparision, disconnect the 23 wire connector at the back of the radio. It uses the same connector and sockets, except that it's a 23 wire version. If you look at the 23 wire connector assembled by HD, you'll see the silver edges of the sockets immediately behind/touching the red wedgelock's inner surface. If the 35 wire connector you've assembled looks the same for all wires, you're good to go (assuming you've inserted the right wires in the right chambers); if they aren't, you need to push the wire/connector in further than you have even though it may have seemed to "locked" upon your initial assembly.
Like wachuko, I learned the above the hard way on a previous project. Don't worry if the same thing happens to you. Nothing is broken, and all it will take is to push the wire/socket a bit farther into the connector.
Carl
� Insert the tan/blue wire terminal into cavity 31.
What you and I experienced is a "false lock" of the wire/socket in the connector with the red wedgelock in the "locked" position. By "false lock" I mean that that socket/wire seems to be correctly inserted because pulling on it doesn't remove it from the connector, but, in fact, it is not fully inserted into the connector.
To avoid the "false lock," take a look at the red wedgelock when the wedgelock has been put in the locked position. The sockets should be touching the inner surface of the wedgelock. For a visual comparision, disconnect the 23 wire connector at the back of the radio. It uses the same connector and sockets, except that it's a 23 wire version. If you look at the 23 wire connector assembled by HD, you'll see the silver edges of the sockets immediately behind/touching the red wedgelock's inner surface. If the 35 wire connector you've assembled looks the same for all wires, you're good to go (assuming you've inserted the right wires in the right chambers); if they aren't, you need to push the wire/connector in further than you have even though it may have seemed to "locked" upon your initial assembly.
Like wachuko, I learned the above the hard way on a previous project. Don't worry if the same thing happens to you. Nothing is broken, and all it will take is to push the wire/socket a bit farther into the connector.
Carl
I love the writeup. excellent.
My concern is that all the hd part numbers add up to more than my Iphone cost! I bought the tourpack side and top pockets and a decient fm modulator 50.00, select random, but then I have 8000 blues songs on my 3gs 32g. pop it in the side pouch pluged in to the nice power outlet hd put back there.
don't get me wrong but I cant justify the price where I did a similar install to my dodge ram for $100.00 and it will let me answer the phone hands free. I don't believe the HD factory setup will do anything but the music. rather steep for a mimimum of 350.00, probablly closer to 500.00 by the time your done.
Advanced
Joined: Jul 2007
Posts: 84
Likes: 0
From: Waukesha, WI
Great write-up, thank you. I have the module on order so these will help greatly. I do have one other question, I have a 2006 Streetglide, do I need to install a software update on my radio as part of this installation?
Thanks in advance.
Thanks in advance.
Extreme HDF Member
Joined: Apr 2006
Posts: 10,449
Likes: 46
From: Roswell, GA
FWIW: Tyco's instructions for the connector declares that the red wedgelock should not be removed from the connector:
3. ASSEMBLY PROCEDURE
NEVER remove the red wedge lock from the
housing.
NEVER remove the red wedge lock from the
housing.
You can read the instructions from Tyco's website by using this link and clicking on "Instruction Sheets":
Speaking from personal experience (acquired using the 23 wire version of this connector), it's very easy to break the small black tabs that secure the red wedgelock in the "open" position which ruins the connector. Also, with the red wedgelock removed, it can be a PITA to get the sockets inserted in the correct chambers of the red wedgelock when reinstalling the wedgelock. The sockets lock in the connector, so removing the wedgelock doesn't help lock the sockets.
The OP did a great write-up with pictures, but removing the wedgelock isn't necessary or desireable.
Carl
Stellar HDF Member


Joined: Nov 2010
Posts: 2,576
Likes: 465
From: Maryland
HD Forum Stories
The Best of Harley-Davidson for Lifelong Riders

6 Weirdest Harley-Davidsons Ever Sold to the Public
Verdad Gallardo
7 Times Harley-Davidson Chucked Tradition Out the Window
Verdad Gallardo
7 Surprising Harley-Davidson Products that Are Not Motorcycles
Verdad Gallardo
8 Best Harley-Davidson Motorcycles Ever
Pouria Savadkouei
10 Worst Harley-Davidson Motorcycles Ever
Pouria Savadkouei
Killer Custom's Jail Break Is The Breakout That Refused to Blend In
Verdad Gallardo
Crazy Bunderbike Build Looks Amazing, But Is It Impossible to Ride?
Verdad Gallardo
Harley-Davidson Reveals Super Cool Cafe Racer Concept
Verdad Gallardo
Engraved Rebellion: Inside Bundnerbike's Glam Rock II
Verdad Gallardo
Supporter
Joined: Mar 2011
Posts: 587
Likes: 1
From: Ga.
wachuko, Great pics and write up, you have a lot more patience than me.
HDJIM, If by plug and play, you mean after doing the installation, can you put the iPod in a lower or on the handle bar, without buying the cable extension or saddle bag stuff. The answer is yes.
I installed mine when it first came out and was also doing the RT660, the NAM interface, and the fairing mount. Needless to say I had close to 1500 already invested, I didn't feel like investing at that moment on the extra stuff.
In the pic you will see the RAM mount leftover from the Zumo 660 (don't ask) with the Ipod, but the cable is not connected, but it is just below to the left as you can see.

Last edited by Copyless; Apr 12, 2011 at 05:00 PM.