
Jagg 10-row Oil Cooler Install on Ultra - Pics
#1
 02-08-2014, 08:44 PM

My 2010 Ltd came with the HD 6-row oil cooler. I noticed a few days ago that oil was leaking from the top right corner (as you face the bike from the front). Well, I knew it was time for a new cooler. I looked around the internet and decided to go with the Zagg 10-row standard cooler kit. (no fan)
I decided on the Jagg because of their reputation and because of the way the oil flows with Jagg as compared to the HD oil cooler oil flow. The Jagg sends filtered oil to the cooler, then from the cooler to the engine. The HD cooler sends dirty oil to the cooler, then to the filter, then to the engine. The quality of the Jagg build is evident, especially compared to the cheap looking HD oil cooler assembly. (at least I thought it looked cheap once I got it off and started really looking at it)
The kit install instructions can be found here:
http://www.jagg.com/pdf/instructions...-rev121813.pdf
In the box (the white nylon spacers are not used with the Ultra):

The Jagg uses an offset-type of base bracket. There is a back half, and the front half. Here is a pic of the back side of the back half. This surface mates via the thick O-ring (sitting to the right) to the bikes oil filter bracket:

Front half:

The front half also houses the actuator (or thermostat). Here is a pic of where the actuator lives. I ordered the 140 degree actuator from Jason Ward. The Jagg actuator starts oil to the cooler around 190 -200 degrees. Jason's actuator starts the oil cooling process sooner at around 140 degrees with the actuator fully stroked at around 160 degrees:

No real visual difference between the two actuators. Jason's is at the bottom, beside the cap:

Ok, with the new actuator installed in the Jagg, I am ready to start the install process.
First remove the oil filter to gain access to the stock oil cooler base nut. You have to use a 7/16" Allen head to remove this nut. This is what it looks like with the nut removed, the stock oil cooler base and lines removed, and the old gasket removed:

Here's the HD cooler, base, mounting bracket, and lines:


Now I have installed the new stock-to-Jagg backplate adapter:

Now for the back-half install. Here you see the supplied nut that secures the back half of the offset adapter to the stock filter bracket:

Now it's time to add the front half, with the gasket in-between it and the back half. Notice the red anti-rotation device. This piece of aluminum will prevent the filter bracket from moving during filter installs. I colored it red with a Sharpee to make it easier to see in the photos. You get both versions of this anti-rotation bracket in the kit (version A & B) depending upon your engine case configuration:


I removed the two nuts securing the voltage regulator, took it off and cleaned it a bit, cleaned the area under it, and then installed the new Jagg cooler on the same studs used to mount the regulator. After the nuts were tightened, it looked like this: (I did add lock washers and a couple of washers under the legs of the regulator to physically seperate the bottom of the regulator body from the top of the oil cooler housing):

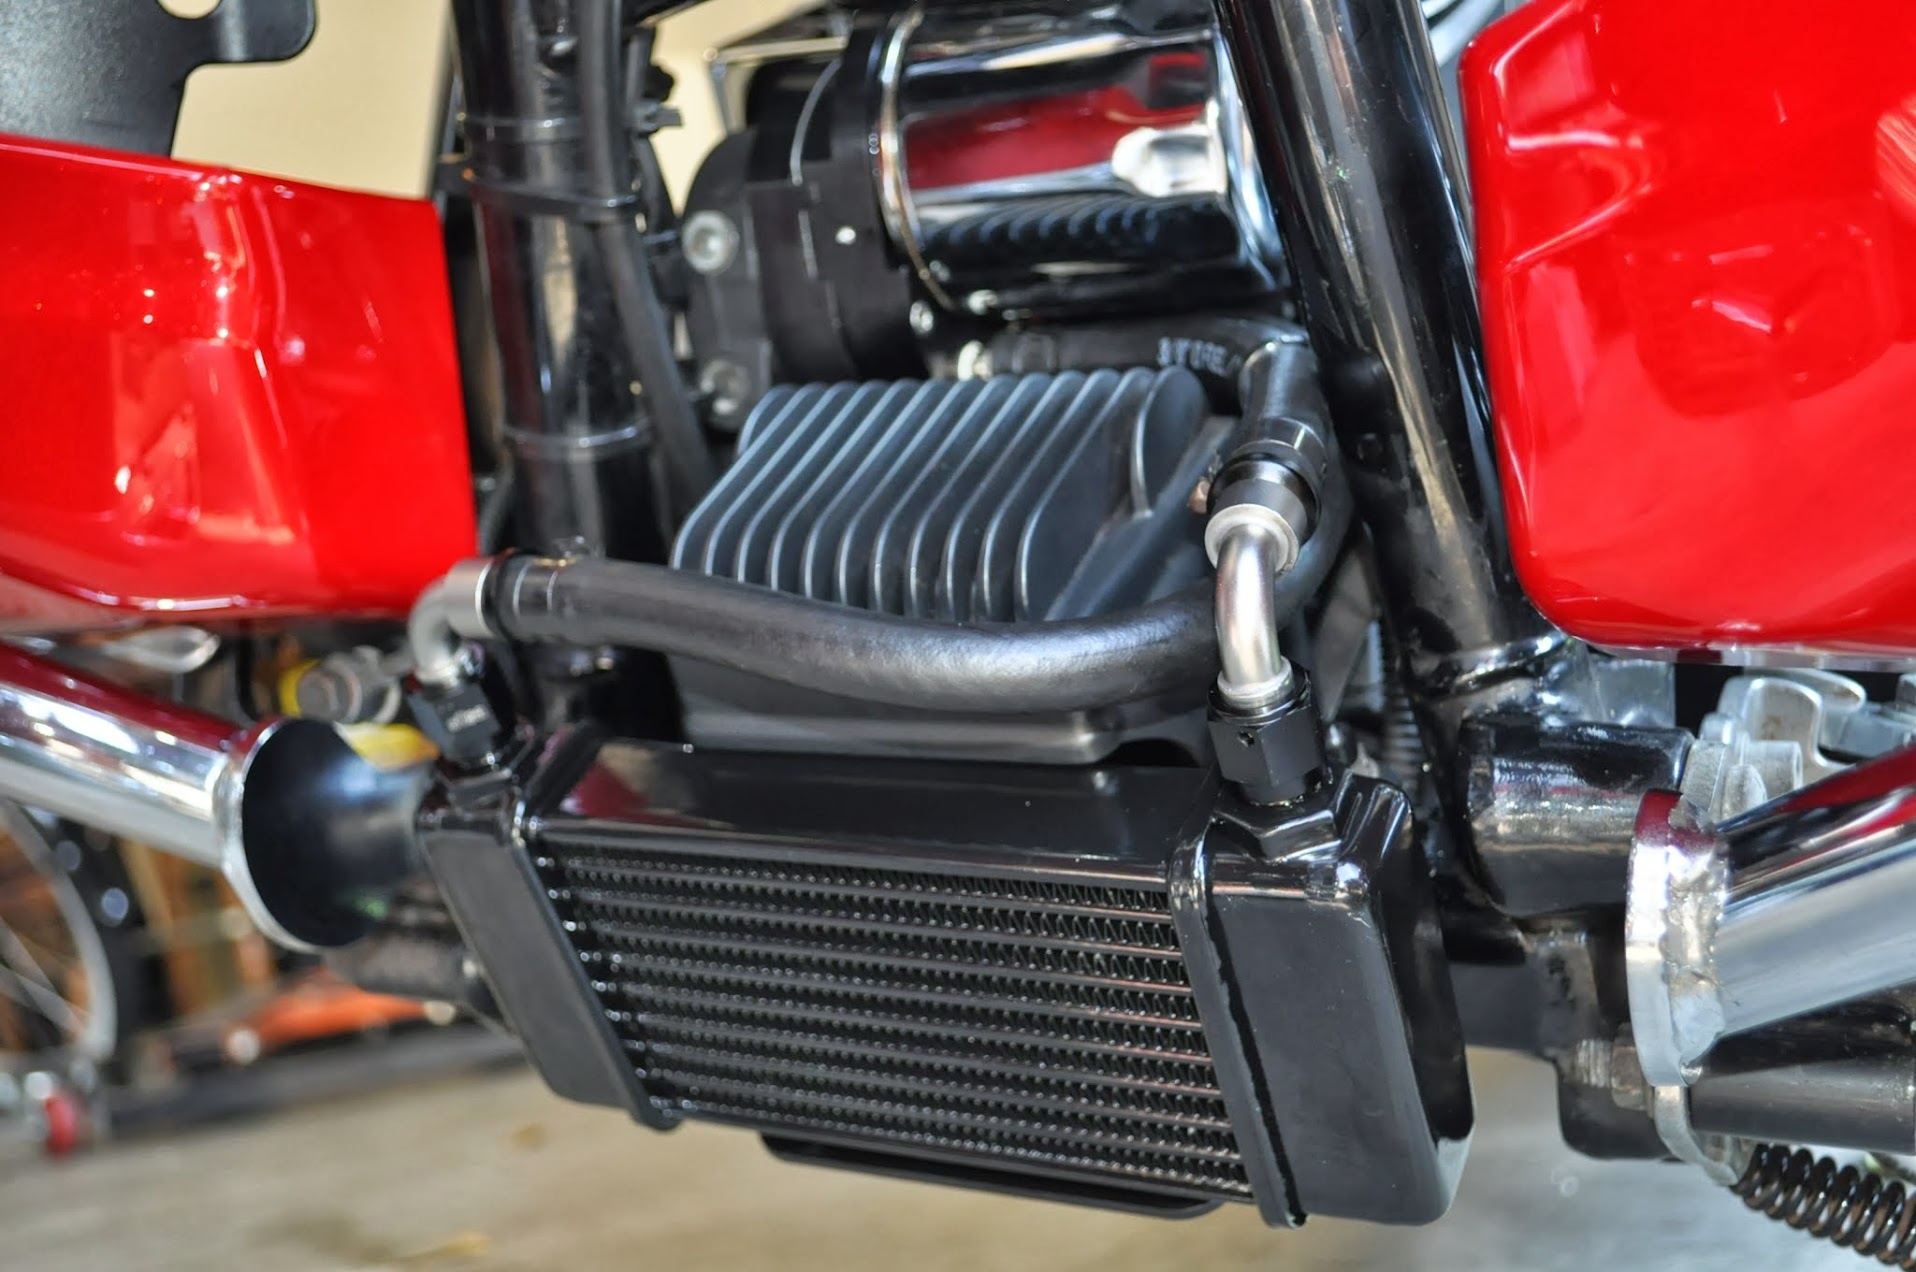
Now time for some plumbing work. Jagg supplies way more oil line than you will need for this install. Before I installed the oil lines, I thought it prudent to charge the cooler with about 7 ounces of new oil. I used a large animal syringe (available at any Tractor Supply) to apply oil to the cooler. Here's what the final product looked like once it was all finished:
I took a 60 mile ride after changing the oil and everything seems to be working fine. At least I have yet to see any leaks…so keeping my fingers crossed. I had to add another 1/2 quart of oil after the ride to account for the new lines and new filter.
As far as some out of the ordinary tools needed, you will need a 1" socket or wrench, a 7/16" Allen (and that's a big Allen), and a 7/8" or 22mm socket. These may or may not be common for some folks, but I had everything except the 7/16" Allen…and of course I now have that!
This is not a complicated install, just a little tedious at times. Anyone can do it!
I decided on the Jagg because of their reputation and because of the way the oil flows with Jagg as compared to the HD oil cooler oil flow. The Jagg sends filtered oil to the cooler, then from the cooler to the engine. The HD cooler sends dirty oil to the cooler, then to the filter, then to the engine. The quality of the Jagg build is evident, especially compared to the cheap looking HD oil cooler assembly. (at least I thought it looked cheap once I got it off and started really looking at it)
The kit install instructions can be found here:
http://www.jagg.com/pdf/instructions...-rev121813.pdf
In the box (the white nylon spacers are not used with the Ultra):
The Jagg uses an offset-type of base bracket. There is a back half, and the front half. Here is a pic of the back side of the back half. This surface mates via the thick O-ring (sitting to the right) to the bikes oil filter bracket:
Front half:
The front half also houses the actuator (or thermostat). Here is a pic of where the actuator lives. I ordered the 140 degree actuator from Jason Ward. The Jagg actuator starts oil to the cooler around 190 -200 degrees. Jason's actuator starts the oil cooling process sooner at around 140 degrees with the actuator fully stroked at around 160 degrees:
No real visual difference between the two actuators. Jason's is at the bottom, beside the cap:
Ok, with the new actuator installed in the Jagg, I am ready to start the install process.
First remove the oil filter to gain access to the stock oil cooler base nut. You have to use a 7/16" Allen head to remove this nut. This is what it looks like with the nut removed, the stock oil cooler base and lines removed, and the old gasket removed:
Here's the HD cooler, base, mounting bracket, and lines:
Now I have installed the new stock-to-Jagg backplate adapter:
Now for the back-half install. Here you see the supplied nut that secures the back half of the offset adapter to the stock filter bracket:
Now it's time to add the front half, with the gasket in-between it and the back half. Notice the red anti-rotation device. This piece of aluminum will prevent the filter bracket from moving during filter installs. I colored it red with a Sharpee to make it easier to see in the photos. You get both versions of this anti-rotation bracket in the kit (version A & B) depending upon your engine case configuration:
I removed the two nuts securing the voltage regulator, took it off and cleaned it a bit, cleaned the area under it, and then installed the new Jagg cooler on the same studs used to mount the regulator. After the nuts were tightened, it looked like this: (I did add lock washers and a couple of washers under the legs of the regulator to physically seperate the bottom of the regulator body from the top of the oil cooler housing):
Now time for some plumbing work. Jagg supplies way more oil line than you will need for this install. Before I installed the oil lines, I thought it prudent to charge the cooler with about 7 ounces of new oil. I used a large animal syringe (available at any Tractor Supply) to apply oil to the cooler. Here's what the final product looked like once it was all finished:
I took a 60 mile ride after changing the oil and everything seems to be working fine. At least I have yet to see any leaks…so keeping my fingers crossed. I had to add another 1/2 quart of oil after the ride to account for the new lines and new filter.
As far as some out of the ordinary tools needed, you will need a 1" socket or wrench, a 7/16" Allen (and that's a big Allen), and a 7/8" or 22mm socket. These may or may not be common for some folks, but I had everything except the 7/16" Allen…and of course I now have that!
This is not a complicated install, just a little tedious at times. Anyone can do it!
Last edited by Lowcountry Joe; 02-09-2014 at 11:42 AM. Reason: spelling

#3
02-08-2014, 09:02 PM
#4
02-08-2014, 09:20 PM

Thanks for posting this. I am close to finishing my 107 build and the Jagg is on the list for spring time.
Something that I was not satisfied with previously on the jagg ( until i saw your Post ) was the lack of A.N. fittings, looks like -6. I even called and talked to them about a year ago and they said no A.N. fittings.
So now I am stoked to see the fitting I want on the cooler I want, perfect!
Something that I was not satisfied with previously on the jagg ( until i saw your Post ) was the lack of A.N. fittings, looks like -6. I even called and talked to them about a year ago and they said no A.N. fittings.
So now I am stoked to see the fitting I want on the cooler I want, perfect!
#6
02-08-2014, 10:22 PM
Thanks for posting this. I am close to finishing my 107 build and the Jagg is on the list for spring time.
Something that I was not satisfied with previously on the jagg ( until i saw your Post ) was the lack of A.N. fittings, looks like -6. I even called and talked to them about a year ago and they said no A.N. fittings.
So now I am stoked to see the fitting I want on the cooler I want, perfect!
Something that I was not satisfied with previously on the jagg ( until i saw your Post ) was the lack of A.N. fittings, looks like -6. I even called and talked to them about a year ago and they said no A.N. fittings.
So now I am stoked to see the fitting I want on the cooler I want, perfect!
#7
02-09-2014, 01:28 AM
Road Master
Join Date: Oct 2013
Location: Elgin IL
Posts: 924
Likes: 0
Received 0 Likes
on
0 Posts
Trending Topics
#8
02-09-2014, 05:40 AM
Stellar HDF Member
#9
02-09-2014, 06:25 AM
I believe we have some forum sponsors that may handle these kits. The kit is Jagg part number 750-2400. DCP references that number, but the kit contents they show in the picture is different than mine with the same part number. Can't say if my kit is older or newer.
Last edited by Lowcountry Joe; 02-09-2014 at 06:37 AM.
#10
02-09-2014, 07:15 AM
Interesting..They changed the routing of the cooler lines with those beautiful fittings. I actually wrote Jagg when i first received my cooler (3 years ago) and was concerned about the routing. Previously the lines were routed (if you sitting on the bike) between the left frame rail and the oil cooler then up to the oil filter housing. With this, the lines were sitting very tight on the frame rail and i was concerned about rubbing through. Jagg stated that they have been running the lines that way for many years with no problems. Interesting they have changed the routing. Thanks for posting joe.