Harley Davidson Sportster: How to Reset Check Engine Light
Once you've resolved issues with your Harley-Davidson Sportster, you'll need to reset the check engine light on your dashboard.
This article applies to the Harley Davidson Sportster.
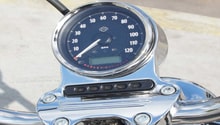
The Harley-Davidson Sportster is a well-engineered motorcycle that is manufactured to quickly and effectively alert you to any potential or probing issues (mechanical or otherwise) related to the function of your motorcycle. One of the ways your motorcycle will do this is by displaying a check engine warning light on your instrument cluster. This light could signify any number of problems, including your gas cap being loose or broken, your spark plugs or wires being bad, or your oxygen (O2) sensor needing to be replaced. Let's go over the steps you'll need to take to reset your check engine light.

Materials Needed
- Keys
Step 1 – Continue to drive your bike
If you've just resolved a mechanical or electrical issue with your bike, it could take up to 50 more cranks before the check engine light on your instrument cluster goes away. To be on the safe side, it's highly recommended that you check your trouble codes one last time. Doing so will ensure all previous issues pertaining to your bike are effectively resolved and not at hand.

Pro Tip
If your bike is not experiencing any problems and the warning light still will not go away, you can have your dealer clear any impending codes using a Scanalyzer or Digitech instrument.
Step 2 – Reset the throttle idle
- Start by turning your ignition on, but do not start your bike's engine.
- Next, engage the stop switch on the handlebars for a total of four seconds.
- When you are done, disengage the stop switch completely and repeat the above-outlined process for a total of four passes.
- Wait 15 seconds in between each pass.
- Your ignition must remain on while this entire step is being carried out.
- The on-board computer idle control will reset when you are done.
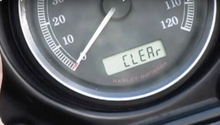
Step 3 – Clear the speedometer
- Start by turning the ignition switch into the "OFF" position.
- Next, turn the run/stop switch into the "RUN" position.
- Press and hold the odometer reset button.
- Put the ignition switch into the "IGNITION" position and take your hand off the odometer reset button.
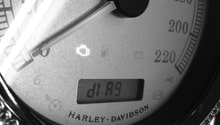
- Check for "DIAG" to appear on your instrument cluster.
- Push the odometer reset button once more.
- Check for "PSSPt" to appear on your instrument cluster.
- Check every area of your diagnostics module, as represented by each letter of the prompt: PSSPt.
- Record your codes as you move one line at a time through the diagnostic process.
- Press and release the odometer reset button as you clear the entire module.
- Turn the ignition off.

Related Discussions
- Throttle Idle Control - HDforums.com
- Complete List of Trouble Codes - HDforums.com
- Clear Diagnostics Modules - HDforums.com