Shimmed front motor mount today WOW
#1
 04-03-2010, 09:57 PM

Ok so I decided to remove the smog canister on my Fat Bob today to install a Chin Spoiler, and while I was at it see if the front motor mount needed to be shimmed I have read several post on this subject over the last year and figured it was time to investagate.......
WoW!!! I could not believe how much the mount pulled back from the frame as I removed the bolts to take off the charcole canster mounting bracket...
Here is a how I did my bike, for those who are intrested in this mod (I would say its a must do!!! to there bike)....
First I placed the jiffy stand on a 3/4'' block of wood to stand the bike more upright, next I place a small floor jack under front motor mount and jacked it up to take the load and support the motor this was to also take the load off of the bolts making it easier to remove them you will have to play with the height to keep the bolts centered in the frame mounting holes.....
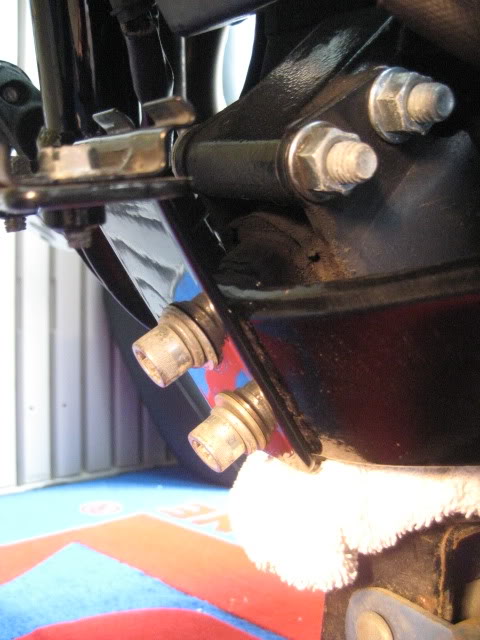
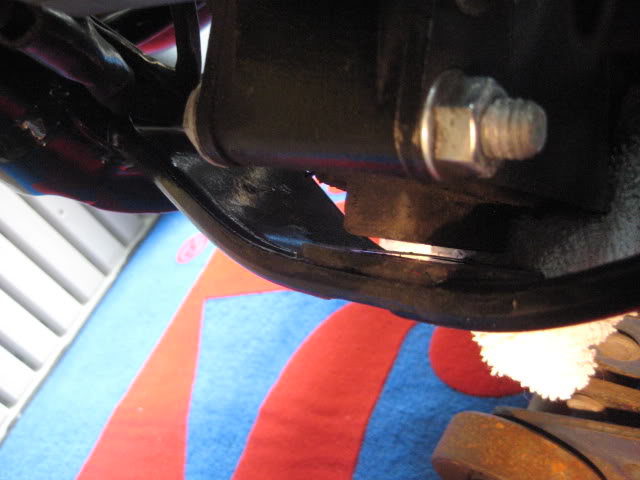
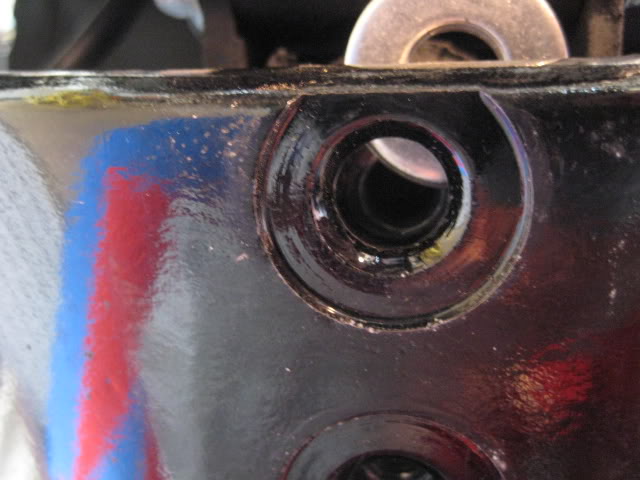
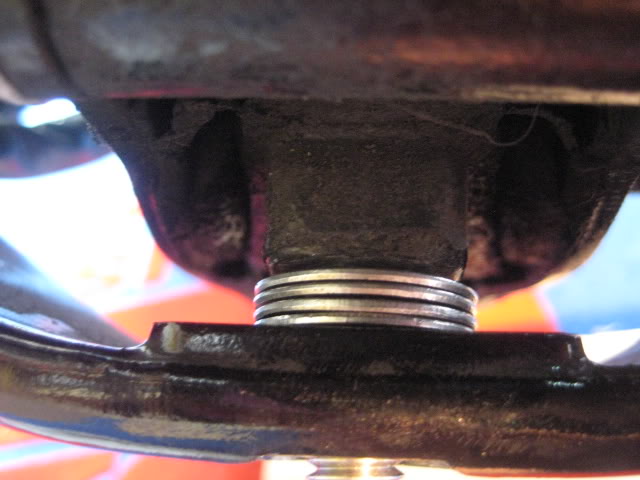
Once I removed the bolts I was suprised on how much clearance there was between the mount and the frame about 3/16'' ...
Ok so now what????
Well I was off to the hardware store (Orchard Supply) for some washers, shims, bolts, nuts, etc......
Heres what I came up with to complete this much needed mod to my bike....
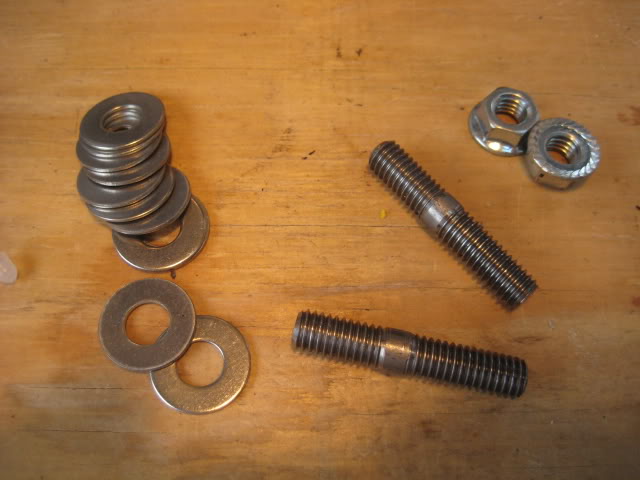
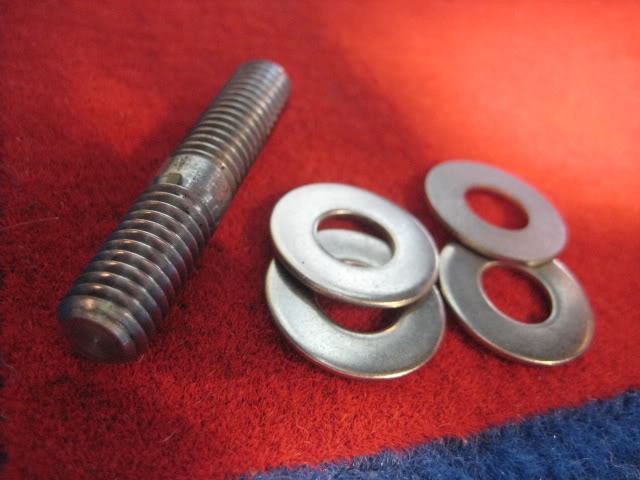
What I decied to do since I'm installing a Chin Spoiler on my bike was to replace the bolts with studs this would make installing the bracket for the spolier much easier as well... 2 - 3/8 studs, a dozen or so stainless 3/8 washers, and 2 3/8 flanged nuts..... You can use regular washer if you want (I like stainless!!!!).
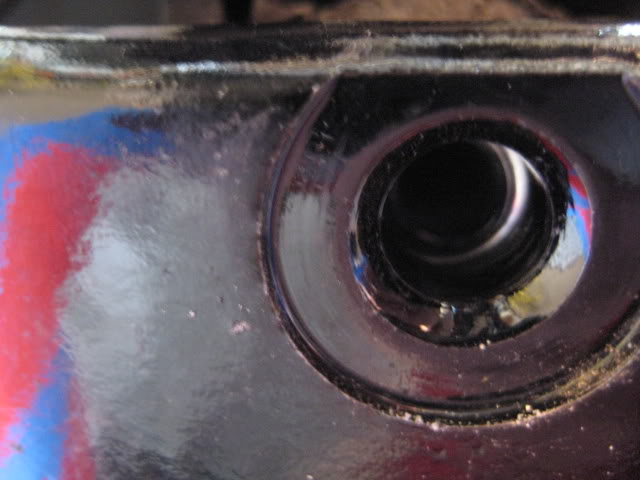
So I stacked up my washers to see how many it would take to take up the gap 3 maybe 4, I decied on 4 they fit in nice and snug..
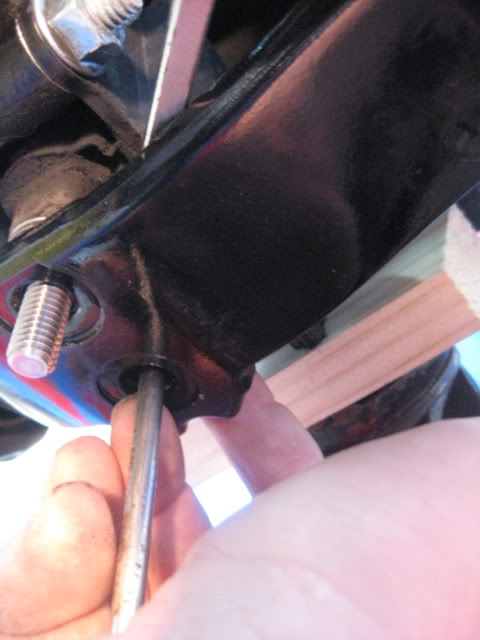
Next I had to fit them in and line them up so the stud could be installed, I slid the stack into the top mounting first used a flat blade screwdriver to pry the rubber mount back a little and started to slip them into place...

The final alignment was completed by using a flat blade screwdriver as a pry bar and and a phillips screw driver as an alinemnt dowel....
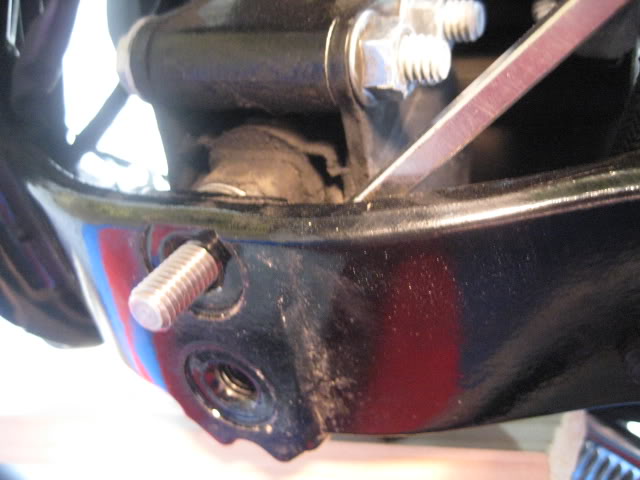
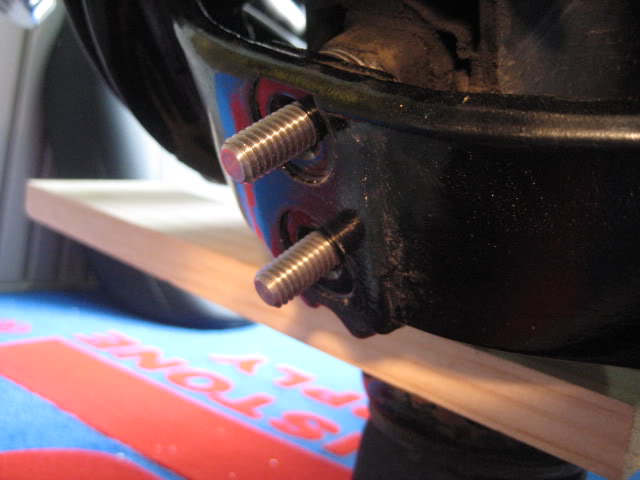
Here the upper stud is installed now onto the lower stud......
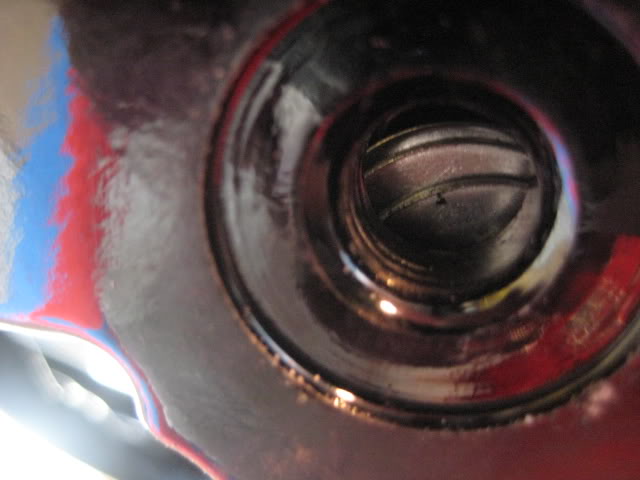
The lower mounting proved to be a slight more diffcult as aligning the washers was more of a challange not much room to work (fat fingers) again using the screwdriver as a prybar to push against the rubber mount and push the washers up from the bottom. An extra pair or at least one more hand would have been helpful to accomplish the alignment of the lower but as you can see from the pic I was sucessful........
So here we have both studs installed a couple of shots of the washers from the top.......
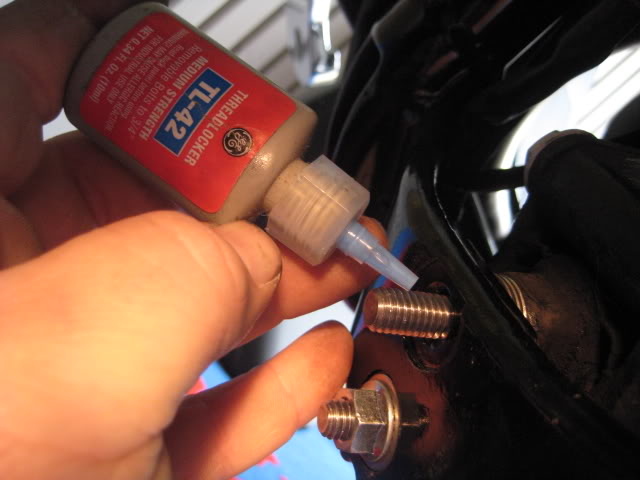
As with all bolts you install on your Harley locktite is a must!!!!!
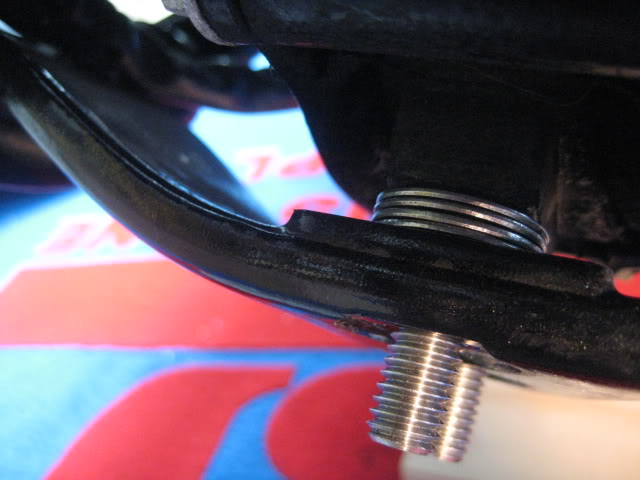
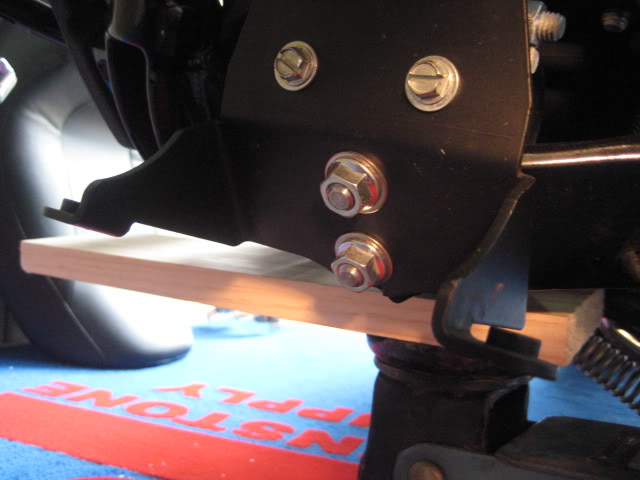
Final shot Chin Spoiler mount installed bolts have been torqued to factory spec's 21-27 ft-lbs..........
All in all very easy and worth while to do and what a differance it makes while riding less vibes................
WoW!!! I could not believe how much the mount pulled back from the frame as I removed the bolts to take off the charcole canster mounting bracket...
Here is a how I did my bike, for those who are intrested in this mod (I would say its a must do!!! to there bike)....
First I placed the jiffy stand on a 3/4'' block of wood to stand the bike more upright, next I place a small floor jack under front motor mount and jacked it up to take the load and support the motor this was to also take the load off of the bolts making it easier to remove them you will have to play with the height to keep the bolts centered in the frame mounting holes.....
Once I removed the bolts I was suprised on how much clearance there was between the mount and the frame about 3/16'' ...
Ok so now what????
Well I was off to the hardware store (Orchard Supply) for some washers, shims, bolts, nuts, etc......
Heres what I came up with to complete this much needed mod to my bike....
What I decied to do since I'm installing a Chin Spoiler on my bike was to replace the bolts with studs this would make installing the bracket for the spolier much easier as well... 2 - 3/8 studs, a dozen or so stainless 3/8 washers, and 2 3/8 flanged nuts..... You can use regular washer if you want (I like stainless!!!!).
So I stacked up my washers to see how many it would take to take up the gap 3 maybe 4, I decied on 4 they fit in nice and snug..
Next I had to fit them in and line them up so the stud could be installed, I slid the stack into the top mounting first used a flat blade screwdriver to pry the rubber mount back a little and started to slip them into place...
The final alignment was completed by using a flat blade screwdriver as a pry bar and and a phillips screw driver as an alinemnt dowel....
Here the upper stud is installed now onto the lower stud......
The lower mounting proved to be a slight more diffcult as aligning the washers was more of a challange not much room to work (fat fingers) again using the screwdriver as a prybar to push against the rubber mount and push the washers up from the bottom. An extra pair or at least one more hand would have been helpful to accomplish the alignment of the lower but as you can see from the pic I was sucessful........
So here we have both studs installed a couple of shots of the washers from the top.......
As with all bolts you install on your Harley locktite is a must!!!!!
Final shot Chin Spoiler mount installed bolts have been torqued to factory spec's 21-27 ft-lbs..........
All in all very easy and worth while to do and what a differance it makes while riding less vibes................
The following 6 users liked this post by HSB:
AKJames (05-04-2018),
esteboatan (06-05-2016),
fatbob_jay (08-22-2018),
jairo (05-28-2018),
Jerry311 (03-31-2021),
and 1 others liked this post.
#2
04-03-2010, 10:32 PM
Elite HDF Member
#4
04-04-2010, 07:15 AM
Seasoned HDF Member

#6
04-04-2010, 09:44 AM
Cruiser
#7
04-04-2010, 11:52 AM
Trending Topics
#9
04-04-2010, 02:11 PM
Novice
Join Date: Apr 2008
Location: New Hampshire
Posts: 24
Likes: 0
Received 0 Likes
on
0 Posts
Great post. I've been following many posts on this subject for a year or so now. Towards the end of last year I noticed my vibration was getting worse. Really feel it in the pegs and I have ISO's! Do any of you know what the HD torque spec is on the two socket head bolts for an 05 Lowrider? I'm going to do this and see how much vibe it takes out.
TK
TK
#10
04-04-2010, 03:44 PM
Elite HDF Member
Takes the preloaded force out of the front motor mount. Stock it seems the bikes are setup to 'pull' on that mount. By shimming the mount to a neutral 'resting' orientation for the motor, it winds up taking various amounts of vibration out of the bike.