Chrome Rocker Box install. w/ pics.
#1
 10-11-2010, 10:35 AM

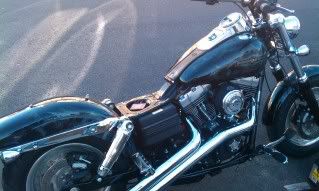
Got a good deal, and i certainly didnt waste time.giving my 2 wheeled lady, a lovely make over.. but i noticed, not to many folks posted a How to when it came to rocker boxes and its assembly. on my 09 FatBob.
Before i begin..a special thanks to Tip , Mike, my lady Jasmine for telling to not be a ***** and go for it. and my neighbor Anthony, who endure a face full of gas as he removed the crossover line of my gas tank,,as he was asking whats this for....
The Manual was helpful, and so where you guys, but it still left people wondering...
on a scale of 1-10, this job is a 4. I recommned 2 people on this project especially with the gas tank. just to avoid any accidents.
ok... so first you remove the tank...
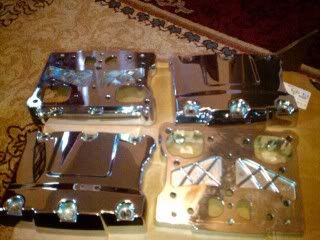
after the removal, your left with an exposed cavity where you can directly see the rocker boxes...
now.... remove the 6 bolts holding the top Rocker box. ( note...do one rocker box at a time...)
once removed your gonna see a few bolts and a few moving parts... ( Stop!!!!!.... have a swig of beer...).
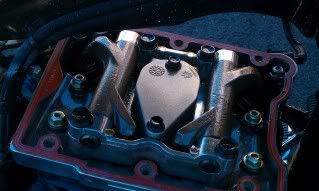
The center assmbly has 4 outer bolts at 1/2 inch. and 2 center bolts at 3/8's inch....remove these bolts first and let stand.. Do Not remove the Bolts... just loosen them from their mounts.
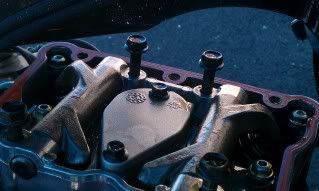
Now proceed to the 6 (7/16's) bolts holding the lower rocker cover in place.. once all the bolts are loose. remove the lower rocker box as an entire unit. place on the ground next to the new lower rocker cover and just slide the rocker/ breather assembly onto the new lower box...i recommned doing it this way, so you dont accidentally place the breather in the wrong direction. or accidentally lose a bolt in the removal process.. yeah yeah im dumbing it down a lil im sorry. ( DO NOT I REPEAT.. DO NOT FORGET THE RUBBER O-RING)
note to placement of the gaskets. pay special attention to a small rubber o-ring underneath the breather assembly, (as per MOCO..this item doesnt need to be purchased new.. just swapped.. unless its broken. )
Installation of components and Upper and Lower Boxes is in reverse order..
Now a few things to pay attention to....
1. the manual states to remove the push rod sleeve on the outer portion of the engine..i didnt see a reason to so i didnt.
2. once you remove the pressure of the breather assembly from the push rods, they will rise...Do nothing on the reinstallation. as you tighten the bolts down... the rods will recess back into their original place.
3. take special care on the bolts upon reinstallation, take your time threading them, and do it by hand and follow the bolt pattern..you will notice the assmbley will mount in an angle.. continue tightening bolts in a spaced out equal manner, 2 turns per bolt till the entire assembly is seated flush..once its tightened. then, and only then, do you proceeed with the Torquing.
4. start from the middle breather bolt and work outwards. one turn at a time to ensure an even and steady seal on the gasket.
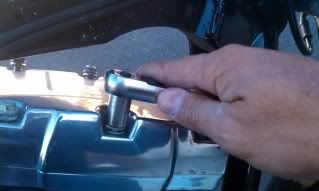
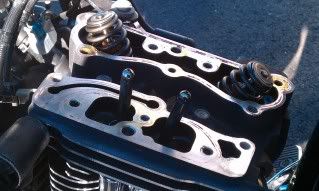
the rear rocker is the same way with one small exception.
I first used a ratchet to break the seal on the bolt under the seat on your left side.. yes... the problem bolt... then used a opened end ratchet style wrench..to remove the bolt. the entire assembly lifts and removes without a problem.

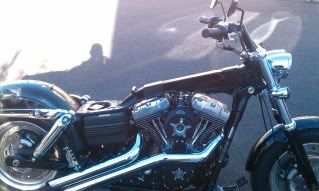
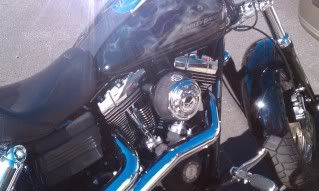
the completed product..damn shame harley couldnt just give you Chrome Boxes right off the floor.i made this write up in 10 minutes, im sure im not forgeting anything but if iam, please tell me
any questions... by all means please.. hit me up.. you guys helped me in soo many ways... i would love to return the favor..

#3
10-11-2010, 10:48 AM


#6
10-11-2010, 02:17 PM
Limp, My pleasure, just my way of giving back.
Excellent write up.
I plan on doing this mod myself hopefully this winter and you made it look straight forward. I also wish chrome covers had been stock on my Fatbob.
Did you buy HD rocker covers and if so do you have the part numbers/supplier?
Thanks
I plan on doing this mod myself hopefully this winter and you made it look straight forward. I also wish chrome covers had been stock on my Fatbob.
Did you buy HD rocker covers and if so do you have the part numbers/supplier?
Thanks
Chrome Lower Rocker Housing 17573-99A
Fits all '99-later Dyna� and Touring; '00-later Softail� models.

Chrome Rocker� Cover 17572-99
Fits all '99-later Dyna� and Touring; '00-later Softail� models.

hope This Helped.
ForMike, Thank you sooo very Much.. you made me a happy camper indeed.
#7
10-11-2010, 02:20 PM
Trending Topics
#8
10-11-2010, 04:28 PM
Outstanding HDF Member