
Show me your tool combo for p clamp exhaust bolt
#21
 01-12-2021, 11:13 PM


Thanks, this is the info I need. I appreciate it. And to you who is brewing coffee, save me a cup...I have a nie SK 1/4" drive set and a snap on 1/4" ratchet too. I've used this stuff more times than I ever thought i would. Invaluable for heat shield clamps and such. I couldn't imagine using a flat head screwdriver to do all those clamps...
#22
01-13-2021, 12:02 AM
Seasoned HDF Member
The Klein might work. The wrenches I have like that are too long to actually do much. I'll look into those. Thanks. As far as a wobbly, I don't mean an extension taht allow a little movement, I used a full wobble piece to be able to get it on teh nut, and it worked OK, but I figure there is still a better tool for the job. My thinking with the 1/4" drive is that the smaller components will allow more space to get to the nut those allowing more to be tuned although the strength of a 1/4" drive is quite a bit less. I'll keep trying stuff until I find what works best. Thanks for the ideas.

#24
01-13-2021, 06:03 AM

There not space to get the ratcheting full circle around the nut. The cam cover is pretty close. If I had a ratcheting wrench that was open ended, not sure if there is such a thing it might work, but what happens with an open ended wrench is at a certain point the flats won't line up with the wrench. I need a super stubby box end. That would help. Just looking to get everything I need so when I need to mess with this or take it off it will be as simple as possible, and to not scratch my heat shield...anymore. LOL. I'll try the crows foot and the 1/4" drive setup with a wobbly once I get a 1/4" wobbly which I forgot to get today.


#26
01-13-2021, 09:17 AM
Seasoned HDF Member

#27
01-13-2021, 09:54 AM
This is the Fuel Moto RTX HS exhaust. I have loosened the heatshields and moved them out of the way to allow easier access, however space was still limited with my tools that were on hand, however the minimal amount of clearance requires some sort of specialty tool I do not own yet. Jamie is going to post what they use. This exhaust fits extremely tight and sits nice and high to minimize the chance of front head pipe scrapage. I can tell you that my Cobra power port headers on my 2013 Road Glide (with 13" shocks in place of the stock 12" shocks) has quite a few scrapes on the front head pipe heat shield. I have since swapped that bike to a Bassani Road Rage 2 into 1 and I have also scraped the front head pipe on that bike. So part of the thinking with this RTX is the "high and tight" fitment, along with the fact that I really like the power this and the combo of a cam are putting out on a 114 M8.
These kind of situations are what allow me to learn more bout the best way to go about doing something specific, and the forums are paramount in that as well.
These kind of situations are what allow me to learn more bout the best way to go about doing something specific, and the forums are paramount in that as well.
#28
01-13-2021, 10:01 AM
Platinum Sponsor
There are a lot of different techniques & tools you can use when installing M8 exhaust systems that use a P-clamp at the original location. Various pipes & brands are configured at different heights, some re-use the factory clamp and others (like the Jackpot RTX) include a new clamp as our header primary is much larger than stock. We use the tools and procedures below:
Start the P-clamp nut by hand and once it gets to the clamp use a 1/2" combination wrench to start snugging it up. This takes a little time as you don't get much throw.
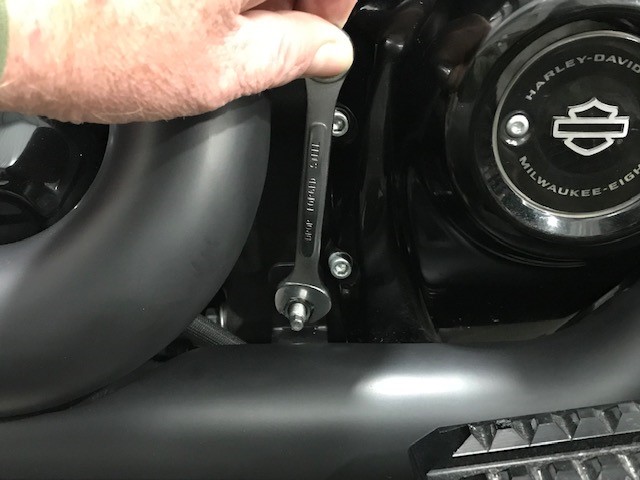
If you have already installed the heat shields be sure to mask each of the surfaces, it may be easier in some cases to remove the heat shields and this will prevent marking the Cerakote or chrome surface.
Next I use a 1/2" standard socket with a swivel extension (1/4 drive) and fully tighten the nut.

As an alternative I use a square socket with a combination wrench, this gives plenty of room. This one is a Milwaukee, similar sockets are available from other tool companies and are great for getting in tight areas.

A quick tip is to make sure the factory mounting stud is screwed all the way in, many times this is not screwed in all the way. The stud has a hex on the end, you can use a 1/4" socket

Start the P-clamp nut by hand and once it gets to the clamp use a 1/2" combination wrench to start snugging it up. This takes a little time as you don't get much throw.
If you have already installed the heat shields be sure to mask each of the surfaces, it may be easier in some cases to remove the heat shields and this will prevent marking the Cerakote or chrome surface.
Next I use a 1/2" standard socket with a swivel extension (1/4 drive) and fully tighten the nut.
As an alternative I use a square socket with a combination wrench, this gives plenty of room. This one is a Milwaukee, similar sockets are available from other tool companies and are great for getting in tight areas.
A quick tip is to make sure the factory mounting stud is screwed all the way in, many times this is not screwed in all the way. The stud has a hex on the end, you can use a 1/4" socket
__________________

Jamie Long / Fuel Moto USA
The USA's Leader V-Twin EFI & Performance www.fuelmotousa.com
Contact 920-423-3309
Email jamie@fuelmotousa.com
Jamie Long / Fuel Moto USA
The USA's Leader V-Twin EFI & Performance www.fuelmotousa.com
Contact 920-423-3309
Email jamie@fuelmotousa.com
#29
01-13-2021, 10:10 AM
This is the Fuel Moto RTX HS exhaust. I have loosened the heatshields and moved them out of the way to allow easier access, however space was still limited with my tools that were on hand, however the minimal amount of clearance requires some sort of specialty tool I do not own yet. Jamie is going to post what they use. This exhaust fits extremely tight and sits nice and high to minimize the chance of front head pipe scrapage. I can tell you that my Cobra power port headers on my 2013 Road Glide (with 13" shocks in place of the stock 12" shocks) has quite a few scrapes on the front head pipe heat shield. I have since swapped that bike to a Bassani Road Rage 2 into 1 and I have also scraped the front head pipe on that bike. So part of the thinking with this RTX is the "high and tight" fitment, along with the fact that I really like the power this and the combo of a cam are putting out on a 114 M8.
These kind of situations are what allow me to learn more bout the best way to go about doing something specific, and the forums are paramount in that as well.
These kind of situations are what allow me to learn more bout the best way to go about doing something specific, and the forums are paramount in that as well.