DIY Cheap Mods

#842
 09-03-2013, 07:19 PM

Advanced
Not sure if this has been covered or not, but I managed to find a inexpensive and easy way to cover up the torx heads on the rear fender struts. I bought some of the spectre bolt caps in the 9/16" size from Pep-Boys, about $9 for a container of 6. I tapped them on over the bolt heads with a rubber mallet, went on pretty snug, I did not utilize any of the filler plastic plugs that were included with the set, these seem to tap right on with a snug fit. I might add that I have had these on there for well over 6 months now, have yet to loose one, and they blend right in with the chrome fender strut.
I also removed the black O-rings from mine, it might have looked better had I left them, but to each his own.
Since then I have also managed to cover the same type bolt head under the front floor-boards, not that it is as easily seen.
When I need to remove these covers I don't think it will be a problem, the only problem may be remembering to use some type of protective device over the teeth of my pliers before doing so. Otherwise I will just be out another $9 and a trip to Pep-Boys.
I will seee if I can post pictures later.
Last edited by jakson200369; 09-03-2013 at 09:40 PM.
#843
09-20-2013, 06:26 AM
I posted about this, but figured this needs to be here...
I had a little time and some 2" aluminum stock laying around and decided to go for it on the lathe.
Milled down to 1.75" diameter and cut at 1.75" length. Drilled out to 1/2"
Stock bolts are 2.75" long 1/2x13. Adding the 1.75" risers required 4.50" bolts.
I polished them out on a buffing wheel and installed them...
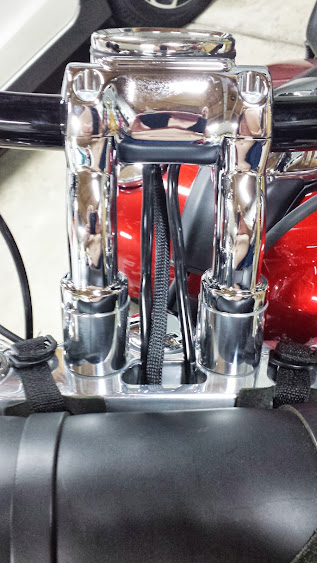
I can't believe the difference in comfort the risers made! (I wasn't uncomfortable to begin with, but sitting up a bit more made a world of difference)
The wiring to the speedo and blinkers only required cutting the zip-tie from the eyelets on each side of the tank rubber to relieve them.
I will have them chromed after a little detailing back on the lathe
ANYONE with a little skill and ambition can to this on the CHEAP.... and you don't need to be a machinist or metal worker for a clean look.
You can buy the aluminum rod in as little as 12" lengths in 1.75" diameter, drill at 1/2", cut your specific length and obtain the correct size 1/2"x13 bolts of the proper length to install them.
I would NOT go over 1.75" due to the strain on the wiring that would have to be relieved by rerouting.
Here is a link for y'all....
Aluminum Round Rods | MSCDirect.com
At under $30.... you can't go wrong and you get that DIY sense of accomplishment... don't forget to polish, paint, powdercoat or chrome! LOL!!
I had a little time and some 2" aluminum stock laying around and decided to go for it on the lathe.
Milled down to 1.75" diameter and cut at 1.75" length. Drilled out to 1/2"
Stock bolts are 2.75" long 1/2x13. Adding the 1.75" risers required 4.50" bolts.
I polished them out on a buffing wheel and installed them...
I can't believe the difference in comfort the risers made! (I wasn't uncomfortable to begin with, but sitting up a bit more made a world of difference)
The wiring to the speedo and blinkers only required cutting the zip-tie from the eyelets on each side of the tank rubber to relieve them.
I will have them chromed after a little detailing back on the lathe
ANYONE with a little skill and ambition can to this on the CHEAP.... and you don't need to be a machinist or metal worker for a clean look.
You can buy the aluminum rod in as little as 12" lengths in 1.75" diameter, drill at 1/2", cut your specific length and obtain the correct size 1/2"x13 bolts of the proper length to install them.
I would NOT go over 1.75" due to the strain on the wiring that would have to be relieved by rerouting.
Here is a link for y'all....
Aluminum Round Rods | MSCDirect.com
At under $30.... you can't go wrong and you get that DIY sense of accomplishment... don't forget to polish, paint, powdercoat or chrome! LOL!!
Last edited by Spazz; 09-20-2013 at 06:29 AM.
#844
09-21-2013, 05:33 AM
I posted about this, but figured this needs to be here...
I had a little time and some 2" aluminum stock laying around and decided to go for it on the lathe.
Milled down to 1.75" diameter and cut at 1.75" length. Drilled out to 1/2"
Stock bolts are 2.75" long 1/2x13. Adding the 1.75" risers required 4.50" bolts.
I polished them out on a buffing wheel and installed them...
I can't believe the difference in comfort the risers made! (I wasn't uncomfortable to begin with, but sitting up a bit more made a world of difference)
The wiring to the speedo and blinkers only required cutting the zip-tie from the eyelets on each side of the tank rubber to relieve them.
I will have them chromed after a little detailing back on the lathe
ANYONE with a little skill and ambition can to this on the CHEAP.... and you don't need to be a machinist or metal worker for a clean look.
You can buy the aluminum rod in as little as 12" lengths in 1.75" diameter, drill at 1/2", cut your specific length and obtain the correct size 1/2"x13 bolts of the proper length to install them.
I would NOT go over 1.75" due to the strain on the wiring that would have to be relieved by rerouting.
Here is a link for y'all....
Aluminum Round Rods | MSCDirect.com
At under $30.... you can't go wrong and you get that DIY sense of accomplishment... don't forget to polish, paint, powdercoat or chrome! LOL!!
#845
09-22-2013, 07:28 PM
Not sure if this has been covered or not, but I managed to find a inexpensive and easy way to cover up the torx heads on the rear fender struts. I bought some of the spectre bolt caps in the 9/16" size from Pep-Boys, about $9 for a container of 6. I tapped them on over the bolt heads with a rubber mallet, went on pretty snug, I did not utilize any of the filler plastic plugs that were included with the set, these seem to tap right on with a snug fit.

#847
11-02-2013, 08:01 PM

Thaks xraybox, that' should be good enough.
BTW I like that idea of the spacer on the mirror stem.
Its easier and cheaper than trying to find the extra deep Acorn nut I used on mine.
Great job.
rsarno,
Instead of buying a couple of cup holders and cutting them up why not just get a piece of plywood, any thickness will do.
Cut it to fit the inside of the bag, then use a hole saw to cut two holes for the cups and put 4" to 6" long carrage bolts in the four corners with the nice wide domed heads agains't the bottom of the bag (they won't over stress the leather that way) to hold it up off the bottom.
Then you can stand the cups in the holes to hold them securely when you need it.
Then when you don't need it, just tip it on its side so the wood is virtically oriented agains't the inside or outside of the bag.
It shouldn't take up much if any space laying like that, but you'll still have it in there whenever you need it.
If you have some scrap plywood, a can of black spray paint, and carrage bolts laying around it shouldn't cost more than a couple of hours work.
#848
11-06-2013, 03:16 PM

Advanced
#849
11-09-2013, 11:45 PM

After taking my E Glide and two coworkers bikes to Florida in September, I found out real quick that there is not much to hook tie downs to on a bagger. My Fatboy is only slightly easier. After checking the thread size on the bolt for the passenger pegs, and a Bing search I found eye bolts on Amazon that have the right thread size to screw in place of the pegs.
The following users liked this post:
drummin1 (01-27-2021)
#850
11-10-2013, 06:32 PM
Road Warrior
Join Date: Nov 2010
Location: in a van down by the river in Ga.
Posts: 1,294
Received 16 Likes
on
13 Posts
After taking my E Glide and two coworkers bikes to Florida in September, I found out real quick that there is not much to hook tie downs to on a bagger. My Fatboy is only slightly easier. After checking the thread size on the bolt for the passenger pegs, and a Bing search I found eye bolts on Amazon that have the right thread size to screw in place of the pegs.