DIY Cheap Mods
#1
Alright gentleman, and any ladies who would like to participate.
It came to my attention some time ago that the Dyna, Sporty, and Touring guys have started treads on cheap mods.
Now we all know that Softail riders are just as innovative (read cheap) as those guys are. So I think its high time we had one of our own, and this is going to be it.
The rules will be no catalog or store bought items, at least nothing you get from a bike catalog or shop.
Home Depot, Lowes, a local hardware store, or even your local 7-11 is another story.
What I want to see is the do it yourself stuff. I'm encouraging you to post pictures and details on what you did, any tools needed, how you did it, and any challenges you found.
Remember the cheaper the better.
I would also like to see comments from the general population, such as;
Requests for more information
Ideas for improving a design
Ideas for a potential project
I'll be editing this with an index and links to the various mods as time goes on.
I'll start with some that I have come up with for starters, but I dont wanna be alone here guys. I know there have tobe a bunch of ingenious projects you guys have come up with for your bike.
Here are links to the Dyna and Touring threads, they have a bunch of good ideas that can be used on your bike too.
Sportster Thread
https://www.hdforums.com/forum/showthread.php?t=215353
Dyna Thread
https://www.hdforums.com/forum/showthread.php?t=173504
Touring Thread
https://www.hdforums.com/forum/showthread.php?t=172254
Hardware upgrade Citoriplus
https://www.hdforums.com/forum/showthread.php?p=3306932#post3306932
Muffler sound upgrade Citoriplus
https://www.hdforums.com/forum/showthread.php?p=3306932#post3306932
Wire Soldering Helper Citoriplus
https://www.hdforums.com/forum/showthread.php?p=3307100#post3307100
Wire Harness Cleanup Citoriplus
https://www.hdforums.com/forum/showthread.php?p=3307162#post3307162
Painting front sliders and spokes Asphalt Cowboy
https://www.hdforums.com/forum/showthread.php?p=3307376#post3307376
Softail Custom Plate Mount cleanup jb55
https://www.hdforums.com/forum/showthread.php?p=3341553#post3341553
Cigarette Lighter/Battery Tender hookup Harley03joe
https://www.hdforums.com/forum/showthread.php?p=3426848#post3426848
Brake Rotor Polish junkorgem
https://www.hdforums.com/forum/showthread.php?p=3438844#post3438844
Stock Muffler mod Nighthawg
https://www.hdforums.com/forum/showthread.php?p=3462007#post3462007
Laydown plate for Tombstone light beepo
https://www.hdforums.com/forum/showthread.php?p=3493532#post3493532
Fender Contour plate mountSimpleman04
https://www.hdforums.com/forum/showthread.php?p=3501038#post3501038
Painting bolt heads 95CHUCK
https://www.hdforums.com/forum/showthread.php?p=3536689#post3536689
Painting Brake Rotors 95CHUCK
https://www.hdforums.com/forum/showthread.php?p=3536697#post3536697
Aircleaner Carb/Throttlebody matching 95CHUCK
https://www.hdforums.com/forum/showthread.php?p=3536708#post3536708
Reshaping stock seats deluxe rider
https://www.hdforums.com/forum/showthread.php?p=3554964#post3554964
Homemade breather kit coop57
https://www.hdforums.com/forum/showthread.php?p=3554964#post3554964
$35 Camera Mounting & $25 Remote Control Garage Door Opener 128auto
https://www.hdforums.com/forum/showthread.php?p=3557651#post3557651
Skull Taillight 1941ratrod
https://www.hdforums.com/forum/showthread.php?p=3565292#post3565292
Vacuuming wires through handlebars wtf6316
https://www.hdforums.com/forum/showthread.php?p=3578914#post3578914
Vented Heat Shields GymRat523
https://www.hdforums.com/forum/showthread.php?p=3594102#post3594102
Darkening smoked turn signal lenses nikonf8
https://www.hdforums.com/forum/showthread.php?p=3617431#post3617431
Replacing punched out stock baffles Goodwrench1967
https://www.hdforums.com/forum/showthread.php?p=3630061#post3630061
Blackening chrome mufflers sdbiker
https://www.hdforums.com/forum/showthread.php?p=3654622#post3654622
Rear Turn Signal relocation PoorBoy
https://www.hdforums.com/forum/showthread.php?p=3705617#post3705617
Saggy Bag fix wrenchguy24
https://www.hdforums.com/forum/showthread.php?p=3828203#post3828203
Swingarm frame inserts & home made bags 2008softail
https://www.hdforums.com/forum/showthread.php?p=3836971#post3836971
Garage Door Opener doghair
https://www.hdforums.com/forum/softail-models/229525-diy-cheap-mods-2.html#post3943033
Turn Signal Relocation on Fl Front Ends WARG
https://www.hdforums.com/forum/softail-models/229525-diy-cheap-mods-2.html#post3981849
Softail Custom Seat Bolt Fix mike@nhca/us
https://www.hdforums.com/forum/softail-models/229525-diy-cheap-mods-3.html#post3998627
Rear Bullet Turn Signals Mod anubisss
https://www.hdforums.com/forum/softail-models/229525-diy-cheap-mods-3.html#post4131472
Forward Control Shifter Fix mopardave
https://www.hdforums.com/forum/softail-models/229525-diy-cheap-mods-3.html#post4173657
Last edited by In Memoriam Citoriplus; 02-04-2009 at 12:58 AM.
The following users liked this post:
tamky (08-05-2023)
#2
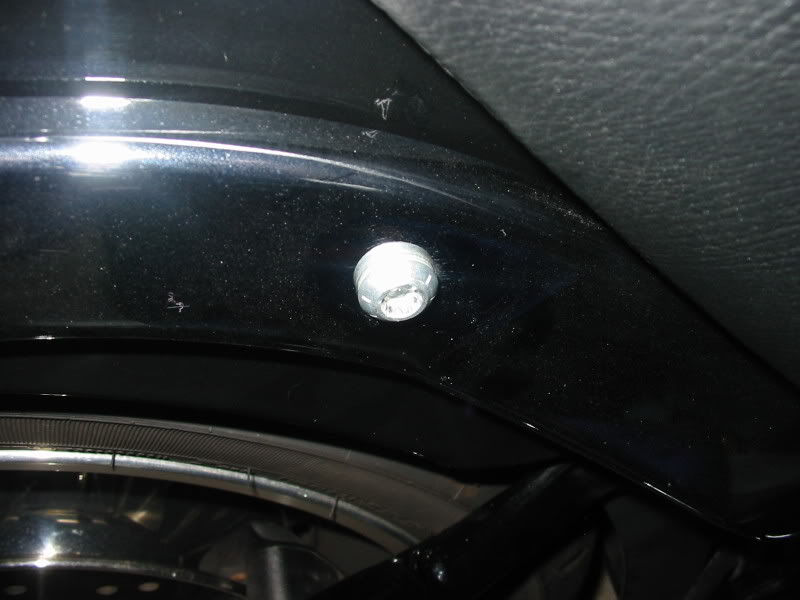
I found a nice and reasonably cheap way to get rid of some of the crappy cad plated junk hardware the factory puts our bikes together with. I did this one on the fender struts on my bike.
But I'm sure that you guys can find otherplaceson your bikes to use it or a variation of it on.
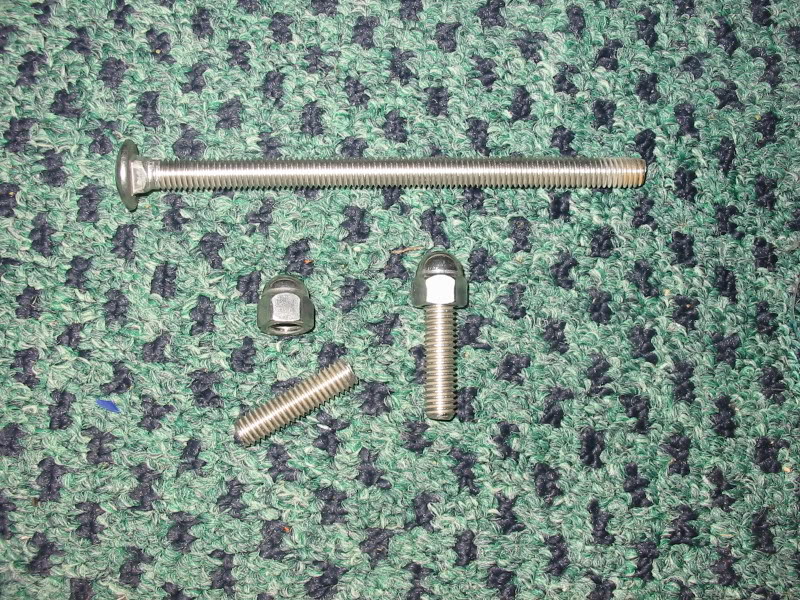
Usesome SS treaded rod, I used SS carrage bolts and cut the threaded section to lengths needed. Jam acorn nuts on the ends with some JB Weld so they don't come apart. I would have used a stainless steel pin through the nut and rod but couldn't find any, and the JB seems to do the job just fine.
Stock Torx bolts in strut.
The parts you need.
And the finished product.
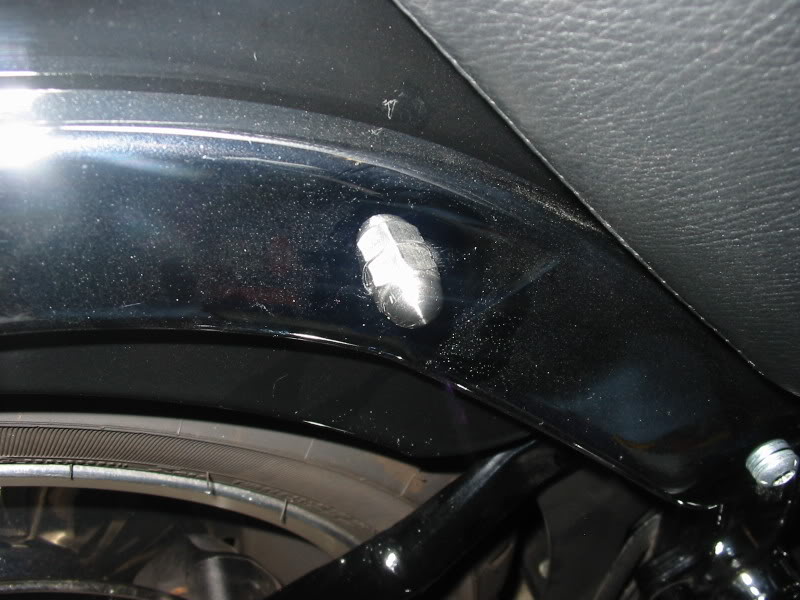
I think they look a lot better, you can remove them a lot easier than the soft Torx headed bolts andI don't have to worry about them rusting.
But I'm sure that you guys can find otherplaceson your bikes to use it or a variation of it on.
Usesome SS treaded rod, I used SS carrage bolts and cut the threaded section to lengths needed. Jam acorn nuts on the ends with some JB Weld so they don't come apart. I would have used a stainless steel pin through the nut and rod but couldn't find any, and the JB seems to do the job just fine.
Stock Torx bolts in strut.

The parts you need.

And the finished product.

I think they look a lot better, you can remove them a lot easier than the soft Torx headed bolts andI don't have to worry about them rusting.
The following 4 users liked this post by In Memoriam Citoriplus:
#3
Here's avery easy and cheap way to get a much more"Harley" like sound a bike should have had from the factory.
There is no needto have the Delphi FI system remapped if youleave the intake alone.I spent under $5 for the parts I used to do it right.
Here's the tools I used to take it 'out';
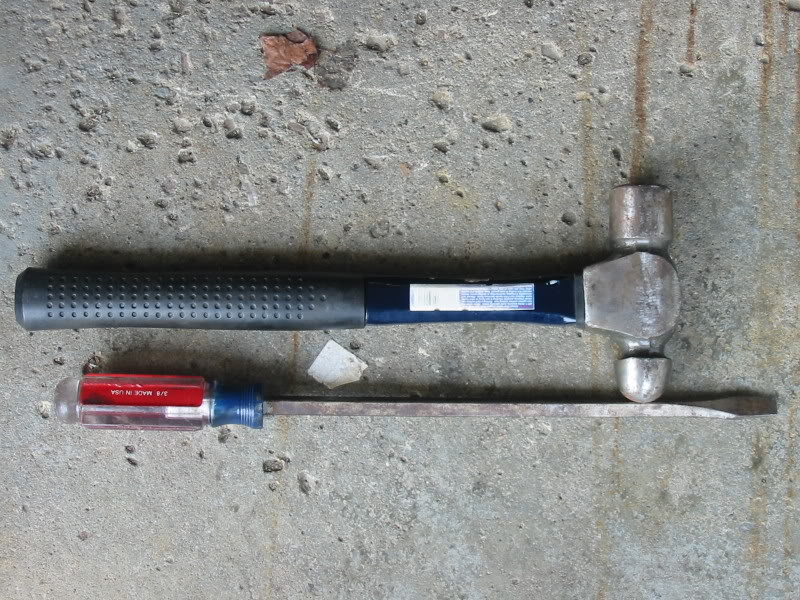
I didn't have a hole saw that would fit all the way down to the plate so I used a hammer and screwdriver, unfortunatly it leaves a bunch of ragged edges. So I came upwith these parts, under $5 at the local Lowes plus a 21mm socket to clean things up.
1 piece of 1/2" X 3' long threaded rod, three nuts to fit and four washers.
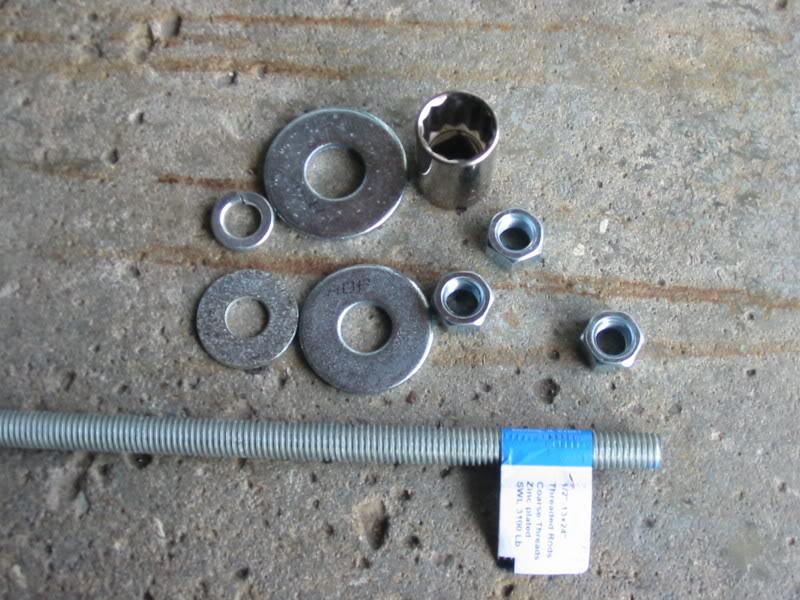
Put two nuts, the socket, and a lock washer together like this at one end.
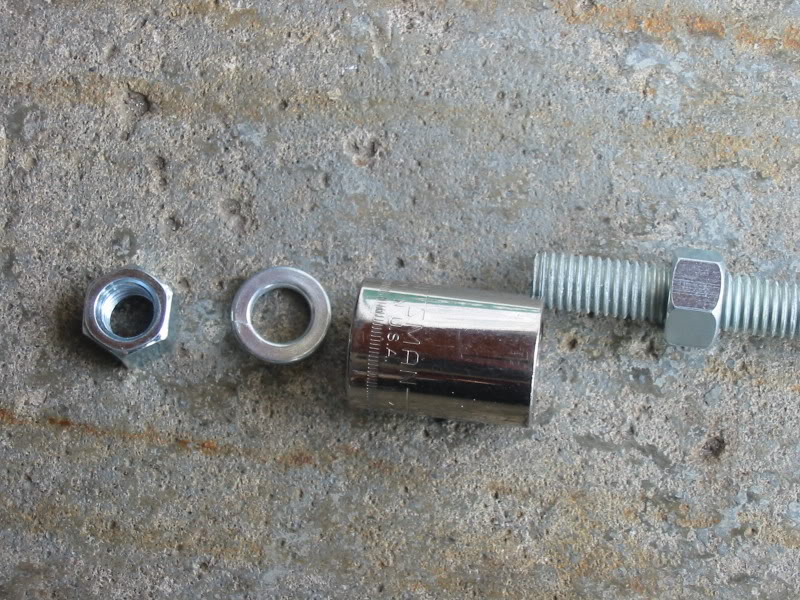
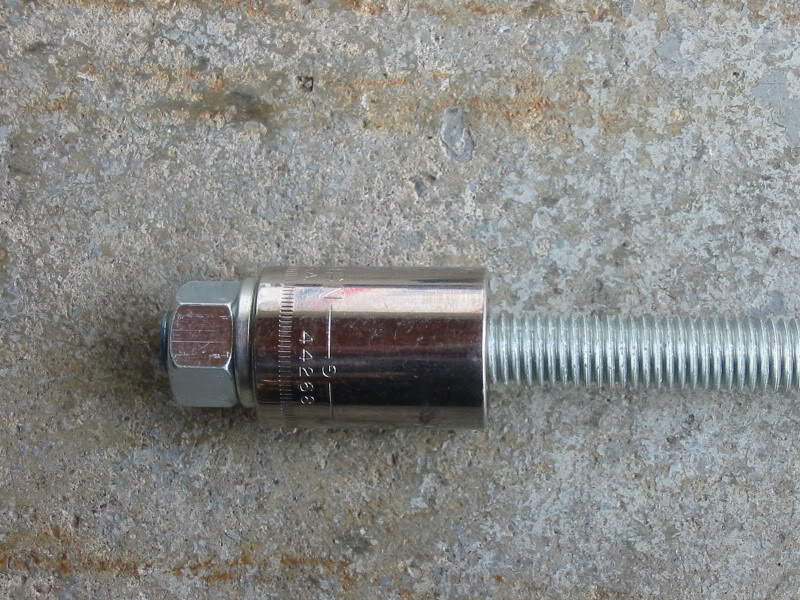
As the socket is certain to get jammed in there when you hammer it through, don't let it go in too far. It only has to go in about 1/2 to 3/4" to work. If you go in too far you might have trouble getting it out without removing the muffler from the bike.
Anyway you can use the rest of the washers and the last nut to prevent it from going in too far, and as a bonus it can be used to "jack" the piece back out. Cause you will almost certainly not be able to pull it out by hand.
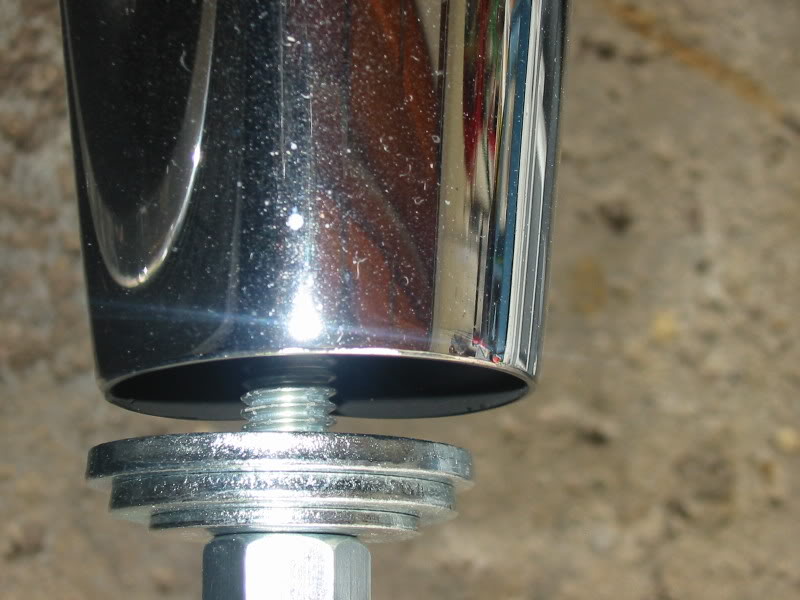
Don't expect it to sould like its got a set of Rush slip on's w/2" baffles, or a set of Big Radius pipes. But if you like the stock looks but not the sound or your just short funds for new pipes its acheap way to improve what you got.
There is no needto have the Delphi FI system remapped if youleave the intake alone.I spent under $5 for the parts I used to do it right.
Here's the tools I used to take it 'out';

I didn't have a hole saw that would fit all the way down to the plate so I used a hammer and screwdriver, unfortunatly it leaves a bunch of ragged edges. So I came upwith these parts, under $5 at the local Lowes plus a 21mm socket to clean things up.
1 piece of 1/2" X 3' long threaded rod, three nuts to fit and four washers.

Put two nuts, the socket, and a lock washer together like this at one end.


As the socket is certain to get jammed in there when you hammer it through, don't let it go in too far. It only has to go in about 1/2 to 3/4" to work. If you go in too far you might have trouble getting it out without removing the muffler from the bike.
Anyway you can use the rest of the washers and the last nut to prevent it from going in too far, and as a bonus it can be used to "jack" the piece back out. Cause you will almost certainly not be able to pull it out by hand.

Don't expect it to sould like its got a set of Rush slip on's w/2" baffles, or a set of Big Radius pipes. But if you like the stock looks but not the sound or your just short funds for new pipes its acheap way to improve what you got.
The following users liked this post:
longrideshields-2 (09-16-2021)
#4
Citoriplus
Great idea. Of those that have the older bikes know, you can somewhat rebuild the whole bike, at least an old shovelhead, going through the fastener section at Lowe's or Home Depot. Electrical tape, zip ties, JB Weld, Fuses, extra wire, spark plugs, a quart of oil for those longer trips, and the required tools...........
I'll do my best to come up with some goodies.
The following 2 users liked this post by BigJohn Fatboy:
ArdyBoone (04-10-2024),
longrideshields-2 (09-16-2021)
#5
Here's a cheap way to help get good solder connections when you need to lengthen, shorten, or add lines in the bikes electrical system.
The biggest problem with soldering wires on a bike is you need to be an octopus. You need a couple of extra hands to hold the wires whileyou use solder with one hand and the iron in the other. So I came up with a simple and cheap way to make a couple of different wire holders.
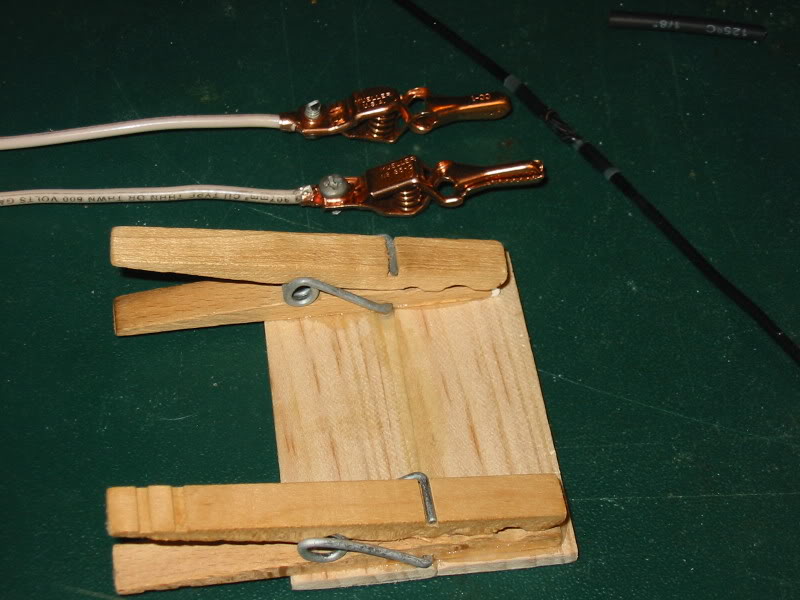
I think I spent a grand total of less than a buck for both of them, and that's because I wanted to get a new pair of alligator clips. The wood one was made from a pair of cloths pins glued to a couple of pieces of a paint mixing stick I got from Home Depot for free. The clips I swiped off the wife. This one is good for any wires that you can lay on a table, or you can glue a magnet to the back and stick it to any steel surface.
The other one with the alligator clips I mademade from the clips and a one foot long piece of scrap 12ga solid copper wire. Its great for using where you can use a clamp or vise grips on the wire between the clips and bend the ends to wherever you need them. Just be careful of using metal clips like these. A hot iron on the wores will have the teeth melting through the wire insulation. So you might considerfiling the teeth down a little and covering them with some tape or shrink tubing.
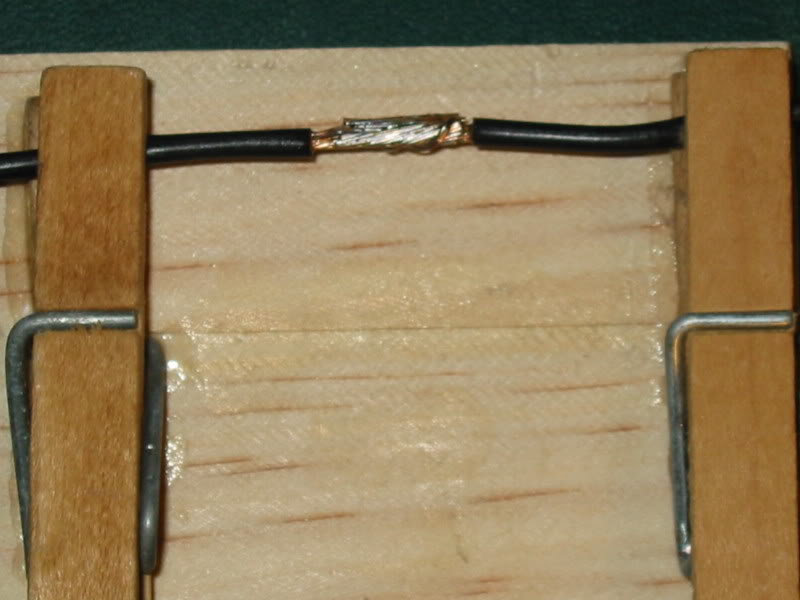
Soldering wires isn't rocket science, but it does take a little practice to do well all the time. But here's a tip for making solder connections that are nearly bullet proof. Once you get the wires soldered properly, like this.
Get some of the wives nail polish or some of this liguid tape and paint the exposed wire and solder connection.
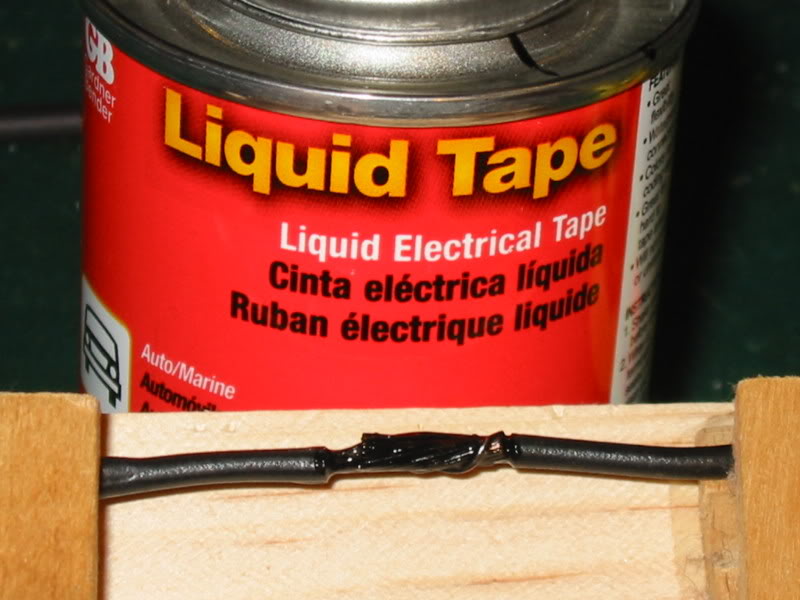
When you ‘paint’ the connection pay particular attention to the ends of the insulation and make sure its well coated. This will prevent any moisture from migrating up the wire strands and corroding them. It won't bother anything today, but a couple of years down the road it will drive you nuts trying to find the electrical gremlins.
Once its dry use a good grade of heat shrink tubing to seal and protect the connection.
Done right the connection will be only slightly larger than the original wire size and last a lifetime.
This is what it looks like before I heated the shrink tubing.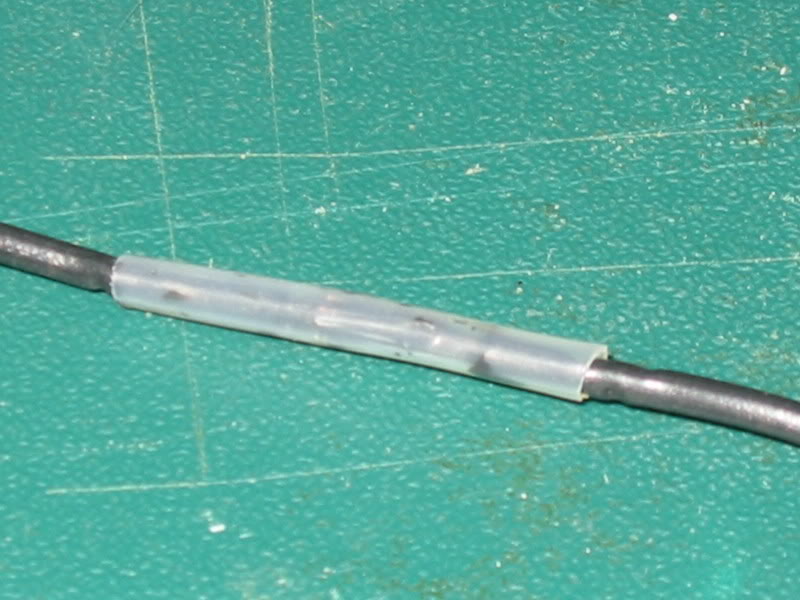
And after.
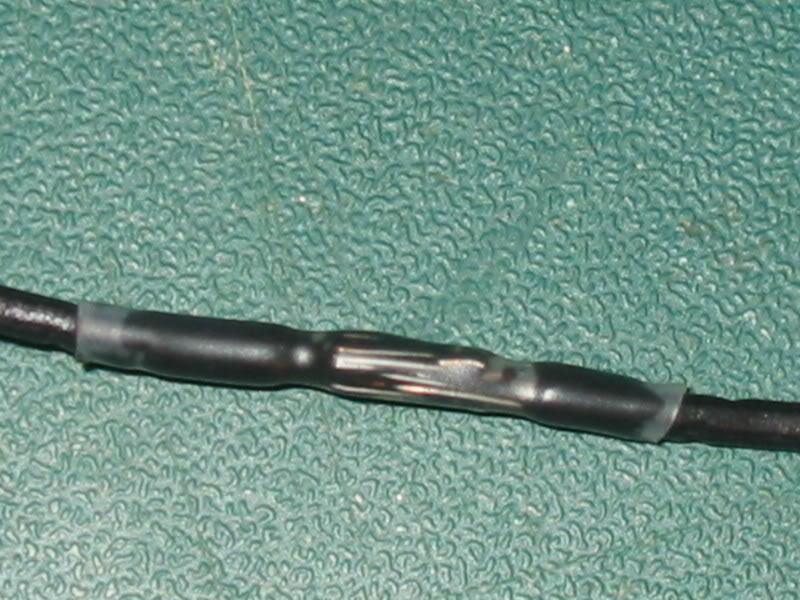
And here's one where I spliced one wire to an existing line.
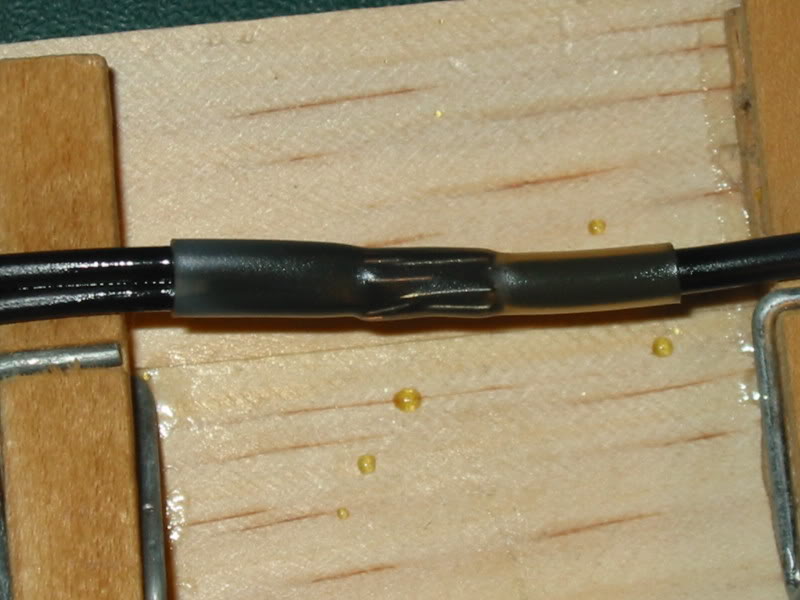
Ride safe.
The biggest problem with soldering wires on a bike is you need to be an octopus. You need a couple of extra hands to hold the wires whileyou use solder with one hand and the iron in the other. So I came up with a simple and cheap way to make a couple of different wire holders.

I think I spent a grand total of less than a buck for both of them, and that's because I wanted to get a new pair of alligator clips. The wood one was made from a pair of cloths pins glued to a couple of pieces of a paint mixing stick I got from Home Depot for free. The clips I swiped off the wife. This one is good for any wires that you can lay on a table, or you can glue a magnet to the back and stick it to any steel surface.
The other one with the alligator clips I mademade from the clips and a one foot long piece of scrap 12ga solid copper wire. Its great for using where you can use a clamp or vise grips on the wire between the clips and bend the ends to wherever you need them. Just be careful of using metal clips like these. A hot iron on the wores will have the teeth melting through the wire insulation. So you might considerfiling the teeth down a little and covering them with some tape or shrink tubing.
Soldering wires isn't rocket science, but it does take a little practice to do well all the time. But here's a tip for making solder connections that are nearly bullet proof. Once you get the wires soldered properly, like this.

Get some of the wives nail polish or some of this liguid tape and paint the exposed wire and solder connection.

When you ‘paint’ the connection pay particular attention to the ends of the insulation and make sure its well coated. This will prevent any moisture from migrating up the wire strands and corroding them. It won't bother anything today, but a couple of years down the road it will drive you nuts trying to find the electrical gremlins.
Once its dry use a good grade of heat shrink tubing to seal and protect the connection.
Done right the connection will be only slightly larger than the original wire size and last a lifetime.
This is what it looks like before I heated the shrink tubing.

And after.

And here's one where I spliced one wire to an existing line.

Ride safe.
The following 5 users liked this post by In Memoriam Citoriplus:
drummin1 (01-24-2021),
eagleeyeice (04-14-2021),
longrideshields-2 (09-16-2021),
slrate67 (04-09-2023),
SolidRock724 (03-02-2018)
#6
Its not much of a big time mod, but it is under $50 and it does make the wires in the tripple tree area look a bit better.
I'm in the process of changing the bars on my bike and didn't like the cheap a$$ed plastic covering the factory put on my wires. But when I was in a dealer I noticed that the Wideglide has a plastic meshcovering that looks a lot better with thenew Diamondback lines and cables I'm putting on.
So I did a little digging and found the part number70017-06 (Conduit, Black Mesh) and ordered a couple of pieces from Zenotti's to replace the ones on my bike.
Here's a couple of pics of the old plastic on the right, and the new mesh on the left.
Please no cracks about how dirty the bike is, its in that "winter mod" state.
I have since I did this found a better place to get the mesh from,its cheaper and avalable in different sizes to boot.
Frys.com sells it in four different sizes.I ordered and all four of them cost about $35 delivered.
2281378 1/8" X 20'
2281388 1/4" X 16'
22813981/2" X 10'
22814083/4" X 8'
Each piece is only $6.99 and all together there's enough to do at least 2 complete bike's.
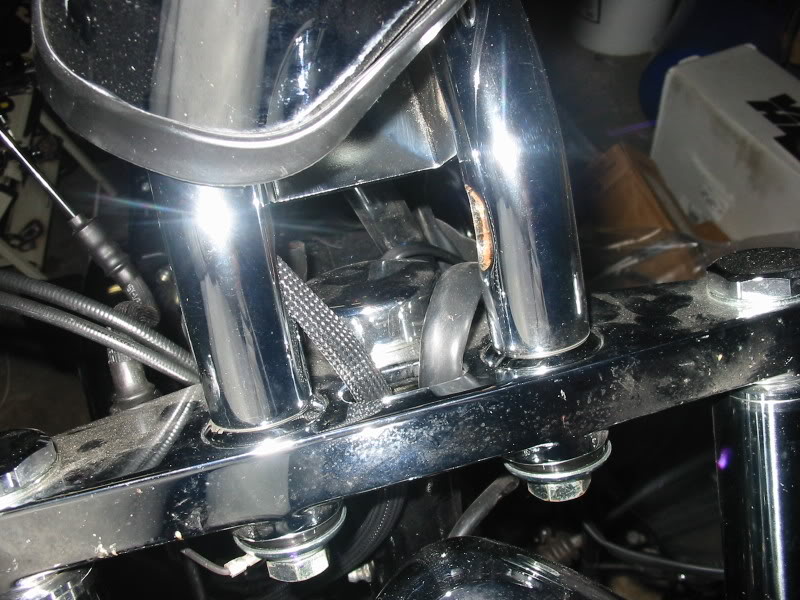
Here's a closer look at it.
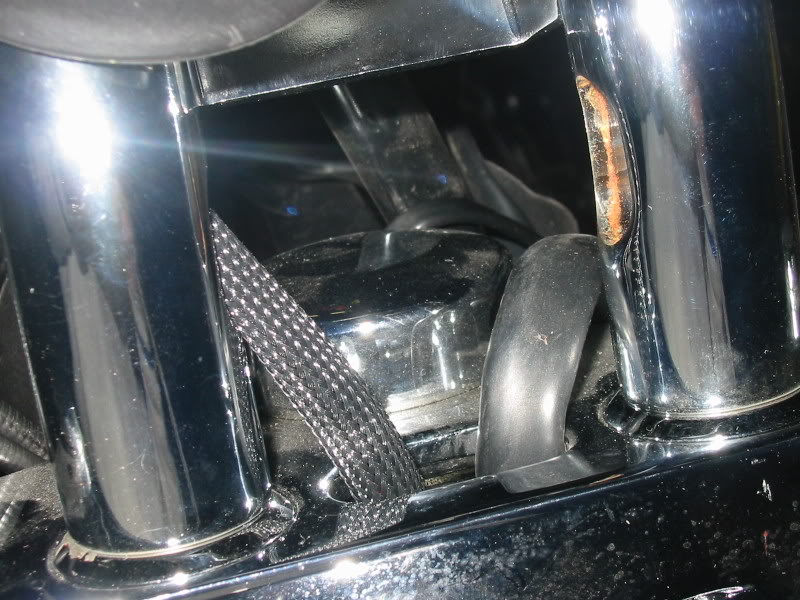
BTW there is an unexpected benifit to using the mesh on internal wires. It was very easy to slip the wires through the bars with this covering on them. My bars don't have any major bends in them, but the old covering was so stiff and bent up it was a sure bet that they were going to be Royal Pain in The A$$ to get through.
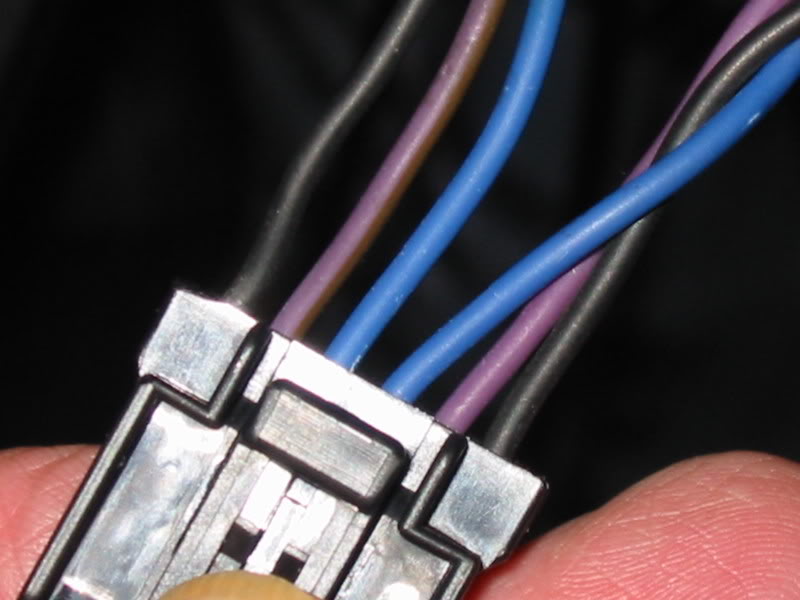
This is the plug that is used on my Softail for the turn signals.
You'll notice that the pinouts are mirror images and I suggest that you only take the pins out of one side at a time. That will eliminate the possibility of itgetting missplaced or lost on you and you'll have a ready guide to putting the pins back in properly. Just remember its exactly oppisite and you won't have a problem.
For the turn signals I used the 1/8" stuff so it would fit snugly over the original covering. First thing is to put a piece of tape over the pin plugs. It will make iteasier to slip the mesh over them. Onceyou have enough on so that its about 4" to 6" from the signal cut the mesh about 1" below the pins.
That should be more than enough to cover it and with it not completely on yet it will let you slidetwo short pieces of shrink tubing on much easier.
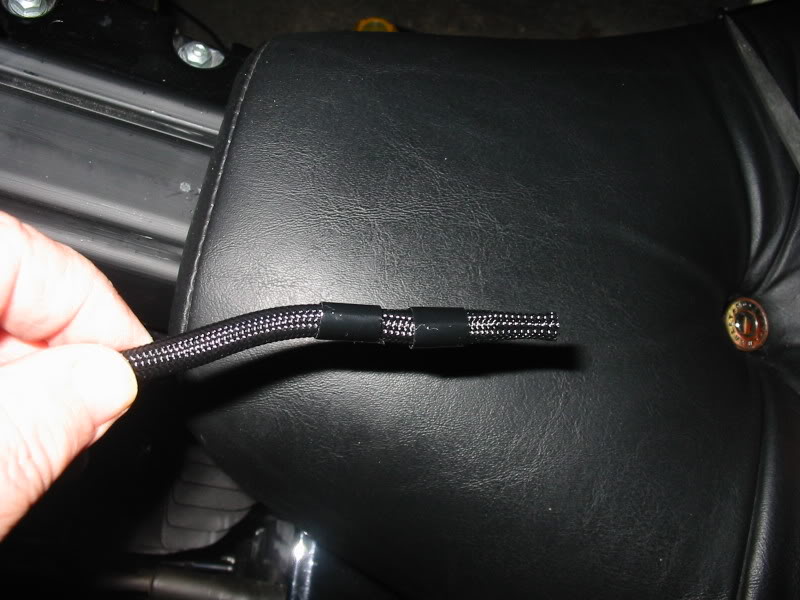
Once its all the way up it will look like this.
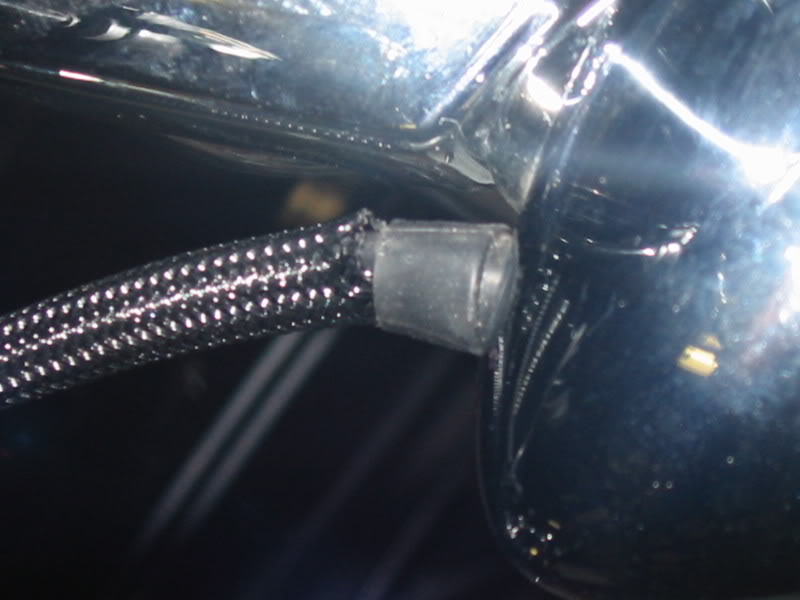
Because the mesh has a fairly low melting point you should put a short piece of electrical tape, enough for a little over one wrap around the end first. Then slide one piece of the shrink tube up and shrink it over the end. The shrink tube will keep the mesh from fraying or unraveling and give it a more 'finished' look.
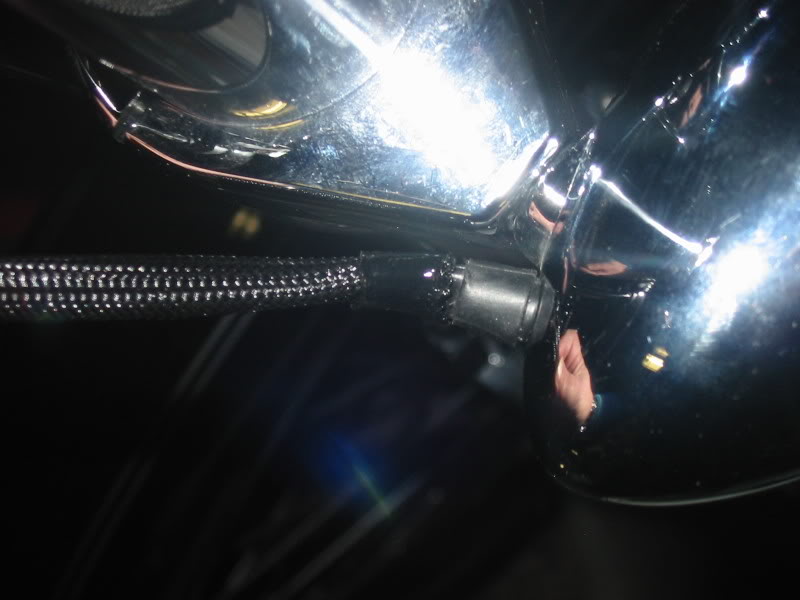
Then do the same to the other end. You don't need the elecrical tape here because its going to be hidden under the tank. But its up to you.
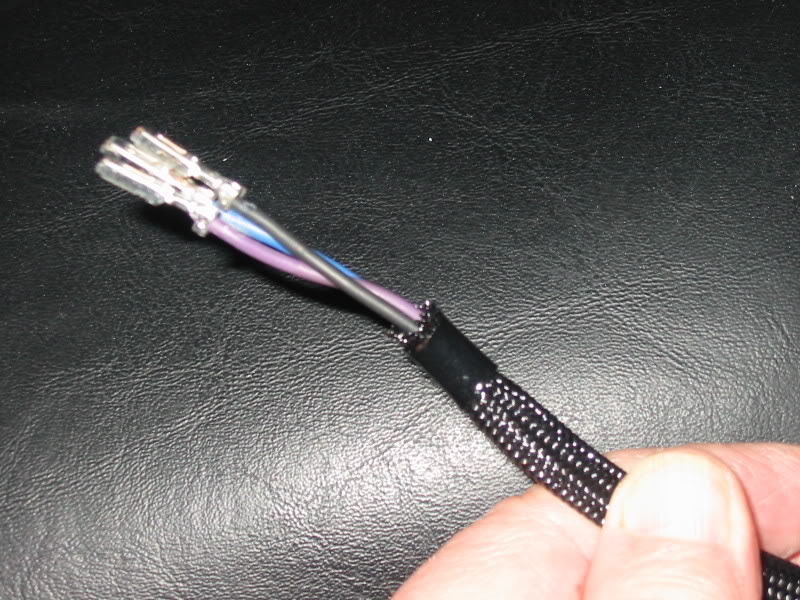
Here's what the cable looks like before on the left, and the after on the right.
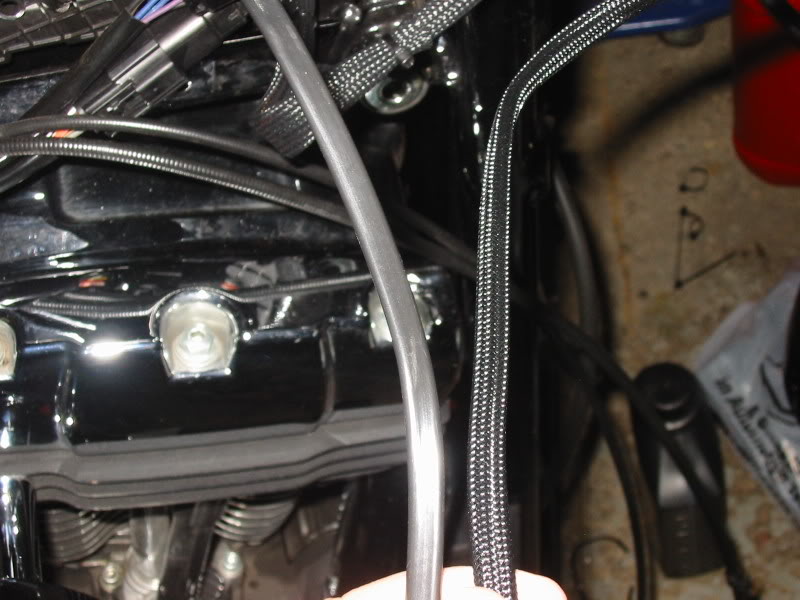
Now for my next trick, the headlight cable.
Good luck and ride safe
Frank
I'm in the process of changing the bars on my bike and didn't like the cheap a$$ed plastic covering the factory put on my wires. But when I was in a dealer I noticed that the Wideglide has a plastic meshcovering that looks a lot better with thenew Diamondback lines and cables I'm putting on.
So I did a little digging and found the part number70017-06 (Conduit, Black Mesh) and ordered a couple of pieces from Zenotti's to replace the ones on my bike.
Here's a couple of pics of the old plastic on the right, and the new mesh on the left.
Please no cracks about how dirty the bike is, its in that "winter mod" state.
I have since I did this found a better place to get the mesh from,its cheaper and avalable in different sizes to boot.
Frys.com sells it in four different sizes.I ordered and all four of them cost about $35 delivered.
2281378 1/8" X 20'
2281388 1/4" X 16'
22813981/2" X 10'
22814083/4" X 8'
Each piece is only $6.99 and all together there's enough to do at least 2 complete bike's.

Here's a closer look at it.

BTW there is an unexpected benifit to using the mesh on internal wires. It was very easy to slip the wires through the bars with this covering on them. My bars don't have any major bends in them, but the old covering was so stiff and bent up it was a sure bet that they were going to be Royal Pain in The A$$ to get through.
This is the plug that is used on my Softail for the turn signals.
You'll notice that the pinouts are mirror images and I suggest that you only take the pins out of one side at a time. That will eliminate the possibility of itgetting missplaced or lost on you and you'll have a ready guide to putting the pins back in properly. Just remember its exactly oppisite and you won't have a problem.

For the turn signals I used the 1/8" stuff so it would fit snugly over the original covering. First thing is to put a piece of tape over the pin plugs. It will make iteasier to slip the mesh over them. Onceyou have enough on so that its about 4" to 6" from the signal cut the mesh about 1" below the pins.
That should be more than enough to cover it and with it not completely on yet it will let you slidetwo short pieces of shrink tubing on much easier.

Once its all the way up it will look like this.

Because the mesh has a fairly low melting point you should put a short piece of electrical tape, enough for a little over one wrap around the end first. Then slide one piece of the shrink tube up and shrink it over the end. The shrink tube will keep the mesh from fraying or unraveling and give it a more 'finished' look.

Then do the same to the other end. You don't need the elecrical tape here because its going to be hidden under the tank. But its up to you.

Here's what the cable looks like before on the left, and the after on the right.

Now for my next trick, the headlight cable.
Good luck and ride safe
Frank
The following 3 users liked this post by In Memoriam Citoriplus:
#7
This thread is a GREAT idea! Here is my 1st contribution:
W/2 kids and a Wife to feed, well... ok, I'm cheap. I wanted to PC the lowers on my Train, but I didn't want to take apart the front end and pay $80 or so to get it done. I also didn't like the stock spoke wheel up front and don't have $1,500 or so for a new one (Did I mention that I'm cheap?), so I killed two birds with one stone.
Materials:
2 cans of Rustoleum in gloss black
1 can of clear coat
1 roll masking tape
1 old sheet, moving blanket, or whatever your wife won't kick your a$$ over for painting black!
* a six pack of your favorite brew*
I removed the front wheel and brake, covered the front end with the sheet, and taped off the lower sliders. Then, I removed the rotor from the front wheel and went to tapingthe wheeloff. This is by far the most tedious task I have tackled in a while. Take your time and do it right, and the finished product looks like it was disassebled and PC'd.
Back to the point. Start spraying. Lots of THIN coats w/ a minute or so in between. Go heavy on the clear for the sliders. This will help protect the finish from chips. Let it all dry and re-assemble. Oh, and I used Rustoleum because it is made to protect metal when it's outside.... My not need to but it made me feel like I tried. And if it chips from a rock or big a$$ Florida bug, simply touch up with black nail polish.
All in, you get a totaly different look for less than $10 (minus the beer) and a couple hours on Sat.
[IMG]local://upfiles/57932/213B11C597164F3B9368E39865E1214F.jpg[/IMG]
The following users liked this post:
ArdyBoone (04-10-2024)
Trending Topics
#8
#9
I just cleaned them REALLY well. The rustoleum paint is made to use on metal, and seems to "stick" better than regular rattle can stuff. Plus, with the lowers and spokes being polished, they are nowhere near as smooth as chrome. I've put on 1,500 miles or so since, and no chips.
#10

