


DIY Cheap Mods
Novice
Joined: May 2008
Posts: 15
Likes: 0
From: Alabama
Cool! So you're basically punching a big 'ole hole in the baffle? Have you noticed any backfire or anything since doing the mod? I wonder what this does to the warranty? Should I do this while engine is running? HA! So how can you describe the new sound? Just louder? Or sweeter? or Nastier? I know it's subjective...
Great thread btw!
Thanks,
Rick
Great thread btw!
Thanks,
Rick
Thread Starter
|
May our Moderator Rest in Peace
Joined: Sep 2006
Posts: 11,386
Likes: 35
From: Rochester, NY
R_Niner,
I'm assuming that your asking me aboutpunching out the baffle plate.
Anyway to me it sounded about the same until you jumped on it. Then it got very authoritative without the high pitched bark that frag pipes have.
If I were to do it again I would cut the weld that holds the baffle tube in. Pull it out and enlarge all the holes adding a couple of new rows wherever I could, then reweld it back in. That way if anyone wanted to see if it had been 'tampered' with they would have to cut the baffle out to prove it.
Club Member
Joined: May 2006
Posts: 14,564
Likes: 9,225
From: the 50s & the 60s

ORIGINAL: Harley03joe
My Friends Homedepot Bike It Has A B&S Motor
He's Waiting On The Plywood Seat
See The X Bones Look
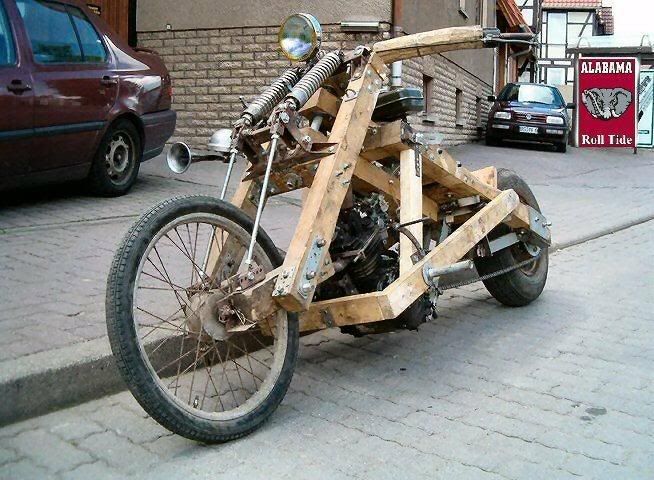
My Friends Homedepot Bike It Has A B&S Motor
He's Waiting On The Plywood Seat
See The X Bones Look
Harley03joe, didn't you mean to post this with you empty beer cans???
Just curious.
And yeah, I don't believe you when you say you have a friend.
mud
Road Master
Joined: Sep 2007
Posts: 750
Likes: 8
From: South Florida
ORIGINAL: mudpuddle
Harley03joe, didn't you mean to post this with you empty beer cans???
Just curious.
And yeah, I don't believe you when you say you have a friend.
mud
ORIGINAL: Harley03joe
My Friends Homedepot Bike It Has A B&S Motor
He's Waiting On The Plywood Seat
See The X Bones Look
My Friends Homedepot Bike It Has A B&S Motor
He's Waiting On The Plywood Seat
See The X Bones Look
Harley03joe, didn't you mean to post this with you empty beer cans???
Just curious.
And yeah, I don't believe you when you say you have a friend.
mud
Ok sonny Boy
Road Master
Joined: Sep 2007
Posts: 750
Likes: 8
From: South Florida
My 2 Cents.
This Is What I Did For A Lighter/Cell Phone Hook up
For My 03 Heritage, I Just Plug It Into My Batt Tender Plug
Real Cheap Fix, I Keep It In My windshield Bag.
[sm=goodidea.gif]??????????? YES OR NO ???????????????

This Is What I Did For A Lighter/Cell Phone Hook up
For My 03 Heritage, I Just Plug It Into My Batt Tender Plug
Real Cheap Fix, I Keep It In My windshield Bag.
[sm=goodidea.gif]??????????? YES OR NO ???????????????
Thread Starter
|
May our Moderator Rest in Peace
Joined: Sep 2006
Posts: 11,386
Likes: 35
From: Rochester, NY
No its a good idea, and worth at least a nickle, maybe even a dime. J/K its good I like it.
I was thinking of going the opposite way. Hard mount the lighter socket under the seat somehow and rewire the end of the tender with an adapter plug. Then when I wanted to put it on the tender I would just have to plug the adapter into the waiting lighter socket.
I just need to find a nice waterproof (boat store maybe) socket assembly I can use for it and a good place to mount it.
HD Forum Stories
The Best of Harley-Davidson for Lifelong Riders

7 Times Harley-Davidson Chucked Tradition Out the Window
Verdad Gallardo
7 Surprising Harley-Davidson Products that Are Not Motorcycles
Verdad Gallardo
8 Best Harley-Davidson Motorcycles Ever
Pouria Savadkouei
10 Worst Harley-Davidson Motorcycles Ever
Pouria Savadkouei
Killer Custom's Jail Break Is The Breakout That Refused to Blend In
Verdad Gallardo
Crazy Bunderbike Build Looks Amazing, But Is It Impossible to Ride?
Verdad Gallardo
Harley-Davidson Reveals Super Cool Cafe Racer Concept
Verdad Gallardo
Engraved Rebellion: Inside Bundnerbike's Glam Rock II
Verdad Gallardo
10 Motorcycles You Should Never Buy
Joe KucinskiRoad Master
Joined: Sep 2007
Posts: 750
Likes: 8
From: South Florida
ORIGINAL: Citoriplus
No its a good idea, and worth at least a nickle, maybe even a dime. J/K its good I like it.
I was thinking of going the opposite way. Hard mount the lighter socket under the seat somehow and rewire the end of the tender with an adapter plug. Then when I wanted to put it on the tender I would just have to plug the adapter into the waiting lighter socket.
I just need to find a nice waterproof (boat store maybe) socket assembly I can use for it and a good place to mount it.
I Have It If I Need It, If Not I Still Have It Ha Ha Ha
So Im All Set Now.
P. S. Need A Light
Want To See Neat Look This Over For Changing primary oil
And Not Taking Off the Derby Cover To Refill It Back Up
Corbin EZ-Fill Inspection Covers
I Got One On My Bike
http://www.corbin.com/accessories/ezpour.shtml
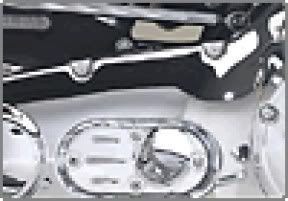
It's one of those things that is so simple it makes you want to scream... "Why hasn't this been done before?" With the Corbin EZ-Fill adding oil to your primary is simple, just remove the knurled plug from the inspection cover and pour. It looks great and works just as well (a hallmark of Corbin design).
Forged aluminum and triple plate chromed for a perfect fit and finish. Rubber o-ring creates a positive seal and secure fit of the chromed plug. Two models are available for a variety of Harley-Davidson models.
#HD-ST-EZ-FILL
Fits: 1970 - 2006
FX, FL Shovelheads
FLST Softails
FXDWG Dyna Wide-Glide
Softail Deuce
#HD-FLH-EZ-FILL
Fits: 1985 - 2006
FXR Models
Roadking
Road-Glide
FLH / FLT models
Special Notes and Info
 EZ-Fill primary inspection covers do not fit on Harley models with mid-controls like the standard Dyna-Glides. There is no hole for the shifter shaft. On some models, it may be required to slightly bend the side-stand helper for clearance (that's the thing you hook your boot on to get the stand to swing out). EZ-Fill primary inspection covers do not fit the 2007 models. EZ-Fill primary inspection covers do not fit any after market shifters that are longer than stock shifters.
 ITEM
DESCRIPTION
PRICE
#HD-ST-EZ-FILL
EZ-Fill Cover, Shovelhead, Softails, Deuce & Dyna Wide-Glide
$99.00
#HD-FLH-EZ-FILL
EZ-Fill Cover, FLH/FLT, Roadking, Roadglide & FXR
$99.00

Advanced
Joined: May 2008
Posts: 71
Likes: 1
From: Oswego,NY
Hello, I might have something for you guys. I polished my rear brake rotor for about $20, and it looks awesome! Heres what you need:
1) 1000 grit wet or dry, 3M Imperial, and a rubber sanding block
2) a can of WD-40 or something like it
3) a sewn buff wheel 6" or so
4) white buffing compound
5) something to rake the wheel with, a screwdriver would work (a kitchen fork is
better,but don't let your old lady find out[ ])
])
6) a bench mounted buffer, or a grinder if you don't have a buffer (3500-5000 RPMs)
Next time you have your wheel off remove your rotor. You have to start by wet sanding the rotor with WD-40 instead of water. I know it sound odd but the oil makes the paper last quite a bit longer. You have to sand it until most of the machine marks are gone. Plan on spending some time on it, and wearing out a couple pieces of paper per side, anyways. You don't need to make the surface completely blemish-free, but you should remove all the marks you can. When your satisfied clean the rotor with hot soapy water, or brakecleaner, be sure to clean all of the abrasives out of the slots, holes.
Now your ready to start buffing! Mount your sewn buff on your buffer/grinder. If you have a buffer you will have to put a little more pressure on the work than if you have a grinder. Add a small amount of compound to the wheel and rake often. I rake every time I add compound. You should be able to tell when your done in a spot, it'll take a while and your rotor may get a little warm. It may take a while to get the hang of it but you won't be able to damage the rotor.It's going to shine as good as chrome! Better than chrome because it's polished stainless, less maintenence and no worries.
Now I should touch on safety, Be sure to CLEAN THE ROTOR before you put it back on the bike. The compound has grease in it, grease and brakes don't work well together, dig? If you mistakenly shined up part of you friction surface don't be alarmed. Be sure that it is clean and it will go back to the way it was in about 2 seconds under your brake pad. Also your going to want a respirator or at least a dry particulates mask/ filter. Heavy metal is not cool to breathe and don't forget the safety glasses either, compound isn't good for the eyes.
If you can't find this stuff readily you can google Caswell Plating, they have it all and a pretty good forum as well.
I would try to post a pic except my wife has the camera somewhere, maybe later if anyones interested.
1) 1000 grit wet or dry, 3M Imperial, and a rubber sanding block
2) a can of WD-40 or something like it
3) a sewn buff wheel 6" or so
4) white buffing compound
5) something to rake the wheel with, a screwdriver would work (a kitchen fork is
better,but don't let your old lady find out[
])6) a bench mounted buffer, or a grinder if you don't have a buffer (3500-5000 RPMs)
Next time you have your wheel off remove your rotor. You have to start by wet sanding the rotor with WD-40 instead of water. I know it sound odd but the oil makes the paper last quite a bit longer. You have to sand it until most of the machine marks are gone. Plan on spending some time on it, and wearing out a couple pieces of paper per side, anyways. You don't need to make the surface completely blemish-free, but you should remove all the marks you can. When your satisfied clean the rotor with hot soapy water, or brakecleaner, be sure to clean all of the abrasives out of the slots, holes.
Now your ready to start buffing! Mount your sewn buff on your buffer/grinder. If you have a buffer you will have to put a little more pressure on the work than if you have a grinder. Add a small amount of compound to the wheel and rake often. I rake every time I add compound. You should be able to tell when your done in a spot, it'll take a while and your rotor may get a little warm. It may take a while to get the hang of it but you won't be able to damage the rotor.It's going to shine as good as chrome! Better than chrome because it's polished stainless, less maintenence and no worries.
Now I should touch on safety, Be sure to CLEAN THE ROTOR before you put it back on the bike. The compound has grease in it, grease and brakes don't work well together, dig? If you mistakenly shined up part of you friction surface don't be alarmed. Be sure that it is clean and it will go back to the way it was in about 2 seconds under your brake pad. Also your going to want a respirator or at least a dry particulates mask/ filter. Heavy metal is not cool to breathe and don't forget the safety glasses either, compound isn't good for the eyes.
If you can't find this stuff readily you can google Caswell Plating, they have it all and a pretty good forum as well.
I would try to post a pic except my wife has the camera somewhere, maybe later if anyones interested.