


Duracell from Hell - PICS
Thread Starter
|
Elite HDF Member
Joined: Aug 2008
Posts: 4,133
Likes: 125
From: Japan
Okay, I wasn't gonna post this cuz most people aren't keen on the Duracell colors and as I was thinking this project thru and posted about it here and there I got quite a bit of negative input toward the "plastic" rear fender, flare of the fender, etc...
But I went ahead with my project anyway and now that I'm done, I don't know...I think she turned out kinda okay, imho, so I thought I'd share. Haters can go ahead and flame away. They have a right to their opinion, too, since I did decide to go ahead and post.
So here goes...
I'll begin with the traditional "before" picture and proceed chronologically from there. I took it slow and deliberate. On days I didn't feel like workin' on 'er I just didn't. When something wasn't going the way I thought it should and I got frustrated, I quit for the day, thought things thru and asked for advice when needed.
This pic was taken a few days after she cleared inspection on 6/27/11. Pretty much stock except for the T-Max and a/c.
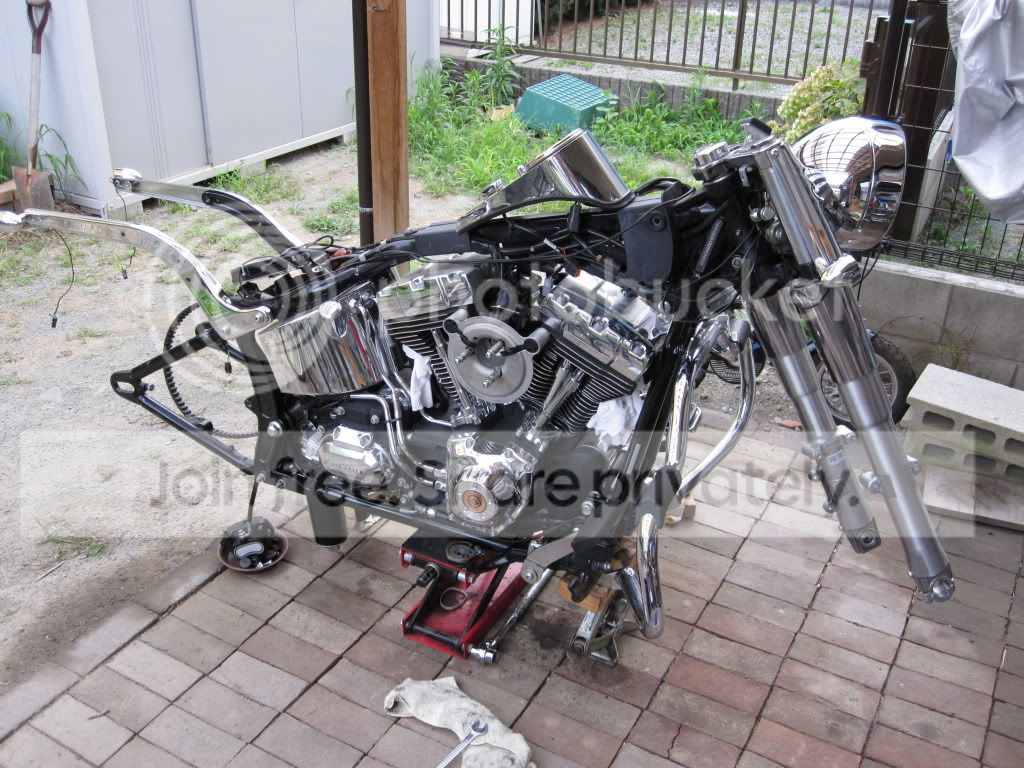
Had 'er torn down to the frame almost a month later - 7/25/11.
Here she is with wheels, 18" apes and Shotgun Shock installed - 8/6/11

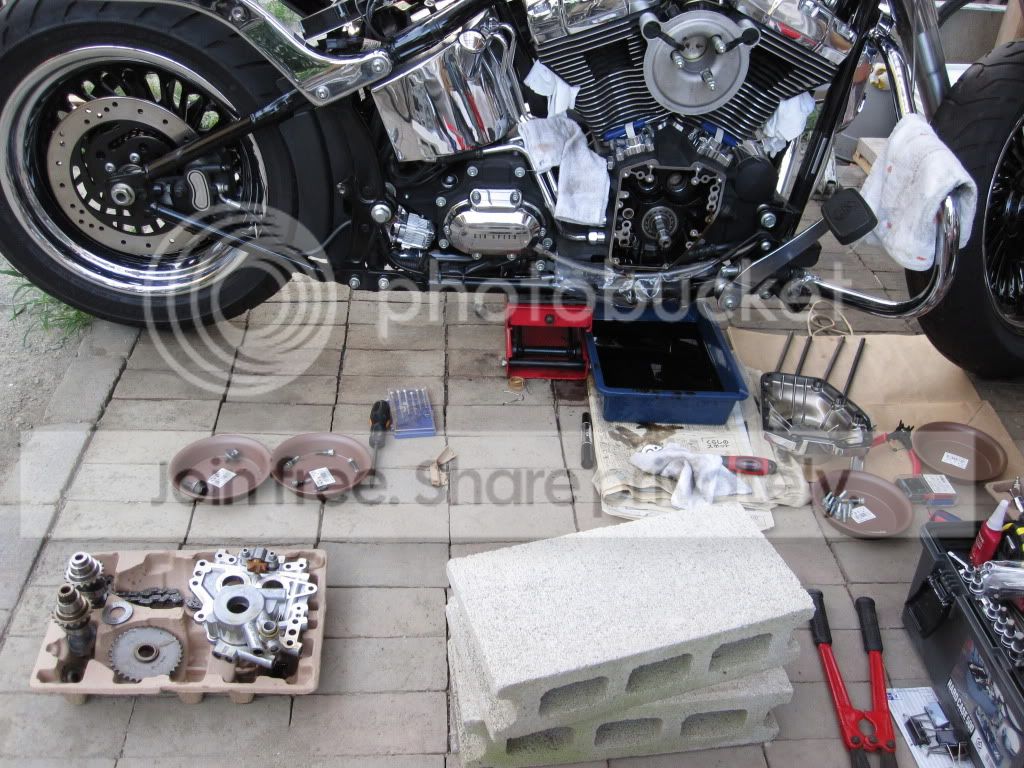
Wood TW555 cam and FM adj. pushrod install - 8/16/11.

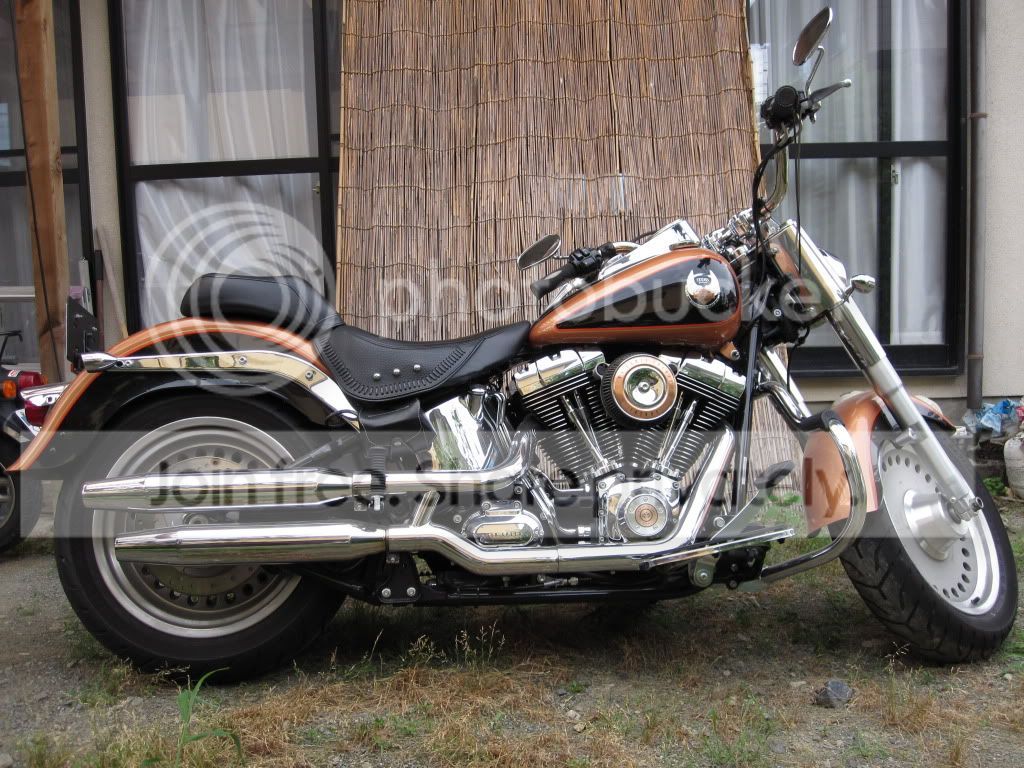
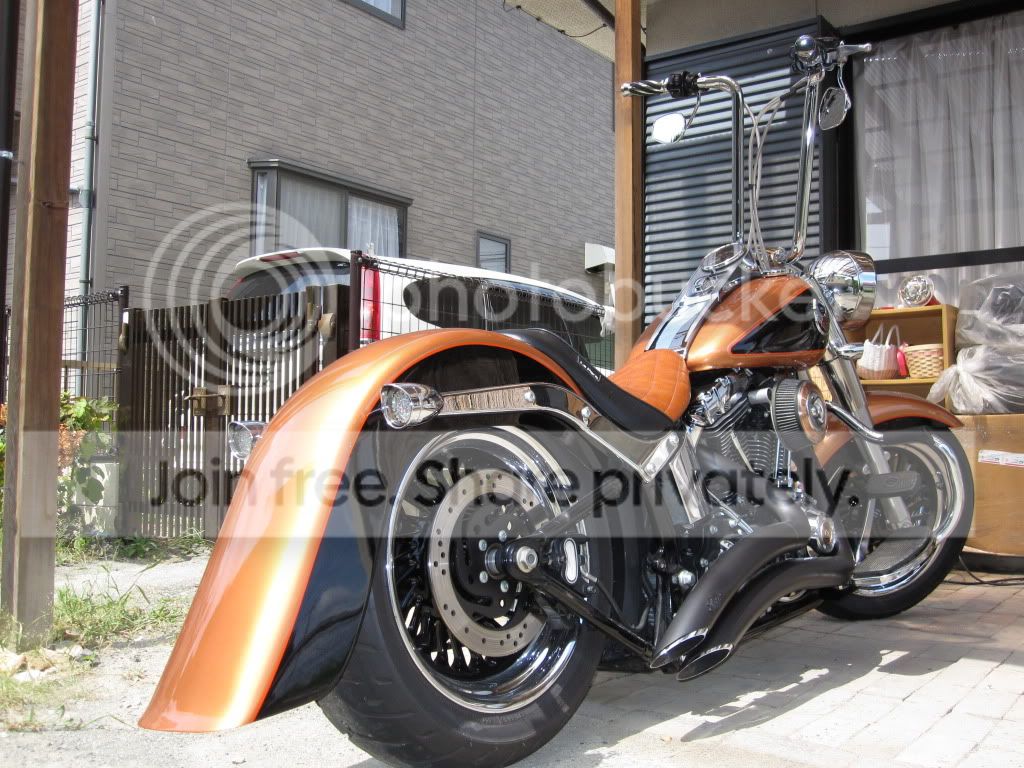
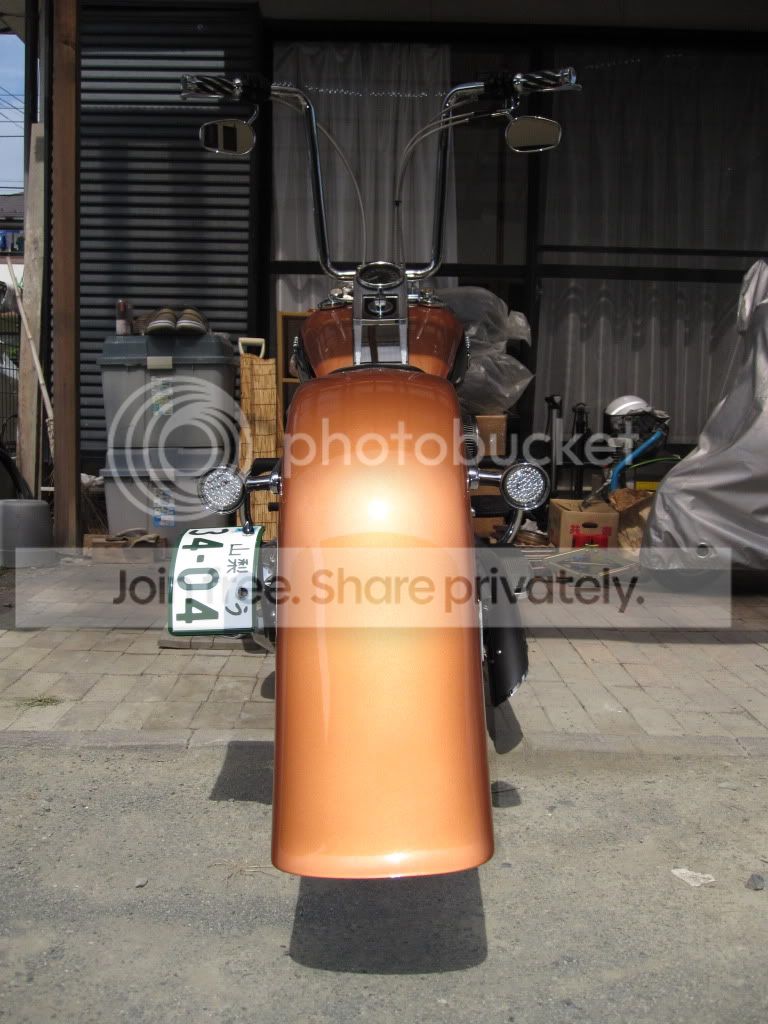
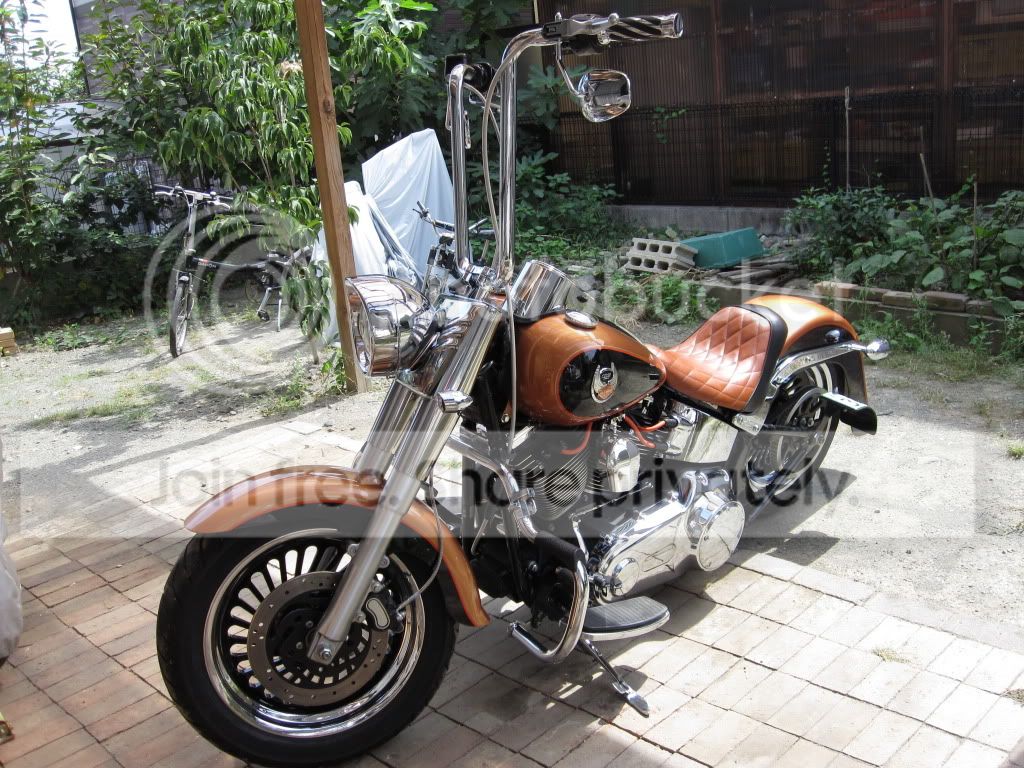
Project completed with new cams, extended & paint-matched rear fender and Le Pera custom seat, one-off side plate mount, etc. - Today (9/16/11).
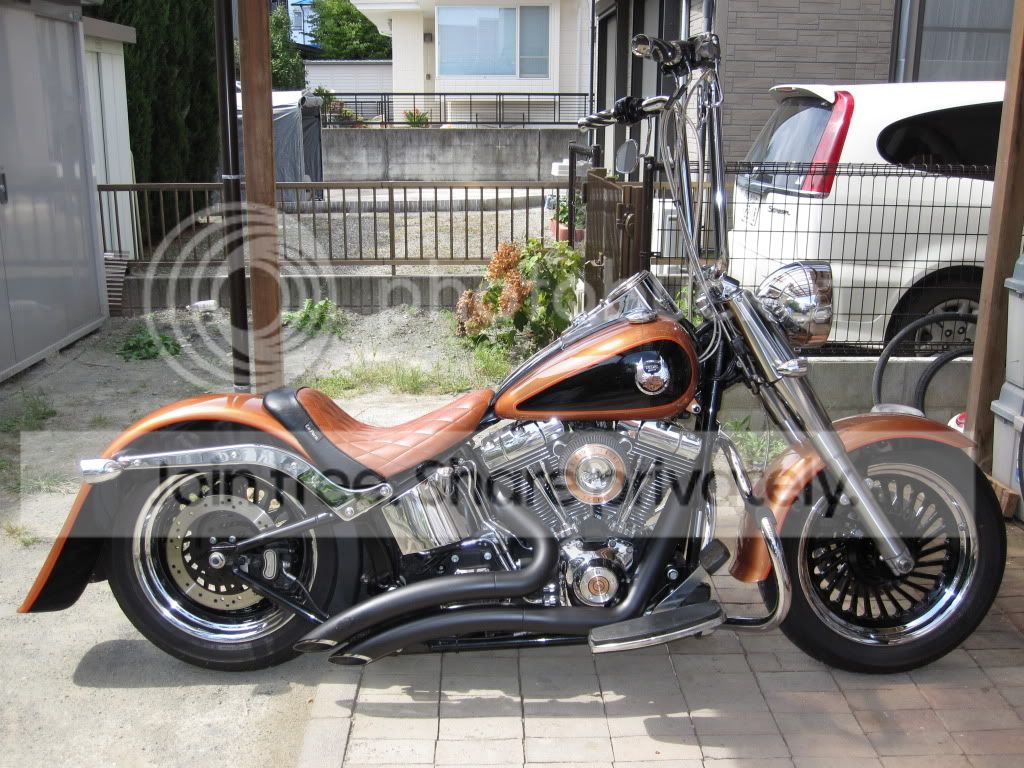
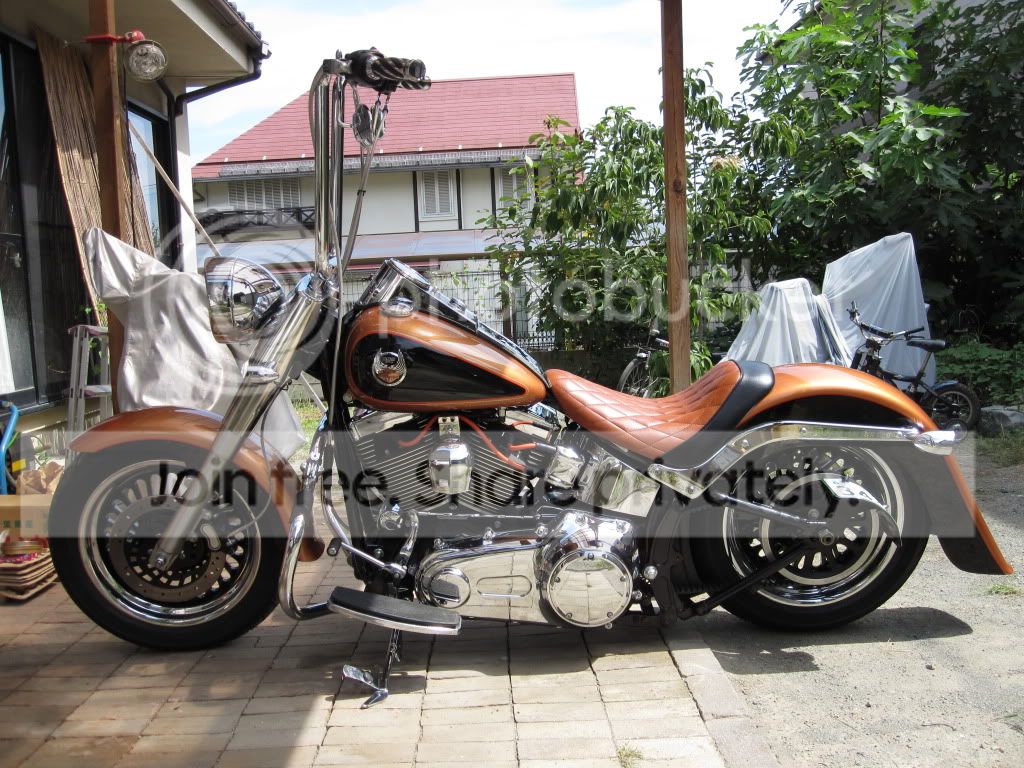
Sorry for all the junk in the background. This is my backyard/covered work area, so there's other stuff sitting around. I'll get better pics and post them as I ride, etc.
Some observations and learning experiences over the course of this project:
1. On the cam install, most people use those binder clips to hold the lifters up and out of the way and seem to have success with them. I on the other hand wasn't having much luck with those, so I used 4 watch battery-sized magnets instead. I just pulled the lifters up pretty much as far as they would go and stuck one magnet on the outside housing of each lifter. Held them up and out of the way with no problems. Best to use good strong magnets for this. The one's out of your kids' plastic ABC's & 123's won't work. Only problem I could foresee with this is perhaps forgetting to take them out since they're sorta "out of sight, out of mind" Kinda hard not to see them, tho, when you go to install the pushrods. You do need a tool to extract them, too. Either a magnet picker-upper tool or a set of longish needle-nose pliers works fine. Curved needle-nose pliers are even better.
2. Fuel Moto's "Quick Install" pushrods. Yes, perhaps the install goes a little quicker than having to remove the heads and re-use the stock pushrods, but make no mistake! These pushrods will take awhile to install correctly. Took me 5 hours from start to finish, including waiting for lifters to bleed down. Pros and experienced wrenches could probably do it in as little as 2 1/2, but I have my doubts. That tool to hold the pushrod tubes up was a BIOTCH to get in. Pushrod tube clips weren't much better, but once you get the hang of those, they go in w/o much trouble.
I highly recommend against putting red loctite into the pushrod base before screwing in the top portion as set forth in FM's instructions. Red loctite sets up FAST and unless you know exactly what you're doing, it WILL set up and catch before you have a chance to screw the threaded portion in until it bottoms out in the base. I almost lost a pushrod doing it this way! Screw the top portion of the pushrod into the base until it bottoms out, first, then back it out a bit. At THAT point, apply some red loctite to the backed out threads and screw it back in the rest of the way. From there follow FM's instructions.
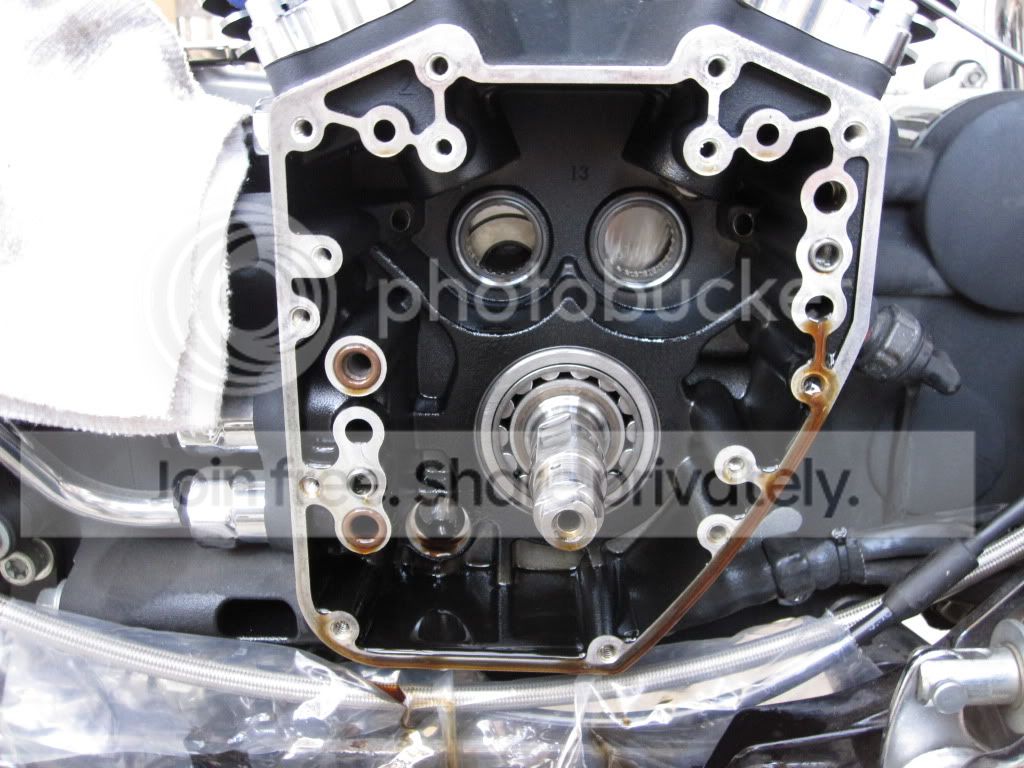
3. Speaking of pushrods, after installing my cams which went rather smoothly, I found I needed a slightly thicker spacer between the cam and cam sprocket, so I went to the dealer and of course they didn't have one. They said they could have one in the next day (for a little extra money), so I figured while I was waiting for the spacer, I'd just go ahead and install the old spacer, sprockets, timing chain and cam cover, temporarily, and install the pushrods. Experienced wrenches will be laughing at me at this point. Others will have no idea and say, "what's wrong with that?" Well, installing the pushrods puts pressure on the cams and therefore the timing chain as well, making it nearly impossible to remove the sprockets and chain, again, in order to install the new spacer. With the timing marks aligned it WAS impossible. But I found a position almost exactly halfway between "alignment" where it loosened up just enough to get the buggers off. I figured I'd be okay just as long as I put everything back together EXACTLY as it came off. I installed the new spacer and I don't remember why, but I spun the rear wheel for some ill-considered reason which moved the crank and put it out of timing. "****", I thought, "I'm totally FUBARed!" But I put it back to where I thought it was and figured I'd check timing alignment once I had the sprockets and chain back on, but guess what? Moron forgot to do that and put the cam cover back on with new gasket and torqued it down. In the minutes following, I remembered and almost shot myself. So, I cracked the cam chest open again (needing a new gasket) checked timing alignment (it was fine) and closed the cam chest again with (again) new gasket and in the process busted a cam cover bolt. (yes, I was using a torque wrench) At this point I almost threw the wrench thru a window and was about to kick my bike over. I backed out all the bolts again, was able to save the gasket this time and luckily the broken end of that one bolt was sticking out about a 1/4 inch, so I didn't have to tap a new hole. Got myself a new bolt, installed the cam cover and was done with cams. THANK GOD!
4. When installing my apes I drew those connector diagrams to make sure I put got the wiring right when I put the connectors back together, right? Well, I screwed the wiring up anyway. Got it turned around somehow and now I am no longer a believer in drawing diagrams. Come to think of it, you don't need them at all cuz you have two sure ways to make certain you've done it right. One is your service manual. Which colors go in what pin positions are set forth in the SM wiring diagrams and the pin holes are numbered on the rear of each Molex connector. The other way to check is of course to look at the female side of the connector. Just check to make sure all colors coincide before disconnect. There you go. No more wasting time drawing silly diagrams.
5. The rear fender. Though I think that the fender ended up looking pretty nice once installed and lowered, I probably wouldn't buy from this company (Dragonfly Cycle Concepts) if I had it to do again. First, the fender developed a small crack in the paint at the tip, while sitting in my shed waiting to be installed. When I took it out of the box when it was first delivered, I went over it with a fine tooth comb, and it was not there, at that time. Not noticeable unless I was to point it out, but it's there, making me sick, nevertheless. Two, they did not drill enough holes for the struts and the holes that they did drill weren't big enough. Three, the holes that they drilled didn't quite line up with the strut bolts on the left side, so I ended up having to grind them out into an oval so they'd fit. Would send the fender back to have them make it right, if I could, but I'd be paying over $600 for shipping both ways - more than half the cost of the fender itself. Just gotta be happy with what I got for now. I am thinking of perhaps fabricating another rear fender slowly, over time while having this one on and seeing how it holds up.
6. Vance & Hines 2-2 Big Radius mufflers. I was going to go with a D&D Fatcat 2-1, but it ended up not fitting my budget and I really do like the sound of these BR's, even tho a lot of other people don't (too loud, they say). These did start to rust thru the stock ceramic coating, as well, when I had them on before, so I sanded them with 3M Scotchbrite pads and recoated them. I actually like the result even more now than when I pulled them out of the box, new. They're a little blacker and still have that satin sheen. I also painted over that chrome V&H badge that I thought was an eye sore to begin with. They look way better now, imho, and they seem go with the wheels, nicely.
EDIT:
7. Gas Tank. A lot of people refrain from removing the tank when doing an ape install, because it's "a pain", but I really didn't find it that hard to pull. I think it would have been a bigger pain to try and work around, if I had just slid it back. I highly recommend getting it off and out of your way for several reasons. One, is that it gives you a LOT more room to work. Another is that it gets it of harm's way. There are so many things that could smack into it and scratch, scuff or ding it while trying to work around it. Lastly it gives you the opportunity to polish the tops of those dingy rocker box covers that you can't get to during a normal cleaning. Honestly, the biggest pain was getting it back on and trying to slide it up over that big rubber grommet (even people who slide it back have to do this). Yes, there isn't much room to work that crossover line off, but I just clipped that thing in two - rubber fuel hose is dirt cheap.
After updating my T-Max last Wednesday (that's when it was actually done), I pulled the bike out and with heart pounding pressed the started button. She fired right up. Valve train was rattling at first and I almost panicked and shut 'er down, but as oil began circulating, the noise went away and the idle smoothed out. After about 5 minutes of warm-up, I took 'er out for a test spin and she runs BEAUTIFULLY and REALLY strong. I was cruising down a straightway in 5th gear, ran 'er up to around 110km (around 70mph), but didn't even feel like I needed 6th. Felt like I could just keep on going in 5th thanks to the new cams. Really happy with those.
Anyway, I'm done (for now - no money left). Enjoy.
Special thanks for this project go to the following people and establishments, without whose help this project would not have been possible:
Christine at Le Pera (seat)
Impress Plating & Polishing (wheels)
HDF member mentor70 (for sending over my wheels)
Hill Country Customs (apes, cables, extension wires - thanks for the free shipping, too!)
J.D. at Shotgun Shock (great price & free shipping!)
Jamie at Fuel Moto (cams, pushrods, o-rings & gaskets)
Heartland Products (cam bearing puller & installer tools)
Custom Dynamics (dynamic LED clusters for my rear signal housings, load EQ)
Zanotti Motors (chrome tank panel and wheel bearings - before "the great international H-D parts ban")
Ken & Sandra at Dragonfly Cycle Concepts (can't recommend, but fender looks great. Well matched)
My bud, Dan Woolsey (for fabricating the plate mount, recommending a good hi-heat paint, and lending me his Dremel)
My bud, Koji Anamizu (lending me his jack, lots of other tools and a hand when needed)
HDF member atrain68 (awesome cam write-up - I referred to it countless times)
J&P Cycles (cam replacement youtube vid - watched that several times, as well)
Jerry Fishel & eHow (clutch pack adjustment vid)
HDF member rrambo (nice ape write-up - helped a bunch)
Harley Tech Talk member Mayor (For helping to educate me on programming and tweaking my T-Max - ongoing)
Yoshikazu Kawashima at Scooter Tramp (tire and wheel bearing install, answering questions, offering advice, etc.)
Mechanics at my local H-D dealer (cam sprocket spacer, answering questions about wiring and cam install)
Smiley Cycles (grips, rear signal trim rings, risers)
HDF member harleyheaven (inspiration)
HDF member bobberevo88 & all others on HDF w/ SoCal style bikes (inspiration - even tho mine's not purely SoCal)
All others on HDF who offered input, advice & encouragement
My bud, Noaki Nakamura (encouragement)
My wife (last but certainly not least - for putting up with my absence to the backyard, listening to my tantrums and cussing)
Hope I didn't forget anybody (I'll add 'em later, if I did)
But I went ahead with my project anyway and now that I'm done, I don't know...I think she turned out kinda okay, imho, so I thought I'd share. Haters can go ahead and flame away. They have a right to their opinion, too, since I did decide to go ahead and post.
So here goes...
I'll begin with the traditional "before" picture and proceed chronologically from there. I took it slow and deliberate. On days I didn't feel like workin' on 'er I just didn't. When something wasn't going the way I thought it should and I got frustrated, I quit for the day, thought things thru and asked for advice when needed.
This pic was taken a few days after she cleared inspection on 6/27/11. Pretty much stock except for the T-Max and a/c.
Had 'er torn down to the frame almost a month later - 7/25/11.
Here she is with wheels, 18" apes and Shotgun Shock installed - 8/6/11
Wood TW555 cam and FM adj. pushrod install - 8/16/11.
Project completed with new cams, extended & paint-matched rear fender and Le Pera custom seat, one-off side plate mount, etc. - Today (9/16/11).
Sorry for all the junk in the background. This is my backyard/covered work area, so there's other stuff sitting around. I'll get better pics and post them as I ride, etc.
Some observations and learning experiences over the course of this project:
1. On the cam install, most people use those binder clips to hold the lifters up and out of the way and seem to have success with them. I on the other hand wasn't having much luck with those, so I used 4 watch battery-sized magnets instead. I just pulled the lifters up pretty much as far as they would go and stuck one magnet on the outside housing of each lifter. Held them up and out of the way with no problems. Best to use good strong magnets for this. The one's out of your kids' plastic ABC's & 123's won't work. Only problem I could foresee with this is perhaps forgetting to take them out since they're sorta "out of sight, out of mind" Kinda hard not to see them, tho, when you go to install the pushrods. You do need a tool to extract them, too. Either a magnet picker-upper tool or a set of longish needle-nose pliers works fine. Curved needle-nose pliers are even better.
2. Fuel Moto's "Quick Install" pushrods. Yes, perhaps the install goes a little quicker than having to remove the heads and re-use the stock pushrods, but make no mistake! These pushrods will take awhile to install correctly. Took me 5 hours from start to finish, including waiting for lifters to bleed down. Pros and experienced wrenches could probably do it in as little as 2 1/2, but I have my doubts. That tool to hold the pushrod tubes up was a BIOTCH to get in. Pushrod tube clips weren't much better, but once you get the hang of those, they go in w/o much trouble.
I highly recommend against putting red loctite into the pushrod base before screwing in the top portion as set forth in FM's instructions. Red loctite sets up FAST and unless you know exactly what you're doing, it WILL set up and catch before you have a chance to screw the threaded portion in until it bottoms out in the base. I almost lost a pushrod doing it this way! Screw the top portion of the pushrod into the base until it bottoms out, first, then back it out a bit. At THAT point, apply some red loctite to the backed out threads and screw it back in the rest of the way. From there follow FM's instructions.
3. Speaking of pushrods, after installing my cams which went rather smoothly, I found I needed a slightly thicker spacer between the cam and cam sprocket, so I went to the dealer and of course they didn't have one. They said they could have one in the next day (for a little extra money), so I figured while I was waiting for the spacer, I'd just go ahead and install the old spacer, sprockets, timing chain and cam cover, temporarily, and install the pushrods. Experienced wrenches will be laughing at me at this point. Others will have no idea and say, "what's wrong with that?" Well, installing the pushrods puts pressure on the cams and therefore the timing chain as well, making it nearly impossible to remove the sprockets and chain, again, in order to install the new spacer. With the timing marks aligned it WAS impossible. But I found a position almost exactly halfway between "alignment" where it loosened up just enough to get the buggers off. I figured I'd be okay just as long as I put everything back together EXACTLY as it came off. I installed the new spacer and I don't remember why, but I spun the rear wheel for some ill-considered reason which moved the crank and put it out of timing. "****", I thought, "I'm totally FUBARed!" But I put it back to where I thought it was and figured I'd check timing alignment once I had the sprockets and chain back on, but guess what? Moron forgot to do that and put the cam cover back on with new gasket and torqued it down. In the minutes following, I remembered and almost shot myself. So, I cracked the cam chest open again (needing a new gasket) checked timing alignment (it was fine) and closed the cam chest again with (again) new gasket and in the process busted a cam cover bolt. (yes, I was using a torque wrench) At this point I almost threw the wrench thru a window and was about to kick my bike over. I backed out all the bolts again, was able to save the gasket this time and luckily the broken end of that one bolt was sticking out about a 1/4 inch, so I didn't have to tap a new hole. Got myself a new bolt, installed the cam cover and was done with cams. THANK GOD!
4. When installing my apes I drew those connector diagrams to make sure I put got the wiring right when I put the connectors back together, right? Well, I screwed the wiring up anyway. Got it turned around somehow and now I am no longer a believer in drawing diagrams. Come to think of it, you don't need them at all cuz you have two sure ways to make certain you've done it right. One is your service manual. Which colors go in what pin positions are set forth in the SM wiring diagrams and the pin holes are numbered on the rear of each Molex connector. The other way to check is of course to look at the female side of the connector. Just check to make sure all colors coincide before disconnect. There you go. No more wasting time drawing silly diagrams.
5. The rear fender. Though I think that the fender ended up looking pretty nice once installed and lowered, I probably wouldn't buy from this company (Dragonfly Cycle Concepts) if I had it to do again. First, the fender developed a small crack in the paint at the tip, while sitting in my shed waiting to be installed. When I took it out of the box when it was first delivered, I went over it with a fine tooth comb, and it was not there, at that time. Not noticeable unless I was to point it out, but it's there, making me sick, nevertheless. Two, they did not drill enough holes for the struts and the holes that they did drill weren't big enough. Three, the holes that they drilled didn't quite line up with the strut bolts on the left side, so I ended up having to grind them out into an oval so they'd fit. Would send the fender back to have them make it right, if I could, but I'd be paying over $600 for shipping both ways - more than half the cost of the fender itself. Just gotta be happy with what I got for now. I am thinking of perhaps fabricating another rear fender slowly, over time while having this one on and seeing how it holds up.
6. Vance & Hines 2-2 Big Radius mufflers. I was going to go with a D&D Fatcat 2-1, but it ended up not fitting my budget and I really do like the sound of these BR's, even tho a lot of other people don't (too loud, they say). These did start to rust thru the stock ceramic coating, as well, when I had them on before, so I sanded them with 3M Scotchbrite pads and recoated them. I actually like the result even more now than when I pulled them out of the box, new. They're a little blacker and still have that satin sheen. I also painted over that chrome V&H badge that I thought was an eye sore to begin with. They look way better now, imho, and they seem go with the wheels, nicely.
EDIT:
7. Gas Tank. A lot of people refrain from removing the tank when doing an ape install, because it's "a pain", but I really didn't find it that hard to pull. I think it would have been a bigger pain to try and work around, if I had just slid it back. I highly recommend getting it off and out of your way for several reasons. One, is that it gives you a LOT more room to work. Another is that it gets it of harm's way. There are so many things that could smack into it and scratch, scuff or ding it while trying to work around it. Lastly it gives you the opportunity to polish the tops of those dingy rocker box covers that you can't get to during a normal cleaning. Honestly, the biggest pain was getting it back on and trying to slide it up over that big rubber grommet (even people who slide it back have to do this). Yes, there isn't much room to work that crossover line off, but I just clipped that thing in two - rubber fuel hose is dirt cheap.
After updating my T-Max last Wednesday (that's when it was actually done), I pulled the bike out and with heart pounding pressed the started button. She fired right up. Valve train was rattling at first and I almost panicked and shut 'er down, but as oil began circulating, the noise went away and the idle smoothed out. After about 5 minutes of warm-up, I took 'er out for a test spin and she runs BEAUTIFULLY and REALLY strong. I was cruising down a straightway in 5th gear, ran 'er up to around 110km (around 70mph), but didn't even feel like I needed 6th. Felt like I could just keep on going in 5th thanks to the new cams. Really happy with those.
Anyway, I'm done (for now - no money left). Enjoy.
Special thanks for this project go to the following people and establishments, without whose help this project would not have been possible:
Christine at Le Pera (seat)
Impress Plating & Polishing (wheels)
HDF member mentor70 (for sending over my wheels)
Hill Country Customs (apes, cables, extension wires - thanks for the free shipping, too!)
J.D. at Shotgun Shock (great price & free shipping!)
Jamie at Fuel Moto (cams, pushrods, o-rings & gaskets)
Heartland Products (cam bearing puller & installer tools)
Custom Dynamics (dynamic LED clusters for my rear signal housings, load EQ)
Zanotti Motors (chrome tank panel and wheel bearings - before "the great international H-D parts ban")
Ken & Sandra at Dragonfly Cycle Concepts (can't recommend, but fender looks great. Well matched)
My bud, Dan Woolsey (for fabricating the plate mount, recommending a good hi-heat paint, and lending me his Dremel)
My bud, Koji Anamizu (lending me his jack, lots of other tools and a hand when needed)
HDF member atrain68 (awesome cam write-up - I referred to it countless times)
J&P Cycles (cam replacement youtube vid - watched that several times, as well)
Jerry Fishel & eHow (clutch pack adjustment vid)
HDF member rrambo (nice ape write-up - helped a bunch)
Harley Tech Talk member Mayor (For helping to educate me on programming and tweaking my T-Max - ongoing)
Yoshikazu Kawashima at Scooter Tramp (tire and wheel bearing install, answering questions, offering advice, etc.)
Mechanics at my local H-D dealer (cam sprocket spacer, answering questions about wiring and cam install)
Smiley Cycles (grips, rear signal trim rings, risers)
HDF member harleyheaven (inspiration)
HDF member bobberevo88 & all others on HDF w/ SoCal style bikes (inspiration - even tho mine's not purely SoCal)
All others on HDF who offered input, advice & encouragement
My bud, Noaki Nakamura (encouragement)
My wife (last but certainly not least - for putting up with my absence to the backyard, listening to my tantrums and cussing)
Hope I didn't forget anybody (I'll add 'em later, if I did)
Last edited by HoggyMtnBreakdown; Sep 20, 2011 at 05:47 AM.
Thread Starter
|
Elite HDF Member
Joined: Aug 2008
Posts: 4,133
Likes: 125
From: Japan

Thanks for the complements on the wheels, tho.
Ultimate HDF Member
Joined: May 2010
Posts: 7,882
Likes: 5
From: So California
The seat looks great.
One good pothole and BOBBEREVO88's fender will have the flared out look too.
Looks nice and clean in that rear shot and I agree with BOBBEREVO88 that the front would look good blacked out with those new wheels.
One good pothole and BOBBEREVO88's fender will have the flared out look too.
Looks nice and clean in that rear shot and I agree with BOBBEREVO88 that the front would look good blacked out with those new wheels.
Seasoned HDF Member


Joined: Sep 2009
Posts: 17,149
Likes: 6,174
From: SE Michigan
Wow, amazing work, bike looks tremendous, rear flare and all.  . It certainly puts things in perspective for me knowing how I struggled just with a stinking tank lift. Some people just have it!
. It certainly puts things in perspective for me knowing how I struggled just with a stinking tank lift. Some people just have it!
Trending Topics
Tourer
Joined: May 2010
Posts: 295
Likes: 3
From: Powhatan, VA
HD Forum Stories
The Best of Harley-Davidson for Lifelong Riders

Jason Momoa Is Turning Classic Harleys Into PHEVs
Verdad Gallardo
Harley-Davidson Fat Boy Becomes a Dark, Decepticon-Inspired Custom
Verdad Gallardo
6 Weirdest Harley-Davidsons Ever Sold to the Public
Verdad Gallardo
7 Times Harley-Davidson Chucked Tradition Out the Window
Verdad Gallardo
7 Surprising Harley-Davidson Products that Are Not Motorcycles
Verdad Gallardo
8 Best Harley-Davidson Motorcycles Ever
Pouria Savadkouei
10 Worst Harley-Davidson Motorcycles Ever
Pouria Savadkouei
Killer Custom's Jail Break Is The Breakout That Refused to Blend In
Verdad Gallardo
