
How To: Internal Wiring Handlebars :PICS:
#1
 08-06-2011, 11:14 PM

This weekend I finally cut my bars down. Took 2 inches off each side bars were 31 inches, now they are 27 inches. During the process i decided to wire my hand controls internally.
I decided to take a bit of a different route then most people. Rather than taking the pins out of the connector at the backbone of the frame, or try to take apart the controls, I cut the harness just below the risers and used 16-18 gauge bullet butt connectors.
I figured this would be:
A - A quicker and easier route
B - Also if i ever want to remove my bars, to replace or make any repairs i simply just disconnect the bullet butt connectors.
This is my 1st write up, i am sorry if anything is hard to understand, please feel free to PM or E mail me with any questions.
Tools Needed: (tools to remove bars, Controls, and Grips Not listed)
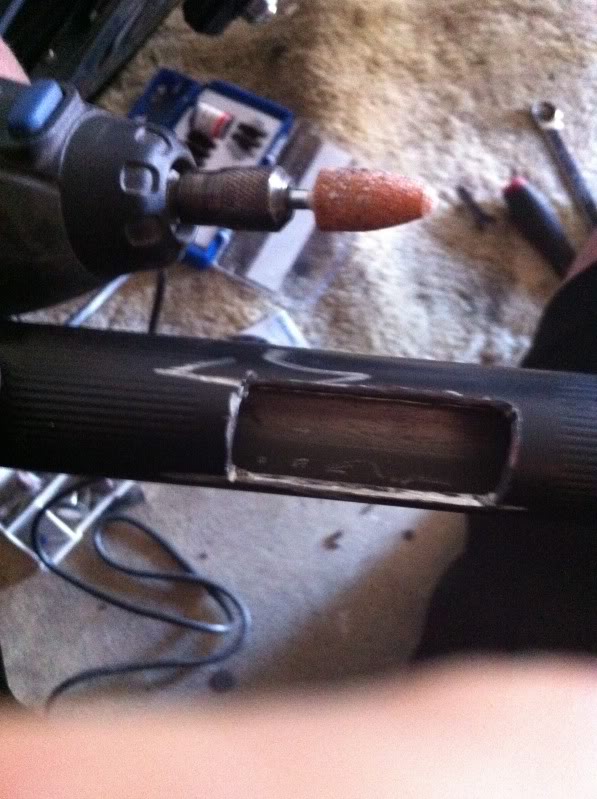
Rotary Tool (I used a dremel)
952 Grinding Stone
456 Cut-Off Wheel (You will need about 8-10 of these)
16-18 Gauge Bullet Butt Connectors
A good pair of wire strippers and Crimp Plyers
1 - You will need to place your hand controls exactly where you want them. Mark where the wires come out of the hand controls, this will be where your wires will enter into the handlebars, and where you will make your cutout
2 -Using your Rotary tool and cut-off wheel make a square cut out approx 1in X 1/2in on each side of the bars, where your markings are (you have more room with a square hole than with a round hole)

3 - Make a rectangular 2in x 1/2in cutout in the center of the bars, directly between where the risers would be
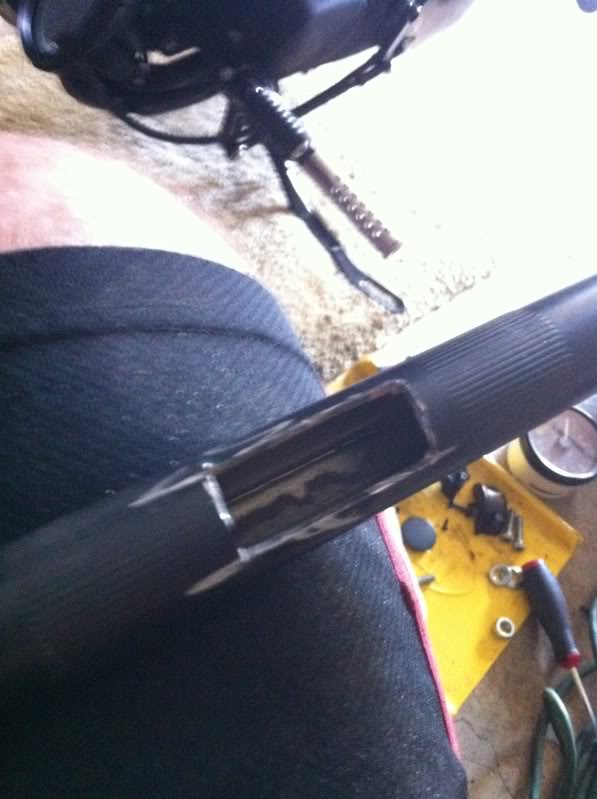
4 - Use your stone grinder to make all the cut outs smooth, make sure there are no sharp edges at all, last thing you want is to have a short while riding and have to take everything off and fix it.
5 - Cut your hand control wires directly under the rises,
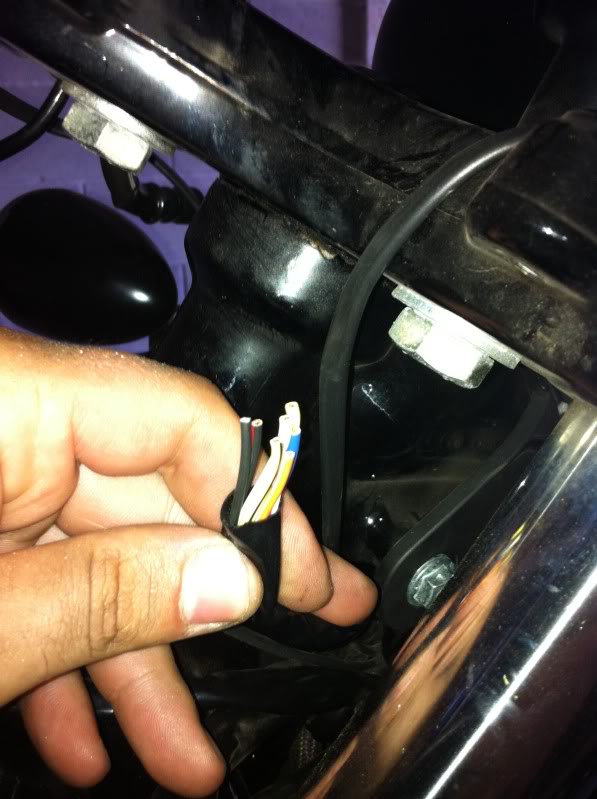
6- Run your hand control wires through the cut outs (Do not remove the black plastic around the wires. (makes running the wires much easier) Once your wires are run, you can cut off about 2-3inches of the black plastic to help you starting putting on the butt connectors
7 - A little tip to assure of never mixing up any wires, use male bullets on the frame side of the harness for your left controls and use male side bullets on the handlebar side of the harness for the right controls. This way you can never connect the wrong wires to each other, since there are some duplicate wire colors for each hand control.
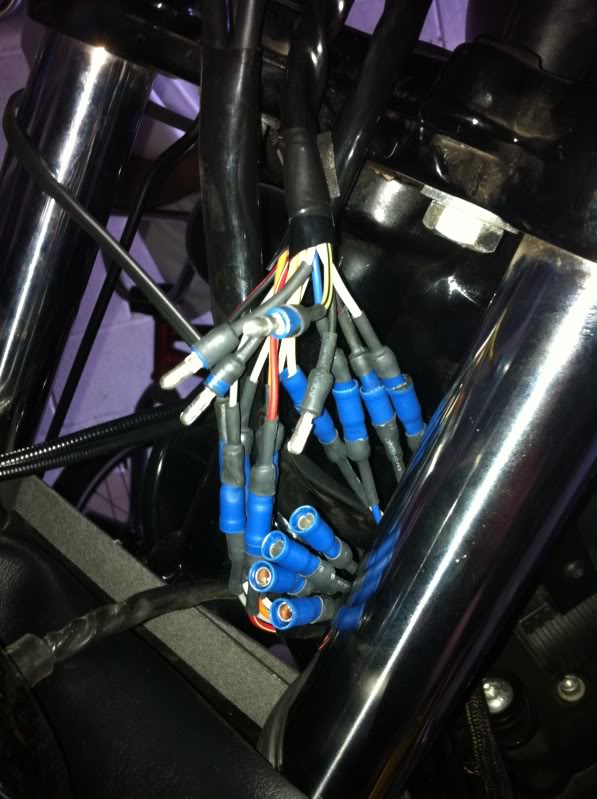
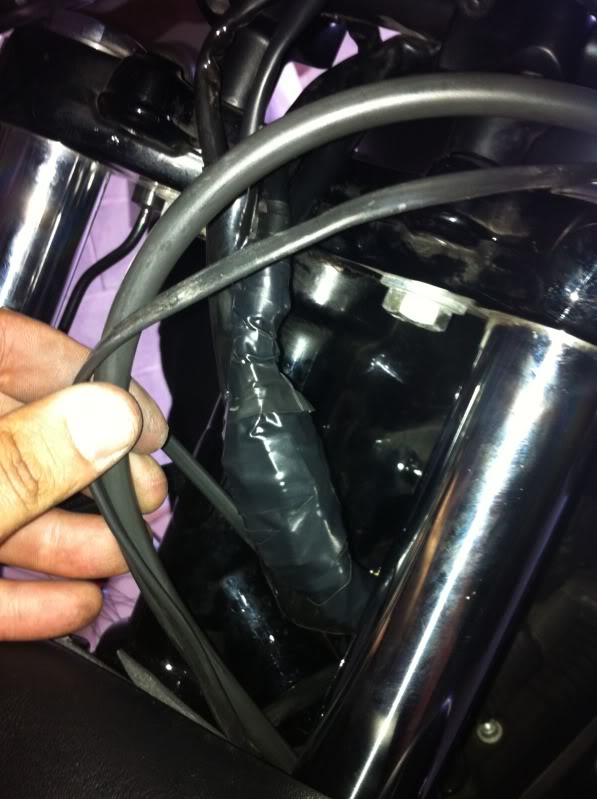
8 - Once you have installed all your bullet connectors, just connect the male and female connectors to each other. Make sure to wrap them tightly with electrical tape so that no water gets in when you wash or ride the bike in the rain.
9 - Before putting everything back together, test your signals, brake lights, horn, high beams, cut off switch and starter.
This is my 1st write up, i am sorry if anything is hard to understand, please feel free to PM or E mail me with any questions.
I decided to take a bit of a different route then most people. Rather than taking the pins out of the connector at the backbone of the frame, or try to take apart the controls, I cut the harness just below the risers and used 16-18 gauge bullet butt connectors.
I figured this would be:
A - A quicker and easier route
B - Also if i ever want to remove my bars, to replace or make any repairs i simply just disconnect the bullet butt connectors.
This is my 1st write up, i am sorry if anything is hard to understand, please feel free to PM or E mail me with any questions.
Tools Needed: (tools to remove bars, Controls, and Grips Not listed)
Rotary Tool (I used a dremel)
952 Grinding Stone
456 Cut-Off Wheel (You will need about 8-10 of these)
16-18 Gauge Bullet Butt Connectors
A good pair of wire strippers and Crimp Plyers
1 - You will need to place your hand controls exactly where you want them. Mark where the wires come out of the hand controls, this will be where your wires will enter into the handlebars, and where you will make your cutout
2 -Using your Rotary tool and cut-off wheel make a square cut out approx 1in X 1/2in on each side of the bars, where your markings are (you have more room with a square hole than with a round hole)
3 - Make a rectangular 2in x 1/2in cutout in the center of the bars, directly between where the risers would be
4 - Use your stone grinder to make all the cut outs smooth, make sure there are no sharp edges at all, last thing you want is to have a short while riding and have to take everything off and fix it.
5 - Cut your hand control wires directly under the rises,
6- Run your hand control wires through the cut outs (Do not remove the black plastic around the wires. (makes running the wires much easier) Once your wires are run, you can cut off about 2-3inches of the black plastic to help you starting putting on the butt connectors
7 - A little tip to assure of never mixing up any wires, use male bullets on the frame side of the harness for your left controls and use male side bullets on the handlebar side of the harness for the right controls. This way you can never connect the wrong wires to each other, since there are some duplicate wire colors for each hand control.
8 - Once you have installed all your bullet connectors, just connect the male and female connectors to each other. Make sure to wrap them tightly with electrical tape so that no water gets in when you wash or ride the bike in the rain.
9 - Before putting everything back together, test your signals, brake lights, horn, high beams, cut off switch and starter.
This is my 1st write up, i am sorry if anything is hard to understand, please feel free to PM or E mail me with any questions.
The following users liked this post:
LocoLocal (09-03-2018)
#2
08-06-2011, 11:24 PM

#3
08-06-2011, 11:31 PM
Seasoned HDF Member
#4
08-06-2011, 11:39 PM
Cruiser
Nice! ...only thing I would have done differently is not use electrical tape. It was a bad habit of not lasting long and coming unraveled. I'd of "painted on" a product called Plastic Dip. Good stuff!
http://www.plastidip.com/
http://www.plastidip.com/
#5
08-06-2011, 11:49 PM

#7
08-07-2011, 01:01 AM
It's the same process as what I did, but if I'm not mistaken I am pretty sure they make kits for apes.
Trending Topics
#8
08-07-2011, 01:02 AM
#9
08-07-2011, 06:11 AM
Outstanding HDF Member
#10
08-07-2011, 10:21 AM