Touring Models Road King, Road King Custom, Road King Classic, Road Glide, Street Glide, Electra Glide, Electra Glide Classic, and Electra Glide Ultra Classic bikes.
Sponsored by:
Sponsored by:

Compensator Installation Misadventures

Thread Tools
 
Search this Thread
 
  #21  
Old 02-07-2012, 06:18 PM
Mike's Avatar
Mike
Mike is offline
Ultimate HDF Member
Join Date: Jun 2009
Location: Centralia, Wa
Posts: 6,787
Received 36 Likes on 33 Posts
Default

Originally Posted by atrain68
I have to tell you that at this point my heart was pounding and was having visions that the bolt would strip, but the damn bolt went in and torqued to it's final 140 ft./lbs with no issues. I will button everything up when I get a chance. Sometimes you have to declare victory and walk away.
All's well that ends well. Got a couple of test rides on my 107 buildup... so far so good. Put the bike back on the lift this afternoon, and tomorrow, I'll go over it carefully to double check for leaks, etc.
 
  #22  
Old 02-07-2012, 06:25 PM
rlaf75's Avatar
rlaf75
rlaf75 is offline
Tourer
Join Date: Aug 2011
Location: connecticut
Posts: 360
Likes: 0
Received 0 Likes on 0 Posts
Default

Originally Posted by boogaloodude
always!

I once installed a set of pistons with the old circlips. Didn't realize it until the next morning, when I found the new circlips still in a plastic baggie on the workbench.
those were just spare clips incase you lost the others
 
  #23  
Old 02-07-2012, 07:01 PM
Lowcountry Joe's Avatar
Lowcountry Joe
Lowcountry Joe is offline
Elite HDF Member
Join Date: Sep 2007
Location: Near Myrtle Beach, SC
Posts: 4,928
Received 65 Likes on 45 Posts
Default

Did you use red threadlocker on the new bolt? And did you give it time to cure before you started riding the bike? Hope all stays put for ya.
 
  #24  
Old 02-07-2012, 07:27 PM
atrain68's Avatar
atrain68
atrain68 is offline
Road Warrior
Thread Starter
Join Date: Mar 2007
Location: Atlanta, GA
Posts: 1,377
Likes: 0
Received 5 Likes on 5 Posts
Default

Originally Posted by Lowcountry Joe
Did you use red threadlocker on the new bolt? And did you give it time to cure before you started riding the bike? Hope all stays put for ya.
The bolt has pre applied threadlocker. It won't be going anywhere. Test ride will be in the near future.

Someone asked what kind of tap I used. It was 1/2"-13 x 3-3/8" OAL HSS 3 Flute Steam Oxide Finish H3, Spiral Point Plug Tap. I bought it from Fastenal. I ordered on Sunday and it arrived on Tuesday. Unbelievably fast!
 
  #25  
Old 03-01-2012, 06:27 AM
fenderzig's Avatar
fenderzig
fenderzig is offline
Road Master
Join Date: Feb 2011
Location: Cincinnati, OH
Posts: 902
Received 3 Likes on 3 Posts
Default

Atrain, did you change the inner primary bearing while you were in there doing the compensator? I'm gearing up to do the compensator myself and wondering what's involved in the IPB replacement.
 
  #26  
Old 03-01-2012, 06:37 AM
dawg's Avatar
dawg
dawg is offline
Seasoned HDF Member
Join Date: Jun 2006
Location: Vermont
Posts: 26,483
Received 2,979 Likes on 1,725 Posts
Default

Originally Posted by fenderzig
Atrain, did you change the inner primary bearing while you were in there doing the compensator? I'm gearing up to do the compensator myself and wondering what's involved in the IPB replacement.
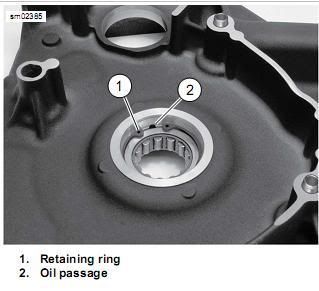
I would most definitely change the IPB and seal. Pull the inner primary and change all the seals. Press the IPB out and press new one in. Just make sure the retaining ring doesn't block the oil feed hole as shown in the pic:

 
  #27  
Old 03-01-2012, 07:20 AM
soft 02's Avatar
soft 02
soft 02 is offline
Seasoned HDF Member
Join Date: Mar 2007
Location: TOAK western branch
Posts: 66,948
Received 4,570 Likes on 2,888 Posts
Default

Good info as usual Dawg! I also recomend looking into a one piece bearing/seal assy.
http://bakerdrivetrain.com/high-torque-bearing-kit
 
  #28  
Old 03-01-2012, 07:52 AM
ocezam's Avatar
ocezam
ocezam is offline
Road Master
Join Date: Apr 2011
Location: Colorado Springs
Posts: 1,145
Received 96 Likes on 62 Posts
Default

Originally Posted by boogaloodude
It's just the way I organize my builds. The old parts come off, and go on the bench. All the gaskets, o-rings, and fasteners stay with the componants, and then when I start reassembly, I compare the old clips, gaskets, etc with the new ones. Then the old ones go in the trash, and the new ones go on the bike. When I'm done, there should be no spare parts on the bench. The day I installed the old clips, it was late in the evening, I'd been working a couple of hours past when I should have quit, and I made a mistake. The only guys I know who haven't made a mistake are the guys who pay a tech to do their work for them.
Wrong!

I'd rather make my own mistakes, then I'm sure they're fixed sufficiently.
 
  #29  
Old 03-01-2012, 08:43 AM
atrain68's Avatar
atrain68
atrain68 is offline
Road Warrior
Thread Starter
Join Date: Mar 2007
Location: Atlanta, GA
Posts: 1,377
Likes: 0
Received 5 Likes on 5 Posts
Default

Originally Posted by fenderzig
Atrain, did you change the inner primary bearing while you were in there doing the compensator? I'm gearing up to do the compensator myself and wondering what's involved in the IPB replacement.
Not yet.

Dawg, will you please do me a favor and help a non-mechanic type like me understand what the weaknesses are with the IPB and why it needs replacing? Are there better parts, or is this a high wear item? Also, when replacing the IPB, what do you use to support the primary when you press the bearing and out?
 
  #30  
Old 03-01-2012, 08:49 AM
HDV-GLIDE's Avatar
HDV-GLIDE
HDV-GLIDE is offline
Elite HDF Member
Join Date: Jul 2008
Location: Indian Land, SC
Posts: 4,741
Likes: 0
Received 44 Likes on 30 Posts
Default

Originally Posted by soft 02
Good info as usual Dawg! I also recomend looking into a one piece bearing/seal assy.
http://bakerdrivetrain.com/high-torque-bearing-kit
85-07 twin cams only per product description....


Quick Reply: Compensator Installation Misadventures


All times are GMT -5. The time now is 07:37 AM.