10" Chubby Apes & Cables
#1
 03-09-2012, 08:13 PM


Join Date: Jan 2007
Location:
Posts: 68
Likes: 0
Received 0 Likes
on
0 Posts
SOLD! SOLD! SOLD!
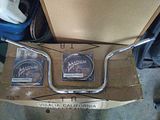
Have a pair of 10" ape hangers from Wild1, model WO515. Used but in like new condition. Selling these along with 2" over Harley diamond back cables for throttle and idle/cruise. Also throwing in for free, the stock length diamond back clutch cable as the teflon covering has some damage. These are the same as the Steel Chromite II cables from Magnum Shielding I believe.
See the following link for specifics:
http://shop.wild1inc.com/WO515-CHUBB...-APE-WO515.htm
New these parts would be over a few hundred dollars, I'm selling for them for only $145 plus shipping.
These came off a road king that didn't have electronic throttle control, so they may not work for a newer bike unless you modify them somehow.

Last edited by rkc9999; 05-22-2012 at 08:03 PM.
#3
03-18-2012, 12:43 AM

Cruiser
Join Date: Nov 2010
Location: my farm in Arkansas
Posts: 139
Likes: 0
Received 0 Likes
on
0 Posts
I have a 2001 RK Classic...what else would be needed to do the complete install?
Bob
pics of the bike with the bars?
chickenmafiaster@gmail.com
Bob
pics of the bike with the bars?
chickenmafiaster@gmail.com

#6
03-18-2012, 06:17 PM
Join Date: Jan 2007
Location:
Posts: 68
Likes: 0
Received 0 Likes
on
0 Posts
For a picture of the bars on my mike you can see my profile pic at http://www.picturehosting.com/images...9/1000752b.jpg, you can also see pictures at the wild1 website.
You cannot run the stock brake line. A complete list of what's needed is:
1. You'll need at least 2" over stock throttle and idle cables.
2. You'll need a longer upper brake line. See there's 3 lines in total, the upper which goes into the puck which splits the brake fluid into the lower lines which don't have to be changed. I bought chrome fittings for the master cylinder and the puck side and then was able to just buy a universal brake line which has female connectors on both sides (23 inches I believe). I'm sure there's lots of options vinyl, stainless steel, line with fittings all together, or what I did, which was to buy separate fittings and a stainless steel brake line.
3. For the clutch cable I was able to get the stock length to work by re-routing it. Instead of being clamped to the nacelle, I just went straight down the downtubes, around the rear master cylinder and then to the clutch.
4. Wiring for the switches. You'll need to extend the wiring for the switches on both sides, unless somehow you have a lot of extra slack behind your headlight. There are kits that can be purchased for extending the wiring. I just did it the old fashioned way, which was to cut each wire, solder in an extra 6-10 inches of wire, and then shrink wrap the connections. I downloaded some directions from the web which which were very good and they included photos and colored wire diagrams. I can send along a copy with the bars if anybody is interested. The wiring is not really that complicated, it just takes some patience and a few basic tools.
Anymore questions, let me know.
#7
03-22-2012, 12:17 AM
Cruiser
Join Date: Feb 2012
Location: houston texas
Posts: 129
Likes: 0
Received 0 Likes
on
0 Posts