LOG IN
REGISTER
Forums
New Members & Forum Support
Welcome Area Only
Forum Issues
Harley Davidson Motorcycles
LiveWire
Touring Models
Dyna Glide Models
Softail Models
Sportster Models
Pan America
VRSC Models
Screamin Eagle CVO Models
Tri Glide, RG3 & Freewheeler Models
Harley-Davidson Street
Harley-Davidson X
HD Engines
Classic
Custom Models
Hacked, Conversions and Trailering
General Harley Davidson Chat
Harley Davidson Tech & Mechanical Forum
Detailing
General Topics/Tech Tips
Audio Systems
Primary/Transmission/Driveline/Clutch
Ignition/Tuner/ECM/Fuel Injection
Engine Mechanical Topics
Exhaust System Topics
Electrical/Lighting/Alarm
Oil Archive (no new posts)
Frame/Suspension/Front End/Brakes
Wheels/Tires
Blowers/Turbos/Nitrous Oxide
Carburetor Related
Powdercoat & Paint
Regional Events, Rides and Road Reports
Road Trips
HDForums Mascot
The Patriot Guard Riders
Members Meeting Members
National Events
"The Florida Crew"
"The Georgia Crew"
Northeast
Northeast Tri-State Area
Southeast
Great Lakes
Pacific
Pacific Northwest
Southwest
Mountain - Prairie
Canada
Europe
Other Countries
Sponsoring Vendors
Rockford Fosgate Audio
Parts Giant
J&M Motorcycle Audio
Fuel Moto / Jackpot Mufflers
Harley Davidson Classifieds
Vendor For Sale Classifieds
Vendor Announcements
Motorcycles For Sale
Motorcycle Audio-Buy/Sell/Trade
Want To Buy Motorcycles/Parts/Accessories
Motorcycle Parts For Sale-Misc. Parts
Stock Harley Take Offs
Gear and Other Items For Sale
Good Or Bad Shopping Experiences At HDF
Trades & Freebies (See Subforums for specific models)
Memorial Forums
In Memory Of...
On The Mend...
Prayer Requests
Team Forums
News
Marketplace
Vendor Directory
Become a Vendor
Member Marketplace
Vendor Marketplace
Site Store
Haynes Manuals
New Posts
Tools
Car Payment Calculator
Tire Rim Calculator
Recalls
Technical Service Bulletins (TSBs)
Members List
Live Feed
New Posts
How-Tos
Gallery
View Dark Mode
Please register or login to enable Dark Mode.
Log In
Register
Threads
Google
Threads
Posts
Advanced
Dark Mode
Please register or login to enable Dark Mode.
Log In
Forgot your Password?
By logging into your account, you agree to our
Terms of Use
and
Privacy Policy
, and to the use of cookies as described therein.
or
Login with Google
Login with Facebook
Recent
Commented
Albums
My Pictures
My Post Pictures
handirifle
October 25, 2018
633
0
Sort:
Default
Default
Most Recent
Here you can see where I drilled and
0
2020/09/07 17:48:07
handirifle
This is the inside of the box, with the 6-32 screw head showing, that is holding the 1/4-20 screw to the box.
0
2020/09/07 18:23:24
handirifle
Here you can see the switch box I made and how the screws I made will be used. Details on the switch box, are, I used a slice of 1.5" ABS pipe, and heated it with a heat gun, to soften it enough to form it into a rectangle. I then cut and shaped pieces to form a top and a bottom. The top has holes drilled in it to hold the switches, and for mounting screws to hold it to the box.
0
2020/09/07 18:23:30
handirifle
This is the cap, before any switches are put on it.
0
2020/09/07 18:28:20
handirifle
With the switches just sitting in place, so you can see how it will look.
0
2020/09/07 18:28:26
handirifle
Mocked up as how it will look when put together. The screws I made, and the small phillips head screws will be blackened.
0
2020/09/07 18:28:32
handirifle
Here the box is mounted with the pair of 6-32 screws. The bottom sits tight against the heads of the 1/4" screws, so no play or looseness.
0
2020/09/07 18:36:19
handirifle
This is the 2 screws installed, ready for the switch box. Note, this is a mock trial run, not a final install.
0
2020/09/07 18:36:24
handirifle
So here is a close up, of the mock install. The buttons sit about 1/4" higher than I wanted, but all things considered it will work fine. I still need to sand and paint the entire unit, with a matching paint to the stock controls.
0
2020/09/07 18:39:51
handirifle
Same switch, but from the other side of the bike. To the left is the one I am using now. It works, but is a little awkward to reach when riding, and the switches are not very durable, or accessible for repair or replacement. The new one is far better in both respects. The old one will obviously be removed when I install the new one. These switches are all just that, switches, the heart of the opener is the circuit board of a GM Homelink, that I modified for the bike.
0
2020/09/07 18:39:55
handirifle
0
2020/09/08 11:43:10
handirifle
0
2020/09/08 11:46:19
handirifle
0
2020/09/08 15:11:25
handirifle
I labeled the button, just because. Gate, Shop, House. In the same order as the other vehicles. The G will be on top.
0
2020/09/08 16:40:42
handirifle
This is the blackened bolts I made. Ready to mount the box. I needed to get this far to determine the location for the hole for the wiring. Found that and drilled the hole.
0
2020/09/09 13:52:22
handirifle
Hole drilled, wire fished through (all 8 wires just in case) and the box mounted. There is a wire staple bent tight to hold the wires in place as stress relief, all good suggestions and reminders.
0
2020/09/09 13:52:28
handirifle
So here is the straight on shot from across the bike.
0
2020/09/09 13:59:43
handirifle
0
2020/09/09 13:59:49
handirifle
A profile shot to show how proud it sits. The buttons are just proud enough to allow me to keep my hand on the hand grip and still push the button. All this is important to me, because at this time I am turning from asphalt to dirt road and slowing for the gate. So its all hands time.
0
2020/09/09 13:59:55
handirifle
0
2020/09/09 14:05:53
handirifle
This is in the ready to roll on position
0
2020/09/09 14:37:04
handirifle
And this is how it sits when the bike is one it.
0
2020/09/09 14:37:12
handirifle
0
2020/09/09 14:48:36
handirifle
0
2020/09/10 10:40:59
handirifle
0
2020/09/10 10:41:08
handirifle
0
2020/09/10 10:42:40
handirifle
0
2020/09/10 15:22:39
handirifle
This is the glass packing after OE baffle was removed. They came packed very tight, so really no place for the exhaust pulse go, except straight out. From what I have read, the SE baffles really act almost like a straight pipe.
0
2020/12/12 16:35:25
handirifle
This is a long blade tool, I made to slice out the old packing. It gets stuck to the sides of the muffler housing and has to be pried/cut away. I made it from an old bandsaw blade, I got off a guy that has a sawmill locally. This was a broken one he had.
0
2020/12/12 16:35:31
handirifle
This is the empty muffler housing. Ready to be improved.
0
2020/12/12 16:35:36
handirifle
The old glass packing. Its literally fiberglass cloth backed. Pretty heavy duty stuff. Would have lasted years without someone like me always messing with them.
0
2020/12/12 16:41:05
handirifle
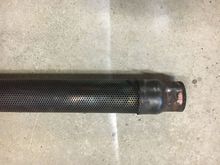
The Fulsac 1.75" unfinished baffle, after I welded it onto my original flange. I found the 1.75 fits right into the front of the muffler, just like the OEM did, so no cutting necessary. I did have to spot weld, with my Mig, the baffle to the flange.
0
2020/12/12 16:41:11
handirifle
The new glass retaining screens, wrapped in new glass packing. The screens are about 3.5" diameter, but are not closed. They can be squeezed smaller to insert back into the muffler. Not shown is that I used kite string and spiral wrapped the glass to compress it. Also the SE badge has 3 pins sticking inside the muffler, and you havevto be careful removing the old packing, and installing the new. To protect them for thevre-install, I covered them with a piece of 1/2x1/2" aluminum angle I hed
0
2020/12/12 16:41:17
handirifle
The OE baffle. You can see how tight the holes are, no room to exhale, so to speak, pretty much a straight pipe. According to Fulsac, this design, plus the very tightly packed glass, creates that raspy sound I am trying to get rid of. You can also see the reducing flange, mentioned above. Not needed when using 1.75" baffles.
0
2020/12/12 17:01:10
handirifle
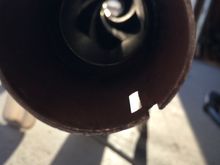
A blurry shot down the newly installed Fulsac baffle. The retaining screen keeps the glass packing about 1/2" away from the baffle, to allow the sound pulse room to expand, and hopefully give me the deeper tone I am after.
0
2020/12/12 17:01:15
handirifle
The finished product, ready for tomorrows install.
0
2020/12/12 17:01:20
handirifle
0
2021/01/28 09:50:46
handirifle
0
2021/02/07 17:49:04
handirifle
0
2021/02/27 22:17:34
handirifle
Here is a comparison of OEM vs Soft Brake. Soft Brake is on top.
0
2021/03/16 15:45:52
handirifle
First
Page
11 of 16
Last
Go To
Page
1
...
9
10
11
12
13
...
16
11 of 16
Go To
GO
Go to page
of 16
pages
1
...
9
10
11
12
13
...
16
When you click on links to various merchants on this site and make a purchase, this can result in this site earning a commission. Affiliate programs and affiliations include, but are not limited to, the eBay Partner Network.
© 2026 MH Sub I, LLC dba Internet Brands