LOG IN
REGISTER
Forums
New Members & Forum Support
Welcome Area Only
Forum Issues
Harley Davidson Motorcycles
LiveWire
Touring Models
Dyna Glide Models
Softail Models
Sportster Models
Pan America
VRSC Models
Screamin Eagle CVO Models
Tri Glide, RG3 & Freewheeler Models
Harley-Davidson Street
Harley-Davidson X
HD Engines
Classic
Custom Models
Hacked, Conversions and Trailering
General Harley Davidson Chat
Harley Davidson Tech & Mechanical Forum
Detailing
General Topics/Tech Tips
Audio Systems
Primary/Transmission/Driveline/Clutch
Ignition/Tuner/ECM/Fuel Injection
Engine Mechanical Topics
Exhaust System Topics
Electrical/Lighting/Alarm
Oil Archive (no new posts)
Frame/Suspension/Front End/Brakes
Wheels/Tires
Blowers/Turbos/Nitrous Oxide
Carburetor Related
Powdercoat & Paint
Regional Events, Rides and Road Reports
Road Trips
HDForums Mascot
The Patriot Guard Riders
Members Meeting Members
National Events
"The Florida Crew"
"The Georgia Crew"
Northeast
Northeast Tri-State Area
Southeast
Great Lakes
Pacific
Pacific Northwest
Southwest
Mountain - Prairie
Canada
Europe
Other Countries
Sponsoring Vendors
Rockford Fosgate Audio
Parts Giant
J&M Motorcycle Audio
Fuel Moto / Jackpot Mufflers
Harley Davidson Classifieds
Vendor For Sale Classifieds
Vendor Announcements
Motorcycles For Sale
Motorcycle Audio-Buy/Sell/Trade
Want To Buy Motorcycles/Parts/Accessories
Motorcycle Parts For Sale-Misc. Parts
Stock Harley Take Offs
Gear and Other Items For Sale
Good Or Bad Shopping Experiences At HDF
Trades & Freebies (See Subforums for specific models)
Memorial Forums
In Memory Of...
On The Mend...
Prayer Requests
Team Forums
News
Marketplace
Vendor Directory
Become a Vendor
Member Marketplace
Vendor Marketplace
Site Store
Haynes Manuals
New Posts
Tools
Car Payment Calculator
Tire Rim Calculator
Recalls
Technical Service Bulletins (TSBs)
Members List
Live Feed
New Posts
How-Tos
Gallery
View Dark Mode
Please register or login to enable Dark Mode.
Log In
Register
Threads
Google
Threads
Posts
Advanced
Dark Mode
Please register or login to enable Dark Mode.
Log In
Forgot your Password?
By logging into your account, you agree to our
Terms of Use
and
Privacy Policy
, and to the use of cookies as described therein.
or
Login with Google
Login with Facebook
Recent
Commented
Albums
My Pictures
STLCHUCK's Photos
View Profile
Sort:
Most Recent
Most Recent
Most Comments
Albums
Photos
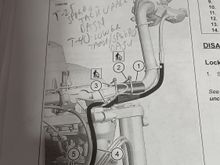
Follow your particular service manual for your bike. Note that Road Glide has one cable tie to remove. "Fork Mounted fairing" has an additional guide and cable ties.
0
2025/08/23 15:43:59
STLCHUCK
0
2025/08/23 15:41:58
STLCHUCK
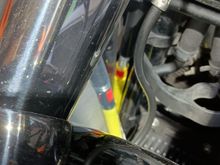
Lower installation clip for reference
0
2025/08/23 15:41:25
STLCHUCK
Lower installation clip for reference.
0
2025/08/23 15:40:35
STLCHUCK
Old cable. Note much smaller adjustment spring. Also note I installed the lower installation red clip from the new cable. This keeps the connector from pulling out (when the adjustment clip is out / not engaged).
0
2025/08/23 15:36:18
STLCHUCK
Tighter measurement within service manual specs. Larger spring on superceded part appears to be the help
0
2025/08/23 15:34:09
STLCHUCK
3/16" gap with the adjuster spring fully extended.
0
2025/08/21 06:36:58
STLCHUCK
Fat Baggers adjuster
0
2025/08/21 06:33:20
STLCHUCK
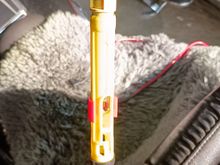
New cable upper clutch
0
2025/08/21 06:32:38
STLCHUCK
New cable to the left compared to original on the bike.
0
2025/08/21 06:30:35
STLCHUCK
Current Software Version in my 2021 FLTRK (picture taken today)
0
2025/07/14 16:25:13
STLCHUCK
Close up. Still OK after 8 years and about 90K miles.
0
2023/09/06 08:32:09
STLCHUCK
Wrapped the entire wire harness.
0
2023/09/06 08:32:05
STLCHUCK
Close up.
0
2023/09/06 08:32:01
STLCHUCK
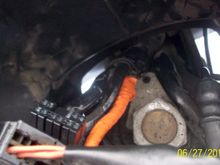
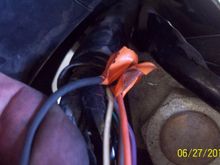
Taped the orange wire and the black wire.
0
2023/09/06 08:31:58
STLCHUCK
The orange wire went to the "Oil" light. The black wire was a ground.
0
2023/09/06 08:31:52
STLCHUCK
Trim along the left side and the brace.
0
2022/04/28 07:30:09
STLCHUCK
Trim on the right side of the fender along the brace. 11-1/2" if I remember correctly.
0
2022/04/28 07:30:03
STLCHUCK
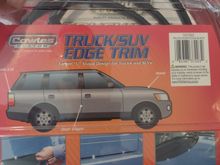
Wider than the factory trim and has stayed in place very well.
0
2022/04/28 07:29:58
STLCHUCK
Trim I bought from Auto Zone.
0
2022/04/28 07:29:50
STLCHUCK
Mileage after the test ride: 175,164
0
2022/04/27 05:26:36
STLCHUCK
All done.
0
2022/04/27 05:26:29
STLCHUCK
Tools I used
0
2022/04/27 05:26:24
STLCHUCK
Love the primary oil funnel.
0
2022/04/27 05:26:18
STLCHUCK
New primary gasket from James Gasket
0
2022/04/27 05:26:12
STLCHUCK
Reinstalling the tensioner.
0
2022/04/27 05:26:06
STLCHUCK
Using my old torque wrench which goes 200+ foot pounds. Check the service manual for bolt installation and torque specs for your application.
0
2022/04/27 05:25:59
STLCHUCK
New rotor
0
2022/04/27 05:25:53
STLCHUCK
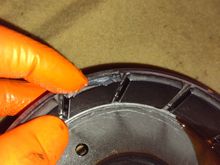
Success! New seal installed. I used a brass drift to install the seal going around the edge till it was seated. A lot of labor for a $4 part!
0
2022/04/27 05:25:46
STLCHUCK
Another pic of the bore prior to deburring and cleaning the bore. There is an air gap between the seal and the crank bearing. The deck screw trick may be a better option.
0
2022/04/27 05:25:39
STLCHUCK
Removal complete. You can see where I nicked the edge of the bore on the right with the seal removal tool.
0
2022/04/27 05:25:31
STLCHUCK
Old seal (I'm guessing the same one from the factory. I have no records of it ever being replaced).
0
2022/04/27 05:25:24
STLCHUCK
Using a seal removal tool. I should have taken better care and not scratched the aluminum bore. It's open space so does not appear to be critical. I deburred and cleaned the bore prior to reinstallation
0
2022/04/27 05:25:18
STLCHUCK
Spacer as it came out. I reversed it when reinstalling per a suggestion from a YouTube video
0
2022/04/27 05:25:10
STLCHUCK
I cracked one of the magnets removing the rotor when I angled it off of the splined shaft. This cost me over $200 to replace and double the parts to do the intended job.
0
2022/04/27 05:25:04
STLCHUCK
Using a breaker bar to remove the bolt
0
2022/04/27 05:24:57
STLCHUCK
Using the service manual recommended bar. If you have the dimensions you may be able to make one yourself.
0
2022/04/27 05:24:49
STLCHUCK
Note that the tensioner show spacers install one way!
0
2022/04/27 05:24:42
STLCHUCK
Following the service manual. Zip tie the tensioner before removing the bolts
0
2022/04/27 05:24:35
STLCHUCK
Oil seal to be replaced. Service manual is always helpful even with all the YouTube videos out there
0
2022/04/27 05:24:26
STLCHUCK
When you click on links to various merchants on this site and make a purchase, this can result in this site earning a commission. Affiliate programs and affiliations include, but are not limited to, the eBay Partner Network.
© 2026 MH Sub I, LLC dba Internet Brands