Harley Davidson Touring: Varying Air Pressure for Ride Quality
Adjustable air-shocks allow Harley owners to quickly and easily set the stiffness of the rear suspension. Shocks lacking sufficient air can bottom out; likewise, too much air will leave you bouncing in the saddle. Setting the proper pressure will improve the ride of your bike.
This article applies to Harley Davidson Touring models.
Most newer Harley Davidson Touring models come factory equipped with air-adjustable rear shock absorbers. Additionally, many owners of older bikes have replaced their conventional shocks with upgraded air-adjustable units. In either case, the air-shocks are designed to allow for incremental pressure adjustments to suit a variety of rider weights, luggage loads, and riding styles. With touring bikes being developed for long distance cruising applications, proper adjustment of the rear shocks is key to achieving a comfortable ride that will allow you, your passenger, and your Harley to travel with ease. Adjustments are quick as well as easy, and should be considered part of any rider's pre-ride checklist. This article will outline the procedure for adjusting the air-shocks as found on Harley Davidson Touring models, as well as provide recommended shock pressures.

Materials Needed
- Tire pressure gauge (0-60 psi)
- Hand operated air pump
- Harley Touring suspension air pump (recommended)
Warning
The rear suspension system only holds a small amount of air when full. DO NOT attempt to fill the system using an air compressor, as damage to the rear suspension can easily occur!
Step 1 – Determine proper air pressure
Generally, the proper amount of air pressure in the shocks is determined by the combined weight of the rider, passenger, and cargo (if applicable). Using the charts below, select the appropriate air pressure for the given weight range as a starting point.
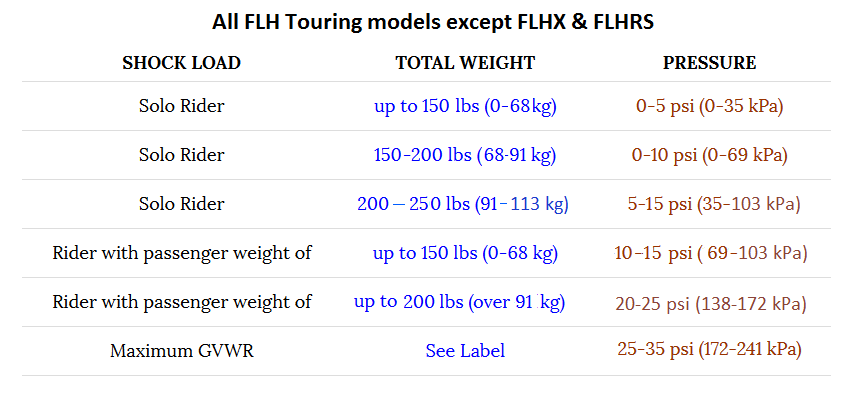
Figure 1. FLH Touring model air pressure recommendations. 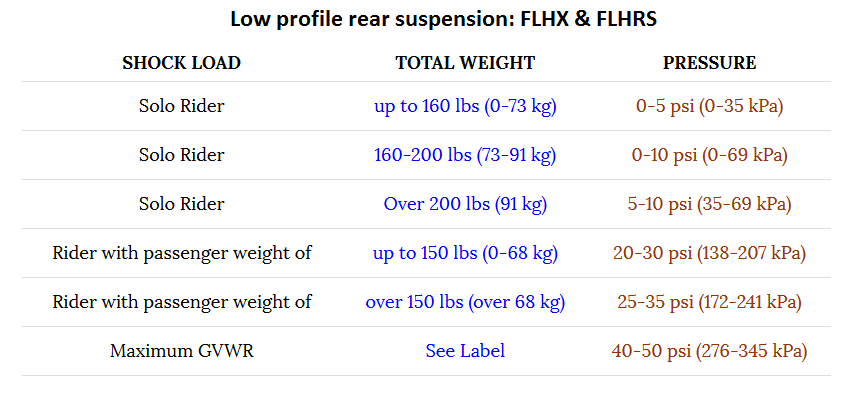
Figure 2. FLHX and FLHRS air pressure recommendations.
Click on image to enlarge.
Pro Tip
Air shocks can gradually lose air over time, so it is best to check your air pressures periodically and before any long ride.
Step 2 – Set shock air pressure
- To access the rear shock system Schrader valve, open the left side saddlebag. Similarly, the whole saddlebag can be removed if you are using a larger air pump.
- Check the air pressure in the shock system.
- If air adjustment is needed, first add 3-5 psi to the system before adding or removing any air. This will prevent the system from losing any fluids if it is completely out of air.
- Set the air pressure to the recommended value, as outlined in the charts above.
-
With the air pressure set, close/reattach the saddlebag.
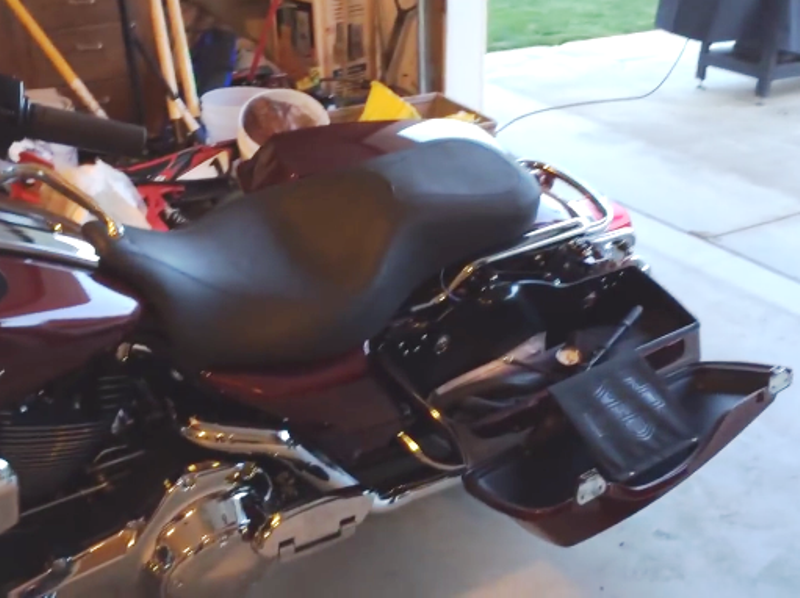
Figure 3. Opening saddlebag to access Schrader valve. 
Figure 4. Air pressure adjustment (saddlebag removed for visual purposes).
Pro Tip
Ride quality is subjective for each rider, bike, and riding style. Adjust the air pressure in small increments until the desired ride is achieved. As a rule of thumb, a few additional pounds of air will stiffen the shocks and improve handling on curvy roads. On the other hand, reducing air pressure can allow for a softer ride when on an extended highway cruise.
Related Discussions
- What psi Do You Set Your Air Suspension at? - HDForums.com
- Rear Suspension PSI Question - HDForums.com
- Rear Suspension PSI- HDForums.com