Harley Davidson Sportster: Engine Performance Diagnostic Guide
It takes time and effort to maintain engine performance at like-new condition as the miles increase. When performance suffers, the task of figuring out where to just start often creates confusion. This article will guide you and help you diagnose as well as correct the many problems that can hinder your Sportster's engine performance.
This article applies to the Harley Davidson Sportster (1994-2016)
Optimum engine performance is the result of a combination of process that occur at the right times and the right amounts inside the engine. The fuel system, ignition system, and mechanical systems must be in sync to develop power. Determining what a correct setting is for ignition and valve timing, as well as the proper fuel mixture, is the key to successfully tuning your Sportster's engine.

Materials Needed
- Multimeter
- Spark tester
- Fuel pressure tester
- Injector noid light
- Vacuum pump
- Automotive stethoscope
- Flat head and Phillips head screwdrivers
- SAE socket set with ratchet
- Compression tester
- Flashlight
If you have a late model fuel injected bike, start your diagnosis by checking for diagnostic trouble codes. Refer to the article How to Obtain Diagnostic Trouble Codes. These often point straight to the problem area.
One of the more commonly reported problems stems from low battery voltage. Refer to Step 2 of the article Electric Diagnostic Guide for a battery test.
You may want to consider buying an engine tuner to optimize your computer controlled engine's performance if you have modified it from stock. Read the article Tuner Reviews and How to Install a Tuner.
Step 1 – Perform a visual inspection
The visual inspection may clue you into what area the problem is occurring.
To perform the visual inspection:
- Walk around the motorcycle looking for obvious signs of damage, such as loose parts, wiring hanging from the loom, fluid leaks etc.
- Take a closer look inside and around the engine. Look for the same as above. Note any areas where fluid may be collecting on sensors and wiring, as this can create erratic readings.
- Turn the engine on. Listen for misfires and watch for smoke. Blue smoke indicates oil is making its way into the combustion chamber due to worn rings or valve seals. Black smoke indicates excessive fuel and a rich mixture due to a bad sensor reading, stuck injector or badly adjusted carburetor.
- Listen for rattles in and around the primary case. This may indicate a loose or worn primary chain. Adjustment is covered in Step 3.
- Raise the RPM's to a fast idle. Does the misfire improve or get worse? Do you hear or smell exhaust coming from near the ports on the heads? This can be a sign of an exhaust leak.
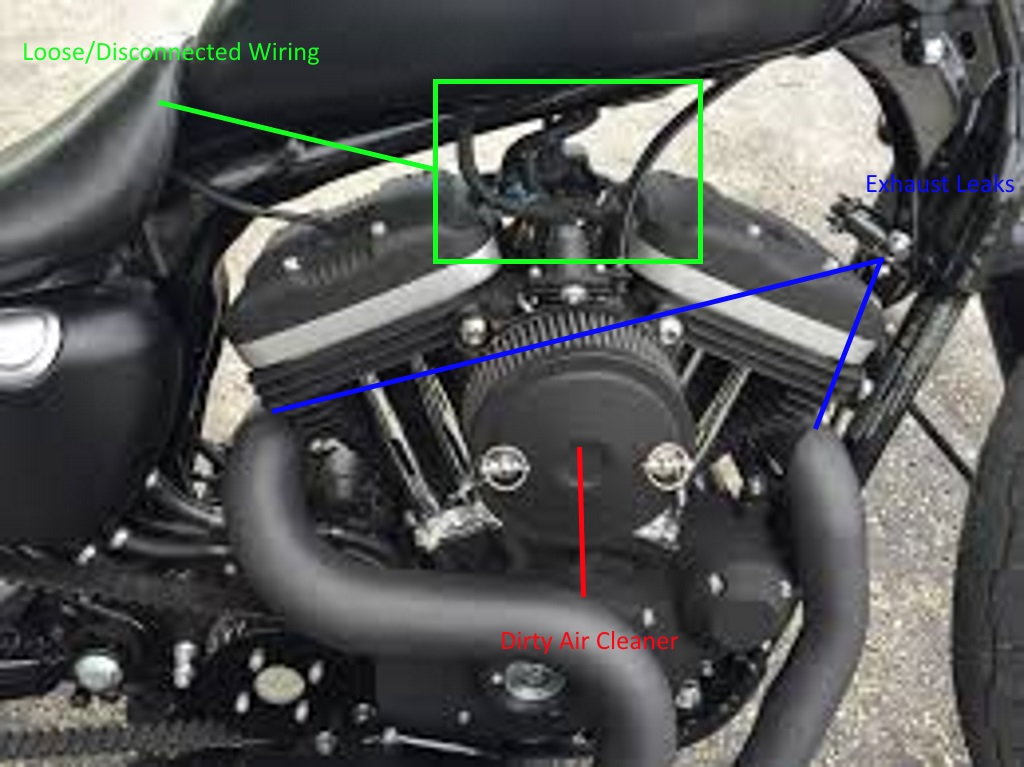
Step 2 – Inspect the air/intake system
A clogged air filter will prevent enough airflow from entering the engine, causing it to stall or decrease performance. The throttle body or carburetor (on earlier models) and intake manifold use seals to prevent air from being drawn into the vacuum created by the engine through anywhere other than the proper place. When a leak develops at these seals, un-metered air enters the combustion chamber, resulting in poor performance.
To inspect the air cleaner:
- Remove the air cleaner from the throttle body.
- Use a flashlight to determine whether the air cleaner is dirty or not. Light should pass through the air cleaner.
- If the cleaner is determined dirty, use a cleaning kit for cleanable elements, or replace it.
- With the air cleaner off, take a look at the throttle body plate. If it's dirty, use throttle body cleaner and a rag to clean the throttle plate area.
To check the throttle body/intake seals for leaks:
- Spray carb cleaner or starter fluid around the throttle body (but not in it) and intake seals.
- If the idle raises, a leak is present.
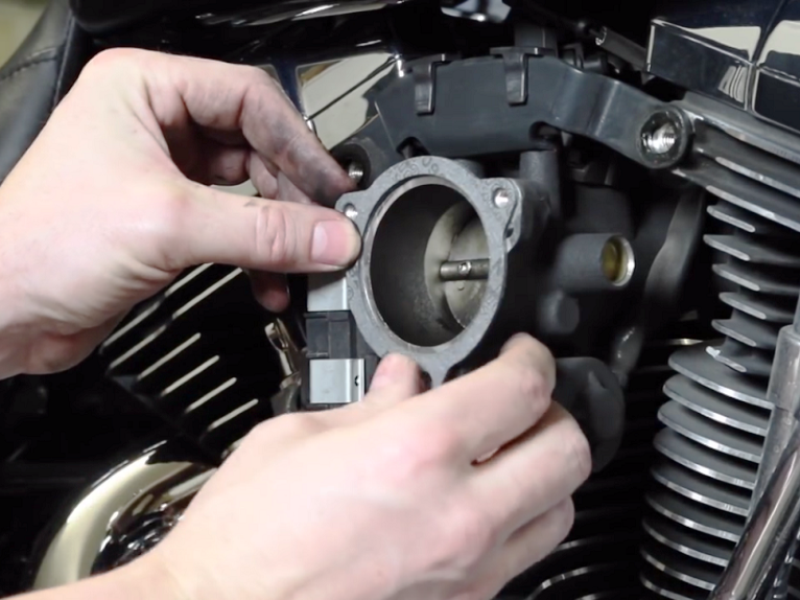
Figure 2. Replacing the gasket on the throttle body. 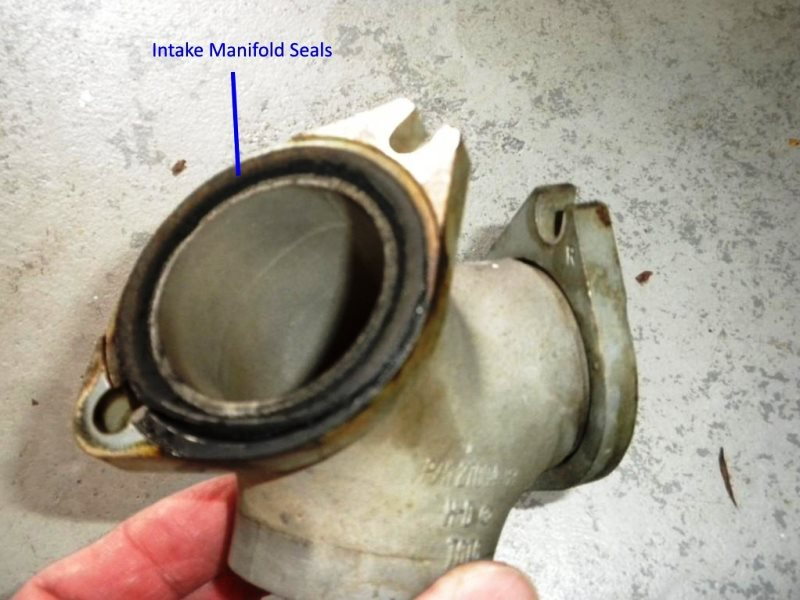
Figure 3. The intake manifold seals to the ports on Sportsters.
Step 3 – Adjust the drive belt/primary chain
A misadjusted drive belt or primary chain may create rattles, vibrations, and hesitations. Checking for proper adjustment is part of the required periodic maintenance. Refer to the articles How to Adjust Drive Belt and Step 3 of the article Transmission Diagnostic Guide for more information.
Step 4 – Test the ignition system
The ignition system must maintain and generate enough voltage for the spark to jump the electrode gap at the spark plug. Refer to the article Ignition Diagnostic Guide for more information.
Step 5 – Adjust the throttle cable
A misadjusted throttle cable can create a high idle or poor acceleration. The throttle uses two cables for positive throttle opening and closing. We'll adjust the throttle opening cable first
To adjust the throttle cables:
- Completely loosen the throttle lock (Figure 4).
- Loosen the jam nuts on the throttle cables, both at the handlebar and in the middle of the cable.
- Thread the adjustment sleeves towards the loosened jam nuts to create slack in the cable.
- Remove the plastic covers surrounding the throttle cables at the handlebar. There is one Phillips head screw on the top and bottom covers. Lube the cables and inspect them for fraying.
- Start tightening the primary throttle cable sleeve. Twist the throttle fully and watch for the throttle plate actuator to reach the throttle stop at the throttle body. Once the throttle limit stop is reached, tighten the jam nuts.
- Now start adjusting the secondary cable sleeve. You want 1/8" free play in the throttle grip. Once this is achieved, tighten the secondary cable jam nuts.
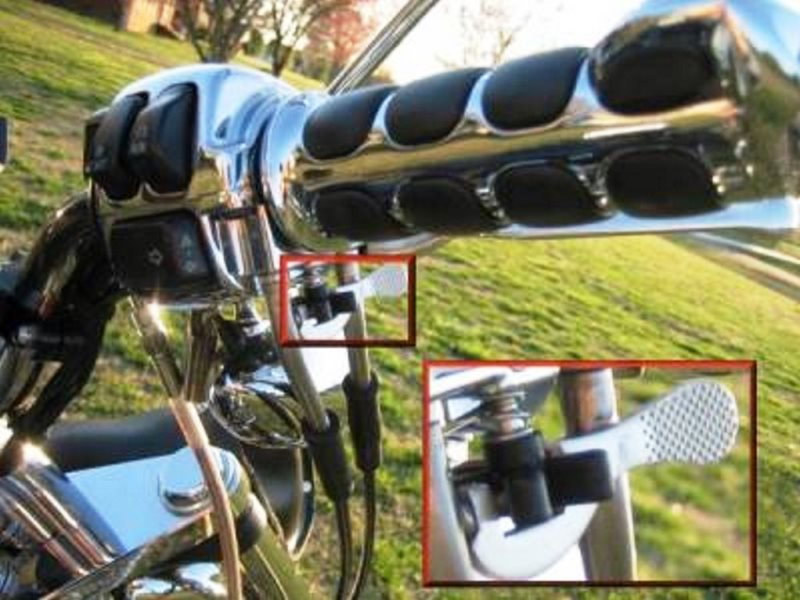
Figure 4. The throttle lock adjustment. 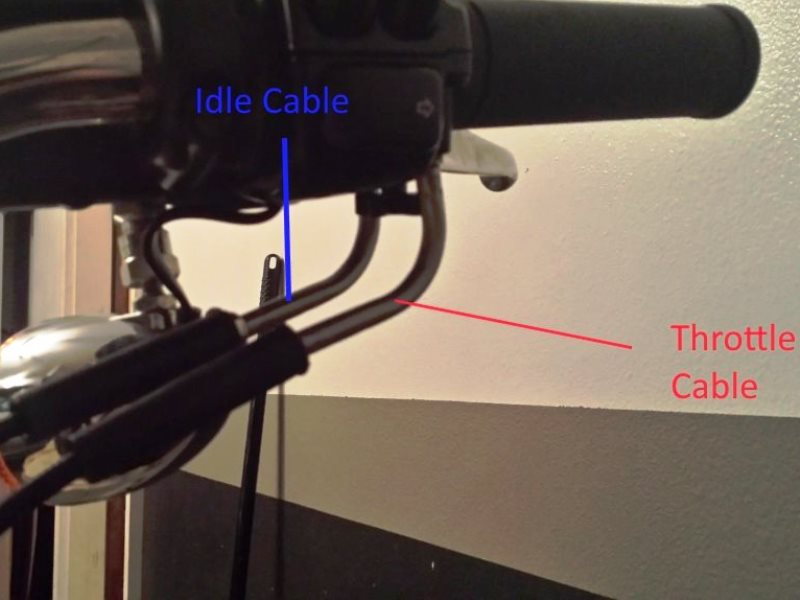
Figure 5. The throttle and idle cables. 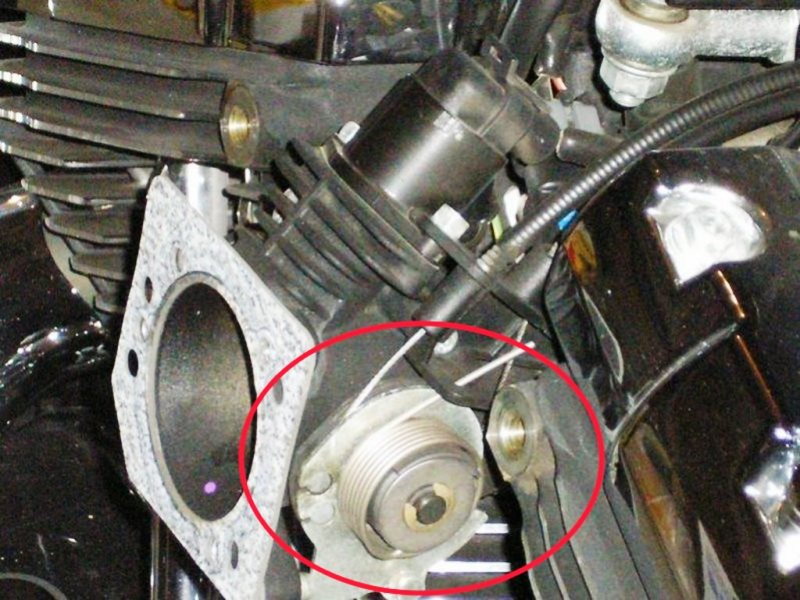
Figure 6. The throttle body plate actuator.
Step 6 – Test the fuel pump and fuel pressure regulator
Fuel is pumped from the tank by the fuel pump. As the pressure builds, fuel moves through the fuel system hoses to the fuel injectors. If the fuel pump is not receiving power, not building enough pressure, or the injectors are not opening/closing properly, engine performance problems will be present.
To test for power to the fuel pump:
- Measure the voltage at the fuel pump fuse with the ignition in the on/run position. You should hear the fuel pump prime. It will make a buzzing noise for several seconds. Refer to the article Fuse Box Information to find the fuse.
- Set your multimeter to read DC volts and place one probe on the fuse test point. Place the other on a good ground; 12 volts should be present at both fuse test points. If not, replace the fuse.
To test the fuel pump pressure:
- Ready your E.F.I. fuel pressure test kit. JIMS makes a kit that can be purchased here.
- Wear safety glasses and rubber gloves. Remove the fuel pump fuse.
- Start or crank the engine. If the engine will not start, crank the engine for about five seconds. If the engine will start, leave the engine running until it stalls on its own. You've now removed pressure from the system.
- Remove the fuel feed line from the tank and throttle body. The line uses a quick disconnect style fitting, which is released by pulling the collar down to unlock it and pulling the line away from the fuel tank/throttle body. Have some rags around the line to catch any fuel.
- Install the fuel pressure tester and crank the engine after re-installing the fuel pump fuse. Fuel pressure should reach 20 PSI. If the engine starts, increase the RPM's to 2,500. Fuel pressure should be between 55 to 62 PSI. A lower fuel pressure indicates a weak fuel pump or a problem with the fuel pressure regulator. Leave the fuel pressure gauge installed to check the regulator next. It may also indicate a clogged fuel filter. Change the fuel filter every 25,000 miles.
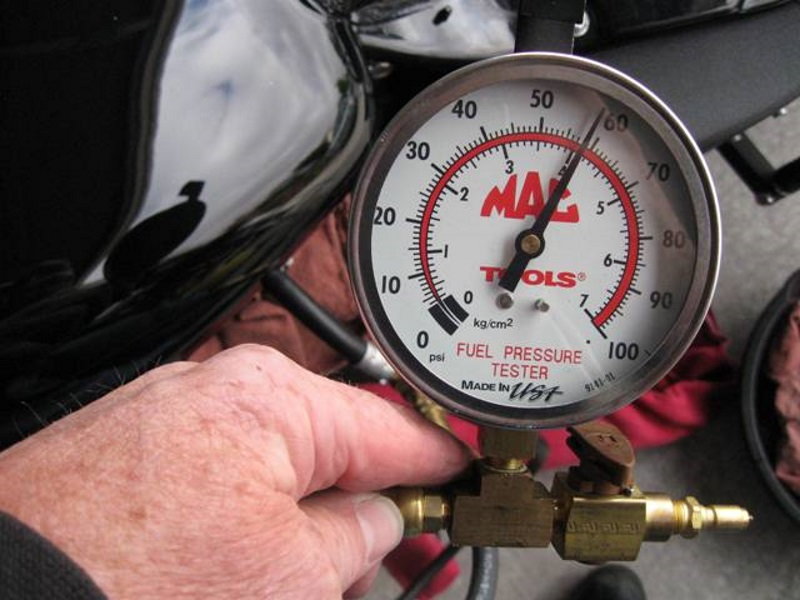
Figure 7. Testing fuel pressure. 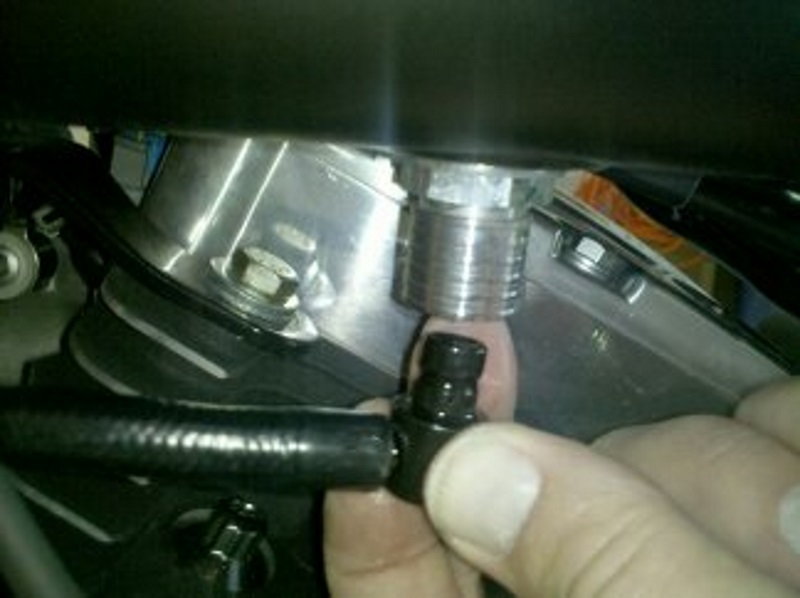
Figure 8. Removing the fuel line from the fuel tank.
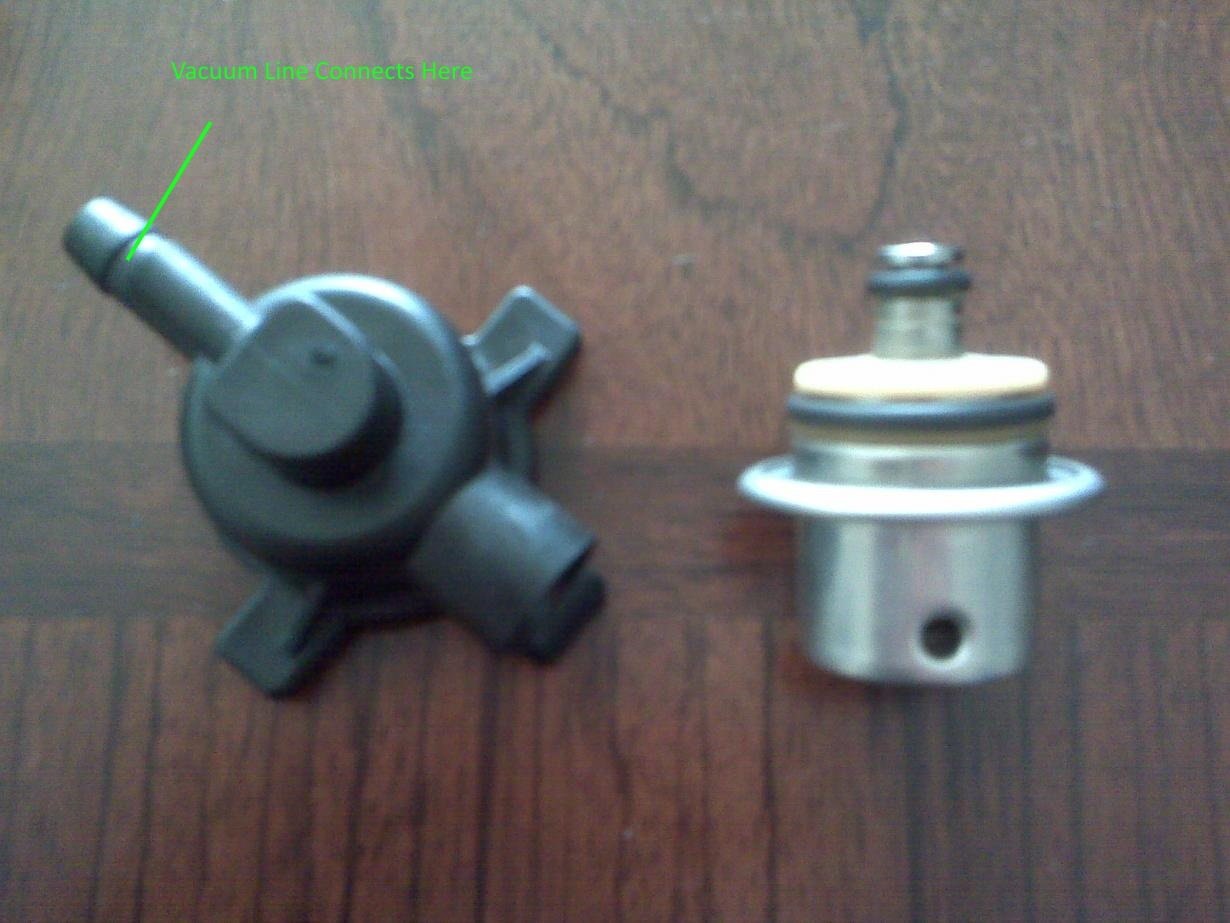
The fuel pressure regulator has two inlets and one outlet. One inlet supplies intake vacuum to the regulator to increase fuel pressure as RPM's rise. The other two are connected to the fuel rail and fuel tank. The regulator uses an internal diaphragm that's sealed to keep the fuel and air separate. Two O-rings are used to keep the regulator sealed and leak-free.
To test the fuel pressure regulator:
- Inspect the O-rings for cracks and tears.
- Inspect the fuel pressure regulator body for cracks.
- Remove the vacuum line connected to the regulator from the intake manifold.
- Connect a vacuum pump to the line and start the engine.
- Monitor the gauge pressure as you apply vacuum to the regulator. Fuel pressure should decrease as vacuum is applied.
Step 7 – Test the fuel injectors
If the regulator and pump tested okay, you'll need to test the injectors. Injectors can become mechanically stuck in the open or closed position. The power and ground wire to the injector can be damaged and/or the solenoid inside the injector can be broken.
To test the fuel injectors power and ground wires:
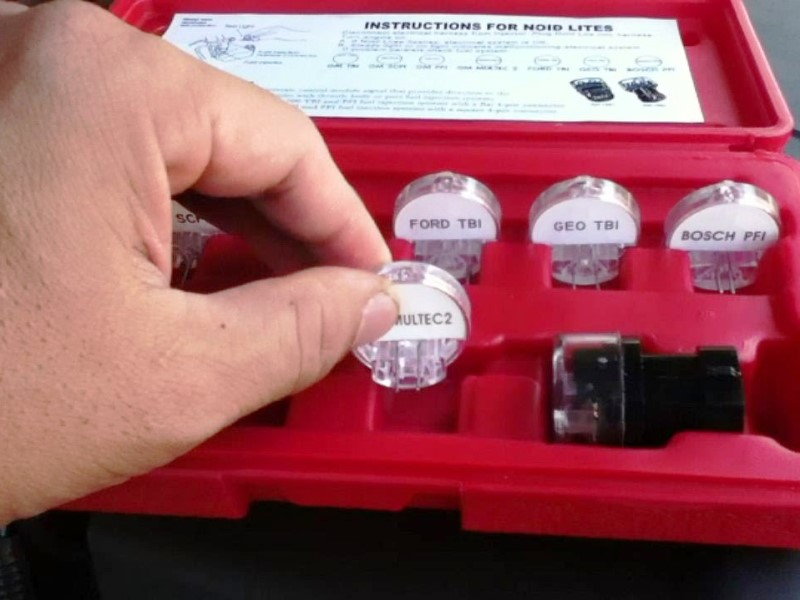
- Unplug the fuel injector wiring connector and install a noid light into the connector. A set of noid lights can be purchased online or even rented at many auto parts stores.
- Remove the fuel pump fuse.
- Crank the engine and watch for the flashes in the noid light. If the noid light flashes, the power as well as ground wires are good and the injector is getting a signal.
To test the fuel injectors solenoid and movement:
- Use your hand or automotive stethoscope to listen/feel for the click of the injector as it opens and closes.
- Unplug the electrical connector from the injector.
- Measure the injectors resistance by placing your meters probes on each injector prong.
- The reading "OL" or infinite confirms the injector must be replaced.
Step 8 – Perform a compression test
With fuel, air, and spark confirmed, the engine may be mechanically damaged or out of time robbing us of compressing.
To test for compression:
- Remove the spark plugs.
- Remove the fuel pump fuse and remove pressure from the system as described in Step 6.
- Install the compression tester into the spark plug opening.
- With the throttle held open, crank the engine for four revolutions. Record the highest reading on each cylinder.
- For the 883, compression should be between 120 to 150 PSI. For the 1200, it should be between 200 to 230 PSI. (These numbers are for the rubber mounted engines. Older models may have a different specification.)
- If your compression numbers appear low, try squirting oil into the spark plug hole. Repeat the test. If the compression rises significantly, the piston rings or bores are worn. Otherwise, the head gasket is leaking, an intake or exhaust valve is leaking, or the valves are dirty and not sealing properly. You can perform a leak down test if you have access to compressed air to find the exact cause of low compression.
- Sportsters use gear driven valves, so it is not likely that the valve train jumped time.

Related Discussions and Video
- Bike Shuts Off While Riding - HDForums.com
- That Misfire Feeling - HDForums.com
- Sporster Throttle Cable Adjustment - YouTube.com