Harley-Davidson Restoration: ’33 VL Engine Preparation Part 1

This new series of articles will allow you to follow along with my 1933 Harley-Davidson VL build. I’ll take you through the entire process of building an antique Harley-Davidson motorcycle, starting with bare engine cases and finishing with a complete running machine. The goal is not to build a 100 point correct restoration that is destined to collect dust in the corner of some showroom, but to build a true “rider” capable of daily use. Since I am not restrained to only using original parts, I’ll be working with some of the best companies in the vintage motorcycle industry to provide aftermarket parts for this build. Throughout the project, you’ll not only learn what products are available and how to install them, but also find out how they stand up to “real world” riding. Back in the teens and twenties, many companies sponsored cross country riders in order to prove that their parts were durable enough to complete a trip across the US. I couldn’t agree more with this philosophy, so I plan to ride my completed motorcycle cross country next fall. In the end, you’ll not only know what it takes to build an antique Harley-Davidson, but also have a good idea of what it takes to ride one.
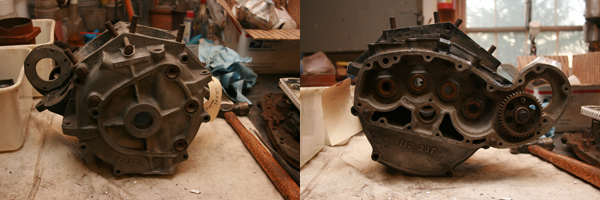
This project started with a set of original 1933 Harley-Davidson matched VL cases. They are called “matched” because the left and right case halves originally came together from the factory. You can confirm matching cases by checking the belly numbers stamped on the bottom of the case halves. On matched cases these numbers are the same, but are not the same as the VIN. It’s important to note that Harley-Davidson did not start stamping VIN numbers on frames until 1970, so the engine case is the only part on the motorcycle which has a VIN number stamped on it. 1933 was a very low production year (only 2,671 Big Twins produced), so it took a bit of searching to find the cases I wanted. The image above shows the right and left case halves in their original patina at the time of purchase.
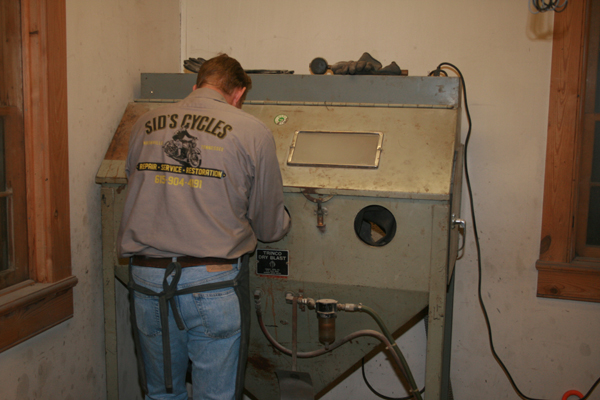
The first step in this build was to prepare the cases for rebuilding. In order to do this, the cases needed to be disassembled and cleaned before being sent to the engine builder for inspection. Since these cases were empty, disassembly meant removing the cylinder base studs and the idler gear. Then it was on to a multi-part cleaning process that started with a lacquer thinner wash down before thoroughly cleaning case half in a blasting cabinet which was followed by more cleaning with compressed air, wire brushes and lacquer thinner. Although tedious, this is one of the most important steps in the build and I’ve covered it in more detail in a separate article that you can find here: Preparing the Cases
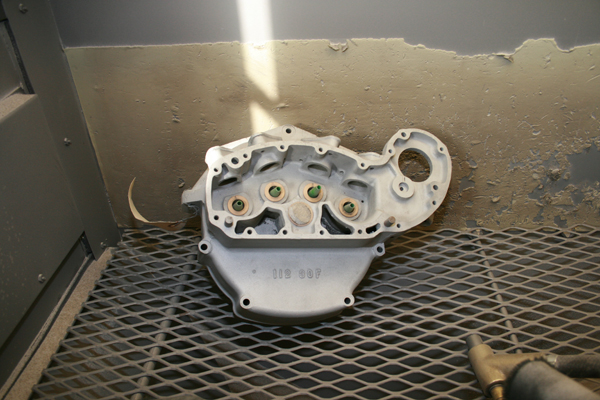
Once the cases were cleaned up, they were carefully inspected for cracks and damage. Mine were in good shape except for a hole in my front right engine baffle. If you don’t work on early HD engines, you’ve probably never seen an engine that uses baffles, but the general idea was that the baffle at the bottom of each cylinder helped to block excess liquid oil from getting into the cylinder while at the same time creating a vacuum to pull in oil mist. This was necessary because early pistons did not have oil control rings, so too much liquid oil in the cylinder would cause the engine to smoke once it seeped past the pistons.
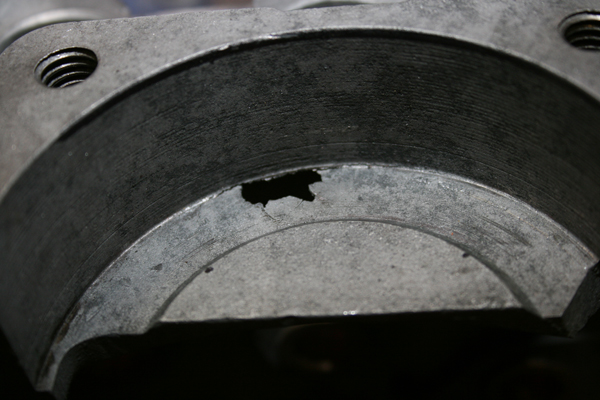
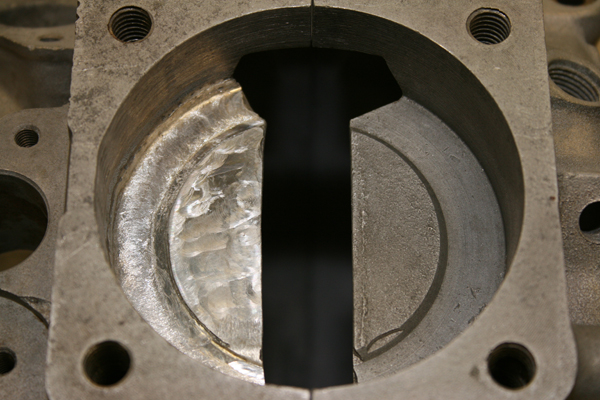
It’s clear from the image above that this hole couldn’t just be left alone. Cracks radiated out from the hole in all directions and if any more pieces came loose inside a running engine, it could ruin it completely. Harley-Davidson engine cases are cast from aluminum, so a TIG welder was used to complete the repair. I’ve spent years welding aluminum , but most of it has involved welding new clean aluminum parts which is much different than working on old cast aluminum cases. In the end I successfully repaired the hole, but it took a lot of time and patience, as well as a few custom tools. The following image shows the end results with the cases bolted together so you can see the repaired baffle on the left and the undamaged original baffle on the right. The pattern that you see on the repaired baffle was made by a custom router bit I used to cut off the excess weld. For those interested in the specifics of how I repaired the baffle, check out: Baffle Repair
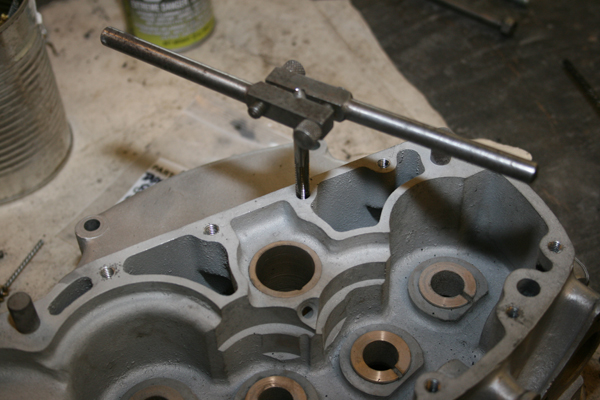
With the baffle repairs completed, the next step was to chase all the threads in the various tapped holes on the cases. All that was needed for this step was a good set of sharp taps and compressed air to blow out the holes. It’s important to do this step before rebuilding the engine because you don’t want to start tapping holes on an assembled engine and risk getting aluminum chips lost inside it.
After all that metal work, the cases needed another good cleaning. This time I used wire brushes to clean out all the holes to make sure there were not any chips stuck inside. Then it was on to a bath in hot soapy water with more scrubbing using bristle brushes. Once everything was cleaned and scrubbed, the case halves were dried using compressed air.
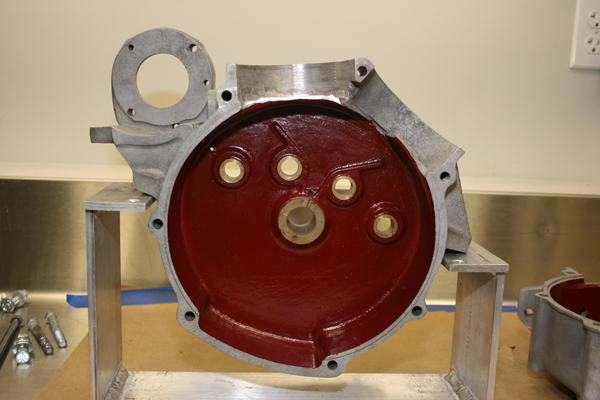
The last step was to coat the inside of the cases with a product called Glyptal. Available from most automotive supply houses, Glyptal is used to seal up small holes in porous cast aluminum or iron engine blocks. It also leaves a smooth finish to help improve oil circulation. Like any type of painting, there was more time spent on the prep work than laying down a coat of finish, but with a coating that only comes off with a sander or wire wheel, it was worth the extra time. After a two hour bake at 275 degrees, I was very pleased with the results. Of course once the engine is together, no one will ever know how nice the inside looks…
An in depth discussion on final cleaning and Glyptal application can be found at: Final Steps to Prep the Cases for Rebuilding
Next we’ll look at how all the internal engine parts were prepared.
Sponsored By
 |
|||
 |

|
||
 |
 |
 |
 |
 |
 |
 |
 |
 |
 |
 |
 |
 |
 |
 |
 |
 |
 |
 |
 |
 |
 |
 |
|
You must be logged in to post a comment.