
Ignition switch moved - Street Bob

Road Master
Joined: Sep 2008
Posts: 1,240
Likes: 0
From: Milwaukee area
I'm able to slide my tank back about 4". I have to disconnect the fuel line and pull the console off, but if I have to get into the wiring harness, if makes work so much easier. I also found it easier to undo the nut and pull the fork lock/ignition switch from the frame then trying to wiggle my fat fingers underneath and try to unplug it.
Road Master
Joined: Sep 2008
Posts: 1,240
Likes: 0
From: Milwaukee area
Originally Posted by cbz1200n
...make sure you cover the rocker cover with some rags so they do not get scratched by the clamps on the cross over line.
 I have to watch that next time.
Guess that's an excuse to replace it (them) with chrome.


Banned
Joined: Oct 2007
Posts: 1,494
Likes: 5

CB
I think the original poster did this.
Last edited by NoLongerAmember; Mar 8, 2009 at 09:32 PM.
Advanced
Joined: Feb 2009
Posts: 85
Likes: 0
From: Canada eh!
I found a black rubber "sink drain gasket" in my hardware store. It measures 2 1/4" OD.
The ID is too small. So with the sanding drum on my dremmel I sanded the rubber down to 1 7/8. The rubber is 1/8" thick. This basically looks just like the top only half of a grommet. It fits perfectly around my switch and will cover the 2" hole. The slight bevel that is left tucks down between the switch and dash gap. Because it is just sitting on top I will stick it down with some liquid gasket material. photos to come once I get my dash back from the chrome platers.
The ID is too small. So with the sanding drum on my dremmel I sanded the rubber down to 1 7/8. The rubber is 1/8" thick. This basically looks just like the top only half of a grommet. It fits perfectly around my switch and will cover the 2" hole. The slight bevel that is left tucks down between the switch and dash gap. Because it is just sitting on top I will stick it down with some liquid gasket material. photos to come once I get my dash back from the chrome platers.
Last edited by cdn-bigfoot; Mar 9, 2009 at 12:36 AM.
Road Master
Joined: Oct 2007
Posts: 918
Likes: 1
From: Iowa
I did what Walter did. I used the black insulation from a discarded piece of 12 ga Romex. Just make a nice straight slit to remove the copper. Put it around the inside of the hole and cut off the excess.
Advanced
Joined: Feb 2009
Posts: 69
Likes: 0
From: Virginia
Other than the fender-mount license plate, the ignition switch location is about the only thing I don't like about my Street Bob. Really nice work, Walt! I'll be revisiting this thread sometime soon. Thanks for the idea, and for taking the time to post it here.

Advanced
Joined: Feb 2009
Posts: 85
Likes: 0
From: Canada eh!
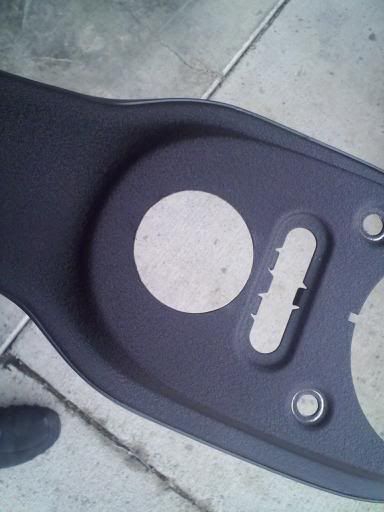
I went with the homemade aluminum plate mount method.
As you can see by the picture I left a gap at the bottom of the plate for water to run through if any gets in there again.
I have my plate mocked up on my old Tank top plate that had been painted black. I have a new top plate to install when I get to it.
I also chose to tilt the aluminum plate I made by adding a few extra of the old gasket washers under the front of it. Remember that those gasket washers need to go under your homemade plate to properly seal the tank. Along with longer bolts at the rear (front of bike) to mount the switch, the tilt on the plate helps achieve the proper angle on the switch to match the dash. The space left by using washers under the homemade plate also serves to allow moisture to escape from under the plate.

I also chose to chrome my dash while I was doing this procedure.


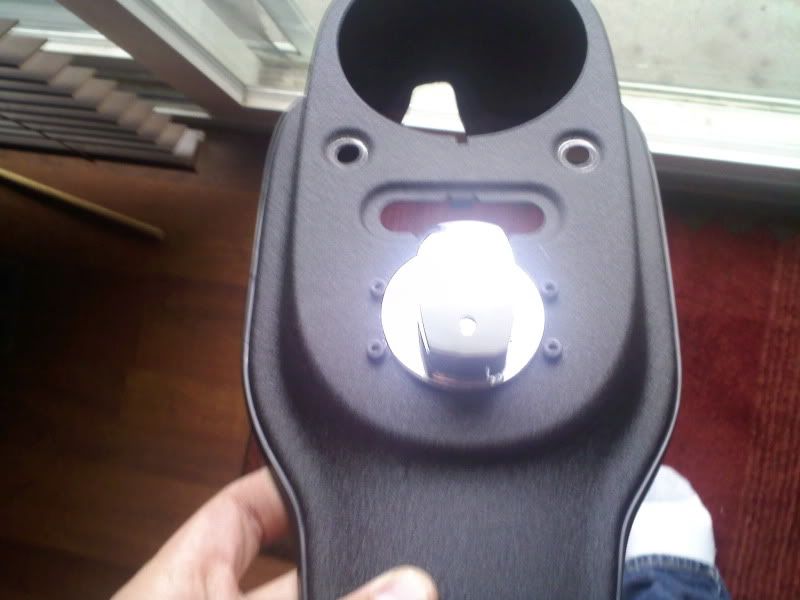
I will have a 1/16 inch gap all around my switch because I drilled a 2" hole in the dash for the 1 7/8" switch body.
Even using a drill press to make the hole, I still didn't get it perfectly centered on the dash. It's very close though.
I haven't decided on a grommet to fill and seal the gap between the switch and the dash.
Will post pictures when done.
As you can see by the picture I left a gap at the bottom of the plate for water to run through if any gets in there again.
I have my plate mocked up on my old Tank top plate that had been painted black. I have a new top plate to install when I get to it.
I also chose to tilt the aluminum plate I made by adding a few extra of the old gasket washers under the front of it. Remember that those gasket washers need to go under your homemade plate to properly seal the tank. Along with longer bolts at the rear (front of bike) to mount the switch, the tilt on the plate helps achieve the proper angle on the switch to match the dash. The space left by using washers under the homemade plate also serves to allow moisture to escape from under the plate.
I also chose to chrome my dash while I was doing this procedure.
I will have a 1/16 inch gap all around my switch because I drilled a 2" hole in the dash for the 1 7/8" switch body.
Even using a drill press to make the hole, I still didn't get it perfectly centered on the dash. It's very close though.
I haven't decided on a grommet to fill and seal the gap between the switch and the dash.
Will post pictures when done.
Last edited by cdn-bigfoot; Mar 11, 2009 at 11:25 PM.
Ultimate HDF Member
Joined: Dec 2008
Posts: 5,120
Likes: 17
From: Indiana
Here's my ignition switch re-location. I know there are several different post on here, but mine I have seen on a Street Bob and mounted it a little different. Well here it goes. I was a little difficult because I made everything so tight so I didn't have to use rubber grommets.
Switch from Eastern Performance on ebay $24.00 Shipped (looks great with a round key)
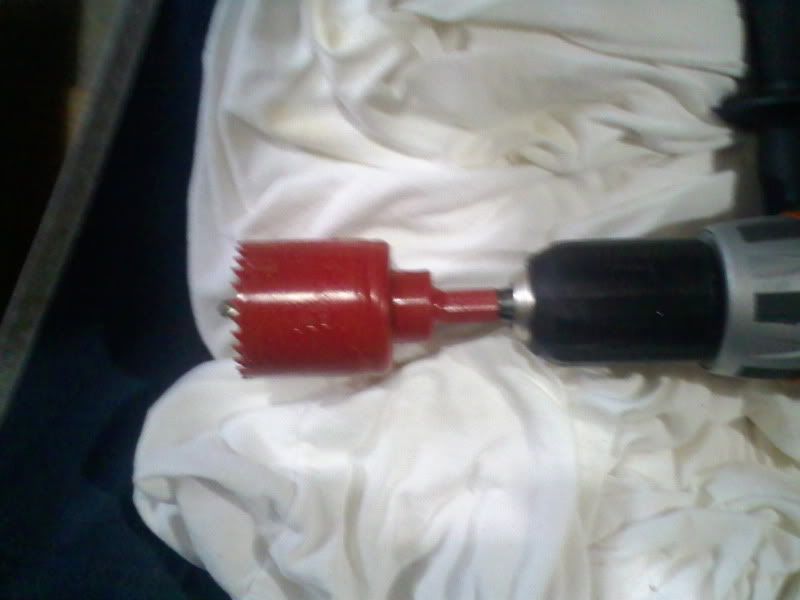
Hole saw with pilot 1 and 7/8 fits perfect. $15.00 @ hardware store
6/32 nuts and bolts from hardware store $3.00
The ***** to cut into my 6 month old bike....Priceless!!
I don't think I need to type instructions because I think the picture are pretty self explanatory. If you have questions go ahead and ask.
Yes I used a Drill. I recommend to cut from the bottom and keep the pilot bit short to keep it accurate. Then take a die grinder and smooth out the sharp edges then touch up with some spray paint. On the front side I used a q-tip to touch up the black, I barely used any.
I used the flat nuts to adjust the height and angle and the other one to secure it. For the bolts I used a 1/8 inch drill bit.
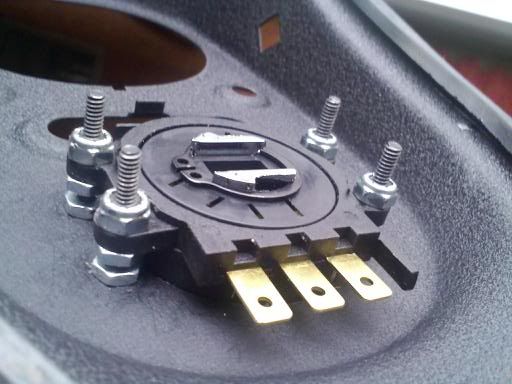
I wasn't to sure about the bolts, so I did it anyways. I think it turn out good and keeps the ruggedness of the Street Bob. Now I need to wire it and get all back together.
Switch from Eastern Performance on ebay $24.00 Shipped (looks great with a round key)
Hole saw with pilot 1 and 7/8 fits perfect. $15.00 @ hardware store
6/32 nuts and bolts from hardware store $3.00
The ***** to cut into my 6 month old bike....Priceless!!
I don't think I need to type instructions because I think the picture are pretty self explanatory. If you have questions go ahead and ask.
Yes I used a Drill. I recommend to cut from the bottom and keep the pilot bit short to keep it accurate. Then take a die grinder and smooth out the sharp edges then touch up with some spray paint. On the front side I used a q-tip to touch up the black, I barely used any.
I used the flat nuts to adjust the height and angle and the other one to secure it. For the bolts I used a 1/8 inch drill bit.
I wasn't to sure about the bolts, so I did it anyways. I think it turn out good and keeps the ruggedness of the Street Bob. Now I need to wire it and get all back together.
Last edited by JaronB; Mar 15, 2009 at 06:13 PM.
Elite HDF Member
Joined: Sep 2008
Posts: 4,440
Likes: 148
From: Northwest
Thanks. Got that suggestion from another forum as well.
Unfortunately they have nothing in rubber for either a 2 inch hole or a 1 7/8 body.
Although I found a hard plastic "desk grommet" that fits a 2" hole and could easily be shaved to fit the 1 7/8" body of my switch. Shipping will be 5 times the cost of the grommet so I'll check my local office depot tomorrow.
http://www.mcmaster.com/#rubber-grommets/=10ogf7
Something like this might work as well:
http://www.mcmaster.com/#flexible-st...ommets/=10olpd