BDL Springless Screw Compensator installed.
#1
 08-03-2014, 08:11 AM

Since HD keeps trying a band aide fix on their compensators I decided to go another route on fixing the comp issue once and for all.. I hope !
Belt Drives LTD 3-Piece Design 34-Tooth Compensator Sprocket - CS34A
07- up Big Twin
Back story; original comp springs took a crap and caused the usual banging on start up and gear engagement. Installed the then current updated SE comp(with no oil trough)but had the grooved thrust washer in the hub, which still ended up with the fretting of the comp hub and trashing of the spokes/ramps. I then reinstalled the original comp adding a extra beville spring to tighten it up. That only last about a year before it started banging again.. JUNK !!
I came across the BDL comp a while back and after researching(btw, very little technical info on it out there) and debating whether to use it or not, I decided to go for it since it was way cheaper to try then the new SE comp kit.
The install was pretty straight forward, but BDL's instructions leave a lot to be desired. They give basic instructions, remove primary, original comp and clutch basket( which you DO NOT have to do). Then proceed to give instructions on lubricating the threads with anti seize compound and lube the thrust washers and not to let them fall out of place.
Here's the kicker, at the end of the instructions, after they say installation is complete , they say to make sure comp sprocket is aligned properly with clutch basket sprocket by using the provided spacers, but provide no information on how to do that. This should have been the first step after removal of the stock comp.
The comp they show in their illustrations is the SE comp with a flat faced rotor. If you are using an original style non- SE comp with the spring basket attached to the rotor, you will first need to cut the basket off the rotor which shouldn't be a big deal since its just thin sheet metal tack welded to the rotor.
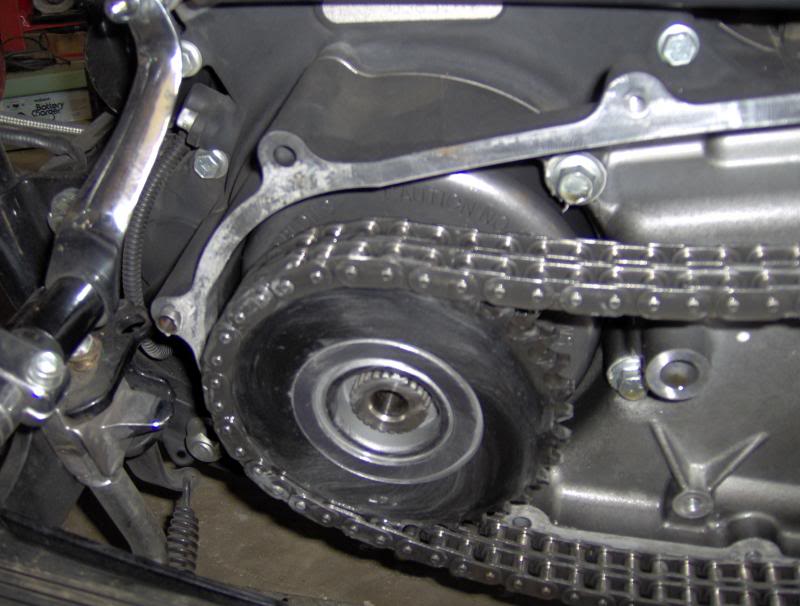
Here are a few pics to make things easier for the next guy..
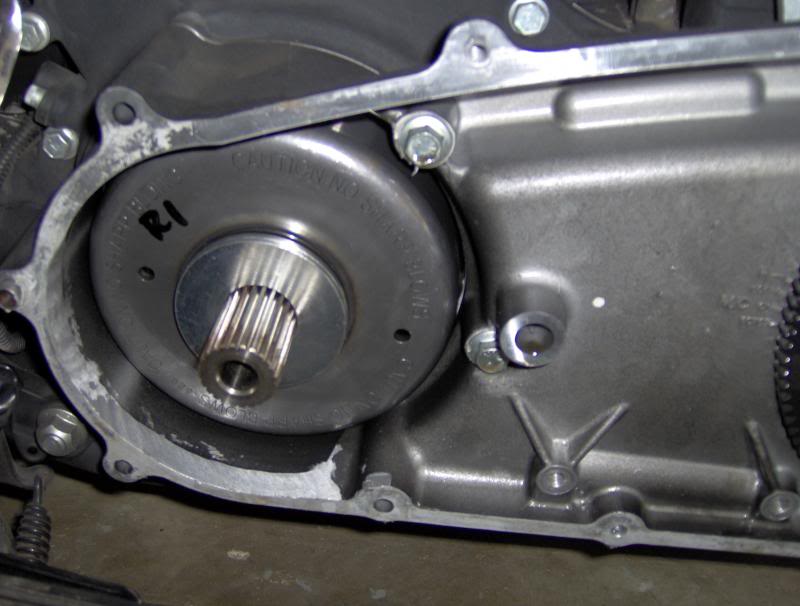
Starting out with SE comp removed, note the clutch basket is still in place( just remove the stock comp bolt, pull center hub from comp and chain will come off clutch basket with no problem) You can also see in my pics where I ground the inner primary case down to remove the original comp rotor without having to remove the inner primary, (left side , 6:00 position up to about 10-11:00 position.)
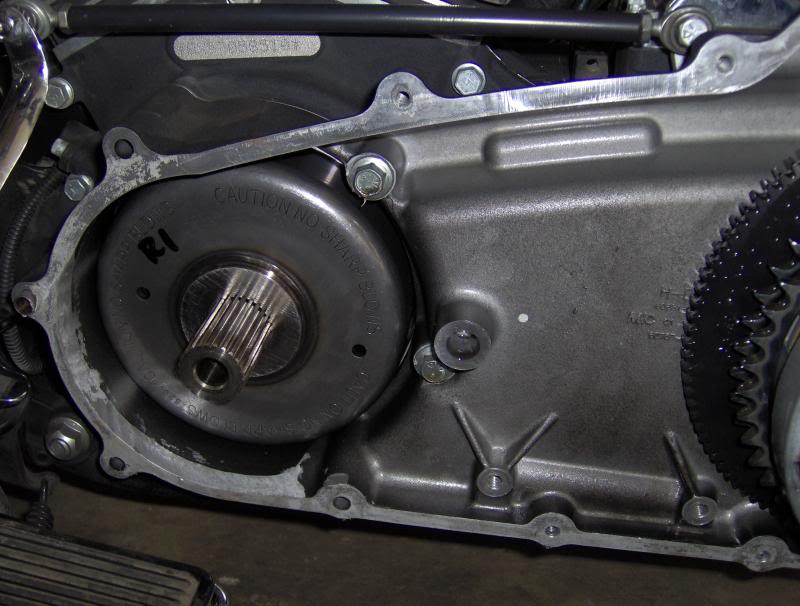
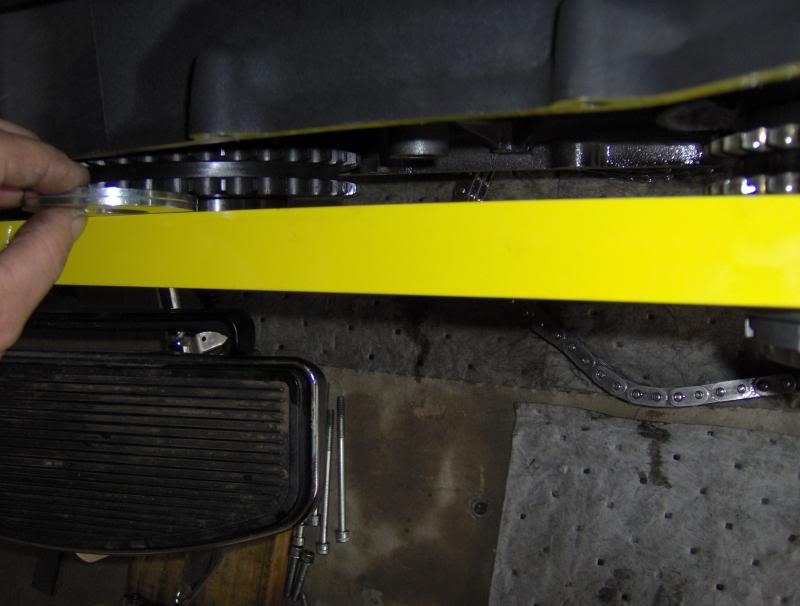
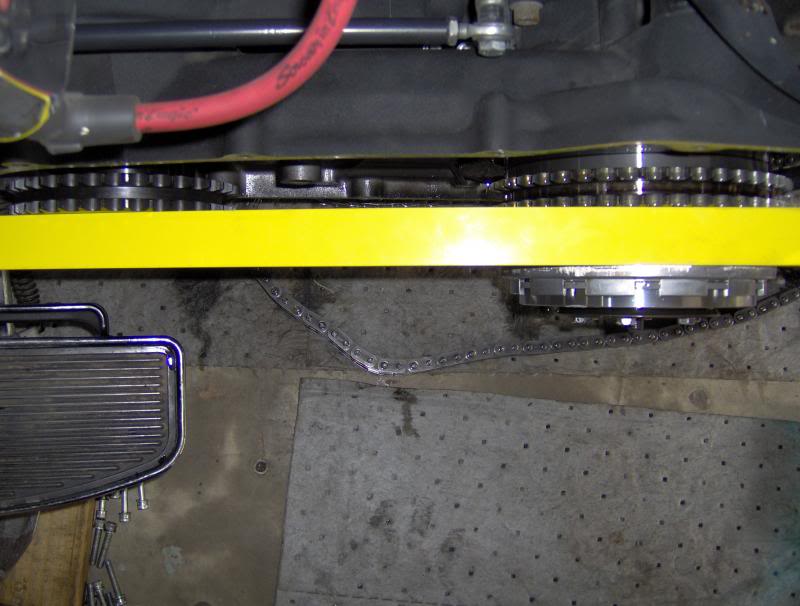
Next step to align BDL sprocket was to install the sprocket onto the output/crankshaft without applying any antiseize or assembly lube yet. this is just to decide on spacers required. I used a straight edge I had up against the clutch basket gear teeth to see the gap between the comp sprocket.
Next I just selected the correct provided shims/washers to fill the gap.
These get placed on the shaft first before the comp hub goes on.
2 thin washers, one really thick washer.
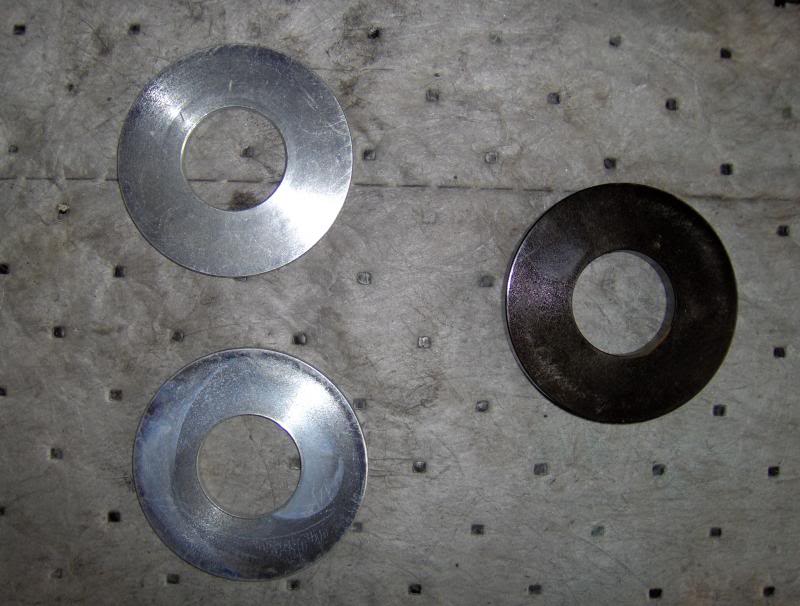
It took the two thin ones to align the straight edge correctly..
Comp removed, washers installed.
Comp reinstalled for alignment check
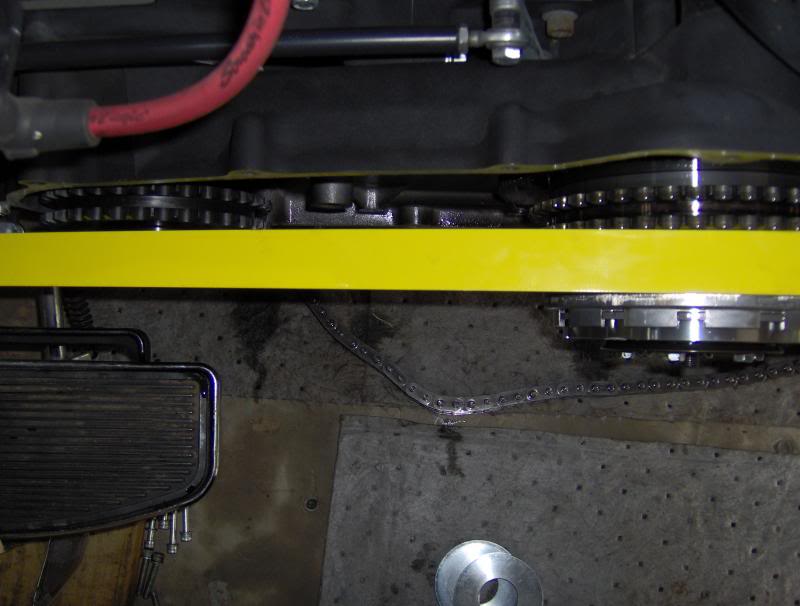
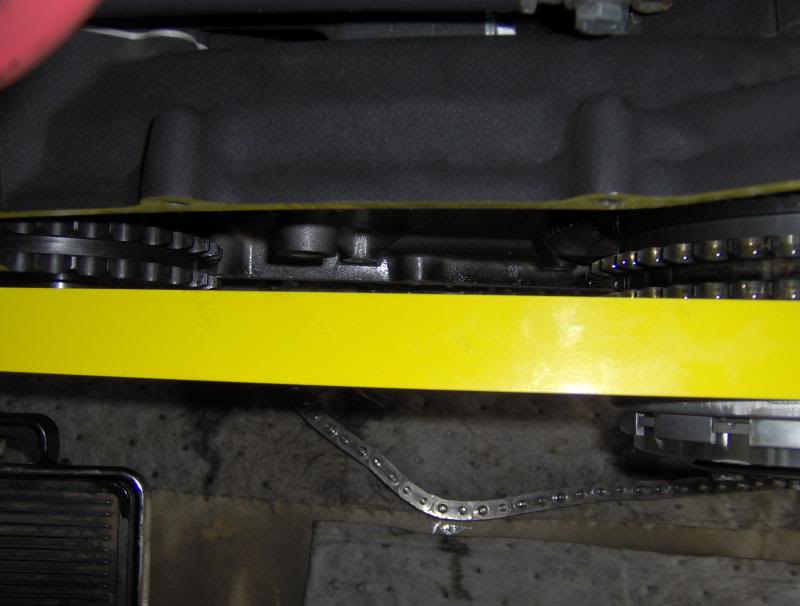
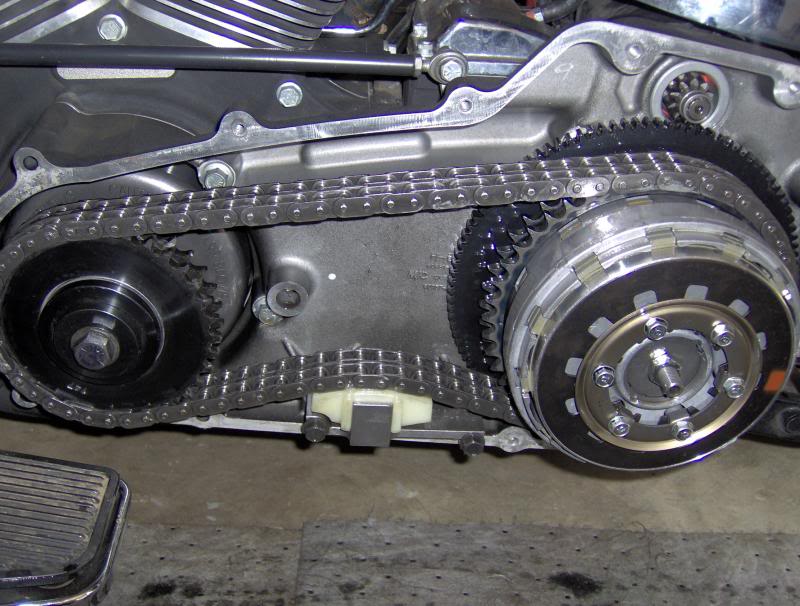
Heres where it gets a little tricky.. Final install of the sprocket and chain. You can't just put the sprocket assembly in the chain and slide it on the mainshaft, you need to install the inner hub on to the shaft first then "screw" the comp sprocket onto the inner hub. You'll need to have the trans in neutral so you can turn the clutch basket.
Everything lubed up per instructions and inner hub installed.
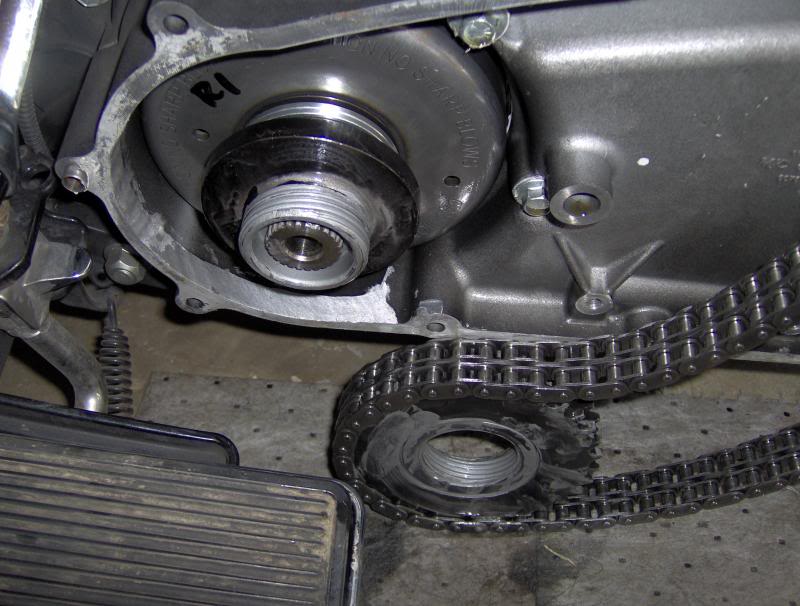
Now while holding sprocket in line with inner hub, slowly turn clutch basket clockwise and the sprocket will screw onto the inner hub. Make sure the thrust washers are in place in their respective grooves on the frt and back side of the sprocket. If lubed properly they should hold themselves in place with no problem.

Sprocket fully screwed into place.
All that's left is to reinstall the chain tensioner,(I use the Hayden M6), Apply a small drop or two of red loctite on the NEW supplied mainshaft bolt and torque to 165 ft lbs and button her up..
oh.. don't forget to refill the primary.. I almost forgot.. LOL..
How does it work.. pretty good I think. Starts with no banging, goes into gear with little to no noise.. completely quiet or a small click.
Shifts great, smooth as silk in gears 1-4th, then some slight vib in 5th and 6th gears at lower rpms (2300-2500 rpms). 5th gr at 3k/70 mph (approx.) is smooth, drop into 6th and it don't like the lower rpms. I believe this is due to the fuelpak not 100%. I have been emailing back and forth with them to get the settings nailed down. to confirm the fuel pak settings are off, i'm going to take it out today and go for a quick ride and see how it feels.
Belt Drives LTD 3-Piece Design 34-Tooth Compensator Sprocket - CS34A
07- up Big Twin
Back story; original comp springs took a crap and caused the usual banging on start up and gear engagement. Installed the then current updated SE comp(with no oil trough)but had the grooved thrust washer in the hub, which still ended up with the fretting of the comp hub and trashing of the spokes/ramps. I then reinstalled the original comp adding a extra beville spring to tighten it up. That only last about a year before it started banging again.. JUNK !!
I came across the BDL comp a while back and after researching(btw, very little technical info on it out there) and debating whether to use it or not, I decided to go for it since it was way cheaper to try then the new SE comp kit.
The install was pretty straight forward, but BDL's instructions leave a lot to be desired. They give basic instructions, remove primary, original comp and clutch basket( which you DO NOT have to do). Then proceed to give instructions on lubricating the threads with anti seize compound and lube the thrust washers and not to let them fall out of place.
Here's the kicker, at the end of the instructions, after they say installation is complete , they say to make sure comp sprocket is aligned properly with clutch basket sprocket by using the provided spacers, but provide no information on how to do that. This should have been the first step after removal of the stock comp.
The comp they show in their illustrations is the SE comp with a flat faced rotor. If you are using an original style non- SE comp with the spring basket attached to the rotor, you will first need to cut the basket off the rotor which shouldn't be a big deal since its just thin sheet metal tack welded to the rotor.
Here are a few pics to make things easier for the next guy..
Starting out with SE comp removed, note the clutch basket is still in place( just remove the stock comp bolt, pull center hub from comp and chain will come off clutch basket with no problem) You can also see in my pics where I ground the inner primary case down to remove the original comp rotor without having to remove the inner primary, (left side , 6:00 position up to about 10-11:00 position.)
Next step to align BDL sprocket was to install the sprocket onto the output/crankshaft without applying any antiseize or assembly lube yet. this is just to decide on spacers required. I used a straight edge I had up against the clutch basket gear teeth to see the gap between the comp sprocket.
Next I just selected the correct provided shims/washers to fill the gap.
These get placed on the shaft first before the comp hub goes on.
2 thin washers, one really thick washer.
It took the two thin ones to align the straight edge correctly..
Comp removed, washers installed.
Comp reinstalled for alignment check
Heres where it gets a little tricky.. Final install of the sprocket and chain. You can't just put the sprocket assembly in the chain and slide it on the mainshaft, you need to install the inner hub on to the shaft first then "screw" the comp sprocket onto the inner hub. You'll need to have the trans in neutral so you can turn the clutch basket.
Everything lubed up per instructions and inner hub installed.
Now while holding sprocket in line with inner hub, slowly turn clutch basket clockwise and the sprocket will screw onto the inner hub. Make sure the thrust washers are in place in their respective grooves on the frt and back side of the sprocket. If lubed properly they should hold themselves in place with no problem.
Sprocket fully screwed into place.
All that's left is to reinstall the chain tensioner,(I use the Hayden M6), Apply a small drop or two of red loctite on the NEW supplied mainshaft bolt and torque to 165 ft lbs and button her up..
oh.. don't forget to refill the primary.. I almost forgot.. LOL..
How does it work.. pretty good I think. Starts with no banging, goes into gear with little to no noise.. completely quiet or a small click.
Shifts great, smooth as silk in gears 1-4th, then some slight vib in 5th and 6th gears at lower rpms (2300-2500 rpms). 5th gr at 3k/70 mph (approx.) is smooth, drop into 6th and it don't like the lower rpms. I believe this is due to the fuelpak not 100%. I have been emailing back and forth with them to get the settings nailed down. to confirm the fuel pak settings are off, i'm going to take it out today and go for a quick ride and see how it feels.
Last edited by FroggyFatBoy; 08-03-2014 at 08:18 AM.
The following users liked this post:
RedneckRob (07-06-2017)

#4
08-05-2014, 05:17 PM
sorry it took me a while to get back for an update.
I've ridden it two days now back and forth to work. the vibration is better without the fuelpak, but unfortunately it puts it back to stock and we all know the factory map isn't very performance oriented. it has been a while but it felt to me like the bike was stock with a good compensator in it.
I only ran the stock setup for approx. 20 miles or so on sunday and reinstalled the fuelpak and tweaked the one setting that V&H was having me do when I initially put the fuelpak in and needed to fine tune it. after changing the one mode, 23 I think it was, and riding for the past two days it seem to feel like it did before I put the BDL comp in. it maybe could be a tad better, but when I was up behind some semis with little to no headwind the bike felt nice and smooth, but I wasn't on a hard acceleration or anything, just cruising along. I'm going to email V&H and see what they can tell me.
fuelpak back story...
(initially with the fuelpak it was flat in 5th and 6th gr and ran rougher then hell with a jakebrake sound on decel, we emailed back and forth about 3-4 times tweaked a few modes with one making the biggest change, I highlighted that one for future reference and had tweaked it once before without emailing them back)
overall, I think the bdl is a good design. I think by its design and Harleys eng design it will never be completely 100% butter smooth 100% of the time and I don't expect it to be. Depending on how hot the bike is, motor/trans oil temp wise, it does have some clunk into gear, but nothing crazy like a worn out stock comp. it does not bang on start up regardless cold or hot.
As for the actual screw function, only time will tell on whether the threads holds up. it has to be better then the hd comps thats for sure. I can hear it sometimes though, since its a screw type setup I can almost hear the hub coming out against the stops. its nothing hateful or loud its just something that I can hear that wasn't there before or maybe its my imagination. there is very little movement in the two pieces that make up the hub once completely installed, I didn't take an actual measurement, but it seemed to be less then an 1/8th of inch so its possible it'll make noise when actually working. seeing and understanding how it works now, it makes sense to what i'm hearing. before buying it I kept doing some research and could find very little info, other then pictures for the later model 06 back comps with the description 07 up similar. One day I found the actual patent paperwork which gave a complete description and design function. Seeing how there are no springs to collapse or yoke/sprocket to beat to death, I figured I would take a shot at this.
there a few others around here that installed the bdl comp and said something about the thrust washers being beat out, but supposedly that has been corrected with another material. again, only time will tell.
sorry its so long, but I get carried away sometimes with whats going on in my head.. I drive the mrs and the boss crazy.. lol..
#5
09-06-2014, 06:52 PM
update :
Removed.
Severe vibration started about 2 weeks with it in, Though it vibrated some with initial install, it seemed to get worse. then I started hearing a bop-bop noise at idle. pulled primary and compensator bolt was loose. yep it was torqued to 165 ftlb with red Loctite. further checking, comp was seized. I could not for the life of me "unscrew" the comp hub sections. even up on jack, in gear and using wheel rotation to unscrew the comp. wouldn't budge.
I've been in talks with BDL finally.. after about a week or so of trying to get a hold of them. The guy( remain nameless for now) suggested removing stock auto chain tensioner with an aftermarket one. I told him I already run a hayden M6, he goes, Oh ... He then wanted to repair or replace it, I told him I didn't want it repaired or replaced, just return it and refund my purchase amount. He said I needed to return it to the dealer where I got it. I told him yes I understand, but they told me to call you first. why I don't know, but that's what I did.
Anyways, its back in the box on its way back to BDL for their assessment and final call. i'll bet I end up with a $200 paperweight.
#7
09-10-2014, 07:57 AM

Stage I
Join Date: Sep 2014
Location: Central Florida
Posts: 1
Likes: 0
Received 0 Likes
on
0 Posts
I have also recently installed the BDL comp (replacing stock comp) on my 09 FLHX and a Baker manual chain adjuster. While riding up in the North Carolina mountains, I started to hear some disturbing rattling sounds coming from the primary case. Pulled the primary cover yesterday and found the Baker adjuster had broke off from the backing plate and the shoe plate assembly was flopping around in the primary.
My BDL comp was also "locked" up as you described, with no free play.
The shop that installed both components will be having discussions with
suppliers and respective manufacturers on these issues.
Looks like the SE comp is my next move. In order to possibly save a $100 bucks on a new SE rotor - what method did you use to remove the spring basket from non-SE rotor?
BTW - excellent feedback from your thread.
Trending Topics
#8
09-10-2014, 08:58 AM
Road Warrior
No way around it. The new comp must be installed with the new rotor.
#9
09-10-2014, 09:54 AM
Thanks for posting this OP. I have the first model of the SE compensator. Have about 25k miles on it, and it has started making some weird noise (clattering). Was hoping for a better alternative....So at least I can cross the BDL off my list. Still waiting for the Darkhorse Crankworks guys to perfect theirs...not sure I can wait much longer. New HD one looks to be improved, but I remain unconvinced...
#10
09-14-2014, 04:49 AM
as far as I know, if you already have a SE comp you won't need the new style rotor, at least that's what the head mechanic told me at my local HD dealer.
when I was debating installing the BDL comp and we were talking about the design of the BDL, the most recent SE comp came up, he said I wouldn't need the rotor since I already have the SE comp. He just said that on his own, I didn't ask, "hey will I really need the rotor". That leads me to believe that he is correct, plus hes done a crap load of them i'm sure.
to edit, i'm not sure what yr HD started putting SE comps in from the factory. if you have the spring pack as part of the rotor, you will need the new rotor.
Last edited by FroggyFatBoy; 09-14-2014 at 04:54 AM.