
Jockey Shift for nightster with mids
#11
 02-19-2010, 07:58 AM

Someone either on this forum for the XL forum put together a foot clutch setup for a mid control Sporty using an inverted mid control brake pedal on the left side, then the clutch cable looped forward then back into the primary. I still think a foward control would give you more room to operate, though...
#12
02-19-2010, 06:40 PM
Road Master
Join Date: Jul 2007
Location: Maryland
Posts: 765
Likes: 0
Received 0 Likes
on
0 Posts
check out ragerbuilt choppers. www.ragerbuiltchoppers.com I got my setup from walter and I love it! simple, easy to install and pretty inexpensive! It is the only kit I found that uses your existing shifter lever. Of course mine is for forward controls, I'm pretty sure they will have something for the mid control setup as well. Good Luck, it takes a little getting used too. Those left hand turns from a stop are interesting to say the least!
John
John
Last edited by woodworking1; 02-19-2010 at 06:44 PM.
#13
02-19-2010, 11:13 PM
Seasoned HDF Member
Join Date: Dec 2004
Location: Texas! Ya mean there's someplace else?
Posts: 11,062
Received 1,211 Likes
on
461 Posts
I'm a suicide clutcher, jockey shifter. Have had foot clutches and hand shifts on everything since my '78 FLH 3 speed w/reverse. LOL, guess that makes about 32 years now. Currently have a LaBriola suicide clutch on both my '87 Sloptail, and the '07 Nightster. Sloptail has the LaB jockey lever, and the Nighty has a home-made hand shift lever mounted to the stock lever.
Always cracks me up hearing the "dangerous" comments. The only time I even thought "Oops" was when THE MAMA leaned over my left shoulder when I had my foot on the clutch while sitting at a light. That was 10 years ago, and she's never done it again since that first time.
Yeah, there's a learning curve, but after that it just becomes natural. Or it is if you actually ride.
FWIW, I had a Rager jockey lever on the Nighty. I liked how it sat behind my leg, but it's a 2-piece lever. It lasted about 2 weeks and then the bottom piece split. I used blue LocTite on the screws/nuts that fasten the 2 pieces together, but they still loosened every couple days. I used a li'l 4 inch adjustable wrench to tighten 'em up to get me home one day. That tiny wrench tightening the 2 nuts holding the upper lever to the lower lever caused the lower portion to split. Had to use a hose clamp to hold it together long enough to make it to my shop. The lower piece is too thin, IMNSHO.
#14
02-20-2010, 07:27 AM
Join Date: Jun 2008
Location: Altoona, PA
Posts: 30
Likes: 0
Received 0 Likes
on
0 Posts
#15
02-20-2010, 10:22 AM
Road Master
Join Date: Jul 2007
Location: Maryland
Posts: 765
Likes: 0
Received 0 Likes
on
0 Posts
#16
03-01-2011, 10:56 AM
Tourer
Got the Rekluse in my custom with no other clutch lever. Suicide shifter is a non issue. It's almost like riding an automatic but ya gotta shift when the motor is ready, ie. just as you roll off the throttle. It works great when stopping. I've stopped fast (locked up rear tire) and the engine didn't die. only little problem is there is no way to move forward slowly or jsut a few feet. I've learned to just roll the bike rather than try to give it throttle to engage the clutch. Bout jumped it into the back of a truck! Ya live and learn...
#17
03-01-2011, 11:12 AM
Hey.. .I am re-posting this from another thread... this is what I did:
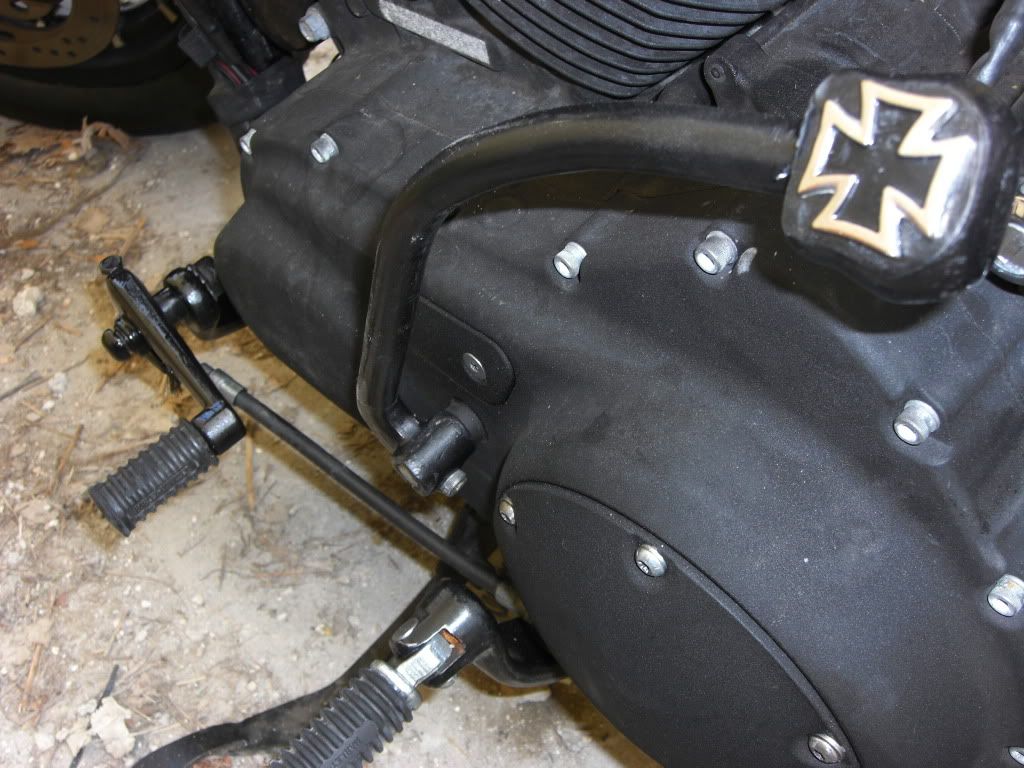
so... the two main pieces are a stock mid control mount and a stock shift peg (got them at a flea market for next to nothing)... the stock mid control does not fit the forward control bolt holes so I had to grind it to make it fit, in this picture you see that I had to remove material next to the bolt hole for the bolt to fit right next to it:

if you don't want to grind the piece then an alternative if to use a flat head bolt, insert it from the rear and then join both bolts using a connecting metal piece with two holes... but that is going to relocate the peg mount higher, and the foot clutch peg is going to be farther away from your foot... I have small feet so that didn't work for me (if you can find longer shifter pegs then much better).. here is a picture of the mount / bolt:

I will try to explain the next image in one shot... cut off the side walls where the peg mounts, grind it so it is as flat as possible.. then drill a 1/2 inch hole (not exactly at the middle but a bit forward do the nut does not get too close to the primary case and rubs against it when the motor vibrates, I made the mistake of drilling the hole a bit too close to it and the nut is now touching the case, but if that happens to you just grind off a bit of one side of the nut).. the bolt is a GRADE 8 fine thread 1/2 bolt, you'll need two nuts.. one on each side of the mount... if you look at the picture the one closest to the peg looks like a spacer, but it is a nut I that reshaped to a round shape so it looks better, the reason for the two nuts is that those are the ones holding the peg, if you just use one the bolt will compress the peg and it wont move, next, take the peg and drill the hole where the shift rod normally inserts to 11/16, I used a bimetal hole saw for this (I recommend you use a step sheet metal drill bit to open the hole to 11/16 first then use the bimetal hole saw to finish it, this way is much easier to guide the bimetal hole saw)... you need to be precise because you will make the hole wall way thinner than original... another option if you think this is too much is to use 3/8 GRADE 8 bolts and drill the peg to 1/2 inch.. a much easier job... I bought a bronze bushing at ACE Hardware that is 1/2 inch inner diameter and 11/16 outer diameter, but if you go with the 3/8 bolt then get the 3/8 inch inner diameter - 1/2 inch outer diameter bushing... the bushing goes inside the hole you just drilled.. this is necessary because if you just drill the peg and use it like that when the walls get rusted the peg will get stuck, the bushing will do the magic for the years to come.. :-) ... to recap... the simplest way is to use 3/8 bolts/nuts, drill the peg to 1/2 inch, then use a 3/8 I.D. - 1/2 O.D. bronze bushing, the more complicated is 1/2 inch bolt/nuts, drill the peg to 1/2 and then use 3/8 I.D. - 1/2 O.D bronze bushing.. I went with 1/2 inch GRADE 8 bolts/nuts because I am paranoid.. but 3/8 GRADE 8 bolts/nuts should be fine too..

Next... attaching the clutch cable... it is actually simple.. I used a two piece wire clamp that looks like a little sandwich.. I will post a picture and more details of the home depot part number later... you'll see in the next picture that it is attached at the bottom, it comes with two bolts, I had to drill one hole to make it bigger for the bolt that attaches it to the peg...

I know there is a lot of missing information here.. like bolts sizes and such... but I promise to update it whenever I get a chance.... for now you can start looking for the mid control mount and shift peg .. :-)
I know we have discussed the issue with a shifter handle that is too heavy it can cause damage to the shifter rod oil seal or the shifter rod itself... I do too believe you should not use something that is too heavy, I have disassembled the primary several times and if you look at the piece that supports the shifter rod internally.. it is just a piece of plastic!!... so.. I decided to go with a very short jockey shift style shifter made with copper tubing... I know.. copper is not the best material for this application.. but it was light enough and easier to bend when you heat it with a torch... I suggest you go dumpster diving and find some aluminum made chair that has a lot of bent pipes in it.. it cant get any cheaper than that!... in my case I had to grind off a lot of material from the original shift peg, also.. the peg sticks outwards too much so the pipe was hitting my leg.. I had to bend the peg inwards, look here and compare it against your peg to see how much I had to bend it (be careful and patient while doing this... you can break it if you apply too much force):

Here is the finished jockey shifter:
A close up:

And from the distance (did you notice my new wide glide with fat front tire?.. I guess I can call my bike an Iron 48 :-).... I also lowered the tank to the original position and lowered the headlight a little bit:

That's it for now... please do not hesitate to ask any questions and I will update the information as time permits... BTW... shifting with a jockey shifter / foot clutch is A BLAST!!!
so... the two main pieces are a stock mid control mount and a stock shift peg (got them at a flea market for next to nothing)... the stock mid control does not fit the forward control bolt holes so I had to grind it to make it fit, in this picture you see that I had to remove material next to the bolt hole for the bolt to fit right next to it:
if you don't want to grind the piece then an alternative if to use a flat head bolt, insert it from the rear and then join both bolts using a connecting metal piece with two holes... but that is going to relocate the peg mount higher, and the foot clutch peg is going to be farther away from your foot... I have small feet so that didn't work for me (if you can find longer shifter pegs then much better).. here is a picture of the mount / bolt:
I will try to explain the next image in one shot... cut off the side walls where the peg mounts, grind it so it is as flat as possible.. then drill a 1/2 inch hole (not exactly at the middle but a bit forward do the nut does not get too close to the primary case and rubs against it when the motor vibrates, I made the mistake of drilling the hole a bit too close to it and the nut is now touching the case, but if that happens to you just grind off a bit of one side of the nut).. the bolt is a GRADE 8 fine thread 1/2 bolt, you'll need two nuts.. one on each side of the mount... if you look at the picture the one closest to the peg looks like a spacer, but it is a nut I that reshaped to a round shape so it looks better, the reason for the two nuts is that those are the ones holding the peg, if you just use one the bolt will compress the peg and it wont move, next, take the peg and drill the hole where the shift rod normally inserts to 11/16, I used a bimetal hole saw for this (I recommend you use a step sheet metal drill bit to open the hole to 11/16 first then use the bimetal hole saw to finish it, this way is much easier to guide the bimetal hole saw)... you need to be precise because you will make the hole wall way thinner than original... another option if you think this is too much is to use 3/8 GRADE 8 bolts and drill the peg to 1/2 inch.. a much easier job... I bought a bronze bushing at ACE Hardware that is 1/2 inch inner diameter and 11/16 outer diameter, but if you go with the 3/8 bolt then get the 3/8 inch inner diameter - 1/2 inch outer diameter bushing... the bushing goes inside the hole you just drilled.. this is necessary because if you just drill the peg and use it like that when the walls get rusted the peg will get stuck, the bushing will do the magic for the years to come.. :-) ... to recap... the simplest way is to use 3/8 bolts/nuts, drill the peg to 1/2 inch, then use a 3/8 I.D. - 1/2 O.D. bronze bushing, the more complicated is 1/2 inch bolt/nuts, drill the peg to 1/2 and then use 3/8 I.D. - 1/2 O.D bronze bushing.. I went with 1/2 inch GRADE 8 bolts/nuts because I am paranoid.. but 3/8 GRADE 8 bolts/nuts should be fine too..
Next... attaching the clutch cable... it is actually simple.. I used a two piece wire clamp that looks like a little sandwich.. I will post a picture and more details of the home depot part number later... you'll see in the next picture that it is attached at the bottom, it comes with two bolts, I had to drill one hole to make it bigger for the bolt that attaches it to the peg...
I know there is a lot of missing information here.. like bolts sizes and such... but I promise to update it whenever I get a chance.... for now you can start looking for the mid control mount and shift peg .. :-)
I know we have discussed the issue with a shifter handle that is too heavy it can cause damage to the shifter rod oil seal or the shifter rod itself... I do too believe you should not use something that is too heavy, I have disassembled the primary several times and if you look at the piece that supports the shifter rod internally.. it is just a piece of plastic!!... so.. I decided to go with a very short jockey shift style shifter made with copper tubing... I know.. copper is not the best material for this application.. but it was light enough and easier to bend when you heat it with a torch... I suggest you go dumpster diving and find some aluminum made chair that has a lot of bent pipes in it.. it cant get any cheaper than that!... in my case I had to grind off a lot of material from the original shift peg, also.. the peg sticks outwards too much so the pipe was hitting my leg.. I had to bend the peg inwards, look here and compare it against your peg to see how much I had to bend it (be careful and patient while doing this... you can break it if you apply too much force):
Here is the finished jockey shifter:
A close up:
And from the distance (did you notice my new wide glide with fat front tire?.. I guess I can call my bike an Iron 48 :-).... I also lowered the tank to the original position and lowered the headlight a little bit:
That's it for now... please do not hesitate to ask any questions and I will update the information as time permits... BTW... shifting with a jockey shifter / foot clutch is A BLAST!!!
Last edited by joebotics; 05-20-2011 at 09:52 AM.


Thread
Thread Starter
Forum
Replies
Last Post