


Jackpot 2 into 1 Headpipe
Thread Starter
|
Road Master
Joined: Feb 2009
Posts: 766
Likes: 6
From: South Dakota
Anyone install theirs yet?? Have a few questions about the heat shields.
Keep in mind I installed my own bars and would rate that as a 9 or so on the 1-10 scale of PITA..
The heat shield fittment on the 2 into 1 pipe. STRONG 8... What a pain the fkin ***! Going to call Jamie tomorrow to get his take on how they should fit. Still need the updated map also. NO way they'll fit like stock from what I can see. Biggest issue I can see is the clamp area where the original cat lived, 3"x2" area, is now a single pipe. Figured it was a 1-2 hour job. I've had the exhaust off, stock came off in 20 minutes. 3 hours of screwing with the heat shields and trying to get the powertube on the new headpipe. I gave up and just tightened **** down and put the floorboard back on. Fired it up and took it for a spin.
- New headpipe VS stock sound opinons -
Woo hoo! There's a bark now. Was a muted but nice sounding rumble with the Jackpot Power Tube. Get on it now and you feel it in your bones. Slightly more of a pop to it now. Just different sound all together IMO. Wife may get fussy about riding hers behind me now. She'll have to get used to it Staying off the throttle you can be peaceful which is good for leaving early in the morning! Get on it even remotely and it's a whole new ballgame!
Keep in mind I installed my own bars and would rate that as a 9 or so on the 1-10 scale of PITA..
The heat shield fittment on the 2 into 1 pipe. STRONG 8... What a pain the fkin ***! Going to call Jamie tomorrow to get his take on how they should fit. Still need the updated map also. NO way they'll fit like stock from what I can see. Biggest issue I can see is the clamp area where the original cat lived, 3"x2" area, is now a single pipe. Figured it was a 1-2 hour job. I've had the exhaust off, stock came off in 20 minutes. 3 hours of screwing with the heat shields and trying to get the powertube on the new headpipe. I gave up and just tightened **** down and put the floorboard back on. Fired it up and took it for a spin.
- New headpipe VS stock sound opinons -
Woo hoo! There's a bark now. Was a muted but nice sounding rumble with the Jackpot Power Tube. Get on it now and you feel it in your bones. Slightly more of a pop to it now. Just different sound all together IMO. Wife may get fussy about riding hers behind me now. She'll have to get used to it
Staying off the throttle you can be peaceful which is good for leaving early in the morning! Get on it even remotely and it's a whole new ballgame!
Last edited by SDVmnt; Jun 8, 2010 at 11:53 PM.
I have personally installed 2 of these pipes on 2010 Street Glides within the last 24 hours. The heat shields are a bit of a pain but they will fit properly without too much effort. I can even shoot you some detailed pictures of the bikes that we installed them on as they have not been picked up yet. Give me a call and I will explain the best way to get everything installed correctly and I can get you your map no problem.
__________________

Jamie Long / Fuel Moto USA
The USA's Leader V-Twin EFI & Performance www.fuelmotousa.com
Contact 920-423-3309
Email jamie@fuelmotousa.com
Jamie Long / Fuel Moto USA
The USA's Leader V-Twin EFI & Performance www.fuelmotousa.com
Contact 920-423-3309
Email jamie@fuelmotousa.com

Road Captain
Joined: Apr 2010
Posts: 709
Likes: 1
From: Maine
Anyone install theirs yet?? Have a few questions about the heat shields.
Keep in mind I installed my own bars and would rate that as a 9 or so on the 1-10 scale of PITA..
The heat shield fittment on the 2 into 1 pipe. STRONG 8... What a pain the fkin ***! Going to call Jamie tomorrow to get his take on how they should fit. Still need the updated map also. NO way they'll fit like stock from what I can see. Biggest issue I can see is the clamp area where the original cat lived, 3"x2" area, is now a single pipe. Figured it was a 1-2 hour job. I've had the exhaust off, stock came off in 20 minutes. 3 hours of screwing with the heat shields and trying to get the powertube on the new headpipe. I gave up and just tightened **** down and put the floorboard back on. Fired it up and took it for a spin.
- New headpipe VS stock sound opinons -
Woo hoo! There's a bark now. Was a muted but nice sounding rumble with the Jackpot Power Tube. Get on it now and you feel it in your bones. Slightly more of a pop to it now. Just different sound all together IMO. Wife may get fussy about riding hers behind me now. She'll have to get used to it Staying off the throttle you can be peaceful which is good for leaving early in the morning! Get on it even remotely and it's a whole new ballgame!
Keep in mind I installed my own bars and would rate that as a 9 or so on the 1-10 scale of PITA..
The heat shield fittment on the 2 into 1 pipe. STRONG 8... What a pain the fkin ***! Going to call Jamie tomorrow to get his take on how they should fit. Still need the updated map also. NO way they'll fit like stock from what I can see. Biggest issue I can see is the clamp area where the original cat lived, 3"x2" area, is now a single pipe. Figured it was a 1-2 hour job. I've had the exhaust off, stock came off in 20 minutes. 3 hours of screwing with the heat shields and trying to get the powertube on the new headpipe. I gave up and just tightened **** down and put the floorboard back on. Fired it up and took it for a spin.
- New headpipe VS stock sound opinons -
Woo hoo! There's a bark now. Was a muted but nice sounding rumble with the Jackpot Power Tube. Get on it now and you feel it in your bones. Slightly more of a pop to it now. Just different sound all together IMO. Wife may get fussy about riding hers behind me now. She'll have to get used to it
Staying off the throttle you can be peaceful which is good for leaving early in the morning! Get on it even remotely and it's a whole new ballgame!Thread Starter
|
Road Master
Joined: Feb 2009
Posts: 766
Likes: 6
From: South Dakota
I was able to get the head bolt flanges to all line up like they should. Just don't tigten anything down. I had the trans mount and head bolts all started and wiggled it a little till I could get the flanges to feel like they were sitting where they should. THen slowly tightened the head bolts alternating till they were "tight". Not "can't turn anymore tight!"
That part should go. Hopefully I find a trick on the shields.
That part should go. Hopefully I find a trick on the shields.

Cruiser
Joined: Jul 2007
Posts: 113
Likes: 1
From:
Put mine on yesterday. Took about an hour.....
Shields go on real easy. That back piece is weird with only one pipe to go around, but just keep tightening it, it'll be fine. Only thing is to make sure the excess tucks behind the shield and not outside as it comes through. The forward clamp on the third piece tightens nicely around the double tubes.
As for the head bolts, just be PATIENT, Jamie has those things with some TIGHT tolerences! You have to be gentle, but steady.
It did help to get the rear headbolts on and started, but loose, then seat and tighten the front. It gives you some wiggle room adjusting the front. Then tighten the rear ones. Put the slip-on where you want it (or where it works, again Jamie with his tolerances, lol) snug the bolts holding it to the bag rail. Then the clamp holding it on. Save the tranny mount for last.
I put the shields on after all was mounted, seemed to be the easiest. Front, back, then third piece. No problems.
BTW, it is WAY worth it. Jamie and crew ROCK!
Thread Starter
|
Road Master
Joined: Feb 2009
Posts: 766
Likes: 6
From: South Dakota
Trending Topics
Cruiser
Joined: Jul 2007
Posts: 113
Likes: 1
From:
SDVmnt,
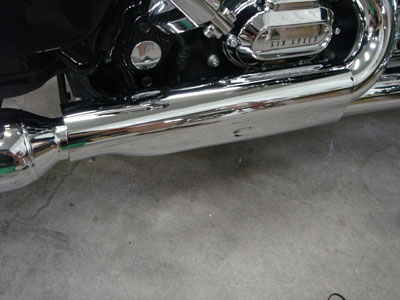
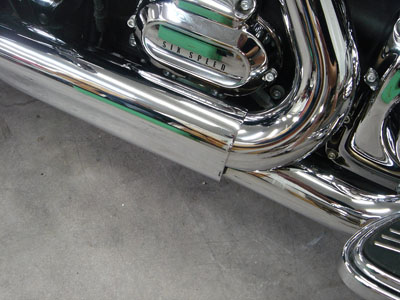
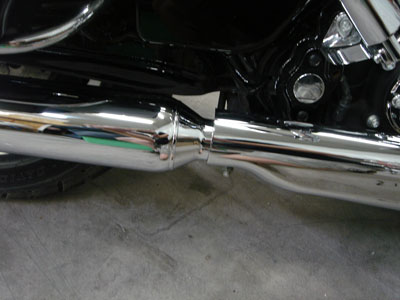
Here's a few pics.
Had a thought (scary, I know). Jamie, feel free to flame me if you disagree, but if they are in reasonably good shape, don't change the exhaust gaskets.
I always do and this time may be a victim of my own analness.... The Jackpot pipe flanges are not tapered like the stock ones and fit very tight in the heads. I'm thinking they would seal up very nicely to the originals, due to the gaskets being shaped by the stock headpipe.
Something that may help you guys having trouble getting the front one to seat right and get the nuts on fully: If you've changed the gaskets already, you may just need to get them seated a bit deeper before trying to put the pipe on. I used a small piece of flat metal and double stacked the exhaust flanges to make a field expediant "exhaust gasket press". Been told many times I'm the master of "Plan B".
As for the fitment of heat sheilds, they go on fine. I did notice from my pics that I need to loosen them and do some adjustments (gaps), but they went on real easy. Just open the clamps all the way, slide over the pipe and reconnect as required.
Hope this helps,
HD Forum Stories
The Best of Harley-Davidson for Lifelong Riders

Harley-Davidson Fat Boy Becomes a Dark, Decepticon-Inspired Custom
Verdad Gallardo
6 Weirdest Harley-Davidsons Ever Sold to the Public
Verdad Gallardo
7 Times Harley-Davidson Chucked Tradition Out the Window
Verdad Gallardo
7 Surprising Harley-Davidson Products that Are Not Motorcycles
Verdad Gallardo
8 Best Harley-Davidson Motorcycles Ever
Pouria Savadkouei
10 Worst Harley-Davidson Motorcycles Ever
Pouria Savadkouei
Killer Custom's Jail Break Is The Breakout That Refused to Blend In
Verdad Gallardo
Crazy Bunderbike Build Looks Amazing, But Is It Impossible to Ride?
Verdad Gallardo
Harley-Davidson Reveals Super Cool Cafe Racer Concept
Verdad Gallardo
Here are a few pictures of the heat shield installed on the Jackpot 2/1 head pipe. As far as the inlet collar fitment it is a bit different than the stock pipe, unlike the tapered stamped inlet collars on the stock headpipe our collars are CNC machined to exact tolerances and are precisely matched to the exhaust port dimensions. When you fit the pipe you will see the billet collars are only slighly smaller than the machined port diameter and there will will be a much tighter tolerance for a far more accurate seal. I recommend installing the rear collar nuts first, leaving them loosely, then the front nuts. Adjust the pipe into place and tighten each nut steps by sequence. For easier initial installation you can install the pipe first without the heat shields which will allow you to see the port surfaces and studs easier. When installing the heat shields start with the front primary shield leaving it somewhat loose, install the rear primary shield and finally the rear shield. It is important to have the rear shield installed somewhat forward, and when adjusting the rear primary shield you need to rotate it so it aligns with the rear shield. With each adjustment tighten the clamps slighly as you get them closer into place and with some patience you can get them to align very nice.
Thread Starter
|
Road Master
Joined: Feb 2009
Posts: 766
Likes: 6
From: South Dakota
I guess I just need to mess with the gap in the rear cylinder shield and the back shield. I have a gap there that looks ugly. The front seems to be similar to what's in the pictures. Thought it was supposed to sit flush with the rear shield like stock but guess it doesn't have to.