LOG IN
REGISTER
Forums
New Members & Forum Support
Welcome Area Only
Forum Issues
Harley Davidson Motorcycles
LiveWire
Touring Models
Dyna Glide Models
Softail Models
Sportster Models
Pan America
VRSC Models
Screamin Eagle CVO Models
Tri Glide, RG3 & Freewheeler Models
Harley-Davidson Street
Harley-Davidson X
HD Engines
Classic
Custom Models
Hacked, Conversions and Trailering
General Harley Davidson Chat
Harley Davidson Tech & Mechanical Forum
Detailing
General Topics/Tech Tips
Audio Systems
Primary/Transmission/Driveline/Clutch
Ignition/Tuner/ECM/Fuel Injection
Engine Mechanical Topics
Exhaust System Topics
Electrical/Lighting/Alarm
Oil Archive (no new posts)
Frame/Suspension/Front End/Brakes
Wheels/Tires
Blowers/Turbos/Nitrous Oxide
Carburetor Related
Powdercoat & Paint
Regional Events, Rides and Road Reports
Road Trips
HDForums Mascot
The Patriot Guard Riders
Members Meeting Members
National Events
"The Florida Crew"
"The Georgia Crew"
Northeast
Northeast Tri-State Area
Southeast
Great Lakes
Pacific
Pacific Northwest
Southwest
Mountain - Prairie
Canada
Europe
Other Countries
Sponsoring Vendors
Rockford Fosgate Audio
Parts Giant
J&M Motorcycle Audio
Fuel Moto / Jackpot Mufflers
Harley Davidson Classifieds
Vendor For Sale Classifieds
Vendor Announcements
Motorcycles For Sale
Motorcycle Audio-Buy/Sell/Trade
Want To Buy Motorcycles/Parts/Accessories
Motorcycle Parts For Sale-Misc. Parts
Stock Harley Take Offs
Gear and Other Items For Sale
Good Or Bad Shopping Experiences At HDF
Trades & Freebies (See Subforums for specific models)
Memorial Forums
In Memory Of...
On The Mend...
Prayer Requests
Team Forums
News
Marketplace
Vendor Directory
Become a Vendor
Member Marketplace
Vendor Marketplace
Site Store
Haynes Manuals
New Posts
Tools
Car Payment Calculator
Tire Rim Calculator
Recalls
Technical Service Bulletins (TSBs)
Members List
Live Feed
New Posts
How-Tos
Gallery
View Dark Mode
Please register or login to enable Dark Mode.
Log In
Register
Threads
Google
Threads
Posts
Advanced
Dark Mode
Please register or login to enable Dark Mode.
Log In
Forgot your Password?
By logging into your account, you agree to our
Terms of Use
and
Privacy Policy
, and to the use of cookies as described therein.
or
Login with Google
Login with Facebook
Recent
Commented
Albums
My Pictures
My Post Pictures
Oogie Wa Wa
September 11, 2014
323
0
Sort:
Most Recent
Default
Most Recent
0
2015/09/04 05:08:00
Oogie Wa W
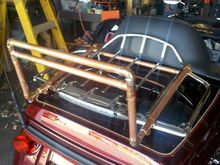
There's also a piece of oak between the two T's, curved to match the top of the tour pack and padded with felt. Plus a strip of electricians tape on the tour pack that is removed when not in use, it protects the paing.
0
2015/08/14 19:17:05
Oogie Wa W
Back lower elbows reinforced with 3/8" oak dowels and filled solid with JB Weld.
0
2015/08/14 19:17:02
Oogie Wa W
0
2015/07/02 04:39:22
Oogie Wa W
0
2015/06/28 15:51:19
Oogie Wa W
0
2015/06/28 15:51:17
Oogie Wa W
0
2015/05/04 10:36:49
Oogie Wa W
0
2015/04/13 10:35:46
Oogie Wa W
0
2015/04/13 10:24:02
Oogie Wa W
0
2015/04/02 12:07:10
Oogie Wa W
0
2015/04/01 21:49:48
Oogie Wa W
0
2015/04/01 21:49:44
Oogie Wa W
0
2015/04/01 06:55:41
Oogie Wa W
0
2015/04/01 06:07:39
Oogie Wa W
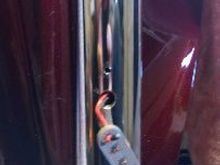
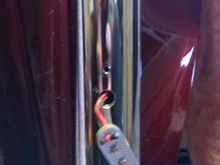
Provide clearance for wires to get below the seal area without pinching. Used a dremel to rout about half way through. I thought about just having slots, but then it would be trying to align the windshield with seven things, not just the three posts, and that would weaken it substantially Had to remember to do it on the front
0
2015/03/13 08:24:22
Oogie Wa W
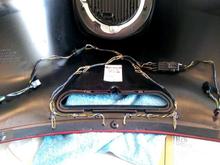
Cut weatherstrip to pass wires down through, with wires straight and parallel. Hot melt glue wires out of the way. Add a couple of waterproof connectors instead of the eight twist-locks. To get in there, pull the windshield as normal, reach in and disconnect 3 connectors (one for the headlight) and DONE. No juggling.
0
2015/03/13 08:23:51
Oogie Wa W
0
2015/03/09 16:52:05
Oogie Wa W
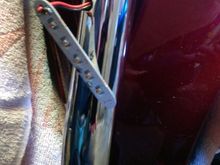
The small holes were drilled 3/32 and tapped 4-40 for the lights.
0
2015/03/09 16:42:42
Oogie Wa W
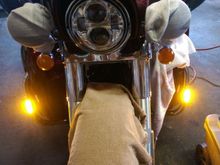
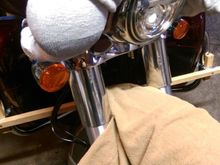
Like I said, very bright and very noticeable, which is what I was hoping to get. Compare them to the CD LED turn signals.
0
2015/03/09 10:02:07
Oogie Wa W
Testing with a DC bench supply before final hookup.
0
2015/03/09 10:01:47
Oogie Wa W
The clear plastic part houses the LED assembly snaps over the tubing and is sealed to the tubing all the way around with a squished layer of silicone. You can see if it seals. Then the metal cover snaps in place and is screwed down. The clear plastic is visible all the way around the metal cover (it's the same size) and light gets out around the edges, which is cool. The clear part sticks out past the metal by about 1/8" or so, adding to side visibility.
0
2015/03/09 10:01:38
Oogie Wa W
The LED assembly, mounting and wiring holes.
0
2015/03/09 10:01:32
Oogie Wa W
Oak V-block drilling template/bushings hose clamped at the right height, and tied together to hold them at the correct angle, canted out 15 degrees on each side.
0
2015/03/09 10:01:25
Oogie Wa W
Like I said, very bright, extremely noticable. Will update when I try it on the road.
0
2015/03/09 09:56:05
Oogie Wa W
Testing everything prior to final hook up with a DC bench supply.
0
2015/03/09 09:55:54
Oogie Wa W
The plastic housing sticks out through the metal cover by about 1/8" or so, plus it's flush with the metal cover all the way around. A smashed bead of silicone seals the plastic to the tubing all the way around, the metal cover just holds everything in place.
0
2015/03/09 09:55:36
Oogie Wa W
Here you can see the LED assembly and the mounting and access holes.
0
2015/03/09 09:52:29
Oogie Wa W
Used this jig to hold oak V-block drilling template/"bushings" at the right angle and height.
0
2015/03/09 09:47:58
Oogie Wa W
Power ON! WOW are these things bright. Wired to one of the new Accessory switches on the dash.
0
2015/03/09 09:09:08
Oogie Wa W
Wiring ran, final test on a bench DC supply at 12V to make sure everything was intact.
0
2015/03/09 09:08:56
Oogie Wa W
There's a clear cover under the entire polished stainless piece, and it's got silicone all the way around to seal the assembly. The wiring hole got gooped, too. Then the metal piece pops on over that, and is secured with the screws.
0
2015/03/09 09:08:12
Oogie Wa W
Two threaded mounting holes and one wiring access hole each.
0
2015/03/09 09:07:55
Oogie Wa W
Hose clamped V-blocks to keep the drill aligned, as low as I could get them, canted outwards 15 degrees each.
0
2015/03/09 09:07:42
Oogie Wa W
More of a clamp, less skill and fewer tools needed.
0
2015/02/28 08:57:03
Oogie Wa W
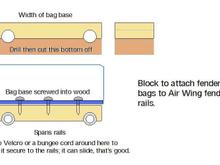
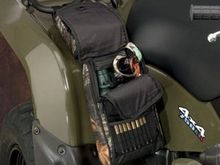
Shape block, drill holes for rails, cut off bottom so as to leave 'half of the holes' left. Screw bag base into block. Wrap with rope, velcro, bungee or something.
0
2015/02/28 08:55:29
Oogie Wa W
0
2015/02/27 19:42:54
Oogie Wa W
0
2015/02/23 22:05:56
Oogie Wa W
0
2015/02/23 22:05:29
Oogie Wa W
0
2015/01/11 20:35:54
Oogie Wa W
0
2015/01/11 20:35:50
Oogie Wa W
First
Page
8 of 9
Last
Go To
Page
1
2
3
4
5
6
7
8
9
8 of 9
Go To
GO
Go to page
of 9
pages
1
2
3
4
5
6
7
8
9
When you click on links to various merchants on this site and make a purchase, this can result in this site earning a commission. Affiliate programs and affiliations include, but are not limited to, the eBay Partner Network.
© 2026 MH Sub I, LLC dba Internet Brands