LOG IN
REGISTER
Forums
New Members & Forum Support
Welcome Area Only
Forum Issues
Harley Davidson Motorcycles
LiveWire
Touring Models
Dyna Glide Models
Softail Models
Sportster Models
Pan America
VRSC Models
Screamin Eagle CVO Models
Tri Glide, RG3 & Freewheeler Models
Harley-Davidson Street
Harley-Davidson X
HD Engines
Classic
Custom Models
Hacked, Conversions and Trailering
General Harley Davidson Chat
Harley Davidson Tech & Mechanical Forum
Detailing
General Topics/Tech Tips
Audio Systems
Primary/Transmission/Driveline/Clutch
Ignition/Tuner/ECM/Fuel Injection
Engine Mechanical Topics
Exhaust System Topics
Electrical/Lighting/Alarm
Oil Archive (no new posts)
Frame/Suspension/Front End/Brakes
Wheels/Tires
Blowers/Turbos/Nitrous Oxide
Carburetor Related
Powdercoat & Paint
Regional Events, Rides and Road Reports
Road Trips
HDForums Mascot
The Patriot Guard Riders
Members Meeting Members
National Events
"The Florida Crew"
"The Georgia Crew"
Northeast
Northeast Tri-State Area
Southeast
Great Lakes
Pacific
Pacific Northwest
Southwest
Mountain - Prairie
Canada
Europe
Other Countries
Sponsoring Vendors
Rockford Fosgate Audio
Parts Giant
J&M Motorcycle Audio
Fuel Moto / Jackpot Mufflers
Harley Davidson Classifieds
Vendor For Sale Classifieds
Vendor Announcements
Motorcycles For Sale
Motorcycle Audio-Buy/Sell/Trade
Want To Buy Motorcycles/Parts/Accessories
Motorcycle Parts For Sale-Misc. Parts
Stock Harley Take Offs
Gear and Other Items For Sale
Good Or Bad Shopping Experiences At HDF
Trades & Freebies (See Subforums for specific models)
Memorial Forums
In Memory Of...
On The Mend...
Prayer Requests
Team Forums
News
Marketplace
Vendor Directory
Become a Vendor
Member Marketplace
Vendor Marketplace
Site Store
Haynes Manuals
New Posts
Tools
Car Payment Calculator
Tire Rim Calculator
Recalls
Technical Service Bulletins (TSBs)
Members List
Live Feed
New Posts
How-Tos
Gallery
View Dark Mode
Please register or login to enable Dark Mode.
Log In
Register
Threads
Google
Threads
Posts
Advanced
Dark Mode
Please register or login to enable Dark Mode.
Log In
Forgot your Password?
By logging into your account, you agree to our
Terms of Use
and
Privacy Policy
, and to the use of cookies as described therein.
or
Login with Google
Login with Facebook
Recent
Commented
Albums
My Pictures
SE-254E Cams Install
O-Town D
June 4, 2013
10
0
Sort:
Most Recent
Default
Most Recent
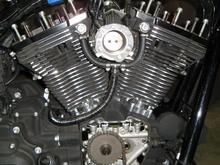
Reused OEM pushrods for cam swap, so drained removed tank to access top end. Also removed exhaust to access cam cover/cavity.
0
2013/06/04 11:18:09
O-Town D
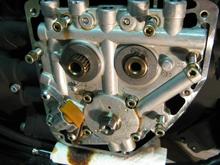
Close-up of TC96 roller lifters and anti-rotational pin (see screwdriver). With fairly low miles on motor decided not to change lifters during install.
0
2013/06/04 11:17:37
O-Town D
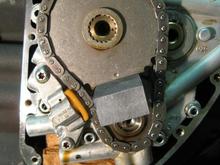
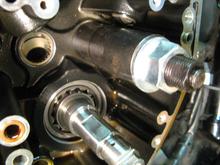
Cam cover removed (only a bit of oil is lost). Used a lock tool to remove cam/crank sprocket nuts (you can also leave motor in gear with rear wheel on floor to keep sprockets from turning).
0
2013/06/04 11:17:37
O-Town D
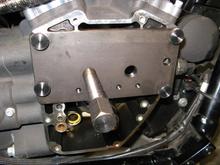
With both sprockets removed you can see large spacer washer on rear cam - purchased $8 bag of different thickness MoCo washers for new cam install. Remove 6 allen bolts that secure cam plate to motor (do not need to touch bolts on oil pump or chain tensioner). Now is a good time to inspect chain rubbing blocks, front and rear.
0
2013/06/04 11:17:37
O-Town D
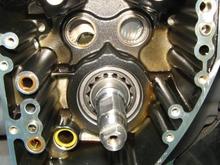
With cam support plate removed can now access cam bearings. Flywheel can be seen just behind bearings. Note oil passage o-rings on left - must change during install no matter how many miles on motor.
0
2013/06/04 11:16:43
O-Town D
I used a Heartland cam bearing puller/installer tool - great kit that came with new B168 bearings for about $120. Only glitch was that fingers on puller were spread a little too far apart to fit into bearings, so I gently tweaked the arms with a small hammer to close them up a little. Used a socket wrench on the large nut and pulled out the old bearings.
0
2013/06/04 11:16:43
O-Town D
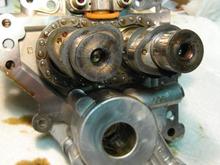
Here is pic of cam support plate with the old cams ready for swapping. Rear chain tensioner is at top, oil pump is at bottom.
0
2013/06/04 11:16:43
O-Town D
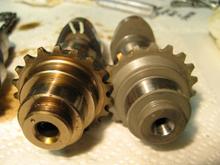
Here is a side-by side of the OEM cam (left) and the new SE-254E cam - note difference in cam lobes. Reassemble in reverse order, be sure to use asm'bly lube on cams and bearings, replace necessary gaskets and o-rings, and be sure to torque fasteners to proper values.
0
2013/06/04 11:15:04
O-Town D
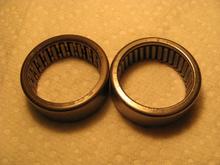
Side-by-side pic of old (left) and new cam bearings. Note number of needle rollers and cage.
0
2013/06/04 11:15:04
O-Town D
After the old bearings are removed, use the Heartland tool to install the new B168 bearings. The installer is designed to press the new bearings at the correct depth - no measuring is necessary. Easy! Be sure to put a little asm'bly lube in the new bearings.
0
2013/06/04 11:15:04
O-Town D
When you click on links to various merchants on this site and make a purchase, this can result in this site earning a commission. Affiliate programs and affiliations include, but are not limited to, the eBay Partner Network.
© 2026 MH Sub I, LLC dba Internet Brands