
HOW-TO Starter Clutch Replacement
#1
 08-06-2014, 11:06 PM

I have sufferd long enough with the "Hot Start Issue found in other threads". I have an 08 Street Glide with the SE 110 . I have installed the Screaming Eagle compensator which has helped, however I still find that every few starts of the bike the starter sounds like its tearing the engine appart, for the most part its a bit embarassing, so its time to replace the start gear. I decided to purchase the unit from All-***** Part Number: 79-2104 OEM Reference: 31681-07. I had the part deliverd for basically $100. Looking at the job it should be easy enough to tackle.
I put the bike on my shop lift as I am getting to old to sit on the floor, sigh I do usually end oup there eventually.
Working on the Left Side of the Bike:
Removed the sadle bag and the fuze cover, then removed the large "master fiuse"
Working from the RIGHT side of the bike.
I unplugged the exhaust sensor and moved the wire out of the way.
Unclipped the small wire that goes to the starter solenoid and moved wire out of the way.
Unbolted the power wire from the starter and moved wire out of the way.
Using an allen key, (luckily i have one attached to a socket aleary) I removed the 2 bolts holding the starter on.
There is an exhaust stabiliser bracket on my bike that attaces to these two bolts as well, I removed that bracket.
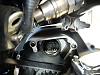
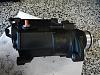
Thats it, I then carefully moved the starter out
The next Photo shows the two spacers that you need to esnure don't get lsot, they are just hollow tubes pushed into the space where the starter bolts go:
Once the starter is out, one needs to remove the end cone that huses the starter drive gear.
Remove chrome cover and its holding bracket (note the way it came appart as the bracket needs to fit one way only.
You might want to drag an exacto blade aorund the styarter cone joint to cut the paint or it will break away in chunks.
Remove the 2 Philips screws/bolts (I used a socket, much easier than trying to torque them out with a screwdriver)
Remove the 2 nuts that hold the starter motor cover on. BE CARFULL not to seprate the motor cover, you just want to seperate the starter cone to get at your replacement parts.
There is a small gear in the cone which you can put asside, when you do you will probbaly have the 5 needle bearings drop out of the plastic cage, no worries, just set them asside as well.
The old starter clutch gearset will push out.
Clean the cone and all the pices very well.
Remove the old o-rings, ther are 2 one inside the cone and one outside of it.
Once everything is clean,
Attachment 393332
I put some o-ring grease on the rings and put the outer and inner one in NOTE the inner one made me laugh, it was a royal pain to get it all inside the groove, it seemed too big, but patience and persitence had it in place.
Put some decent crease on the gear parts, push the new clutch assembly inplace, ensure its all the way down, it probably issent the first time, you must push it in till the new bearuing pushes past the new oring. (spin it, it should be free without binding and should not wobble, if it does push it a little harder.
Put your clean and lubbed needle bearings and its gear back in place.
Once your happy with the assembly, attache the cone back to the starter body, DONT FORCE anything and be sure parts are alligned, it will be a little fiddly to keep the starter motor cover from slipping off but you can do it.
Carefully bolt the cone together and the long bolts on the starter motor as well.
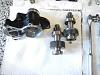
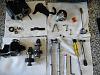
Here is a shot of the stuff I removed and tools I was using:
At this time I cleaned the starter of my greasy fingers and such. i have a can of "flat black" paint so I used a small paintbrush to seal up the cone to starter joint and to hide the spots where the paint came away. The things looks brand new.
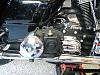
I reversed the removal procedure, it slipped nicley into place, bolted it all up evenly, replaced all the wires and the exchaust bracket, (Mine was broken so i welded it back together at this time). Put the fuse and everything bacl together and test started the bike 5 times, it certainly is much much better. See photo next screen:
I put the bike on my shop lift as I am getting to old to sit on the floor, sigh I do usually end oup there eventually.
Working on the Left Side of the Bike:
Removed the sadle bag and the fuze cover, then removed the large "master fiuse"
Working from the RIGHT side of the bike.
I unplugged the exhaust sensor and moved the wire out of the way.
Unclipped the small wire that goes to the starter solenoid and moved wire out of the way.
Unbolted the power wire from the starter and moved wire out of the way.
Using an allen key, (luckily i have one attached to a socket aleary) I removed the 2 bolts holding the starter on.
There is an exhaust stabiliser bracket on my bike that attaces to these two bolts as well, I removed that bracket.
Thats it, I then carefully moved the starter out

The next Photo shows the two spacers that you need to esnure don't get lsot, they are just hollow tubes pushed into the space where the starter bolts go:

Once the starter is out, one needs to remove the end cone that huses the starter drive gear.
Remove chrome cover and its holding bracket (note the way it came appart as the bracket needs to fit one way only.
You might want to drag an exacto blade aorund the styarter cone joint to cut the paint or it will break away in chunks.
Remove the 2 Philips screws/bolts (I used a socket, much easier than trying to torque them out with a screwdriver)
Remove the 2 nuts that hold the starter motor cover on. BE CARFULL not to seprate the motor cover, you just want to seperate the starter cone to get at your replacement parts.

There is a small gear in the cone which you can put asside, when you do you will probbaly have the 5 needle bearings drop out of the plastic cage, no worries, just set them asside as well.
The old starter clutch gearset will push out.
Clean the cone and all the pices very well.
Remove the old o-rings, ther are 2 one inside the cone and one outside of it.
Once everything is clean,
Attachment 393332
I put some o-ring grease on the rings and put the outer and inner one in NOTE the inner one made me laugh, it was a royal pain to get it all inside the groove, it seemed too big, but patience and persitence had it in place.
Put some decent crease on the gear parts, push the new clutch assembly inplace, ensure its all the way down, it probably issent the first time, you must push it in till the new bearuing pushes past the new oring. (spin it, it should be free without binding and should not wobble, if it does push it a little harder.
Put your clean and lubbed needle bearings and its gear back in place.
Once your happy with the assembly, attache the cone back to the starter body, DONT FORCE anything and be sure parts are alligned, it will be a little fiddly to keep the starter motor cover from slipping off but you can do it.
Carefully bolt the cone together and the long bolts on the starter motor as well.
Here is a shot of the stuff I removed and tools I was using:

At this time I cleaned the starter of my greasy fingers and such. i have a can of "flat black" paint so I used a small paintbrush to seal up the cone to starter joint and to hide the spots where the paint came away. The things looks brand new.

I reversed the removal procedure, it slipped nicley into place, bolted it all up evenly, replaced all the wires and the exchaust bracket, (Mine was broken so i welded it back together at this time). Put the fuse and everything bacl together and test started the bike 5 times, it certainly is much much better. See photo next screen:


#3
08-07-2014, 12:18 AM
#6
08-07-2014, 05:46 PM
#7
09-08-2019, 12:34 PM

Trending Topics
#8
09-08-2019, 03:58 PM

Wondering if this is partly my problem as well. It always starts, but each time sounds like it BARELY wants to turn the engine over. Almost like the battery is just about out of cranking amps. Replaced the batter this spring since the old one was just about done anyway. All the connections tight, etc. But every time it always seems like it's not going to start and then does. Extremely embarrassing since people around me will all give the same look "battery dead?".
#9
09-08-2019, 08:50 PM

Thread
Thread Starter
Forum
Replies
Last Post