


* HOW TO * under fifty bux *
Road Captain
Joined: Jun 2006
Posts: 548
Likes: 21
From: 11th State 518
Just got it back today looks sharp as hell.Great job Mud.Mud not even close to the backwoods(wish i was in the woods) about 10 miles north of Albany.State capital of NY.Thanks again.
ORIGINAL: mudpuddle
Yeah Skip, I really like this black one.
It's headed for the backwoods of UpState New York
if I read the Google map correctly.
Send yours. You know where I am.
mud

ORIGINAL: Trotter
Mud..........This one is really good.... I want one.... LOL...
Mud..........This one is really good.... I want one.... LOL...
It's headed for the backwoods of UpState New York
if I read the Google map correctly.
Send yours. You know where I am.
mud
May our Moderator Rest in Peace
Joined: Sep 2006
Posts: 11,386
Likes: 35
From: Rochester, NY
ORIGINAL: x2lee
Something we overlooked in the thought process that makes it tons easier and makes my #2 diagram work again, the ball dont have to be steel, hardened plastic is all HD used. Another thought... if the blade is dangling you need to grind at least a 3 1/2 hand hold in the blade just so you could use it.
Something we overlooked in the thought process that makes it tons easier and makes my #2 diagram work again, the ball dont have to be steel, hardened plastic is all HD used. Another thought... if the blade is dangling you need to grind at least a 3 1/2 hand hold in the blade just so you could use it.
On the other hand anylon ball would work, maybe the ball part of acheck valve. Although it mighttake a bunch of lookingto find one the right size.
Thread Starter
|
Club Member
Joined: May 2006
Posts: 14,564
Likes: 9,225
From: the 50s & the 60s

ORIGINAL: Citoriplus
though it would be easier to find a steel ball bearing the right size than
a plastic one.
though it would be easier to find a steel ball bearing the right size than
a plastic one.
.
Prototyping this today, checked deep in the lost files,
and I found a package of lugNuts.
.

.
Cut the end of one off,
welded it to a short scrap of 1/4 inch round stock.
.

.
Threaded the other end and attached this to a blue finger
from the body parts bin.
.

.

.
Light reflects funny off the oil dripping.
I'll do a step by step when I refine this to a finished piece.
.

.
.
Last edited by mud; Jan 21, 2020 at 07:58 AM.
ORIGINAL: mudpuddle
Prototyping this today, checked deepin the lost files,
and I found a package of lugNuts.
Cut the end of one off,
welded it to a short scrap of 1/4 inch round stock.
Threaded the other end and attached this to a blue finger
from the body parts bin.
Light reflects funny off the oil dripping.
I'll do a step by step when I refine this to a finished piece.
mud........

ORIGINAL: Citoriplus
though it would be easier to find a steel ball bearing the right size thana plastic one.
though it would be easier to find a steel ball bearing the right size thana plastic one.
and I found a package of lugNuts.
Cut the end of one off,
welded it to a short scrap of 1/4 inch round stock.
Threaded the other end and attached this to a blue finger
from the body parts bin.
Light reflects funny off the oil dripping.
I'll do a step by step when I refine this to a finished piece.
mud........
May our Moderator Rest in Peace
Joined: Sep 2006
Posts: 11,386
Likes: 35
From: Rochester, NY
ORIGINAL: mudpuddle
Prototyping this today, checked deepin the lost files,
and I found a package of lugNuts.
Cut the end of one off,
welded it to a short scrap of 1/4 inch round stock.
Threaded the other end and attached this to a blue finger
from the body parts bin.
mud........

ORIGINAL: Citoriplus
though it would be easier to find a steel ball bearing the right size thana plastic one.
though it would be easier to find a steel ball bearing the right size thana plastic one.
and I found a package of lugNuts.
Cut the end of one off,
welded it to a short scrap of 1/4 inch round stock.
Threaded the other end and attached this to a blue finger
from the body parts bin.
mud........
Road Master
Joined: Feb 2007
Posts: 773
Likes: 1
From: NZ but live in Dorset, England
ORIGINAL: mudpuddle
Part One of building seat for the mudSickle.
Producing the "pan" to fit for stock frame, custom fender.
mud..............
Part One of building seat for the mudSickle.
Producing the "pan" to fit for stock frame, custom fender.
mud..............
... will be copying your technique ... prob next winter now as I'm between workshops ...
Please keep this one updated ... you doing the stitching too ?
Mat
finished my leather wrapping on the forks today and decided to do a couple other things with the lace i had left over. gave it the 'rough around the edges look' as Mud puts it. seems we have similar taste cuz i think it looks much better than the uniform lace did also. going around the QR hardware was kinda tricky and I'm not sure I'm happy with that part.
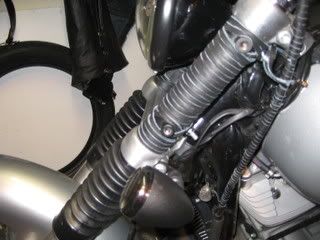
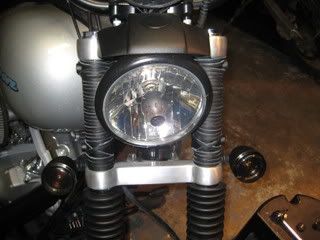
did the clutch cable down to the adjuster. i may do throttle cables also
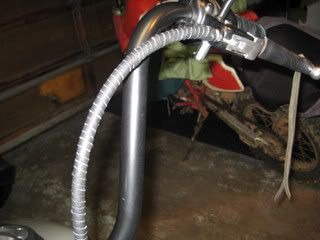
i used a tubing bender to straighten out my brake line to fit the mini apes ( which could be another 'under 50 bux' post) but could only use 1 of the 2 clamps that hold it to the trees. so i used some of the leather to make my own.

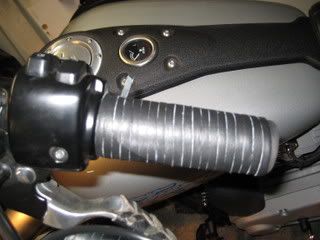
i already posted pix of the grips and shift linkage but they go with the theme of things so here they are again

did the clutch cable down to the adjuster. i may do throttle cables also
i used a tubing bender to straighten out my brake line to fit the mini apes ( which could be another 'under 50 bux' post) but could only use 1 of the 2 clamps that hold it to the trees. so i used some of the leather to make my own.
i already posted pix of the grips and shift linkage but they go with the theme of things so here they are again
HD Forum Stories
The Best of Harley-Davidson for Lifelong Riders

6 Weirdest Harley-Davidsons Ever Sold to the Public
Verdad Gallardo
7 Times Harley-Davidson Chucked Tradition Out the Window
Verdad Gallardo
7 Surprising Harley-Davidson Products that Are Not Motorcycles
Verdad Gallardo
8 Best Harley-Davidson Motorcycles Ever
Pouria Savadkouei
10 Worst Harley-Davidson Motorcycles Ever
Pouria Savadkouei
Killer Custom's Jail Break Is The Breakout That Refused to Blend In
Verdad Gallardo
Crazy Bunderbike Build Looks Amazing, But Is It Impossible to Ride?
Verdad Gallardo
Harley-Davidson Reveals Super Cool Cafe Racer Concept
Verdad Gallardo
Engraved Rebellion: Inside Bundnerbike's Glam Rock II
Verdad GallardoThread Starter
|
Club Member
Joined: May 2006
Posts: 14,564
Likes: 9,225
From: the 50s & the 60s
ORIGINAL: XKROME
finished my leather wrapping on the forks today and decided to do a couple other things with the lace i had left over. gave it the 'rough around the edges look' as Mud puts it. seems we have similar taste cuz i think it looks much better than the uniform lace did also. going around the QR hardware was kinda tricky and I'm not sure I'm happy with that part.
finished my leather wrapping on the forks today and decided to do a couple other things with the lace i had left over. gave it the 'rough around the edges look' as Mud puts it. seems we have similar taste cuz i think it looks much better than the uniform lace did also. going around the QR hardware was kinda tricky and I'm not sure I'm happy with that part.
I like this much better than the a.b.c.1.2.3. uniform wrap.
I would imagine it all looks even better face to face out in the light of day.
mud
Last edited by mud; Aug 16, 2008 at 10:50 AM.
Thread Starter
|
Club Member
Joined: May 2006
Posts: 14,564
Likes: 9,225
From: the 50s & the 60s
ORIGINAL: matkiwi
Mud ... really impressive ...
I've tried this and failed as the result was way too uncomfortable
... will be copying your technique ...
prob next winter now as I'm between workshops ...
Please keep this one updated ... you doing the stitching too ?
Mat
ORIGINAL: mudpuddle
Part One of building seat for the mudSickle.
Producing the "pan" to fit for stock frame, custom fender.
mud..............
Part One of building seat for the mudSickle.
Producing the "pan" to fit for stock frame, custom fender.
mud..............
I've tried this and failed as the result was way too uncomfortable
... will be copying your technique ...
prob next winter now as I'm between workshops ...
Please keep this one updated ... you doing the stitching too ?
Mat
Apparently it was not to your satisfaction.
I may or may not do the stiching and all.
I'm sure I could,
but, I would probably be wise to let someone else have at it.
We'll see.
mud
Last edited by mud; Aug 16, 2008 at 10:50 AM.