


* HOW TO * under fifty bux *
Thread Starter
|
Club Member
Joined: May 2006
Posts: 14,564
Likes: 9,225
From: the 50s & the 60s

ORIGINAL: BluBob
I went with much the same setup as others, but used the screw holding the battery cover down as a mounting point for a flattened shelving bracket. Ran the wiring through under the seat. I had to cut and splice to get the wires out of the shield where they run halfway up the tank. This gave me enough length to get it under the battery cover. It is much louder, maybe because of no cover?

I went with much the same setup as others, but used the screw holding the battery cover down as a mounting point for a flattened shelving bracket. Ran the wiring through under the seat. I had to cut and splice to get the wires out of the shield where they run halfway up the tank. This gave me enough length to get it under the battery cover. It is much louder, maybe because of no cover?
Good job.
mud
Last edited by mud; Aug 19, 2008 at 10:20 AM.
Thread Starter
|
Club Member
Joined: May 2006
Posts: 14,564
Likes: 9,225
From: the 50s & the 60s
ORIGINAL: Dawg Rider
Some spray paint ideas: https://www.hdforums.com/m_3260610/tm.htm
I'll describe the super quick, easy,andcheap Lowe's brand adjustabletank lift as soon as I get a chance.
Some spray paint ideas: https://www.hdforums.com/m_3260610/tm.htm
I'll describe the super quick, easy,andcheap Lowe's brand adjustabletank lift as soon as I get a chance.
Your machine is lookin really good.
mud
Last edited by mud; Aug 19, 2008 at 10:20 AM.
Thread Starter
|
Club Member
Joined: May 2006
Posts: 14,564
Likes: 9,225
From: the 50s & the 60s
Way to go dean.
That was easy once you put your engineers eyeball on it.
This will help out a lot of the lowered bikes.
Bookmark it.
mud
That was easy once you put your engineers eyeball on it.
This will help out a lot of the lowered bikes.
Bookmark it.
mud
ORIGINAL: deanz
Not sure if this covered...
After lowering the rear of my FatBob, using the jiffy stand was a bit scary, the bike had very little weight on the stand and I often feared the wind could blow it over.
Heating and bending can remove the temper and make the stand weak, so the next best thing, by removing an 1/8" from the top of resting tab I was able to get the bike to "lean"
over about an inch and now feels as if there could be weight on the stand.
I blocked the frame so I could move the stand back and forth.
Verified the amount of material to remove, and made sure enough was left to hit the "stop" when extending the stand.
Using a cut off disk remove a uniform amount across the top of the "resting Tab", Return bike to floor and test.
Last edited by mud; Aug 19, 2008 at 10:21 AM.
Road Warrior
Joined: Jul 2007
Posts: 1,443
Likes: 3
From: Sasser, GA
Another tank lift (about 1.5" is what I was after)...really no different than some others that have been done, except that it takes even less work because I used two of these (the flat bracket part):
http://i211.photobucket.com/albums/b...on/Dogs048.jpg
The holes are already there, so no drilling required, plus they are slotted a bit so you actually have some adjustability if you want it (I didn't as Iput them all the way down). I used short black hex type socket head cap screws with stainless nylon lock nuts. In this pic you can see the raw brackets when I put them on for a test run to see how it would look/work.
http://i211.photobucket.com/albums/b...on/Dogs032.jpg
I took them off and ran down the street to an indy guy's shop that I know and used his bench grinder to round and smooth the edges (No shop equipment atmy daughter's house in town where I keep the bike). Then all it needed was some sanding and painting (I was already painting some other stuff). When I put them back on, I decided to go inside the tank tabs this time.The finished product ispretty much invisible, and feels very solid.Total cost wasless than $5 (since I had the paint already), it took very little time, and the grinder was the only thing Ineeded that wasn't in my truck tool box.
http://i211.photobucket.com/albums/b...on/Dogs044.jpg
http://i211.photobucket.com/albums/b.../Dogs046-1.jpg
http://i211.photobucket.com/albums/b.../Dogs045-1.jpg
Finished product from a distance:
Road Master
Joined: Mar 2008
Posts: 1,070
Likes: 0
From: Spokane, WA
ORIGINAL: Beefy
I saw this on a bike yesterday and did it this morning. After putting the HD wing kit on I really didn't like how it made the front end look, and I like the closer fit of Kuriyakan but also didn't want a clamp on my tube. So by chance, unless someone already posted this and I missed it, is my no or little dough blinker mod.
First, the wing.

The ball receptacle from the handle bar turn signal. Everyone has at least one, and I got a used one for free from a local shop. They can be painted black and bought chrome. You just have to drill it out a little.

This is mounted straight, but there is enough room to angle it up or down some. I angled mine up.

This show's the difference.

Both mounted.

I think it looks good with the headlamp.

And finished. About an hour or so without breaks.

I saw this on a bike yesterday and did it this morning. After putting the HD wing kit on I really didn't like how it made the front end look, and I like the closer fit of Kuriyakan but also didn't want a clamp on my tube. So by chance, unless someone already posted this and I missed it, is my no or little dough blinker mod.
First, the wing.
The ball receptacle from the handle bar turn signal. Everyone has at least one, and I got a used one for free from a local shop. They can be painted black and bought chrome. You just have to drill it out a little.
This is mounted straight, but there is enough room to angle it up or down some. I angled mine up.
This show's the difference.
Both mounted.
I think it looks good with the headlamp.
And finished. About an hour or so without breaks.
Thread Starter
|
Club Member
Joined: May 2006
Posts: 14,564
Likes: 9,225
From: the 50s & the 60s
Nice job Dawg.
mud

mud
ORIGINAL: Dawg Rider
Another tank lift (about 1.5" is what I was after)...really no different than some others that have been done, except that it takes even less work because I used two of these (the flat bracket part):
http://i211.photobucket.com/albums/b...on/Dogs048.jpg
The holes are already there, so no drilling required, plus they are slotted a bit so you actually have some adjustability if you want it (I didn't as Iput them all the way down). I used short black hex type socket head cap screws with stainless nylon lock nuts. In this pic you can see the raw brackets when I put them on for a test run to see how it would look/work.
http://i211.photobucket.com/albums/b...on/Dogs032.jpg
I took them off and ran down the street to an indy guy's shop that I know and used his bench grinder to round and smooth the edges (No shop equipment atmy daughter's house in town where I keep the bike). Then all it needed was some sanding and painting (I was already painting some other stuff). When I put them back on, I decided to go inside the tank tabs this time.The finished product ispretty much invisible, and feels very solid.Total cost wasless than $5 (since I had the paint already), it took very little time, and the grinder was the only thing Ineeded that wasn't in my truck tool box.
http://i211.photobucket.com/albums/b...on/Dogs044.jpg
http://i211.photobucket.com/albums/b.../Dogs046-1.jpg
http://i211.photobucket.com/albums/b.../Dogs045-1.jpg
Finished product from a distance:
Thread Starter
|
Club Member
Joined: May 2006
Posts: 14,564
Likes: 9,225
From: the 50s & the 60s
ORIGINAL: CSA
Thanks Beefy! Worked perfect!
Thanks Beefy! Worked perfect!
Real good to see folks taking advantage of some of the ideas here.
Beefy and XKROME both offered up this technique.
It's a good one.
mud
Last edited by mud; Aug 19, 2008 at 10:22 AM.
Road Warrior
Joined: Jul 2007
Posts: 1,443
Likes: 3
From: Sasser, GA
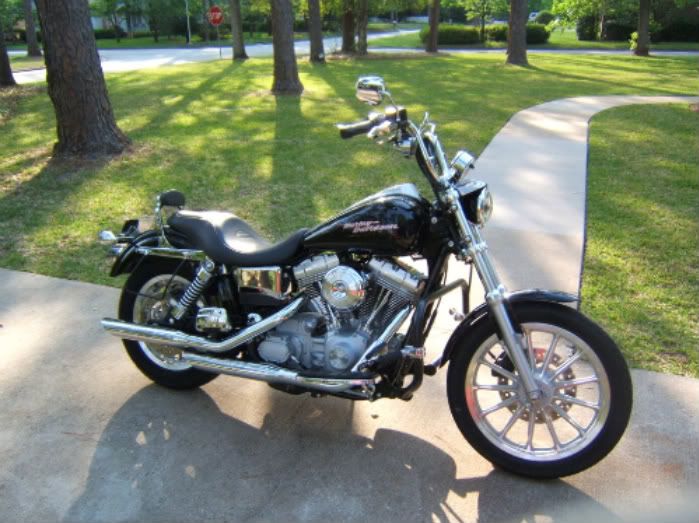
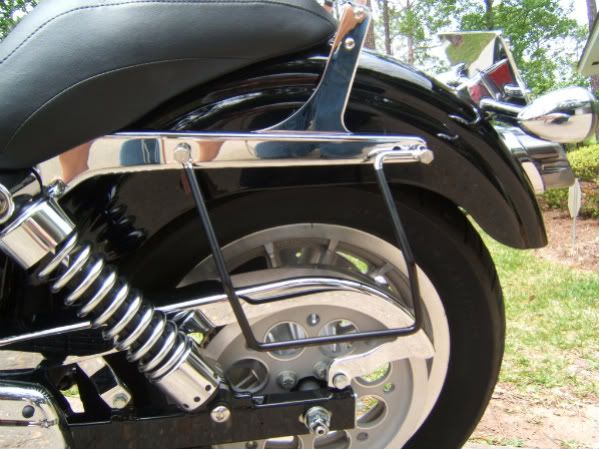
I know most don't have throwover bags these days, but for those that do and use bag supports, here's a couple of closer shots of how I painted them. It really hides them well in person. One day I'll switch to detachables, but it's hard to spend the dough when these work so well for me (especially now that they are in stealth mode).

HD Forum Stories
The Best of Harley-Davidson for Lifelong Riders

6 Weirdest Harley-Davidsons Ever Sold to the Public
Verdad Gallardo
7 Times Harley-Davidson Chucked Tradition Out the Window
Verdad Gallardo
7 Surprising Harley-Davidson Products that Are Not Motorcycles
Verdad Gallardo
8 Best Harley-Davidson Motorcycles Ever
Pouria Savadkouei
10 Worst Harley-Davidson Motorcycles Ever
Pouria Savadkouei
Killer Custom's Jail Break Is The Breakout That Refused to Blend In
Verdad Gallardo
Crazy Bunderbike Build Looks Amazing, But Is It Impossible to Ride?
Verdad Gallardo
Harley-Davidson Reveals Super Cool Cafe Racer Concept
Verdad Gallardo
Engraved Rebellion: Inside Bundnerbike's Glam Rock II
Verdad Gallardo
Intermediate
Joined: Oct 2007
Posts: 45
Likes: 0
From:
Just wondering how you keep can on and how you could reuse it for other filters? Cool idea I would use either beast light or miller lite maybe a tallboy can would wrap around, doesn't matter still cool idea. Any help would be appreciated.
Road Master

Joined: Jan 2006
Posts: 1,154
Likes: 3
From: Colorado Springs
ORIGINAL: Dawg Rider
Another tank lift (about 1.5" is what I was after)...really no different than some others that have been done, except that it takes even less work because I used two of these (the flat bracket part):
http://i211.photobucket.com/albums/b...on/Dogs048.jpg
The holes are already there, so no drilling required, plus they are slotted a bit so you actually have some adjustability if you want it (I didn't as Iput them all the way down). I used short black hex type socket head cap screws with stainless nylon lock nuts. In this pic you can see the raw brackets when I put them on for a test run to see how it would look/work.
http://i211.photobucket.com/albums/b...on/Dogs032.jpg
I took them off and ran down the street to an indy guy's shop that I know and used his bench grinder to round and smooth the edges (No shop equipment atmy daughter's house in town where I keep the bike). Then all it needed was some sanding and painting (I was already painting some other stuff). When I put them back on, I decided to go inside the tank tabs this time.The finished product ispretty much invisible, and feels very solid.Total cost wasless than $5 (since I had the paint already), it took very little time, and the grinder was the only thing Ineeded that wasn't in my truck tool box.
http://i211.photobucket.com/albums/b...on/Dogs044.jpg
http://i211.photobucket.com/albums/b.../Dogs046-1.jpg
http://i211.photobucket.com/albums/b.../Dogs045-1.jpg
Finished product from a distance:
Another tank lift (about 1.5" is what I was after)...really no different than some others that have been done, except that it takes even less work because I used two of these (the flat bracket part):
http://i211.photobucket.com/albums/b...on/Dogs048.jpg
The holes are already there, so no drilling required, plus they are slotted a bit so you actually have some adjustability if you want it (I didn't as Iput them all the way down). I used short black hex type socket head cap screws with stainless nylon lock nuts. In this pic you can see the raw brackets when I put them on for a test run to see how it would look/work.
http://i211.photobucket.com/albums/b...on/Dogs032.jpg
I took them off and ran down the street to an indy guy's shop that I know and used his bench grinder to round and smooth the edges (No shop equipment atmy daughter's house in town where I keep the bike). Then all it needed was some sanding and painting (I was already painting some other stuff). When I put them back on, I decided to go inside the tank tabs this time.The finished product ispretty much invisible, and feels very solid.Total cost wasless than $5 (since I had the paint already), it took very little time, and the grinder was the only thing Ineeded that wasn't in my truck tool box.
http://i211.photobucket.com/albums/b...on/Dogs044.jpg
http://i211.photobucket.com/albums/b.../Dogs046-1.jpg
http://i211.photobucket.com/albums/b.../Dogs045-1.jpg
Finished product from a distance: