


* HOW TO * under fifty bux *
Advanced
Joined: Mar 2008
Posts: 66
Likes: 8
From: Northern New York
I've made a few homemade improvements on my '87 FXR that I bought a couple of months ago. Everything was made with scrap metal that I scrounged from a dumpster.
I made a plate made out of aluminum diamond plate that goes under the right side cover that I plan to use as a kickstand plate (for hot asphalt and gravel). Right now it can't be taken off without a wrench, but I plan to build another that only has one hole for a stud and knurled nut. The rear of the new plate will be 0.25" higher to flow better with the side cover better.
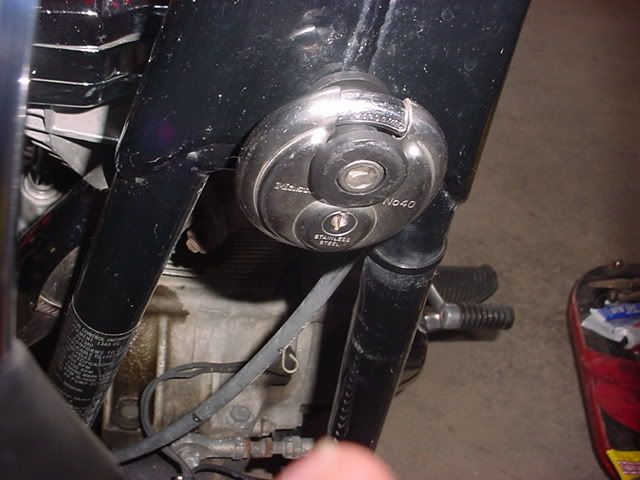
I made a bracket that my fork lock fits on while riding. There's a 3/8"-16 threaded hole from the factory on the neck of the frame that the bolt for the bracket fits. I want to shorten the bracket to look better when the lock is off.

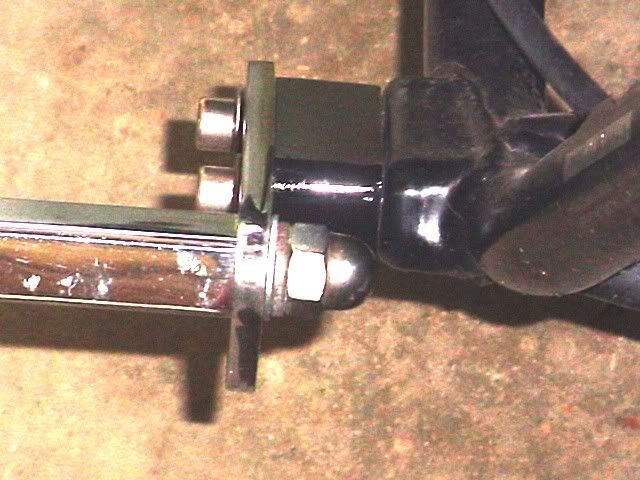
My highway peg on the right side was not long enough because of the air filter (I had to arch my leg around to fit the peg). I could have bought extended pegs, but built a one inch spacer block to go behind the highway peg bracket instead.
I also shorted the front turn signal stalks to one inch:

and made a backing plate from thin aluminum diamond plate for the license tag (New York license plates are very flimsy):

Dave
I made a plate made out of aluminum diamond plate that goes under the right side cover that I plan to use as a kickstand plate (for hot asphalt and gravel). Right now it can't be taken off without a wrench, but I plan to build another that only has one hole for a stud and knurled nut. The rear of the new plate will be 0.25" higher to flow better with the side cover better.
I made a bracket that my fork lock fits on while riding. There's a 3/8"-16 threaded hole from the factory on the neck of the frame that the bolt for the bracket fits. I want to shorten the bracket to look better when the lock is off.
My highway peg on the right side was not long enough because of the air filter (I had to arch my leg around to fit the peg). I could have bought extended pegs, but built a one inch spacer block to go behind the highway peg bracket instead.
I also shorted the front turn signal stalks to one inch:
and made a backing plate from thin aluminum diamond plate for the license tag (New York license plates are very flimsy):
Dave
Last edited by chengdave2003; Mar 3, 2010 at 08:43 AM.
Road Warrior
Joined: Jul 2005
Posts: 1,655
Likes: 17
From: The Frozen Tundra
Great homemade mods Dave, a great way to come into the forum!
The trick where you mounted the lock is a great alternative way to use the engine guard mounting hole, and diamond plate kicks *** in my book.
The trick where you mounted the lock is a great alternative way to use the engine guard mounting hole, and diamond plate kicks *** in my book.
May our Moderator Rest in Peace
Joined: Sep 2006
Posts: 11,386
Likes: 35
From: Rochester, NY
Dave,
Nice work, but I have a suggestion. If you edit that posting to put [IMG] in front of the links and [/IMG] after it it will put the pics into the posting instead of just the link.
Nice work, but I have a suggestion. If you edit that posting to put [IMG] in front of the links and [/IMG] after it it will put the pics into the posting instead of just the link.
Advanced
Joined: Mar 2008
Posts: 66
Likes: 8
From: Northern New York
Thank you...I was trying to figure that out....
Dave
Dave
ORIGINAL: Citoriplus
Dave,
Nice work, but I have a suggestion. If you edit that posting to put [IMG] in front of the links and [/IMG] after it it will put the pics into the posting instead of just the link.
Dave,
Nice work, but I have a suggestion. If you edit that posting to put [IMG] in front of the links and [/IMG] after it it will put the pics into the posting instead of just the link.
Road Master
Joined: Jun 2007
Posts: 976
Likes: 1
From: Sutherlin, Oregon
I will add a small one for those who keep their key on the alarm FOB. I got tired of hearing it bounce off the frame and eventually making its mark on the frame. So I glued a magnet to the back of the FOB.
 .
.
WOW the bike is dirty.
.WOW the bike is dirty.
Extreme HDF Member
Joined: Sep 2006
Posts: 10,114
Likes: 29
From: Vancouver B.C. Canada
My $35 camera handlebar mount
I was looking for a camera/camcorder mount for a while, they are really expensive to buy. I found $5 camera mount mod online but it looks kind of cheap, click here for the link. I decide to make my own, order a 1" chrome handlebar clamp from Kuryakyn part number 1420, bought a optex car window 2-way panhead camera mount from a local store, I bolted the camera mount right onto the clamp, it costs me $35 in total. If you have a light weight camcorder, it may also work. I will go capture some videos with my digital camera this weekend, stay tuned.
WARNING: Although the camera stays tight, I highly recommend using safety tie down.
Click here to view demo video
Reading More Posting Less
Joined: Jan 2007
Posts: 1,658
Likes: 3
From: NorNev

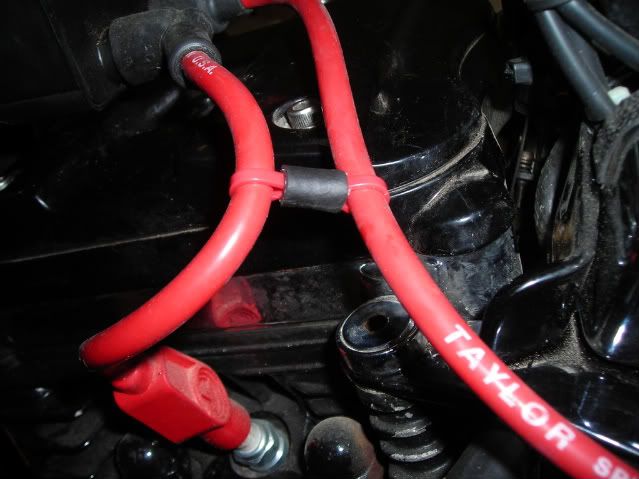
I haven't seen this one on here yet. I wish I could take credit for it but I stole it for The Horse BC. Cheap alterative to the billet clamps and other bought stuff. Use zip ties and tuding to create your own spacers. Turns out to be shock mounted too.


Mud, if it doesn't belong feel free to delete.
Mud, if it doesn't belong feel free to delete.
May our Moderator Rest in Peace
Joined: Sep 2006
Posts: 11,386
Likes: 35
From: Rochester, NY
ORIGINAL: icecaps
Mud, if it doesn't belong feel free to delete.
Mud, if it doesn't belong feel free to delete.
HD Forum Stories
The Best of Harley-Davidson for Lifelong Riders

7 Surprising Harley-Davidson Products that Are Not Motorcycles
Verdad Gallardo
8 Best Harley-Davidson Motorcycles Ever
Pouria Savadkouei
10 Worst Harley-Davidson Motorcycles Ever
Pouria Savadkouei
Killer Custom's Jail Break Is The Breakout That Refused to Blend In
Verdad Gallardo
Crazy Bunderbike Build Looks Amazing, But Is It Impossible to Ride?
Verdad Gallardo
Harley-Davidson Reveals Super Cool Cafe Racer Concept
Verdad Gallardo
Engraved Rebellion: Inside Bundnerbike's Glam Rock II
Verdad Gallardo
10 Motorcycles You Should Never Buy
Joe Kucinski
10 Things Harley-Davidson Needs to Fix in 2026
Verdad GallardoThread Starter
|
Club Member
Joined: May 2006
Posts: 14,564
Likes: 9,225
From: the 50s & the 60s

ORIGINAL: icecaps
I haven't seen this one on here yet.
I wish I could take credit for it but I stole it for The Horse BC.
Cheap alterative to the billet clamps and other bought stuff.
Use zip ties and tuding to create your own spacers.
Turns out to be shock mounted too.
Mud, if it doesn't belong feel free to delete.
I haven't seen this one on here yet.
I wish I could take credit for it but I stole it for The Horse BC.
Cheap alterative to the billet clamps and other bought stuff.
Use zip ties and tuding to create your own spacers.
Turns out to be shock mounted too.
Mud, if it doesn't belong feel free to delete.
A perfect match fot the Under 50 ice. Thanks.
These kinda trix are good for sickles, cars, computers, etc etc.
No way I would delete this.
Might edit - Use zip ties and tuding
to
Use zip ties and tubing
What kinda strap is that in the last pic on the gaiters??
mud
Thread Starter
|
Club Member
Joined: May 2006
Posts: 14,564
Likes: 9,225
From: the 50s & the 60s
ORIGINAL: Citoriplus
If he does, can't think of why, or even if he doesn't would you be so kind as to copy it and repost it over in theDIY thread pinned to the top of the Softail section? I think its a slick idea, especially using it on high voltage plug wires and as a shock stand off. I have been looking for something like that to tie off my clutch line, thanks for the tip.
ORIGINAL: icecaps
Mud, if it doesn't belong feel free to delete.
Mud, if it doesn't belong feel free to delete.
This is a universal type of shortcut that cain't be beat.
There is a way to do this without the tubing,
but you don't get the shock insulating effect.
(I don't have pix)
mud
Last edited by mud; Aug 20, 2008 at 09:16 PM.