When you click on links to various merchants on this site and make a purchase, this can result in this site earning a commission. Affiliate programs and affiliations include, but are not limited to, the eBay Partner Network.
Below, that is a one and three quarter inch block of wood
supporting the tank while I proceed.
With this type of lift, (tBone style), your can't go much lower,
maybe down to one and a half.
.
.
Below, I started the fabrication with a length of one inch by eighth flat stock.
I will trim it down to three quarters wide.
Also shown here is a three inch long piece of
drawn over mandrel tubing, half inch OD, 5/16 ID.
The flat stock has been hammered into shape in the vise,
2 and seven eighth inch inside (roughly).
.
.
Here below, I've fit, welded, and painted, and it is ready to install.
.
.
I bend the tank bungs down slightly so the crossover line doesn't rub on the frame.
I use a long handle 5/16 box end wrench.
If you do this, do it very carefully.
Sometimes the paint will crack here, sometimes it doesn't.
.
.
Below illustrates the clearance, and the unblemished paint.
.
.
Last picture shows the finished product
on a brisk South Texas 65F afternoon.
Long sleeves for the test ride.
.
Ok unload, this thread is quickly becoming overly technical lol for a pocedure that was surprisingly simple.
I'll say it again lol. I know what. The manual says, and I strongly suggest you follow it. My thread was simply a visual tutor to help someone visualize the job ahead of him. During my swap, I dint touch, unload TDC anything. . I simply unbolted, removed, reinstalled. And paid special attention to my bolt tihhtening pattern and my torquing. All the other technical TDC valve compression, unloading etc....was never an issue.
..
.
.
....recently a few folks have asked me about fuel filters.
........yes, replace them on a regular basis.........
.
.
....have the 1331 screws on hand before you begin.........
.
.
.
.
....then remove the dash and top plate...
. f?
.
....not absolutely necessary to disconnect these fittings.....
.
.
.
.
.
....next photo - on my machine I removed the restrictor. forever....
.
....I like a clear view of the inside of the tank.....
.
.
....easier to remove the fuel after the top plate is removed....
.
....for filter change it's not necessary to remove all of the fuel....
.
....have a look inside and see if the fuel lines are contacting the tank....
.
....if they are, look for pinholes. if not, you're probably OK here.....
.
.
.
....after I siphon all I can - I get the last little puddle out by sucking it up into a towel..
.
.
.
....this next step is not needed for filter change....
.
.
....when reinstalling the top plate tighten in the pattern shown in the manual....
.
....I don't torque these. I watch the space between the tank and the plate....
.
....snug them down good. do not overdo it.
.
.
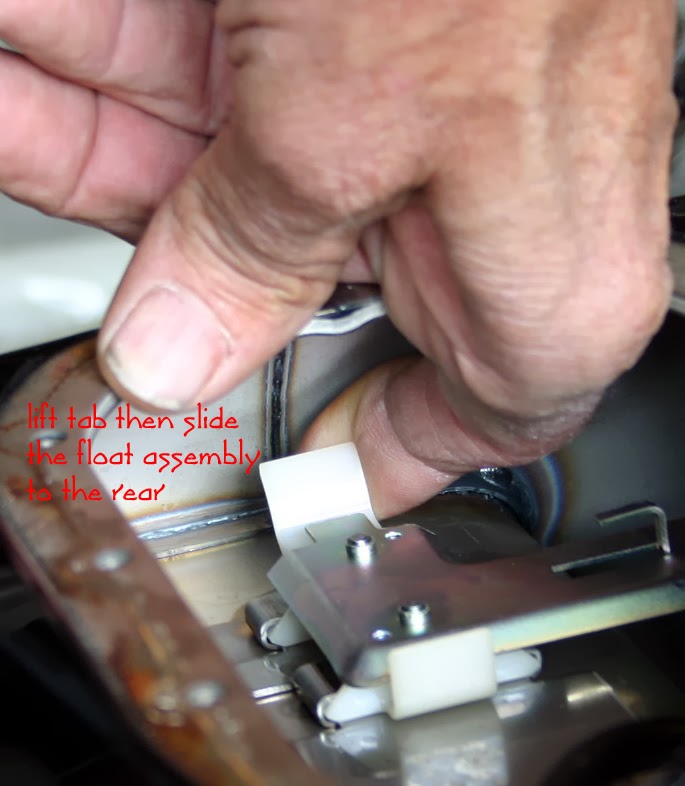
....now the fuel pump and float assembly is removed....
.
.
.
.
.
....above - easier for me to remove the fuel line by demounting the pump assembly first....
.
........next step - you see I am squeezing the two black lock tabs....
.
....the bottom one is always stubborn for me....
.
....don't rush it. lever GENTLY - if needed.........................
.
.
.
....green oRing below is the seal for the fuel line....
7 Surprising Harley-Davidson Products that Are Not Motorcycles
Slideshow: The bar-and-shield logo shows up on far more than motorcycles, some of the company's most unexpected products have nothing to do with riding.
Slideshow: From the troubled AMF years to modern misfires, these bikes earned reputations for reliability issues, questionable engineering, or disappointing performance.
Crazy Bunderbike Build Looks Amazing, But Is It Impossible to Ride?
Slideshow: The Swiss custom shop has taken a Harley Softail and stretched it into something so long and low that it looks closer to a rolling sculpture than a conventional motorcycle.
Engraved Rebellion: Inside Bundnerbike's Glam Rock II
Slideshow: A standard cruiser becomes an intricate metal canvas in the hands of a Swiss custom house known for pushing Harley-Davidson platforms far beyond their factory brief.
Slideshow: Harley-Davidson's challenges aren't abstract; they show up in dropping shipments, shrinking dealer traffic, and strategic decisions that aren't yet translating into growth.


 f?
f?