


* HOW TO * under fifty bux *
Tourer
Joined: Feb 2007
Posts: 477
Likes: 0
From: The Beach
Thanks Mud, sounds like just what I am looking for.
Joe - Thanks for the input. I'll probably just polish and go with that. That's kinda the point. I don't want it too shiny. I like the look of the polished aluminum because of that. I've seen some old airplanes where the aluminum was polished to an almost mirror like finish, and some that have that nice weathered look. That's what I like about it. It's a nice classic look and you can either polish or not polish to get the desired effect.
Joe - Thanks for the input. I'll probably just polish and go with that. That's kinda the point. I don't want it too shiny. I like the look of the polished aluminum because of that. I've seen some old airplanes where the aluminum was polished to an almost mirror like finish, and some that have that nice weathered look. That's what I like about it. It's a nice classic look and you can either polish or not polish to get the desired effect.
Road Warrior
Joined: Jul 2005
Posts: 1,655
Likes: 17
From: The Frozen Tundra
Great job stripping and polishing up the aluminum pieces Mud! There's Youtube videos that explain the process extremely well for getting stuff to shine. http://www.youtube.com/watch?v=Vp-aL7ega5o
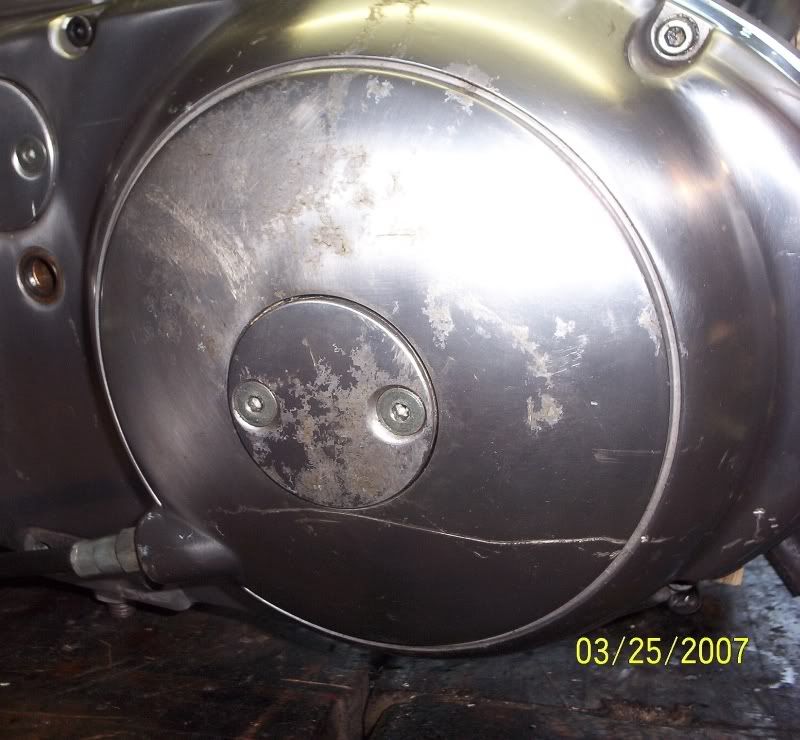
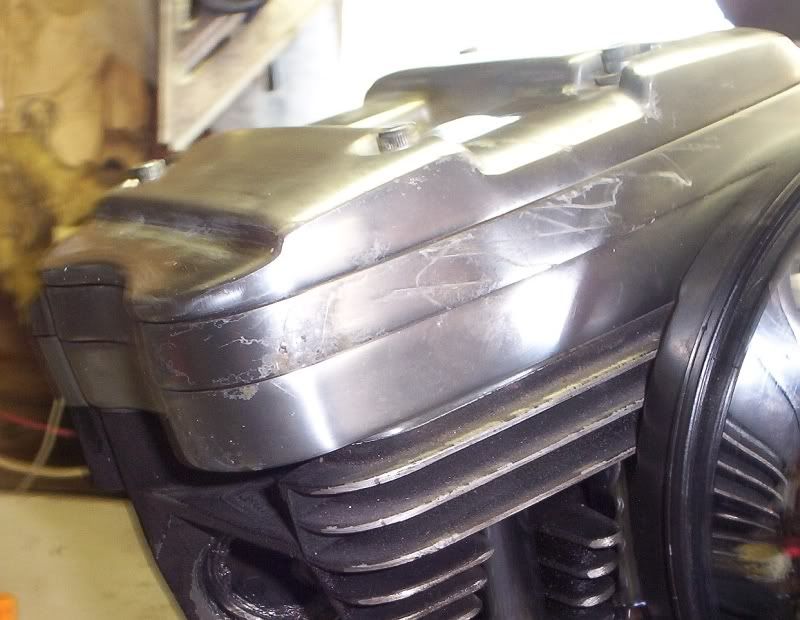
Here's a few pieces from the Sportster project, badly oxidized and scratched from the previous owner trying to polish them:
Before:


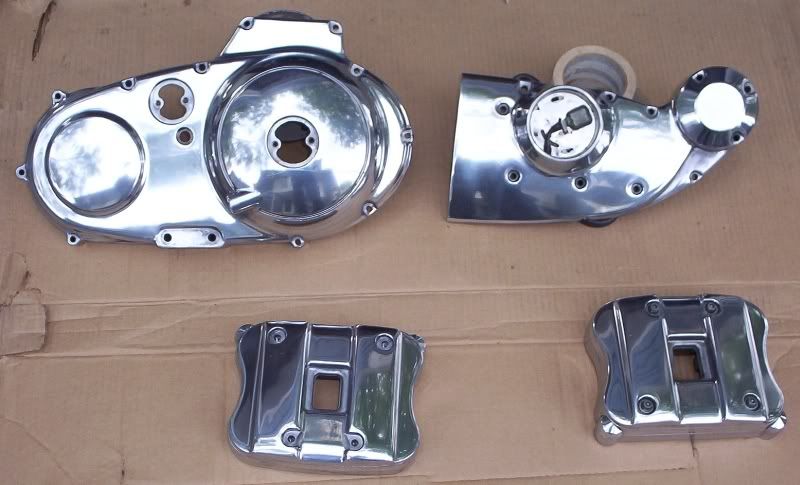
After:


Here's a few pieces from the Sportster project, badly oxidized and scratched from the previous owner trying to polish them:
Before:
After:
Thread Starter
|
Club Member
Joined: May 2006
Posts: 14,564
Likes: 9,225
From: the 50s & the 60s

.
Great job stripping and polishing up the aluminum pieces Mud!
There's Youtube videos that explain the process extremely well for getting stuff to shine.
http://www.youtube.com/watch?v=Vp-aL7ega5o
Great job stripping and polishing up the aluminum pieces Mud!
There's Youtube videos that explain the process extremely well for getting stuff to shine.
http://www.youtube.com/watch?v=Vp-aL7ega5o
And that's using professional equipment.
I did inner and outer primary, cam cover, clutch cover,
transmission top cover, rocker covers, lifter covers, etc.
Adds up to a buncha work.
Start on a small piece and make sure you are up to it.
mud
.
Thread Starter
|
Club Member
Joined: May 2006
Posts: 14,564
Likes: 9,225
From: the 50s & the 60s
.
Building a tank lift is a simple procedure.
Below, that is a one and three quarter inch block of wood
supporting the tank while I proceed.
With this type of lift, (tBone style), your can't go much lower,
maybe down to one and a half.
.

.
Below, I started the fabrication with a length of one inch by eighth flat stock.
I will trim it down to three quarters wide.
Also shown here is a three inch long piece of
drawn over mandrel tubing, half inch OD, 5/16 ID.
The flat stock has been hammered into shape in the vise,
2 and seven eighth inch inside (roughly).
.

.
Here below, I've fit, welded, and painted, and it is ready to install.
.


.
I bend the tank bungs down slightly so the crossover line doesn't rub on the frame.
I use a long handle 5/16 box end wrench.
If you do this, do it very carefully.
Sometimes the paint will crack here, sometimes it doesn't.
.

.
Below illustrates the clearance, and the unblemished paint.
.

.
Last picture shows the finished product
on a brisk South Texas 65F December afternoon.
Long sleeves for the test ride.
.

.
Building a tank lift is a simple procedure.
Below, that is a one and three quarter inch block of wood
supporting the tank while I proceed.
With this type of lift, (tBone style), your can't go much lower,
maybe down to one and a half.
.
.
Below, I started the fabrication with a length of one inch by eighth flat stock.
I will trim it down to three quarters wide.
Also shown here is a three inch long piece of
drawn over mandrel tubing, half inch OD, 5/16 ID.
The flat stock has been hammered into shape in the vise,
2 and seven eighth inch inside (roughly).
.
.
Here below, I've fit, welded, and painted, and it is ready to install.
.
.
I bend the tank bungs down slightly so the crossover line doesn't rub on the frame.
I use a long handle 5/16 box end wrench.
If you do this, do it very carefully.
Sometimes the paint will crack here, sometimes it doesn't.
.
.
Below illustrates the clearance, and the unblemished paint.
.
.
Last picture shows the finished product
on a brisk South Texas 65F December afternoon.
Long sleeves for the test ride.
.
.
Last edited by mud; Oct 5, 2009 at 10:07 AM. Reason: reload the missing pictures
just yesterday I was thinking I was gona have to do a search on a tank lift for the Sprint-Bob project thanks to Joe for suggesting it over in the custom forum. no need to search now, good ''how to'' Mud.
Road Warrior
Joined: Jul 2007
Posts: 1,443
Likes: 3
From: Sasser, GA
Thanks Mud, sounds like just what I am looking for.
Joe - Thanks for the input. I'll probably just polish and go with that. That's kinda the point. I don't want it too shiny. I like the look of the polished aluminum because of that. I've seen some old airplanes where the aluminum was polished to an almost mirror like finish, and some that have that nice weathered look. That's what I like about it. It's a nice classic look and you can either polish or not polish to get the desired effect.
Joe - Thanks for the input. I'll probably just polish and go with that. That's kinda the point. I don't want it too shiny. I like the look of the polished aluminum because of that. I've seen some old airplanes where the aluminum was polished to an almost mirror like finish, and some that have that nice weathered look. That's what I like about it. It's a nice classic look and you can either polish or not polish to get the desired effect.

Cruiser
Joined: Oct 2007
Posts: 213
Likes: 1
From: Southeast New York
To compensate for the times when I get oil drips from the air cleaner, for what ever reason, I built a "catch tank" into my stock air cleaner housing with a drain **** on it. The breather lines from the heads go to catch tank first, then to K and N AC. ALL oil mist is seperated in tank via a small stainless steel screen between the inlet and outlet tubes and nothing comes out of the air cleaner onto motor / leg. You wouldn't believe the nasty oil and water gunk that drains from the tank. Cost me nothing, using stuff laying around the garage, just nerveous about trashing the stock parts if I failed miserably. Will try to get some pics when I set bike up for winter.
HD Forum Stories
The Best of Harley-Davidson for Lifelong Riders

Jason Momoa Is Turning Classic Harleys Into PHEVs
Verdad Gallardo
Harley-Davidson Fat Boy Becomes a Dark, Decepticon-Inspired Custom
Verdad Gallardo
6 Weirdest Harley-Davidsons Ever Sold to the Public
Verdad Gallardo
7 Times Harley-Davidson Chucked Tradition Out the Window
Verdad Gallardo
7 Surprising Harley-Davidson Products that Are Not Motorcycles
Verdad Gallardo
8 Best Harley-Davidson Motorcycles Ever
Pouria Savadkouei
10 Worst Harley-Davidson Motorcycles Ever
Pouria Savadkouei
Killer Custom's Jail Break Is The Breakout That Refused to Blend In
Verdad Gallardo
Crazy Bunderbike Build Looks Amazing, But Is It Impossible to Ride?
Verdad Gallardo
Cruiser


Joined: Feb 2006
Posts: 125
Likes: 0
From: uk
if youre doing your tank lift you may want to check out fitting a quick release valve,great if your removing tank for maintenance ect valve shuts of when unclipped,fairly cheap & if you by a spare fit one end to another section of pipe & you can drain down your tank real easy making for a easy lift off them tanks are heavy when full. ride safe lee
Last edited by soldierbot; Apr 2, 2021 at 07:46 AM.
Advanced
Joined: Mar 2008
Posts: 66
Likes: 9
From: Northern New York
I like it!!! Where do buy these valves?
Dave
Dave
if youre doing your tank lift you may want to check out fitting a quick release valve,great if your removing tank for maintenance ect valve shuts of when unclipped,fairly cheap & if you by a spare fit one end to another section of pipe & you can drain down your tank real easy making for a easy lift off them tanks are heavy when full. ride safe lee