


* HOW TO * under fifty bux *
Ultimate HDF Member
Joined: Mar 2008
Posts: 6,344
Likes: 6
From: my house
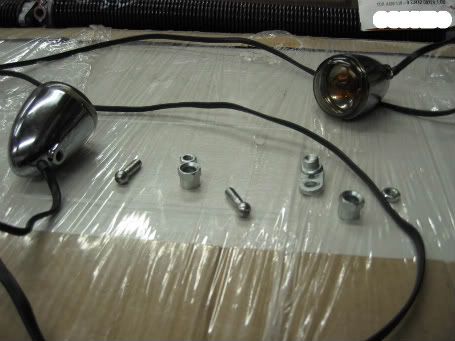
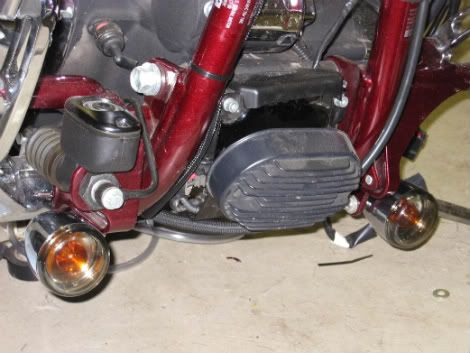
1st take old sigs off
.
.
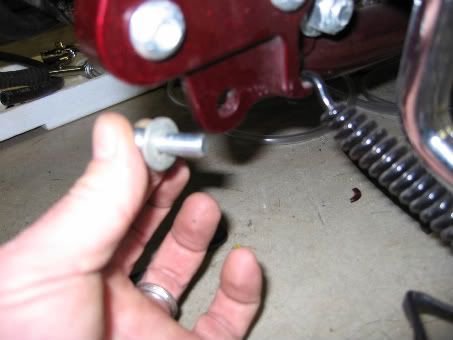
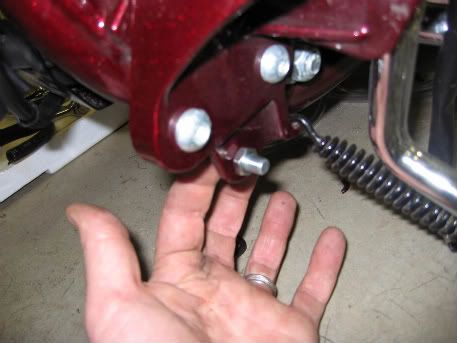
2ndtake old hardware + small washer for shifter side,old nut for spacer
.
.
3rd sticker through pre drilled hole by kickstand spring
.
.
4th pre wrap wire in kool black mesh from earlier post(sorry no pic)
5th apply loctite mount 1st turn sig
.
.
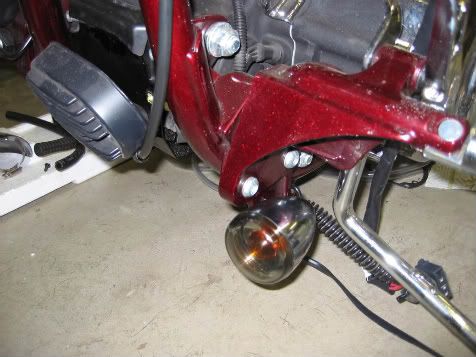
6th needed a longer screw for brake side 1 1/4 5/16 24 thread(1.60) ace hardware,run wire to plug in
.
.
.
.
2ndtake old hardware + small washer for shifter side,old nut for spacer
.
.
3rd sticker through pre drilled hole by kickstand spring
.
.
4th pre wrap wire in kool black mesh from earlier post(sorry no pic)
5th apply loctite mount 1st turn sig
.
.
6th needed a longer screw for brake side 1 1/4 5/16 24 thread(1.60) ace hardware,run wire to plug in
.
.
Last edited by m i k e; Apr 27, 2009 at 09:48 PM.
Ultimate HDF Member
Joined: Mar 2008
Posts: 6,344
Likes: 6
From: my house
dont know yet bike is down waiting for fender/tank lift/ cables etc. etc,
had a sporty w/ sigs down there worked fine until that dam possum
clipped one but its good
had a sporty w/ sigs down there worked fine until that dam possum
clipped one but its good
Last edited by m i k e; Apr 28, 2009 at 10:52 PM.
Road Captain
Joined: Jun 2008
Posts: 507
Likes: 3
From: 2 miles from the Sun!
Less than $20.00 in parts!
2 Misalignment joints 5/16 * 24
Stainless Steel
2 jam nuts5/16*24
Couple of 5/16 * 24 * 1 socket head screws
Reused the Chrome Acorn nut off the shifter end for the front socket head screw
36 in length of cold rolled steel rod
took off the old shift rod to use as a guage, threaded one end, then marked and cut the rod so could thread the other end then installed . Maybe took 2hrs total that included the trip for parts and coffee.
Last edited by soldierbot; Apr 2, 2021 at 07:46 AM.
Intermediate
Joined: Jun 2008
Posts: 45
Likes: 0
From: Staten Island, NY
Instead of buying new "flat" fender support brackets from HD just take a dremel to the old one and cut off the protruding ends meant for tucking in the turn signal wires. Its probably a good idea to move the turn signals to the fender at the same time. This will give you clearance as wide as the fender for free.
Good luck
Good luck
HD Forum Stories
The Best of Harley-Davidson for Lifelong Riders

Jason Momoa Is Turning Classic Harleys Into PHEVs
Verdad Gallardo
Harley-Davidson Fat Boy Becomes a Dark, Decepticon-Inspired Custom
Verdad Gallardo
6 Weirdest Harley-Davidsons Ever Sold to the Public
Verdad Gallardo
7 Times Harley-Davidson Chucked Tradition Out the Window
Verdad Gallardo
7 Surprising Harley-Davidson Products that Are Not Motorcycles
Verdad Gallardo
8 Best Harley-Davidson Motorcycles Ever
Pouria Savadkouei
10 Worst Harley-Davidson Motorcycles Ever
Pouria Savadkouei
Killer Custom's Jail Break Is The Breakout That Refused to Blend In
Verdad Gallardo
Crazy Bunderbike Build Looks Amazing, But Is It Impossible to Ride?
Verdad GallardoRoad Master
Joined: Feb 2008
Posts: 918
Likes: 0
From: Calgary, Canada
I picked up some bags last year for trips.
But now that ive gone to a solo with and without the passenger pad.
As well as new paint i didnt want the bags on my rear fender paint.
I dont care what you use it still gets beaten up.
So i took my detach back rest apart.
Drilled holes in the side plates.
used two small carriage bolts (from the inside) and a brace inside to keep it from flappin in the wind.
Cut the throw over flaps completely off,drilled 2 holes in each bag and used a 3/8 teflon spacer 1.5 inch by 6.5 x 3/8 thick to keep the bag level with the detach bolts at the lowest point of contact from the sideplate.
Now when i get to where im goin i just pop my quick release and the bags with pack attached to the rack and bar come off in one shot .
Same as a quick release backrest .
Tomorrow ill post some pics in stages as i get ready to finish the job.
I need one more bolt.
Hope this helps someone..
Link to pictues..
http://good-times.webshots.com/album/571908346kcaxPE
Last edited by Wireguided; May 10, 2009 at 08:29 AM.