


* HOW TO * under fifty bux *
Cruiser
Joined: Jun 2009
Posts: 104
Likes: 0
From: COLORADO
I have some questions on modifying my rear break light on my 2009 street bob. I am not sure if I can post the pictures here of what I would like to do. I would like to black out the chrome on the tail light and move the mount to a side plate. Let me know if anyone has some tips. Thanks
http://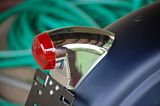
http://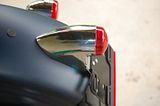
http://

http://

Last edited by Narco101; Jun 5, 2009 at 06:42 PM. Reason: added photo
Ultimate HDF Member
Joined: Dec 2008
Posts: 5,120
Likes: 17
From: Indiana
I have some questions on modifying my rear break light on my 2009 street bob. I am not sure if I can post the pictures here of what I would like to do. I would like to black out the chrome on the tail light and move the mount to a side plate. Let me know if anyone has some tips. Thanks
http://
http://
http://
http://
Road Master

Joined: Jun 2008
Posts: 789
Likes: 2
From: Battle Creek, MI
A few weeks back I read a thread about a company making a mini version of a side bag for small things like cell phones, keys, extras glasses, and even ham sandwiches! The problem, for me at least, was the price. They were very nice, and well made, but out of reach for me.
So I began looking around when out and about. here's what I came up with...


Notice the electrics cover area? here's a close look:


And closer yet:


It's a "Hard Shell Camcorder Bag" from a company called Sakar International, though I bought mine at Kmart (direct link to the item). The item number on the backing cardboard says "SP-200-blk". I paid $15.
I pulled the electrics cover, and exposed the push pins in the back:


I grabbed the top two (one at a time) with vice grips, and threaded out the allen head screws that were in the other side. Then I laid the cover over the back of the bag, lined it up by eyeball so it was fairly even, and marked the holes. Then I drilled a 5/16" hole in each spot and stuck the allen bolts and washers through from the inside of the bag and then through the cover. I threaded the pins back on and tightened it all down. Here's what you see from the inside:


And how it fits together, top view (this should give you some concept of scale too):


After the cover is back on, here's what you see from the top, to give you an idea how far it sticks out:


Here I have a pair of mechanics gloves, a skull cap, a bunjee cord, and my cell phone. In the picture above, all those items are in the bag with it zipped and closed.


And one last shot, showing the compartments/dividers. There are also velcro loops (like you would put film canisters in) and a loop for hooking your keys if you like.


Seems to hold well, and fits just enough of the extras without adding bulk to the bike. The black leather wrap matches the seat nicely.
It is what it is, take it for what it's worth, but considering it was only $15 and 15 minutes worth of time... I think it might be something some others of you could use as well...
So I began looking around when out and about. here's what I came up with...
Notice the electrics cover area? here's a close look:
And closer yet:
It's a "Hard Shell Camcorder Bag" from a company called Sakar International, though I bought mine at Kmart (direct link to the item). The item number on the backing cardboard says "SP-200-blk". I paid $15.
I pulled the electrics cover, and exposed the push pins in the back:
I grabbed the top two (one at a time) with vice grips, and threaded out the allen head screws that were in the other side. Then I laid the cover over the back of the bag, lined it up by eyeball so it was fairly even, and marked the holes. Then I drilled a 5/16" hole in each spot and stuck the allen bolts and washers through from the inside of the bag and then through the cover. I threaded the pins back on and tightened it all down. Here's what you see from the inside:
And how it fits together, top view (this should give you some concept of scale too):
After the cover is back on, here's what you see from the top, to give you an idea how far it sticks out:
Here I have a pair of mechanics gloves, a skull cap, a bunjee cord, and my cell phone. In the picture above, all those items are in the bag with it zipped and closed.
And one last shot, showing the compartments/dividers. There are also velcro loops (like you would put film canisters in) and a loop for hooking your keys if you like.
Seems to hold well, and fits just enough of the extras without adding bulk to the bike. The black leather wrap matches the seat nicely.
It is what it is, take it for what it's worth, but considering it was only $15 and 15 minutes worth of time... I think it might be something some others of you could use as well...
Last edited by timberwolfz28; Nov 12, 2013 at 06:56 AM.
May our Moderator Rest in Peace
Joined: Sep 2006
Posts: 11,386
Likes: 35
From: Rochester, NY
A few weeks back I read a thread about a company making a mini version of a side bag for small things like cell phones, keys, extras glasses, and even ham sandwiches  The problem, for me at least, was the price. They were very nice, and well made, but out of reach for me.
The problem, for me at least, was the price. They were very nice, and well made, but out of reach for me.But if I ever get tired of the bag I have on my sissy bar, that should work. Who know's in might even work out better, sure looks better.
Road Master
Joined: Sep 2008
Posts: 1,013
Likes: 1
From: South Bay, CA
In the past I have read that some people have had trouble with their load equalizers over heating and burning up. Well here is a simple way to help dissipate some of the heat. I happened to have some heat sinks from some parts we made at work. (You can find smaller heat sinks and the thermal tape at most computer electronic stores) What I'm going to do is cut piece out so it is close to the same size as the load equalizer. Use the thermal tape and stick it on. I'm at work now, so I'll get some more pics up later.
Last edited by soldierbot; Apr 2, 2021 at 07:46 AM.
Thread Starter
|
Club Member
Joined: May 2006
Posts: 14,564
Likes: 9,223
From: the 50s & the 60s

.
A few weeks back I read a thread about a company making a mini version of a side bag
for small things like cell phones, keys, extras glasses, and even ham sandwiches
It is what it is, take it for what it's worth,
but considering it was only $15 and 15 minutes worth of time...
I think it might be something some others of you could use as well...
Great brainstorm you had there mr wolf.
Well executed and excellent photo documentation.
the 006 and up covers are different, with only two attachment points,
so, maybe someone will spin off you with a similar concept.
mud
.
Tourer
Joined: Jan 2009
Posts: 265
Likes: 0
From: Central Illinois
I have an '09 FXDC. Electrical cover is black with a chrome band down the middle (which appears to be attached with adhesive). There are two bolts on the exterior of the cover, which hold an internal frame in place via two washer nuts. This frame holds two of the push pins timberwolfz28 shows in the fourth picture.
Here's what I'm thinking so far.
Drill two holes in the bag in the same spot as the bolts, run those two bolts through. These will hold on one side of the bag.
For the other side, either use two disc magnets (and I'm not certain about this - I could glue the disc magnet onto the exterior of the bag and then glue some felt onto the back of the magnets, or I could try to find some magnets powerful enough to grip the metal of the cover through the material of the bag), or drill two more holes into the electrical cover and mount it that way.
Magnets that close to all of the electronics miiiiight be a bad thing. Not sure if they'd be strong enough to eff with things or not. On the other hand, I wouldn't have to put extraneous holes in the electrical cover.
Edit: Just ordered a spare electrical cover on eBay - $20 plus shipping, no chrome band. That'll make things a touch easier, plus I can drill through it without screwing up my stock cover. Still under fifty bucks.
Last edited by Thornhammer; Jun 6, 2009 at 10:30 PM.
I have some questions on modifying my rear break light on my 2009 street bob. I am not sure if I can post the pictures here of what I would like to do. I would like to black out the chrome on the tail light and move the mount to a side plate. Let me know if anyone has some tips. Thanks
http://
http://
http://
http://
take off the lamp, take it apart have it powdered... if it is one piece LED. tape the lense, sand with 220 grit, shoot with rustoleum appliance epoxy paint... blacked out... all done
HD Forum Stories
The Best of Harley-Davidson for Lifelong Riders

8 Best Harley-Davidson Motorcycles Ever
Pouria Savadkouei
10 Worst Harley-Davidson Motorcycles Ever
Pouria Savadkouei
Killer Custom's Jail Break Is The Breakout That Refused to Blend In
Verdad Gallardo
Crazy Bunderbike Build Looks Amazing, But Is It Impossible to Ride?
Verdad Gallardo
Harley-Davidson Reveals Super Cool Cafe Racer Concept
Verdad Gallardo
Engraved Rebellion: Inside Bundnerbike's Glam Rock II
Verdad Gallardo
10 Motorcycles You Should Never Buy
Joe Kucinski
10 Things Harley-Davidson Needs to Fix in 2026
Verdad Gallardo
Southpaw Super Glide: A Left-Hand-Drive 1979 Harley FXE Built to Fit the Rider
Verdad GallardoOutstanding HDF Member
Joined: Aug 2005
Posts: 2,042
Likes: 0
From: Brunswick, MD