
Finally finished my new rear fender

Thread Starter
|
Road Warrior
Joined: May 2010
Posts: 1,382
Likes: 4
From: Kennewick, WA
I've been wanting a cleaner look for my rear fender, so I first converted the turn signals to operate as brake/run/turn with LED's.
Then I bought a WCC Jessie James Roller rear fender blank, 8.5" wide. I first trimmed 1/4" out of the center and welded it up to narrow it to 8.25" so it would fit just like my stock fender. After cutting the fender to clear the belt, I held it in place and saw that it had a larger overall radius, making it stick out too far in back and also would place my seat and passenger seat on different planes than original. I sliced both sides where they wouldn't show, just leaving a hinge piece in the center, then pulled the two ends together until the overall length was shortened from 30.5" to 29". I cut the excess pie shaped pieces out and welded it up, then re-radiused the fender openings.
Then I copied the stock fender's front mounting hole location and the electrical wiring pass-through hole for the new fender. I bolted the front bolt in and stuck wooden shims crosswise under the fender and over the tire until the top of the fender arc matched the stock one's. To do this I had previously made a horse shoe shaped cardboard template as a gauge and used a Sharpie to mark the struts on each side, so I could repeat the same fender height, at the peak of the arc, with the new fender.
Now with the fender at it's proper setting, I took a Sharpie and made dots on the fender for where I needed to drill the four remaining fender mounting holes. After these holes were drilled, I drilled holes for the turn signal stems.
Oh, yeah, I almost forgot my main reason for this mod... I cut the rear of the fender out a bit to fit a frenched in license plate. I used 16 ga sheet steel to fab that up. The top eyebrow has a small cut-out to fit a white Radiantz 4 LED light to illuminate the license plate. The lower 5" strip light is a 40 LED TruFLEX wired in to serve as an extra running and brake light.
I ended up using an HVLP paint sprayer for the first time and made a few mistakes trying to get used to it's slower speed of application. Then the first 4 coats of clear were mixed 2-2-1 instead of 2-1-2, so I had to wait a week for the paint to get hard enough to sand and recoat. It was a frustrating week just watching paint dry.
Here is the finished fender sitting on the rotating painting stand, just drying in the sun.

This shows how the 3/4" standoffs clear the saddlebags.

This shows the frenched recess and slightly curved license plate. I had planned to also french in that strip light, but it was so thin that I just ended up sticking it to the fender. That saved me quite a few hours of labor for what little there was to be gained. I don't know if I made the right decision on that, but I'm sure not about to repaint to make that mod! I have already applied 20 coats of paint!

The paint "defects" you see are actually reflections.
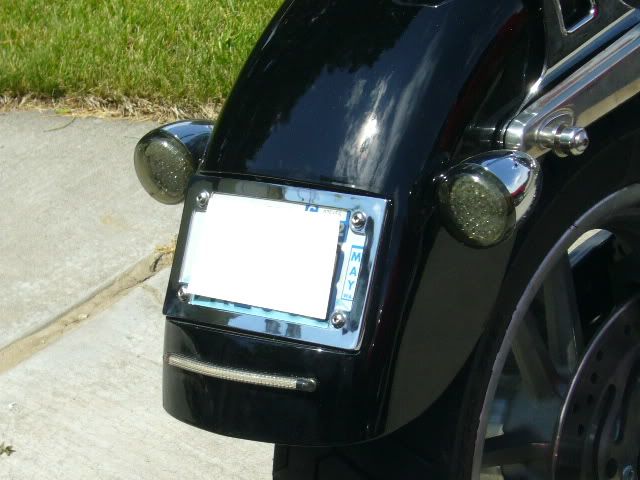
The new fender is rounded from side to side and got rid of that stock stepped cross-section. This gave me the room to mount the signal stems and the frenched license plate.

Then I bought a WCC Jessie James Roller rear fender blank, 8.5" wide. I first trimmed 1/4" out of the center and welded it up to narrow it to 8.25" so it would fit just like my stock fender. After cutting the fender to clear the belt, I held it in place and saw that it had a larger overall radius, making it stick out too far in back and also would place my seat and passenger seat on different planes than original. I sliced both sides where they wouldn't show, just leaving a hinge piece in the center, then pulled the two ends together until the overall length was shortened from 30.5" to 29". I cut the excess pie shaped pieces out and welded it up, then re-radiused the fender openings.
Then I copied the stock fender's front mounting hole location and the electrical wiring pass-through hole for the new fender. I bolted the front bolt in and stuck wooden shims crosswise under the fender and over the tire until the top of the fender arc matched the stock one's. To do this I had previously made a horse shoe shaped cardboard template as a gauge and used a Sharpie to mark the struts on each side, so I could repeat the same fender height, at the peak of the arc, with the new fender.
Now with the fender at it's proper setting, I took a Sharpie and made dots on the fender for where I needed to drill the four remaining fender mounting holes. After these holes were drilled, I drilled holes for the turn signal stems.
Oh, yeah, I almost forgot my main reason for this mod... I cut the rear of the fender out a bit to fit a frenched in license plate. I used 16 ga sheet steel to fab that up. The top eyebrow has a small cut-out to fit a white Radiantz 4 LED light to illuminate the license plate. The lower 5" strip light is a 40 LED TruFLEX wired in to serve as an extra running and brake light.
I ended up using an HVLP paint sprayer for the first time and made a few mistakes trying to get used to it's slower speed of application. Then the first 4 coats of clear were mixed 2-2-1 instead of 2-1-2, so I had to wait a week for the paint to get hard enough to sand and recoat. It was a frustrating week just watching paint dry.
Here is the finished fender sitting on the rotating painting stand, just drying in the sun.
This shows how the 3/4" standoffs clear the saddlebags.
This shows the frenched recess and slightly curved license plate. I had planned to also french in that strip light, but it was so thin that I just ended up sticking it to the fender. That saved me quite a few hours of labor for what little there was to be gained. I don't know if I made the right decision on that, but I'm sure not about to repaint to make that mod! I have already applied 20 coats of paint!
The paint "defects" you see are actually reflections.
The new fender is rounded from side to side and got rid of that stock stepped cross-section. This gave me the room to mount the signal stems and the frenched license plate.
Last edited by HemiOrange; Jul 20, 2011 at 01:55 AM.

Ultimate HDF Member
Joined: Jun 2007
Posts: 9,193
Likes: 494
From: Richmond, VA
Nice job!
_______________________________________________

_______________________________________________
Last edited by bikerlaw; Jul 17, 2011 at 04:26 PM.
